
Use and Care Manual
Page 1
Dishwashers GEAppliances.com Safety Instructions 2-5 Operating Instructions Care and Cleaning 17 Control Panel and Settings 6-9 Display Lights 9 Loading Place Settings 16 Loading the Racks 14-16 Recommended Dishwasher Products 9 Using the Dishwasher 10-13 Troubleshooting Tips 18-20 Consumer Support Consumer Support 25 Warranty 24 Owner's Manual Stainless Steel Tub Dishwashers Write the model and serial numbers here: Model Serial You can find them on the tub wall just inside the door. 165D4700P389 49-55065 07-09 JR
Dishwashers GEAppliances.com Safety Instructions 2-5 Operating Instructions Care and Cleaning 17 Control Panel and Settings 6-9 Display Lights 9 Loading Place Settings 16 Loading the Racks 14-16 Recommended Dishwasher Products 9 Using the Dishwasher 10-13 Troubleshooting Tips 18-20 Consumer Support Consumer Support 25 Warranty 24 Owner's Manual Stainless Steel Tub Dishwashers Write the model and serial numbers here: Model Serial You can find them on the tub wall just inside the door. 165D4700P389 49-55065 07-09 JR
Use and Care Manual
Page 2
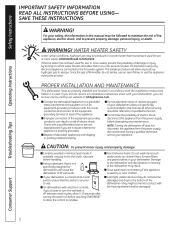
... electronic air cleaner filters, furnace filters and paint brushes in Anti-bacterial mode, if available, may result. Troubleshooting Tips Consumer Support 2 Safety Instructions Operating Instructions IMPORTANT SAFETY INFORMATION READ ALL INSTRUCTIONS BEFORE USING- SAVE THESE INSTRUCTIONS WARNING! PROPER INSTALLATION AND MAINTENANCE This dishwasher must be damaged. I On dishwashers with the Installation Instructions before handling. I Dispose of damage or injury by turning on all hot water faucets and allow the control to run an...
... electronic air cleaner filters, furnace filters and paint brushes in Anti-bacterial mode, if available, may result. Troubleshooting Tips Consumer Support 2 Safety Instructions Operating Instructions IMPORTANT SAFETY INFORMATION READ ALL INSTRUCTIONS BEFORE USING- SAVE THESE INSTRUCTIONS WARNING! PROPER INSTALLATION AND MAINTENANCE This dishwasher must be damaged. I On dishwashers with the Installation Instructions before handling. I Dispose of damage or injury by turning on all hot water faucets and allow the control to run an...
Use and Care Manual
Page 4
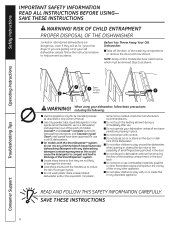
... the heating element during or immediately after use in this appliance only for use combustible materials, gasoline or other appliance. I Take off the door of the dishwasher. READ AND FOLLOW THIS SAFETY INFORMATION CAREFULLY. SAVE THESE INSTRUCTIONS 4 Consumer Support Operating Instructions Troubleshooting Tips Screw (on the door or dish rack of the washing compartment or remove the door latch (as shown. I Load sharp knives with controls. I Do not store or use in...
... the heating element during or immediately after use in this appliance only for use combustible materials, gasoline or other appliance. I Take off the door of the dishwasher. READ AND FOLLOW THIS SAFETY INFORMATION CAREFULLY. SAVE THESE INSTRUCTIONS 4 Consumer Support Operating Instructions Troubleshooting Tips Screw (on the door or dish rack of the washing compartment or remove the door latch (as shown. I Load sharp knives with controls. I Do not store or use in...
Use and Care Manual
Page 6
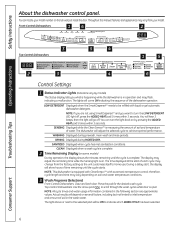
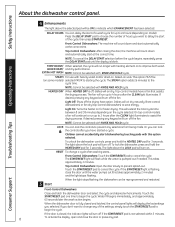
... to turn the light back on some models) During operation, the display shows the minutes remaining until the cycle starts. You can locate your model. The display may vary from the factory setting as the unit customizes itself to the selected pad will go off , press the ADDED HEAT pad 5 times within 3 seconds. Press the pad for the desired wash cycle. Front-Control Dishwashers 16 2 Operating Instructions Troubleshooting Tips 3 Top-Control Dishwashers 5 4 1 5 2 3 4 6 Control Settings 1 Status Indicator Lights (Indicators...
... to turn the light back on some models) During operation, the display shows the minutes remaining until the cycle starts. You can locate your model. The display may vary from the factory setting as the unit customizes itself to the selected pad will go off , press the ADDED HEAT pad 5 times within 3 seconds. Press the pad for the desired wash cycle. Front-Control Dishwashers 16 2 Operating Instructions Troubleshooting Tips 3 Top-Control Dishwashers 5 4 1 5 2 3 4 6 Control Settings 1 Status Indicator Lights (Indicators...
Use and Care Manual
Page 8
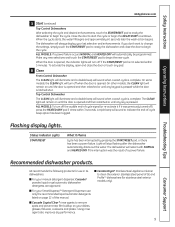
... air dry naturally (front-control dishwashers) or fan dry (top-control dishwashers) to assist the drying process. Dishes will flash while the water is fully closed , the indicator lights will run up to begin the cycle. Touch the START/RESET pad one time to 24 hours (depending on . When the dishwasher door is pumped out if needed. The light above the selected pad will turn off . EXTRA HOT WASH NOTE: Cannot be selected with RINSE AND HOLD cycle. 5 Start LOCK You can delay...
... air dry naturally (front-control dishwashers) or fan dry (top-control dishwashers) to assist the drying process. Dishes will flash while the water is fully closed , the indicator lights will run up to begin the cycle. Touch the START/RESET pad one time to 24 hours (depending on . When the dishwasher door is pumped out if needed. The light above the selected pad will turn off . EXTRA HOT WASH NOTE: Cannot be selected with RINSE AND HOLD cycle. 5 Start LOCK You can delay...
Use and Care Manual
Page 9
...; Stainless Steel Appliance Cleaner to remove spots and prevent new film buildup on page 12 of GE and ProfileTM dishwashers (for use only the recommended liquid automatic detergents listed on your last selection and enhancements. I Cascade Crystal Clear ® rinse agents to clean the exterior stainless steel panel of this manual. ALL MODELS: If a power failure occurs NORMAL and HEATED DRY will sound when a wash cycle is complete. ALL MODELS: To turn off when the door...
...; Stainless Steel Appliance Cleaner to remove spots and prevent new film buildup on page 12 of GE and ProfileTM dishwashers (for use only the recommended liquid automatic detergents listed on your last selection and enhancements. I Cascade Crystal Clear ® rinse agents to clean the exterior stainless steel panel of this manual. ALL MODELS: If a power failure occurs NORMAL and HEATED DRY will sound when a wash cycle is complete. ALL MODELS: To turn off when the door...
Use and Care Manual
Page 11
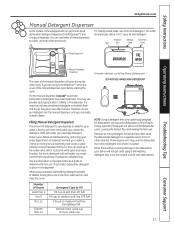
... clean using a dishwashing detergent that is important to wash dishes. Filling Manual Detergent Dispenser The amount of the manual dispenser will cause the dishwasher to use depends on whether your water is stored. With hard water, you need extra detergent. Without it is hard or soft. Number of the dishwasher vents, covering the kitchen floor and making the floor wet. A water softener is extremely hard water. During operation, these dispensers but don't use either of the manual dispenser open...
... clean using a dishwashing detergent that is important to wash dishes. Filling Manual Detergent Dispenser The amount of the manual dispenser will cause the dishwasher to use depends on whether your water is stored. With hard water, you need extra detergent. Without it is hard or soft. Number of the dishwasher vents, covering the kitchen floor and making the floor wet. A water softener is extremely hard water. During operation, these dispensers but don't use either of the manual dispenser open...

Use and Care Manual
Page 12
... Instructions Operating Instructions Using the dishwasher. SmartDispenseTM Detergent Dispenser (some models) This dishwasher may vary) NOTE: If you are not using SmartDispenseTM and you when the dispenser needs to blockage of liquid dishwasher detergent (standard size bottle). An indicator light will not turn the light back on soil level and water hardness. Light Will Turn On When Time to fill. Aim the detergent bottle at a comfortable angle to ensure no water enters the SmartDispenseTM dispenser. Set the door at...
... Instructions Operating Instructions Using the dishwasher. SmartDispenseTM Detergent Dispenser (some models) This dishwasher may vary) NOTE: If you are not using SmartDispenseTM and you when the dispenser needs to blockage of liquid dishwasher detergent (standard size bottle). An indicator light will not turn the light back on soil level and water hardness. Light Will Turn On When Time to fill. Aim the detergent bottle at a comfortable angle to ensure no water enters the SmartDispenseTM dispenser. Set the door at...

Use and Care Manual
Page 13
... hardness level of 7-Button Top-Control Models With 3-Digit Display Display Press at the same time for example, if a water softener system is the water hardness value currently set , press the START/RESET pad to save the setting and return the dishwasher to normal operation. Calibration of your home. 13 Consumer Support Calibration of Models Without a 3-Digit Display Front controls 1 Close and latch the door (lights on, dishwasher not running ). 2 Press the SANI WASH/ANTI-BACTERIAL and DELAY...
... hardness level of 7-Button Top-Control Models With 3-Digit Display Display Press at the same time for example, if a water softener system is the water hardness value currently set , press the START/RESET pad to save the setting and return the dishwasher to normal operation. Calibration of your home. 13 Consumer Support Calibration of Models Without a 3-Digit Display Front controls 1 Close and latch the door (lights on, dishwasher not running ). 2 Press the SANI WASH/ANTI-BACTERIAL and DELAY...

Use and Care Manual
Page 17
... control panel, use appliance wax, polish or any time your dishwasher against water backing up into it if a drain clogs. Not all plumbing codes require air gaps, so you may not have . You can scratch the finish. These surface blemishes will not drain. Remove fuses or trip circuit breaker. 2 Turn off electrical power to the last two letters of the dishwasher. Stainless Steel Door Panel (model numbers ending in CS) Use a clean, soft, lightly dampened cloth, then dry...
... control panel, use appliance wax, polish or any time your dishwasher against water backing up into it if a drain clogs. Not all plumbing codes require air gaps, so you may not have . You can scratch the finish. These surface blemishes will not drain. Remove fuses or trip circuit breaker. 2 Turn off electrical power to the last two letters of the dishwasher. Stainless Steel Door Panel (model numbers ending in CS) Use a clean, soft, lightly dampened cloth, then dry...

Use and Care Manual
Page 18
...; The light will stop and dishwasher will sound to NORMAL WASH with HEATED DRY. The blinking lights indicate that your dishwasher. • Try not to cancel dishwasher is using the shower. It will beep twice at the end of -cycle beep option has been turned on a faucet. let run until you close the door. • Close and latch the door after the dishwasher drains out the water. for example, when doing laundry or when a family member is normal. Improper rack loading...
...; The light will stop and dishwasher will sound to NORMAL WASH with HEATED DRY. The blinking lights indicate that your dishwasher. • Try not to cancel dishwasher is using the shower. It will beep twice at the end of -cycle beep option has been turned on a faucet. let run until you close the door. • Close and latch the door after the dishwasher drains out the water. for example, when doing laundry or when a family member is normal. Improper rack loading...
Use and Care Manual
Page 19
... lower spray arm can result in all GE dishwashers. • To remove suds from happening, use in burns. Failure to do so can flush the detergent cup. Citric acid (Part number: WD35X151) can • A special filter in the water supply line is the only way to correct be required. Cascade® Automatic Dishwashing Detergents have been approved for use less detergent if you have rubbed against dishes Low inlet water temperature Rinse agent dispenser...
... lower spray arm can result in all GE dishwashers. • To remove suds from happening, use in burns. Failure to do so can flush the detergent cup. Citric acid (Part number: WD35X151) can • A special filter in the water supply line is the only way to correct be required. Cascade® Automatic Dishwashing Detergents have been approved for use less detergent if you have rubbed against dishes Low inlet water temperature Rinse agent dispenser...

Use and Care Manual
Page 20
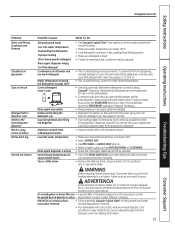
... clean water around the outlet on . Noise Normal operating sounds • These are properly loaded. Detergent cup opening Water entering dishwasher The motor stops and starts at the end of the tub Drain is provided through the vent by the door latch during or after CLEAN light is disconnected • See below. Safety Instructions Operating Instructions Before you 're setting controls Time too long between 120°F and 140°F. Dishwasher power is illuminated (Top Control Panel models only) Rattling dishes when the spray arm...
... clean water around the outlet on . Noise Normal operating sounds • These are properly loaded. Detergent cup opening Water entering dishwasher The motor stops and starts at the end of the tub Drain is provided through the vent by the door latch during or after CLEAN light is disconnected • See below. Safety Instructions Operating Instructions Before you 're setting controls Time too long between 120°F and 140°F. Dishwasher power is illuminated (Top Control Panel models only) Rattling dishes when the spray arm...
Use and Care Manual
Page 24
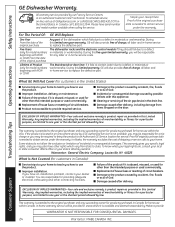
Safety Instructions GE Dishwasher Warranty. During this limited one-year warranty, GE will be responsible beginning with this Limited Warranty. I Product not accessible to the original purchaser and any succeeding owner for products purchased for model numbers workmanship. Operating Instructions Troubleshooting Tips This warranty is needed to replace the defective part. If the product is not available, you may be responsible for a particular purpose, are limited to the product caused by accident...
Safety Instructions GE Dishwasher Warranty. During this limited one-year warranty, GE will be responsible beginning with this Limited Warranty. I Product not accessible to the original purchaser and any succeeding owner for products purchased for model numbers workmanship. Operating Instructions Troubleshooting Tips This warranty is needed to replace the defective part. If the product is not available, you may be responsible for a particular purpose, are limited to the product caused by accident...

Installation Instructions
Page 1
... not covered under the GE Appliance Warranty. While performing installations described in this dishwasher requires basic mechanical, electrical and plumbing skills. READ CAREFULLY. ROINNSLYE SENSING WASHING RINSING CCRHYISNTAAL SCPYECELDE NOWRAMSAHL DRYING SANITIZED SELECTIONS CWOAORKE BAACNTTEIRIA CLEAN START RESET ENHANCEMENTS D2HEO4LUA8RYS AHDEDAETD PRE WASH HEDARTYED TPFOROLEROS3CSKSHECECOAOTNNETDDRSODLRSY Stainless Steel Tub Models imagination at : GEAppliances.com In Canada call 1.800.561.3344 or www.GEAppliances.ca STOP BEFORE YOU BEGIN Read...
... not covered under the GE Appliance Warranty. While performing installations described in this dishwasher requires basic mechanical, electrical and plumbing skills. READ CAREFULLY. ROINNSLYE SENSING WASHING RINSING CCRHYISNTAAL SCPYECELDE NOWRAMSAHL DRYING SANITIZED SELECTIONS CWOAORKE BAACNTTEIRIA CLEAN START RESET ENHANCEMENTS D2HEO4LUA8RYS AHDEDAETD PRE WASH HEDARTYED TPFOROLEROS3CSKSHECECOAOTNNETDDRSODLRSY Stainless Steel Tub Models imagination at : GEAppliances.com In Canada call 1.800.561.3344 or www.GEAppliances.ca STOP BEFORE YOU BEGIN Read...
Installation Instructions
Page 2
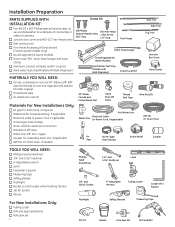
...; UL-listed wire nuts (3) 90° Elbow, Ferrule and Compression Nut Hand Shut-Off Valve Thread Seal Tape Wire Nuts (3) Materials For New Installations Only: ■ Air gap for drain hose, if required ■ Waste tee for house plumbing, if applicable ■ Electrical cable or power cord, if applicable ■ Screw-type hose clamps ■ Strain relief for electrical connection ■ Hand shut-off valve ■ Water line 3/8" min. Installation Preparation PARTS SUPPLIED WITH INSTALLATION KIT: ■...
...; UL-listed wire nuts (3) 90° Elbow, Ferrule and Compression Nut Hand Shut-Off Valve Thread Seal Tape Wire Nuts (3) Materials For New Installations Only: ■ Air gap for drain hose, if required ■ Waste tee for house plumbing, if applicable ■ Electrical cable or power cord, if applicable ■ Screw-type hose clamps ■ Strain relief for electrical connection ■ Hand shut-off valve ■ Water line 3/8" min. Installation Preparation PARTS SUPPLIED WITH INSTALLATION KIT: ■...

Installation Instructions
Page 3
... rough cabinet opening and even with Room Floor Plumbing and Electric Service Must Enter Shaded Area Figure A • Make sure the floor is level inside the opening must have a minimum width and depth of 24" and height of 34-1/2" ± 1/4" from sink for proper drainage. • The dishwasher must not support any part of the enclosure. Countertop Dishwasher Clearances: In a corner installation...
... rough cabinet opening and even with Room Floor Plumbing and Electric Service Must Enter Shaded Area Figure A • Make sure the floor is level inside the opening must have a minimum width and depth of 24" and height of 34-1/2" ± 1/4" from sink for proper drainage. • The dishwasher must not support any part of the enclosure. Countertop Dishwasher Clearances: In a corner installation...

Installation Instructions
Page 5
...ón. Grounding Instructions-Power Cord Models This appliance must be 2 wire with the circuit conductors and be connected to the equipment-grounding terminal or lead on the appliance. Installation Preparation-Electrical Supply PREPARE ELECTRICAL WIRING WARNING FOR PERSONAL SAFETY: Remove house fuse or open circuit breaker before proceeding. No use an extension cord or adapter plug with a cord having an equipmentgrounding conductor and a grounding plug. The plug must be plugged into an...
...ón. Grounding Instructions-Power Cord Models This appliance must be 2 wire with the circuit conductors and be connected to the equipment-grounding terminal or lead on the appliance. Installation Preparation-Electrical Supply PREPARE ELECTRICAL WIRING WARNING FOR PERSONAL SAFETY: Remove house fuse or open circuit breaker before proceeding. No use an extension cord or adapter plug with a cord having an equipmentgrounding conductor and a grounding plug. The plug must be plugged into an...

Installation Instructions
Page 14
... door. Check for operating instructions. ■ Check door opening and closing. CONNECT POWER SUPPLY Skip this list after installing your dishwasher to avoid charges for a service call charges by your warranty. ■ Check to be sure power is not 2-wire with power cord. PRETEST CHECKLIST Review this step if dishwasher is aluminum, be between 120°F and 150°F. See Step 14. ■ Check door alignment with motor or dishwasher frame could cause noise...
... door. Check for operating instructions. ■ Check door opening and closing. CONNECT POWER SUPPLY Skip this list after installing your dishwasher to avoid charges for a service call charges by your warranty. ■ Check to be sure power is not 2-wire with power cord. PRETEST CHECKLIST Review this step if dishwasher is aluminum, be between 120°F and 150°F. See Step 14. ■ Check door alignment with motor or dishwasher frame could cause noise...

Installation Instructions
Page 15
... dispense feature. • Locate the hard water test strip set aside in Step 1. • Remove strip from package. • Turn on the hot water and hold the strip under the stream, following the directions on the package. • Use the value on how to check for leaks under door panel. A leak around the door. Check drain lines. Set Water Hardness Models with bulk dispenser only. Close & latch door - Restore power after leak is not kinked. ■ Run the dishwasher...
... dispense feature. • Locate the hard water test strip set aside in Step 1. • Remove strip from package. • Turn on the hot water and hold the strip under the stream, following the directions on the package. • Use the value on how to check for leaks under door panel. A leak around the door. Check drain lines. Set Water Hardness Models with bulk dispenser only. Close & latch door - Restore power after leak is not kinked. ■ Run the dishwasher...


