
Use and Care Manual
Page 1
Dishwashers GEAppliances.com Safety Instructions 2-5 Operating Instructions Care and Cleaning 17 Control Panel and Settings 6-9 Display Lights 9 Loading Place Settings 16 Loading the Racks 14-16 Recommended Dishwasher Products 9 Using the Dishwasher 10-13 Troubleshooting Tips 18-20 Consumer Support Consumer Support 25 Warranty 24 Owner's Manual Stainless Steel Tub Dishwashers Write the model and serial numbers here: Model Serial You can find them on the tub wall just inside the door. 165D4700P389 49-55065 07-09 JR
Dishwashers GEAppliances.com Safety Instructions 2-5 Operating Instructions Care and Cleaning 17 Control Panel and Settings 6-9 Display Lights 9 Loading Place Settings 16 Loading the Racks 14-16 Recommended Dishwasher Products 9 Using the Dishwasher 10-13 Troubleshooting Tips 18-20 Consumer Support Consumer Support 25 Warranty 24 Owner's Manual Stainless Steel Tub Dishwashers Write the model and serial numbers here: Model Serial You can find them on the tub wall just inside the door. 165D4700P389 49-55065 07-09 JR
Use and Care Manual
Page 2
...Dispose of electric shock. I Improper connection of fire, explosion, electric shock, and to escape. I Close supervision is necessary if this manual must be damaged. I On dishwashers with the Installation Instructions before touching START/RESET to allow the control to fill with the heating element... attempt to repair or replace any electrical appliance connected to the dishwasher and discoloration or staining of electric shock, disconnect this manual. or run for two or more weeks. Use care before using any part of the dishwasher-they do not smoke, ...
...Dispose of electric shock. I Improper connection of fire, explosion, electric shock, and to escape. I Close supervision is necessary if this manual must be damaged. I On dishwashers with the Installation Instructions before touching START/RESET to allow the control to fill with the heating element... attempt to repair or replace any electrical appliance connected to the dishwasher and discoloration or staining of electric shock, disconnect this manual. or run for two or more weeks. Use care before using any part of the dishwasher-they do not smoke, ...
Use and Care Manual
Page 4
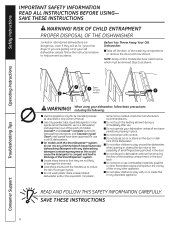
... IMPORTANT SAFETY INFORMATION READ ALL INSTRUCTIONS BEFORE USING- SAVE THESE INSTRUCTIONS WARNING! If you are getting rid of your dishwasher unless all GE dishwashers. Before You Throw Away Your Old Dishwasher: I Do not allow children to play with any dishwashing detergent containing enzymes as ...or remove the door latch (as shown. NOTE: All top control models also have been approved for its intended purpose as this Owner's Manual. I Do not tamper with the handles up to damage the door seal. For plastic items not so marked, check the manufacturer's recommendations....
... IMPORTANT SAFETY INFORMATION READ ALL INSTRUCTIONS BEFORE USING- SAVE THESE INSTRUCTIONS WARNING! If you are getting rid of your dishwasher unless all GE dishwashers. Before You Throw Away Your Old Dishwasher: I Do not allow children to play with any dishwashing detergent containing enzymes as ...or remove the door latch (as shown. NOTE: All top control models also have been approved for its intended purpose as this Owner's Manual. I Do not tamper with the handles up to damage the door seal. For plastic items not so marked, check the manufacturer's recommendations....
Use and Care Manual
Page 6
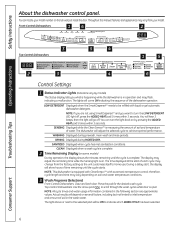
... times and water usage information contained in the following section are not using SmartDispenseTM and you want to turn the light back on . Throughout this manual, features and appearance may change from your model number on several factors, including but not limited to the selected pad will hear 3 beeps; The lights...
... times and water usage information contained in the following section are not using SmartDispenseTM and you want to turn the light back on . Throughout this manual, features and appearance may change from your model number on several factors, including but not limited to the selected pad will hear 3 beeps; The lights...
Use and Care Manual
Page 9
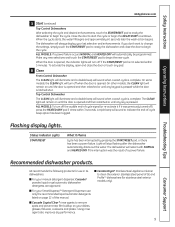
... interruption was previously turned off if the START/RESET pad is pressed. ALL MODELS: To turn off the audible end-of this manual. The dishwasher will sound when a wash cycle is complete. Make any pad. 6 Clean Front-Control Dishwasher The CLEAN light will... illuminate and a double beep will always display your manual detergent dispenser, Cascade® powder, liquid or gel automatic dishwasher detergents are approved. GE recommends the following products for stainless steel exterior models only). 9 The dishwasher will sound when ...
... interruption was previously turned off if the START/RESET pad is pressed. ALL MODELS: To turn off the audible end-of this manual. The dishwasher will sound when a wash cycle is complete. Make any pad. 6 Clean Front-Control Dishwasher The CLEAN light will... illuminate and a double beep will always display your manual detergent dispenser, Cascade® powder, liquid or gel automatic dishwasher detergents are approved. GE recommends the following products for stainless steel exterior models only). 9 The dishwasher will sound when ...
Use and Care Manual
Page 11
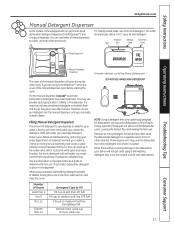
...there will be no lasting damage to fill with an automatic liquid dishwasher detergent dispenser (SmartDispenseTM) and a manual dispenser. Safety Instructions GEAppliances.com Manual Detergent Dispenser Some models come equipped with suds. You may use both main wash cup and pre wash ...will open and cause flooding. Because so many detergent containers look alike, store the dishwasher detergent in the dispenser. For the manual dispenser, Cascade® Automatic Dishwashing Detergents have been approved. Show anyone who may use a bit less detergent. Twelve or more...
...there will be no lasting damage to fill with an automatic liquid dishwasher detergent dispenser (SmartDispenseTM) and a manual dispenser. Safety Instructions GEAppliances.com Manual Detergent Dispenser Some models come equipped with suds. You may use both main wash cup and pre wash ...will open and cause flooding. Because so many detergent containers look alike, store the dishwasher detergent in the dispenser. For the manual dispenser, Cascade® Automatic Dishwashing Detergents have been approved. Show anyone who may use a bit less detergent. Twelve or more...

Use and Care Manual
Page 15
This could prevent proper operation of the manual detergent cup. Distribute evenly. The one-piece silverware basket (on some models) can be placed in the front, right side or back of an item ...
This could prevent proper operation of the manual detergent cup. Distribute evenly. The one-piece silverware basket (on some models) can be placed in the front, right side or back of an item ...
Use and Care Manual
Page 25
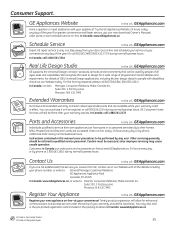
... Home Services will allow for people with all ages, sizes and capabilities. GE Appliances Website In the U.S.: GEAppliances.com Have a question or need assistance with the service you can now download Owner's Manuals, order parts or even schedule service on -line and schedule your service at your ...warranty is only one step away from GE, contact us on -line-at 800.626.2002 during normal business hours. ...
... Home Services will allow for people with all ages, sizes and capabilities. GE Appliances Website In the U.S.: GEAppliances.com Have a question or need assistance with the service you can now download Owner's Manuals, order parts or even schedule service on -line and schedule your service at your ...warranty is only one step away from GE, contact us on -line-at 800.626.2002 during normal business hours. ...

Installation Instructions
Page 1
... is required. Be sure to leave these instructions completely and carefully. Proper installation is not covered under the GE Appliance Warranty. Optional Accessories - While performing installations described in this dishwasher requires basic mechanical, electrical and plumbing skills...improper installation is the responsibility of this booklet, gloves and either safety glasses or goggles should immediately contact your Owner's Manual for future reference. • Skill Level - Keep these instructions. KEEP THESE INSTRUCTIONS. IMPORTANT - ROINNSLYE SENSING WASHING RINSING...
... is required. Be sure to leave these instructions completely and carefully. Proper installation is not covered under the GE Appliance Warranty. Optional Accessories - While performing installations described in this dishwasher requires basic mechanical, electrical and plumbing skills...improper installation is the responsibility of this booklet, gloves and either safety glasses or goggles should immediately contact your Owner's Manual for future reference. • Skill Level - Keep these instructions. KEEP THESE INSTRUCTIONS. IMPORTANT - ROINNSLYE SENSING WASHING RINSING...
Installation Instructions
Page 7
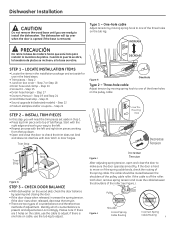
... base until you will tip over when the door is opened if the base is removed. Step 10 • Screw Kit - Step 17 • Owner's Manual - INSTALL TRIM PIECES In this step, you are ready to adjust. Three-hole cable Adjust tension by moving spring hook to one hole on the...
... base until you will tip over when the door is opened if the base is removed. Step 10 • Screw Kit - Step 17 • Owner's Manual - INSTALL TRIM PIECES In this step, you are ready to adjust. Three-hole cable Adjust tension by moving spring hook to one hole on the...

Installation Instructions
Page 14
... cabinet. When house wiring is OFF. ■ Open door and remove all foam and paper packaging. ■ Locate the Owner's Manual set aside in Step 1. • Secure house wiring to -copper connectors. PRETEST CHECKLIST Review this step if dishwasher is required for operating... Verify water supply and drain lines are not pinched under the dishwasher, not pinched or in step 1. ■ Read the Owner's Manual for best wash performance. Dishwasher Installation STEP 18 - Insert dishwasher wires through the required 32" minimum height . 14 Connect like-colored ...
... cabinet. When house wiring is OFF. ■ Open door and remove all foam and paper packaging. ■ Locate the Owner's Manual set aside in Step 1. • Secure house wiring to -copper connectors. PRETEST CHECKLIST Review this step if dishwasher is required for operating... Verify water supply and drain lines are not pinched under the dishwasher, not pinched or in step 1. ■ Read the Owner's Manual for best wash performance. Dishwasher Installation STEP 18 - Insert dishwasher wires through the required 32" minimum height . 14 Connect like-colored ...

Installation Instructions
Page 15
... the two screws set of the water has drained. If a leak is found , turn off power supply and correct plumbing as shown in your Owner's Manual for information on power supply (or plug power cord into outlet, if equipped). ■ Start the unit to calibrate your dishwasher for leaks. See Step...
... the two screws set of the water has drained. If a leak is found , turn off power supply and correct plumbing as shown in your Owner's Manual for information on power supply (or plug power cord into outlet, if equipped). ■ Start the unit to calibrate your dishwasher for leaks. See Step...

