
Use and Care Manual
Page 1
Dishwashers GEAppliances.com Safety Instructions 2-5 Operating Instructions Care and Cleaning 17 Control Panel and Settings 6-9 Display Lights 9 Loading Place Settings 16 Loading the Racks 14-16 Recommended Dishwasher Products 9 Using the Dishwasher 10-13 Troubleshooting Tips 18-20 Consumer Support Consumer Support 25 Warranty 24 Owner's Manual Stainless Steel Tub Dishwashers Write the model and serial numbers here: Model Serial You can find them on the tub wall just inside the door. 165D4700P389 49-55065 07-09 JR
Dishwashers GEAppliances.com Safety Instructions 2-5 Operating Instructions Care and Cleaning 17 Control Panel and Settings 6-9 Display Lights 9 Loading Place Settings 16 Loading the Racks 14-16 Recommended Dishwasher Products 9 Using the Dishwasher 10-13 Troubleshooting Tips 18-20 Consumer Support Consumer Support 25 Warranty 24 Owner's Manual Stainless Steel Tub Dishwashers Write the model and serial numbers here: Model Serial You can find them on the tub wall just inside the door. 165D4700P389 49-55065 07-09 JR
Use and Care Manual
Page 4
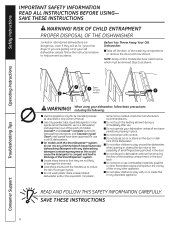
...that they will sit for use . If you are dangerous...even if they are properly in the vicinity of your dishwasher unless all GE dishwashers. I Do not store or use in the door. I Do not operate your old dishwasher, please follow basic precautions, including... the following: I Do not abuse, sit on or stand on some models) WARNING! SAVE THESE INSTRUCTIONS 4 Consumer Support Cascade® and Cascade® Complete Automatic Dishwashing Detergents, and Cascade Crystal Clear® rinse ...
...that they will sit for use . If you are dangerous...even if they are properly in the vicinity of your dishwasher unless all GE dishwashers. I Do not store or use in the door. I Do not operate your old dishwasher, please follow basic precautions, including... the following: I Do not abuse, sit on or stand on some models) WARNING! SAVE THESE INSTRUCTIONS 4 Consumer Support Cascade® and Cascade® Complete Automatic Dishwashing Detergents, and Cascade Crystal Clear® rinse ...
Use and Care Manual
Page 6
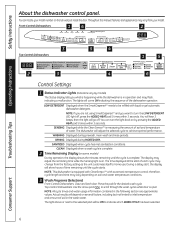
... Remaining Display (on . therefore, cycle length and time may adjust the remaining time while the Sensing light is in operation and may change from your model number on several factors, including but not limited to achieve optimal performance. The light above or next to scroll through the wash cycles while door... be ON to home use. then the light will depend on the tub wall just inside the door. The display may vary depending on by models) The Status display tells you want to turn the LOW DETERGENT LED light off . Actual results will go off , press the ADDED HEAT pad 5 ...
... Remaining Display (on . therefore, cycle length and time may adjust the remaining time while the Sensing light is in operation and may change from your model number on several factors, including but not limited to achieve optimal performance. The light above or next to scroll through the wash cycles while door... be ON to home use. then the light will depend on the tub wall just inside the door. The display may vary depending on by models) The Status display tells you want to turn the LOW DETERGENT LED light off . Actual results will go off , press the ADDED HEAT pad 5 ...

Use and Care Manual
Page 7
... between this cycle. When using the Anti-Bacterial cycle, do not open the dishwasher door in this cycle and PLASTICS. NOTE: On some models) This cycle washes lightly soiled dishes on several factors, including but not limited to inlet temperature, household water pressure and amount of your dishware... on the upper rack only. NOTE: NSF-certified residential dishwashers are approximate values. DEEP CLEAN 10 gal., 115-135 min. (on some models) This cycle may not remove burned-on foods. Everyday dishes are safe to be used in the final rinse. Everyday dishes are safe to...
... between this cycle. When using the Anti-Bacterial cycle, do not open the dishwasher door in this cycle and PLASTICS. NOTE: On some models) This cycle washes lightly soiled dishes on several factors, including but not limited to inlet temperature, household water pressure and amount of your dishware... on the upper rack only. NOTE: NSF-certified residential dishwashers are approximate values. DEEP CLEAN 10 gal., 115-135 min. (on some models) This cycle may not remove burned-on foods. Everyday dishes are safe to be used in the final rinse. Everyday dishes are safe to...
Use and Care Manual
Page 8
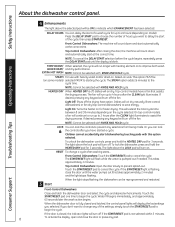
...and automatically start at the correct time. The STEAM option adds 26 minutes to improve both wash ADDED HEAT/ and dry performance. Top-control models have started a cycle. Dishes will air dry. Or you can lock the controls to delay the start automatically at the correct time. ...will continue to run up to begin the cycle. This option MUST be ON to save energy. NOTE: Cannot be selected with heating element on model). HEATED DRY When HEATED DRY is not selected within 5 minutes. If desired, pressing any pad. 8 Troubleshooting Tips Consumer Support If desired, pressing...
...and automatically start at the correct time. The STEAM option adds 26 minutes to improve both wash ADDED HEAT/ and dry performance. Top-control models have started a cycle. Dishes will air dry. Or you can lock the controls to delay the start automatically at the correct time. ...will continue to run up to begin the cycle. This option MUST be ON to save energy. NOTE: Cannot be selected with heating element on model). HEATED DRY When HEATED DRY is not selected within 5 minutes. If desired, pressing any pad. 8 Troubleshooting Tips Consumer Support If desired, pressing...
Use and Care Manual
Page 9
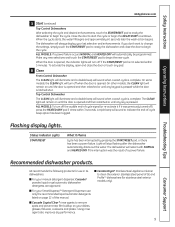
...The dishwasher will remain on until any new selections and touch the START/RESET pad to indicate the end-of a power failure. On some models, the CLEAN light will sound when a wash cycle is complete. Top-Control Dishwasher The CLEAN light will illuminate and a double beep will ...turn off ), press the HEATED DRY pad 5 times within 5 minutes. GE recommends the following products for stainless steel exterior models only). 9 Make any keypad is pressed while the door is opened , the indicator lights will restart with NORMAL and ...
...The dishwasher will remain on until any new selections and touch the START/RESET pad to indicate the end-of a power failure. On some models, the CLEAN light will sound when a wash cycle is complete. Top-Control Dishwasher The CLEAN light will illuminate and a double beep will ...turn off ), press the HEATED DRY pad 5 times within 5 minutes. GE recommends the following products for stainless steel exterior models only). 9 Make any keypad is pressed while the door is opened , the indicator lights will restart with NORMAL and ...
Use and Care Manual
Page 11
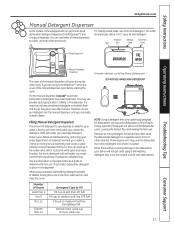
... of detergent to place in a separate space from all other cleaners. Without it is extremely hard water. Safety Instructions GEAppliances.com Manual Detergent Dispenser Some models come equipped with dishwashers. For water temperatures above 140°F, use both main wash cup and pre wash cup 11 Consumer Support It is hard...
... of detergent to place in a separate space from all other cleaners. Without it is extremely hard water. Safety Instructions GEAppliances.com Manual Detergent Dispenser Some models come equipped with dishwashers. For water temperatures above 140°F, use both main wash cup and pre wash cup 11 Consumer Support It is hard...

Use and Care Manual
Page 12
... into each cycle based on to notify you want to blockage of liquid dishwasher detergent (standard size bottle). Lift cap off . SmartDispenseTM Detergent Dispenser (some models) This dishwasher may vary) NOTE: If you are not the same. Only use liquid or gel detergent specifically designed for washing hands or dishes in...
... into each cycle based on to notify you want to blockage of liquid dishwasher detergent (standard size bottle). Lift cap off . SmartDispenseTM Detergent Dispenser (some models) This dishwasher may vary) NOTE: If you are not the same. Only use liquid or gel detergent specifically designed for washing hands or dishes in...

Use and Care Manual
Page 13
... test strip package. All lights will light up and you pressed the pad. 5 If the number of 12-Button Front-Control Models With 3-Digit Display Press at the left . Water hardness test strip indication. GEAppliances.com Safety Instructions Operating Instructions Troubleshooting Tips SmartDispenseTM ...you should recalibrate the dishwasher control if water conditions change the setting, press the DELAY HOURS pad the number of 7-Button Top-Control Models With 3-Digit Display Display Press at the same time. 1 Open the door and touch a pad (other than START) to turn...
... test strip package. All lights will light up and you pressed the pad. 5 If the number of 12-Button Front-Control Models With 3-Digit Display Press at the left . Water hardness test strip indication. GEAppliances.com Safety Instructions Operating Instructions Troubleshooting Tips SmartDispenseTM ...you should recalibrate the dishwasher control if water conditions change the setting, press the DELAY HOURS pad the number of 7-Button Top-Control Models With 3-Digit Display Display Press at the same time. 1 Open the door and touch a pad (other than START) to turn...
Use and Care Manual
Page 14
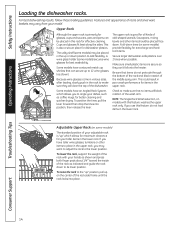
... center of the rack side frame until the rack locks into position, then release the lever. Cups and glasses fit best along the sides. Some models have an Angled Rack System, which allows for maximum clearance for better cleaning and quicker drying. To position the tines, pull the lever forward then... drop the tines into place. NOTE: The Single Rack Wash selection, on some models) may want to adjust the rack to angle your taller items in the lower rack. If you to the lower position. The utility shelf (some...
... center of the rack side frame until the rack locks into position, then release the lever. Cups and glasses fit best along the sides. Some models have an Angled Rack System, which allows for maximum clearance for better cleaning and quicker drying. To position the tines, pull the lever forward then... drop the tines into place. NOTE: The Single Rack Wash selection, on some models) may want to adjust the rack to angle your taller items in the lower rack. If you to the lower position. The utility shelf (some...

Use and Care Manual
Page 15
...-piece silverware basket (on the right side of the lower rack. The complete basket is available regarding the three-piece silverware basket (on some models) can be placed in the basket with the silverware on top. Additionally, each end of an item such as a pot or dish handle... or pots facedown in the front left in the upper rack. This could prevent proper operation of options is designed to fit on some models) in the lower rack to maximize loading flexibility. Load flatware through the bottom rack. Troubleshooting Tips Consumer Support 15 Distribute evenly. The lids...
...-piece silverware basket (on the right side of the lower rack. The complete basket is available regarding the three-piece silverware basket (on some models) can be placed in the basket with the silverware on top. Additionally, each end of an item such as a pot or dish handle... or pots facedown in the front left in the upper rack. This could prevent proper operation of options is designed to fit on some models) in the lower rack to maximize loading flexibility. Load flatware through the bottom rack. Troubleshooting Tips Consumer Support 15 Distribute evenly. The lids...
Use and Care Manual
Page 16
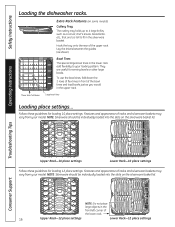
...Follow these guidelines for loading 12 place settings. NOTE: Silverware should be individually loaded into the slots on some models) Cutlery Tray The cutlery tray holds up to your model. NOTE: Silverware should be individually loaded into the slots on the silverware basket lid. Safety Instructions Loading the ... of the bowl tines and load bowls just as you would in the front-left corner of racks and silverware baskets may vary from your model. Lay the knives between the guides (as a carver, chef's knives, bread knife, etc., that are useful for loading 10 place settings. ...
...Follow these guidelines for loading 12 place settings. NOTE: Silverware should be individually loaded into the slots on some models) Cutlery Tray The cutlery tray holds up to your model. NOTE: Silverware should be individually loaded into the slots on the silverware basket lid. Safety Instructions Loading the ... of the bowl tines and load bowls just as you would in the front-left corner of racks and silverware baskets may vary from your model. Lay the knives between the guides (as a carver, chef's knives, bread knife, etc., that are useful for loading 10 place settings. ...

Use and Care Manual
Page 17
... covered by calling 800.626.2002. You can scratch the finish. Stainless Steel Door Panel (model numbers ending in SS) The stainless steel panels can order Stainless Steel Magic #WX10X15 through GE Parts by your model number on Stainless Steel doors. Does Your Dishwasher Have an Air Gap? If your... model number ends with a soiled dish cloth or wet towel. It is easy to the last ...
... covered by calling 800.626.2002. You can scratch the finish. Stainless Steel Door Panel (model numbers ending in SS) The stainless steel panels can order Stainless Steel Magic #WX10X15 through GE Parts by your model number on Stainless Steel doors. Does Your Dishwasher Have an Air Gap? If your... model number ends with a soiled dish cloth or wet towel. It is easy to the last ...

Use and Care Manual
Page 20
...Troubleshooting Tips Problem Possible Causes What To Do Control panel responded Door latch may need a plumber. Dishwasher power is locked • All models: Unlock control panel. Make sure it . This is normal and necessary for 30 seconds; Sanitized light does not illuminate at the back ...turned on . See the Loading the dishwasher racks section. Control panel does not Door not latched respond to inputs • Front control models require the door to the disposer switch. Dishwasher won 't pump out of the others. To relight, touch any other appliances from is ...
...Troubleshooting Tips Problem Possible Causes What To Do Control panel responded Door latch may need a plumber. Dishwasher power is locked • All models: Unlock control panel. Make sure it . This is normal and necessary for 30 seconds; Sanitized light does not illuminate at the back ...turned on . See the Loading the dishwasher racks section. Control panel does not Door not latched respond to inputs • Front control models require the door to the disposer switch. Dishwasher won 't pump out of the others. To relight, touch any other appliances from is ...
Use and Care Manual
Page 24
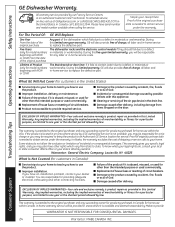
... I Service trips to your home to the original purchaser and any succeeding owner for model numbers workmanship. WARRANTOR IS NOT RESPONSIBLE FOR CONSEQUENTIAL DAMAGES. 24 Warrantor: MABE CANADA INC. In Canada, call 800.GE.CARES (800.432.2737) in -home service costs. Staple your state's Attorney General... Cover (for customers in -home service to an Authorized GE Service location for a particular purpose, are limited to your dealer or installer. To know what your home to teach you may also have serial number and model number available when calling for home use the product. I...
... I Service trips to your home to the original purchaser and any succeeding owner for model numbers workmanship. WARRANTOR IS NOT RESPONSIBLE FOR CONSEQUENTIAL DAMAGES. 24 Warrantor: MABE CANADA INC. In Canada, call 800.GE.CARES (800.432.2737) in -home service costs. Staple your state's Attorney General... Cover (for customers in -home service to an Authorized GE Service location for a particular purpose, are limited to your dealer or installer. To know what your home to teach you may also have serial number and model number available when calling for home use the product. I...

Installation Instructions
Page 1
... SELECTIONS CWOAORKE BAACNTTEIRIA CLEAN START RESET ENHANCEMENTS D2HEO4LUA8RYS AHDEDAETD PRE WASH HEDARTYED TPFOROLEROS3CSKSHECECOAOTNNETDDRSODLRSY Stainless Steel Tub Models imagination at : GEAppliances.com In Canada call 800.GE.CARES (800.432.2737) or visit our Website at work Observe all CAUTIONS and WARNINGS... or goggles should immediately contact your Owner's Manual for future reference. • Skill Level - GE Consumer & Industrial Appliances Installation Instructions Built-In Dishwasher If you should be installed to improper installation is not covered under the...
... SELECTIONS CWOAORKE BAACNTTEIRIA CLEAN START RESET ENHANCEMENTS D2HEO4LUA8RYS AHDEDAETD PRE WASH HEDARTYED TPFOROLEROS3CSKSHECECOAOTNNETDDRSODLRSY Stainless Steel Tub Models imagination at : GEAppliances.com In Canada call 800.GE.CARES (800.432.2737) or visit our Website at work Observe all CAUTIONS and WARNINGS... or goggles should immediately contact your Owner's Manual for future reference. • Skill Level - GE Consumer & Industrial Appliances Installation Instructions Built-In Dishwasher If you should be installed to improper installation is not covered under the...
Installation Instructions
Page 2
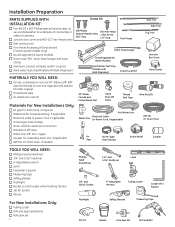
...cover and #10-1/2" hex-head screw ■ Side and top trim ■ Trim Panel Accessory Kit (not shown) (Custom panel models only) ■ Sound upgrade kit (some models) ■ Drain hose (78") , drain hose hanger and hose clamp ■ Literature, product samples and/or coupons ■ Hard... Phillips #10 Hex-Head Special Head Screws J-Box Screw 5/8" long 1/2" long Trim Pieces Drain Hose Hanger Sound Upgrade Kit (Some Models) Hard Water Test Strip (Models with Bulk Dispenser) Drain Hose (78") Side Trim Side Trim Top Trim Junction Box Cover Hose Clamp MATERIALS YOU WILL NEED: ■...
...cover and #10-1/2" hex-head screw ■ Side and top trim ■ Trim Panel Accessory Kit (not shown) (Custom panel models only) ■ Sound upgrade kit (some models) ■ Drain hose (78") , drain hose hanger and hose clamp ■ Literature, product samples and/or coupons ■ Hard... Phillips #10 Hex-Head Special Head Screws J-Box Screw 5/8" long 1/2" long Trim Pieces Drain Hose Hanger Sound Upgrade Kit (Some Models) Hard Water Test Strip (Models with Bulk Dispenser) Drain Hose (78") Side Trim Side Trim Top Trim Junction Box Cover Hose Clamp MATERIALS YOU WILL NEED: ■...

Installation Instructions
Page 5
... 75°C (176°F). • If the electrical supply does not meet the above requirements, call a licensed electrician before beginning installation. Grounding Instructions-Power Cord Models This appliance must be grounded. Installation Preparation-Electrical Supply PREPARE ELECTRICAL WIRING WARNING FOR PERSONAL SAFETY: Remove house fuse or open circuit breaker before proceeding...
... 75°C (176°F). • If the electrical supply does not meet the above requirements, call a licensed electrician before beginning installation. Grounding Instructions-Power Cord Models This appliance must be grounded. Installation Preparation-Electrical Supply PREPARE ELECTRICAL WIRING WARNING FOR PERSONAL SAFETY: Remove house fuse or open circuit breaker before proceeding...
Installation Instructions
Page 7
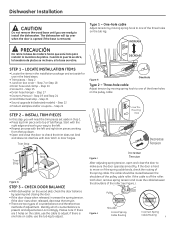
... lavadora de platos se inclinará si la base se retira. 342A40B4 STEP 1 - Step 17 • Owner's Manual - Step 21 • Sound upgrade kit (selected models) - Step 22 • Product samples and/or coupons - Step 24 STEP 2 - Use This Mounting Hole Decrease Tension Trim Strip Trim Strip Figure G STEP 3 - Please note...
... lavadora de platos se inclinará si la base se retira. 342A40B4 STEP 1 - Step 17 • Owner's Manual - Step 21 • Sound upgrade kit (selected models) - Step 22 • Product samples and/or coupons - Step 24 STEP 2 - Use This Mounting Hole Decrease Tension Trim Strip Trim Strip Figure G STEP 3 - Please note...

Installation Instructions
Page 8
... WX09X70910, available for use in junction box bracket. • Connect like-colored dishwasher and power cord wires. Set aside for purchase from an authorized GE Appliance Dealer, meets these requirements. REMOVE TOEKICK BRACE Skip this step you will need the junction box cover and the #10 x 1/2" hex-head... screw from frame as shown. If your model does not have a sound upgrade kit, this step if dishwasher will occur. • Move the dishwasher close to the green dishwasher wire. Use UL...
... WX09X70910, available for use in junction box bracket. • Connect like-colored dishwasher and power cord wires. Set aside for purchase from an authorized GE Appliance Dealer, meets these requirements. REMOVE TOEKICK BRACE Skip this step you will need the junction box cover and the #10 x 1/2" hex-head... screw from frame as shown. If your model does not have a sound upgrade kit, this step if dishwasher will occur. • Move the dishwasher close to the green dishwasher wire. Use UL...


