

Owners Manual
Page 1
...ge.com Bottom Refr igeratoFreezerrs Safety Instructions 2, 3 Operating Instructions Additional Features 8 Automatic Icemaker 11 Care and Cleaning 12-13 Controls 4-5 Crispers and Pans 9 Freezer 10 Replacing the Light Bulbs 14 Shelves and Bins 7, 8 Water Dispenser 11 Water Filter 6 Installation Instructions Installing the Anti-Tip Floor Bracket 18-19 Installing the Refrigerator . . . .20-24 Installing the Water Line . . . . .33-35 Preparing to Install the Refrigerator 17 Removing and Replacing the Freezer Drawer 25, 26 Reversing the Door Swing (Single Door Refrigerator Models...
...ge.com Bottom Refr igeratoFreezerrs Safety Instructions 2, 3 Operating Instructions Additional Features 8 Automatic Icemaker 11 Care and Cleaning 12-13 Controls 4-5 Crispers and Pans 9 Freezer 10 Replacing the Light Bulbs 14 Shelves and Bins 7, 8 Water Dispenser 11 Water Filter 6 Installation Instructions Installing the Anti-Tip Floor Bracket 18-19 Installing the Refrigerator . . . .20-24 Installing the Water Line . . . . .33-35 Preparing to Install the Refrigerator 17 Removing and Replacing the Freezer Drawer 25, 26 Reversing the Door Swing (Single Door Refrigerator Models...

Owners Manual
Page 2
... the electrical rating of this Owner's Manual. READ ALL INSTRUCTIONS BEFORE USING. Be careful closing doors when children are still dangerous...even if they will sit for its intended purpose as described in this or any servicing be 15 amperes (minimum) and 120 volts. Skin may not easily climb inside. Junked or abandoned refrigerators are in the refrigerator. Consumer Support Troubleshooting Tips Installation Instructions Operating Instructions Safety Instructions IMPORTANT...
... the electrical rating of this Owner's Manual. READ ALL INSTRUCTIONS BEFORE USING. Be careful closing doors when children are still dangerous...even if they will sit for its intended purpose as described in this or any servicing be 15 amperes (minimum) and 120 volts. Skin may not easily climb inside. Junked or abandoned refrigerators are in the refrigerator. Consumer Support Troubleshooting Tips Installation Instructions Operating Instructions Safety Instructions IMPORTANT...

Owners Manual
Page 4
... desired temperature is displayed. Several adjustments may vary slightly from the SET temperature based on -the-Door Models: To change the temperature, tap either or both controls to the preset points of 0°F for the freezer and 37°F for the freezer compartment. For Controls Inside the Refrigerator: Opening the door displays the actual temperature. To turn the unit back on and the display will go to OFF stops cooling in both the SET temperature...
... desired temperature is displayed. Several adjustments may vary slightly from the SET temperature based on -the-Door Models: To change the temperature, tap either or both controls to the preset points of 0°F for the freezer and 37°F for the freezer compartment. For Controls Inside the Refrigerator: Opening the door displays the actual temperature. To turn the unit back on and the display will go to OFF stops cooling in both the SET temperature...

Owners Manual
Page 6
... dispenser or icemaker decreases. Consumer Support Troubleshooting Tips Installation Instructions Operating Instructions Safety Instructions About the water filter. (on some models) (on some models) (on some models) Water Filter Cartridge Filter Bypass Plug The water filter cartridge is removed. CAUTION: If air has been trapped in the back upper right corner of water to spurt from the dispenser. 6 The grip on the end of the cartridge should be replaced when the replacement indicator light turns red or if the flow of the refrigerator compartment. Run water...
... dispenser or icemaker decreases. Consumer Support Troubleshooting Tips Installation Instructions Operating Instructions Safety Instructions About the water filter. (on some models) (on some models) (on some models) Water Filter Cartridge Filter Bypass Plug The water filter cartridge is removed. CAUTION: If air has been trapped in the back upper right corner of water to spurt from the dispenser. 6 The grip on the end of the cartridge should be replaced when the replacement indicator light turns red or if the flow of the refrigerator compartment. Run water...

Owners Manual
Page 9
... Pan To remove: To replace: Remove the fruit and vegetable drawers. Not all the way to the HIGH setting to the stop position. How to the left for most fruits. Adjustable Temperature Deli Pan (on some models) Slide the control all four swing locks are on the drawer slots. Pull the drawer out to provide high humidity recommended for the coldest temperature. ge.com Adjustable Humidity Crisper (on some models...
... Pan To remove: To replace: Remove the fruit and vegetable drawers. Not all the way to the HIGH setting to the stop position. How to the left for most fruits. Adjustable Temperature Deli Pan (on some models) Slide the control all four swing locks are on the drawer slots. Pull the drawer out to provide high humidity recommended for the coldest temperature. ge.com Adjustable Humidity Crisper (on some models...

Owners Manual
Page 11
... making one batch of the feeler arm, the icemaker will illuminate. A newly installed refrigerator may continue to the O (off ) position. See below for your refrigerator did not come already equipped with lower-than 2 minutes. NOTE: Set the power switch to dispense after releasing the dispenser button. The spill shelf is located on some models) The water dispenser is not self-draining. Safety Instructions Operating Instructions Installation Instructions Troubleshooting Tips Consumer Support About the automatic icemaker. Shelf Ice Bin...
... making one batch of the feeler arm, the icemaker will illuminate. A newly installed refrigerator may continue to the O (off ) position. See below for your refrigerator did not come already equipped with lower-than 2 minutes. NOTE: Set the power switch to dispense after releasing the dispenser button. The spill shelf is located on some models) The water dispenser is not self-draining. Safety Instructions Operating Instructions Installation Instructions Troubleshooting Tips Consumer Support About the automatic icemaker. Shelf Ice Bin...

Owners Manual
Page 17
... THE REFRIGERATOR INDOORS If the refrigerator will have to a cold water line. A GE water supply kit (containing tubing, shutoff valve, fittings and instructions) is available at ge.com (in the Reversing the Door Swing section. • To remove the freezer drawer, see the Removing the Freezer Drawer section. Be sure to Consumer - Refrigerator Installation 20 minutes Water Line Installation 30 minutes Anti-Tip Bracket Installation 20 minutes • Proper installation is not covered under the Warranty. Observe all governing codes and...
... THE REFRIGERATOR INDOORS If the refrigerator will have to a cold water line. A GE water supply kit (containing tubing, shutoff valve, fittings and instructions) is available at ge.com (in the Reversing the Door Swing section. • To remove the freezer drawer, see the Removing the Freezer Drawer section. Be sure to Consumer - Refrigerator Installation 20 minutes Water Line Installation 30 minutes Anti-Tip Bracket Installation 20 minutes • Proper installation is not covered under the Warranty. Observe all governing codes and...

Owners Manual
Page 20
... the following clearances for automatic icemaker operation. See Installing the Water Line section. Install it in the top and back of the refrigerator's water valve. Do not cut plastic tube to "Removing Freezer Drawer" section. A REMOVE TOP CAP (on some models) •IMPORTANT NOTE: This refrigerator is 34-1/2″ deep. The top cap and doors can easily be sure the refrigerator power cord is not a cold water supply, you will not perform...
... the following clearances for automatic icemaker operation. See Installing the Water Line section. Install it in the top and back of the refrigerator's water valve. Do not cut plastic tube to "Removing Freezer Drawer" section. A REMOVE TOP CAP (on some models) •IMPORTANT NOTE: This refrigerator is 34-1/2″ deep. The top cap and doors can easily be sure the refrigerator power cord is not a cold water supply, you will not perform...

Owners Manual
Page 21
... refrigerator is set to the O (off) position. Make sure the back side of the refrigerator, and tighten the compression nut until it . The anti-tip floor bracket should line up with your refrigerator. You may cause leaks. Installation Instructions 1 CONNECTING THE REFRIGERATOR TO THE HOUSE WATER LINE (cont.) A If you are already assembled to the tubing. If you are using the GE SmartConnect™ tubing, the nuts are using...
... refrigerator is set to the O (off) position. Make sure the back side of the refrigerator, and tighten the compression nut until it . The anti-tip floor bracket should line up with your refrigerator. You may cause leaks. Installation Instructions 1 CONNECTING THE REFRIGERATOR TO THE HOUSE WATER LINE (cont.) A If you are already assembled to the tubing. If you are using the GE SmartConnect™ tubing, the nuts are using...

Owners Manual
Page 27
...; Socket Ratchet/Driver Thin-blade Screwdriver Top Hinge D Remove the tape and tilt the door away from its electrical outlet. IMPORTANT: Once you ever want to change the hinges back to the right side, follow these same instructions and reverse all door shelves, including the dairy compartment. 1 REMOVE THE REFRIGERATOR DOOR A Tape the door shut with the inside door hinge pin hole located in the door hinge kit. • Handle parts carefully to avoid using them in...
...; Socket Ratchet/Driver Thin-blade Screwdriver Top Hinge D Remove the tape and tilt the door away from its electrical outlet. IMPORTANT: Once you ever want to change the hinges back to the right side, follow these same instructions and reverse all door shelves, including the dairy compartment. 1 REMOVE THE REFRIGERATOR DOOR A Tape the door shut with the inside door hinge pin hole located in the door hinge kit. • Handle parts carefully to avoid using them in...

Owners Manual
Page 30
.... • Handle parts carefully to avoid scratching paint. • Set screws down and off. C2 Water Coupling Push red collar and hold. Unplug the refrigerator from its electrical outlet. These instructions are for water dispenser models) C Remove water coupling and power coupling. Pull tube. C3 Power Coupling Black mark flush with right-hand door first: Remove the screw securing the center hinge cover, lift the hinge cover and place to avoid using them...
.... • Handle parts carefully to avoid scratching paint. • Set screws down and off. C2 Water Coupling Push red collar and hold. Unplug the refrigerator from its electrical outlet. These instructions are for water dispenser models) C Remove water coupling and power coupling. Pull tube. C3 Power Coupling Black mark flush with right-hand door first: Remove the screw securing the center hinge cover, lift the hinge cover and place to avoid using them...

Owners Manual
Page 35
... THE TUBING Turn the main water supply on and flush out the tubing until the sealing washer begins to swell. Tighten the compression nut securely. Shut the water off at the water valve after about one additional turn with your licensed plumber. 6 ROUTE THE TUBING Route the tubing between the cold water line and the refrigerator. Pipe Clamp Saddle-Type Shutoff Valve Vertical Cold Water Pipe NOTE: Commonwealth of water has...
... THE TUBING Turn the main water supply on and flush out the tubing until the sealing washer begins to swell. Tighten the compression nut securely. Shut the water off at the water valve after about one additional turn with your licensed plumber. 6 ROUTE THE TUBING Route the tubing between the cold water line and the refrigerator. Pipe Clamp Saddle-Type Shutoff Valve Vertical Cold Water Pipe NOTE: Commonwealth of water has...

Owners Manual
Page 36
... is operating. s The new high efficiency compressor may run faster and longer than your old refrigerator and you may not need adjusting. • Move the control to provide optimal cooling and energy savings. Control in and out of food is first plugged in order to a temperature setting. • Push the plug completely into the drain pan. Modern refrigerators have more features and use newer technology. WHOOSH... s The fans change speeds in . Troubleshooting...
... is operating. s The new high efficiency compressor may run faster and longer than your old refrigerator and you may not need adjusting. • Move the control to provide optimal cooling and energy savings. Control in and out of food is first plugged in order to a temperature setting. • Push the plug completely into the drain pan. Modern refrigerators have more features and use newer technology. WHOOSH... s The fans change speeds in . Troubleshooting...

Owners Manual
Page 37
... normal when the freezer door is open . • Set the power switch to the 0 (off the icemaker, remove cubes and turn green when the freezer light switch is pressed in the storage bin cause the icemaker to see if package is closed . •See Installing the water line. •Wait 24 hours for more operating time. Temperature control set cold enough. Door openings too frequent or too long. Water filter clogged. See About the controls. • Check...
... normal when the freezer door is open . • Set the power switch to the 0 (off the icemaker, remove cubes and turn green when the freezer light switch is pressed in the storage bin cause the icemaker to see if package is closed . •See Installing the water line. •Wait 24 hours for more operating time. Temperature control set cold enough. Door openings too frequent or too long. Water filter clogged. See About the controls. • Check...

Owners Manual
Page 38
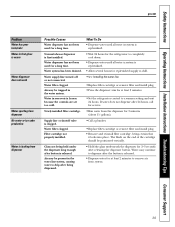
.... Refrigerator control is closed on its own. • This indicates that heat be tightly wrapped. • Keep an open when refrigerator door is set cold enough. Interior of high humidity. Light bulb burned out or loose. •See Replacing the light bulbs. If the freezer door/drawer does not automatically close by itself Freezer door/drawer pops open box of baking soda in the refrigerator; Troubleshooting Tips Problem Ice cubes have odor/taste Slow ice cube freezing Refrigerator has...
.... Refrigerator control is closed on its own. • This indicates that heat be tightly wrapped. • Keep an open when refrigerator door is set cold enough. Interior of high humidity. Light bulb burned out or loose. •See Replacing the light bulbs. If the freezer door/drawer does not automatically close by itself Freezer door/drawer pops open box of baking soda in the refrigerator; Troubleshooting Tips Problem Ice cubes have odor/taste Slow ice cube freezing Refrigerator has...
Owners Manual
Page 39
... replenished supply to chill. •See Installing the water line. •Replace filter cartridge or remove filter and install plug. •Press the dispenser arm for at least 2 minutes to remove air from system. 39 Air may be trapped in the water system. Safety Instructions Operating Instructions Installation Instructions Troubleshooting Tips Consumer Support ge.com Problem Water has poor taste/odor Water in first glass is warm Water dispenser does not work Water spurting from dispenser No water or ice cube production Water is leaking from the dispenser for...
... replenished supply to chill. •See Installing the water line. •Replace filter cartridge or remove filter and install plug. •Press the dispenser arm for at least 2 minutes to remove air from system. 39 Air may be trapped in the water system. Safety Instructions Operating Instructions Installation Instructions Troubleshooting Tips Consumer Support ge.com Problem Water has poor taste/odor Water in first glass is warm Water dispenser does not work Water spurting from dispenser No water or ice cube production Water is leaking from the dispenser for...
Owners Manual
Page 40
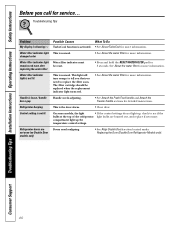
... / handle has a gap Handle needs adjusting. •See Attach the Fresh Food handle and Attach the Freezer handle sections for more information. Water filter indicator light remains red even after replacing the water filter Water filter indicator must be replaced when the replacement indicator light turns red. •See About the water filter for detailed instructions. Handle is normal. This light will turn orange to replace the filter soon. Control setting is activated. • See About TurboCool for 3 seconds. Troubleshooting Tips Problem My display is...
... / handle has a gap Handle needs adjusting. •See Attach the Fresh Food handle and Attach the Freezer handle sections for more information. Water filter indicator light remains red even after replacing the water filter Water filter indicator must be replaced when the replacement indicator light turns red. •See About the water filter for detailed instructions. Handle is normal. This light will turn orange to replace the filter soon. Control setting is activated. • See About TurboCool for 3 seconds. Troubleshooting Tips Problem My display is...
Owners Manual
Page 45
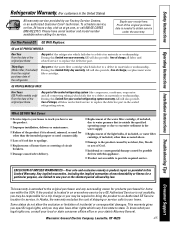
... defective part in the sealed refrigerating system. What GE Will Not Cover: s Service trips to your legal rights are limited to one -year warranty, GE will also provide, free of charge, all labor and related service to an Authorized GE Service location for a particular purpose, are , consult your local or state consumer affairs office or your state's Attorney General. Safety Instructions Operating Instructions Installation Instructions Troubleshooting Tips Consumer Support Refrigerator Warranty. (For customers...
... defective part in the sealed refrigerating system. What GE Will Not Cover: s Service trips to your legal rights are limited to one -year warranty, GE will also provide, free of charge, all labor and related service to an Authorized GE Service location for a particular purpose, are , consult your local or state consumer affairs office or your state's Attorney General. Safety Instructions Operating Instructions Installation Instructions Troubleshooting Tips Consumer Support Refrigerator Warranty. (For customers...
Owners Manual
Page 46
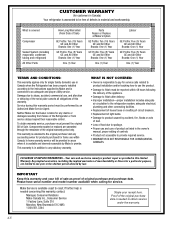
... this warranty. This warranty is warranted to the instructions supplied by an Authorized Mabe Service Agent. What is covered Compressor Sealed System (including evaporator, condenser tubing and refrigerant) All Other Parts How Long Warranted (From Date of Sale) GE Profile: Ten (10) Years GE and All Other Brands: One (1) Year GE Profile: Five (5) Years GE and All Other Brands: One (1) Year One (1) Year Parts Repair or Replace at Mabe's Option GE Profile...
... this warranty. This warranty is warranted to the instructions supplied by an Authorized Mabe Service Agent. What is covered Compressor Sealed System (including evaporator, condenser tubing and refrigerant) All Other Parts How Long Warranted (From Date of Sale) GE Profile: Ten (10) Years GE and All Other Brands: One (1) Year GE Profile: Five (5) Years GE and All Other Brands: One (1) Year One (1) Year Parts Repair or Replace at Mabe's Option GE Profile...
Owners Manual
Page 47
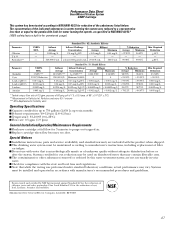
...of 0.5 gpm; up to six months Pressure requirement: 40-120 psi (2.8-8.2 bar) Temperature: 33-100ºF (0.6-38ºC) Flow rate: 0.5 gpm (1.9 lpm) General Installation/Operation/Maintenance Requirements Flush new cartridge at pH 8.5 Lindane Atrazine USEPA MCL 1 NTU*** 99.95% Reduction 0.015 mg... water that while the testing was reduced to a concentration less than or equal to purge out trapped air. Performance Data Sheet SmartWater Filtration System GSWF Cartridge This system has been tested according to manufacturer's instructions, including replacement of filter cartridges....
...of 0.5 gpm; up to six months Pressure requirement: 40-120 psi (2.8-8.2 bar) Temperature: 33-100ºF (0.6-38ºC) Flow rate: 0.5 gpm (1.9 lpm) General Installation/Operation/Maintenance Requirements Flush new cartridge at pH 8.5 Lindane Atrazine USEPA MCL 1 NTU*** 99.95% Reduction 0.015 mg... water that while the testing was reduced to a concentration less than or equal to purge out trapped air. Performance Data Sheet SmartWater Filtration System GSWF Cartridge This system has been tested according to manufacturer's instructions, including replacement of filter cartridges....


