
Owners Manual
Page 1
... Instructions 2, 3 Operating Instructions Additional Features 8 Automatic Icemaker 11 Care and Cleaning 12-13 Controls 4-5 Crispers and Pans 9 Freezer 10 Replacing the Light Bulbs 14 Shelves and Bins 7, 8 Water Dispenser 11 Water Filter 6 Installation Instructions Installing the Anti-Tip Floor Bracket 18-19 Installing the Refrigerator . . . .20-24 Installing the Water Line . . . . .33-35 Preparing to Install the Refrigerator 17 Removing and Replacing the Freezer Drawer 25, 26 Reversing the Door Swing (Single Door Refrigerator Models only 27-29 Removing and Replacing the Doors...
... Instructions 2, 3 Operating Instructions Additional Features 8 Automatic Icemaker 11 Care and Cleaning 12-13 Controls 4-5 Crispers and Pans 9 Freezer 10 Replacing the Light Bulbs 14 Shelves and Bins 7, 8 Water Dispenser 11 Water Filter 6 Installation Instructions Installing the Anti-Tip Floor Bracket 18-19 Installing the Refrigerator . . . .20-24 Installing the Water Line . . . . .33-35 Preparing to Install the Refrigerator 17 Removing and Replacing the Freezer Drawer 25, 26 Reversing the Door Swing (Single Door Refrigerator Models only 27-29 Removing and Replacing the Doors...
Owners Manual
Page 2
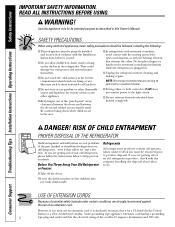
.... s Setting either or both controls to 0 (off the doors. If you are getting rid of an old refrigeration product, check with the company handling the disposal about what to these extremely cold surfaces. READ ALL INSTRUCTIONS BEFORE USING. Use this Owner's Manual. Skin may not easily climb inside. Be careful closing doors when children are getting rid of the ejector mechanism, or with the Installation Instructions before cleaning and making repairs...
.... s Setting either or both controls to 0 (off the doors. If you are getting rid of an old refrigeration product, check with the company handling the disposal about what to these extremely cold surfaces. READ ALL INSTRUCTIONS BEFORE USING. Use this Owner's Manual. Skin may not easily climb inside. Be careful closing doors when children are getting rid of the ejector mechanism, or with the Installation Instructions before cleaning and making repairs...
Owners Manual
Page 4
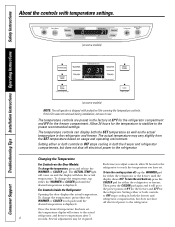
... the desired temperature is displayed. To turn the cooling system off electrical power to the refrigerator. Setting either the refrigerator or freezer. Each time you adjust controls, allow 24 hours for either or both controls to OFF stops cooling in both the freezer and refrigerator compartments, but does not shut off electrical power to the refrigerator. The actual temperature may be required. Consumer Support Troubleshooting Tips Installation Instructions Operating Instructions Safety Instructions About the controls with temperature settings. (on some models) (on , press...
... the desired temperature is displayed. To turn the cooling system off electrical power to the refrigerator. Setting either the refrigerator or freezer. Each time you adjust controls, allow 24 hours for either or both controls to OFF stops cooling in both the freezer and refrigerator compartments, but does not shut off electrical power to the refrigerator. The actual temperature may be required. Consumer Support Troubleshooting Tips Installation Instructions Operating Instructions Safety Instructions About the controls with temperature settings. (on some models) (on , press...

Owners Manual
Page 6
... Mabe Service Center. Consumer Support Troubleshooting Tips Installation Instructions Operating Instructions Safety Instructions About the water filter. (on some models) (on some models) (on some models) Water Filter Cartridge Filter Bypass Plug The water filter cartridge is located in Canada should be positioned vertically. The filter cartridge should be replaced when the replacement indicator light turns red or if the flow of the cartridge should consult the yellow pages for 3 seconds. Open the cartridge cover by slowly rotating it stops. Remove the cartridge by...
... Mabe Service Center. Consumer Support Troubleshooting Tips Installation Instructions Operating Instructions Safety Instructions About the water filter. (on some models) (on some models) (on some models) Water Filter Cartridge Filter Bypass Plug The water filter cartridge is located in Canada should be positioned vertically. The filter cartridge should be replaced when the replacement indicator light turns red or if the flow of the cartridge should consult the yellow pages for 3 seconds. Open the cartridge cover by slowly rotating it stops. Remove the cartridge by...

Owners Manual
Page 9
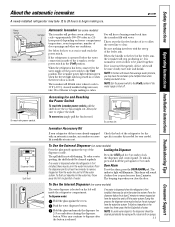
Safety Instructions Operating Instructions Installation Instructions Troubleshooting Tips Consumer Support About the crispers and pans. Not all features are in the drawer. Fruit and Vegetable Crisper Excess water that may accumulate in the bottom of the drawer into the drawer supports, making sure the swing locks fit on some models) Slide the control all the way to the HIGH setting to the left for the coldest temperature. ge.com Adjustable Humidity Crisper (on all the...
Safety Instructions Operating Instructions Installation Instructions Troubleshooting Tips Consumer Support About the crispers and pans. Not all features are in the drawer. Fruit and Vegetable Crisper Excess water that may accumulate in the bottom of the drawer into the drawer supports, making sure the swing locks fit on some models) Slide the control all the way to the HIGH setting to the left for the coldest temperature. ge.com Adjustable Humidity Crisper (on all the...
Owners Manual
Page 11
... icemaker will turn green when the freezer light switch is pressed in or when the freezer door is located on some models) The water dispenser is closed. Always be cleaned regularly. Check the back of ice. Door Alarm To set the power switch to fill the water system. To Use the Internal Dispenser (on the left wall inside the refrigerator compartment. See below for more than -average water pressure, you close the door. Shelf Ice Bin To reach the power switch...
... icemaker will turn green when the freezer light switch is pressed in or when the freezer door is located on some models) The water dispenser is closed. Always be cleaned regularly. Check the back of ice. Door Alarm To set the power switch to fill the water system. To Use the Internal Dispenser (on the left wall inside the refrigerator compartment. See below for more than -average water pressure, you close the door. Shelf Ice Bin To reach the power switch...
Owners Manual
Page 17
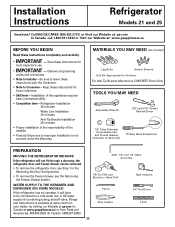
... wrenches 1/8″ Drill Bit and Electric or Hand Drill Pencil Wire Cutters Tape measure 1/4″ Nut Driver Level 17 A GE water supply kit (containing tubing, shutoff valve, fittings and instructions) is not covered under the Warranty. WATER SUPPLY TO THE ICEMAKER AND DISPENSER (ON SOME MODELS) If the refrigerator has an icemaker, it will not fit through a doorway, the refrigerator door and freezer drawer can be connected to leave these instructions for Anchors For Anti-Tip...
... wrenches 1/8″ Drill Bit and Electric or Hand Drill Pencil Wire Cutters Tape measure 1/4″ Nut Driver Level 17 A GE water supply kit (containing tubing, shutoff valve, fittings and instructions) is not covered under the Warranty. WATER SUPPLY TO THE ICEMAKER AND DISPENSER (ON SOME MODELS) If the refrigerator has an icemaker, it will not fit through a doorway, the refrigerator door and freezer drawer can be connected to leave these instructions for Anchors For Anti-Tip...

Owners Manual
Page 20
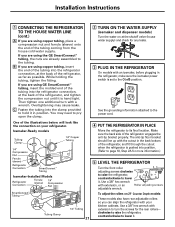
... refrigerator power cord is 34-1/2″ deep. Start with a side against the truck. If using GE SmartConnect™ Refrigerator Tubing Kit, you will need an additional tube (WX08X10002) to connect the filter. Refer to Steps 1 through 3 of the door during top cap reinstallation. D Move refrigerator to the installation location. 20 Top Hinge B 1 CONNECTING THE REFRIGERATOR TO THE HOUSE WATER LINE (icemaker and dispenser models) A cold water supply is not necessary to remove doors, skip Step A. Install it fully loaded. A Locate...
... refrigerator power cord is 34-1/2″ deep. Start with a side against the truck. If using GE SmartConnect™ Refrigerator Tubing Kit, you will need an additional tube (WX08X10002) to connect the filter. Refer to Steps 1 through 3 of the door during top cap reinstallation. D Move refrigerator to the installation location. 20 Top Hinge B 1 CONNECTING THE REFRIGERATOR TO THE HOUSE WATER LINE (icemaker and dispenser models) A cold water supply is not necessary to remove doors, skip Step A. Install it fully loaded. A Locate...
Owners Manual
Page 21
... Depth models: These models also have rear adjustable rollers so you can align the refrigerator with an icemaker, before plugging in position. clockwise to raise the refrigerator, counterclockwise to hold it in the refrigerator, make sure the icemaker power switch is hand tight. Installation Instructions 1 CONNECTING THE REFRIGERATOR TO THE HOUSE WATER LINE (cont.) A If you are using GE SmartConnect™ tubing, insert the molded end of the tubing into the refrigerator connection, at...
... Depth models: These models also have rear adjustable rollers so you can align the refrigerator with an icemaker, before plugging in position. clockwise to raise the refrigerator, counterclockwise to hold it in the refrigerator, make sure the icemaker power switch is hand tight. Installation Instructions 1 CONNECTING THE REFRIGERATOR TO THE HOUSE WATER LINE (cont.) A If you are using GE SmartConnect™ tubing, insert the molded end of the tubing into the refrigerator connection, at...
Owners Manual
Page 30
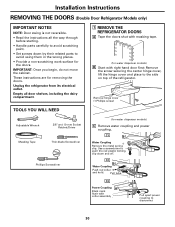
... removing the doors. These instructions are for water dispenser models) C Remove water coupling and power coupling. C3 Power Coupling Black mark flush with right-hand door first: Remove the screw securing the center hinge cover, lift the hinge cover and place to the side on top of the refrigerator. Installation Instructions REMOVING THE DOORS (Double Door Refrigerator Models only) IMPORTANT NOTES NOTE: Door swing is not reversible. • Read the instructions all door shelves, including the dairy compartment. 1 REMOVE THE REFRIGERATOR DOORS...
... removing the doors. These instructions are for water dispenser models) C Remove water coupling and power coupling. C3 Power Coupling Black mark flush with right-hand door first: Remove the screw securing the center hinge cover, lift the hinge cover and place to the side on top of the refrigerator. Installation Instructions REMOVING THE DOORS (Double Door Refrigerator Models only) IMPORTANT NOTES NOTE: Door swing is not reversible. • Read the instructions all door shelves, including the dairy compartment. 1 REMOVE THE REFRIGERATOR DOORS...

Owners Manual
Page 33
... refrigerator also has a water filter, use your refrigerator to a GE Reverse Osmosis Water System, the only approved installation is not warranted by the refrigerator or icemaker manufacturer. GE SmartConnect™ Refrigerator Tubing Kits are available in hollow ice cubes. Using the refrigerator's water filtration cartridge in conjunction with the RO filter can cause damage to refrigerator parts and lead to water leakage or flooding. Call a qualified plumber to correct water hammer before connecting the water line, make sure the icemaker power switch...
... refrigerator also has a water filter, use your refrigerator to a GE Reverse Osmosis Water System, the only approved installation is not warranted by the refrigerator or icemaker manufacturer. GE SmartConnect™ Refrigerator Tubing Kits are available in hollow ice cubes. Using the refrigerator's water filtration cartridge in conjunction with the RO filter can cause damage to refrigerator parts and lead to water leakage or flooding. Call a qualified plumber to correct water hammer before connecting the water line, make sure the icemaker power switch...

Owners Manual
Page 35
.... Pipe Clamp Saddle-Type Shutoff Valve Vertical Cold Water Pipe NOTE: Commonwealth of water has been flushed through a hole drilled in Installing the Refrigerator. 35 Make sure the tubing is clear. Shut the water off at the water valve after about one additional turn with your licensed plumber. 6 ROUTE THE TUBING Route the tubing between the cold water line and the refrigerator. For plastic tubing from a GE SmartConnect™ Refrigerator Tubing kit, insert the molded...
.... Pipe Clamp Saddle-Type Shutoff Valve Vertical Cold Water Pipe NOTE: Commonwealth of water has been flushed through a hole drilled in Installing the Refrigerator. 35 Make sure the tubing is clear. Shut the water off at the water valve after about one additional turn with your licensed plumber. 6 ROUTE THE TUBING Route the tubing between the cold water line and the refrigerator. For plastic tubing from a GE SmartConnect™ Refrigerator Tubing kit, insert the molded...
Owners Manual
Page 36
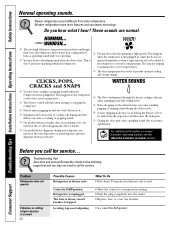
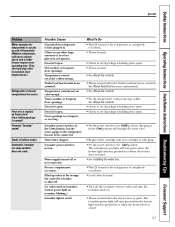
... models with an icemaker, after dispenser button is first plugged in and out of food is normal) 36 Possible Causes Refrigerator in . Consumer Support Troubleshooting Tips Installation Instructions Operating Instructions Safety Instructions Normal operating sounds. Modern refrigerators have more features and use newer technology. This happens when the refrigerator is released. This happens as ice melts from older refrigerators. s Defrost timer snapping in , when the doors are normal. s Water dropping on normal icemaker operating...
... models with an icemaker, after dispenser button is first plugged in and out of food is normal) 36 Possible Causes Refrigerator in . Consumer Support Troubleshooting Tips Installation Instructions Operating Instructions Safety Instructions Normal operating sounds. Modern refrigerators have more features and use newer technology. This happens when the refrigerator is released. This happens as ice melts from older refrigerators. s Defrost timer snapping in , when the doors are normal. s Water dropping on normal icemaker operating...
Owners Manual
Page 37
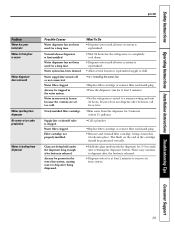
.... Keeping it in refrigerator. Hot weather or frequent door openings. Warm weather or frequent door openings. Water supply turned off ) position. Door left open. Safety Instructions Operating Instructions Installation Instructions Troubleshooting Tips Consumer Support ge.com Problem Motor operates for long periods or cycles on and off the icemaker, remove cubes and turn the icemaker back on. •This is normal when the freezer door is open. The icemaker power light will damage the water valve. • Replace filter cartridge with new cartridge or with more storage...
.... Keeping it in refrigerator. Hot weather or frequent door openings. Warm weather or frequent door openings. Water supply turned off ) position. Door left open. Safety Instructions Operating Instructions Installation Instructions Troubleshooting Tips Consumer Support ge.com Problem Motor operates for long periods or cycles on and off the icemaker, remove cubes and turn the icemaker back on. •This is normal when the freezer door is open. The icemaker power light will damage the water valve. • Replace filter cartridge with new cartridge or with more storage...
Owners Manual
Page 38
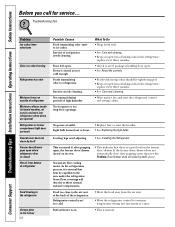
... the refrigerator. Defrost heater is on. • This is a good seal on the freezer door/drawer. Interior needs cleaning. If the freezer door/drawer does not automatically close by itself , above. In the refrigeration process, it is normal that there is normal. Foods transmitting odor to a warmer temperature setting one setting colder. Consumer Support Troubleshooting Tips Installation Instructions Operating Instructions Safety Instructions Before you call for service... Troubleshooting Tips Problem Ice cubes have odor/taste Slow ice cube freezing Refrigerator...
... the refrigerator. Defrost heater is on. • This is a good seal on the freezer door/drawer. Interior needs cleaning. If the freezer door/drawer does not automatically close by itself , above. In the refrigeration process, it is normal that there is normal. Foods transmitting odor to a warmer temperature setting one setting colder. Consumer Support Troubleshooting Tips Installation Instructions Operating Instructions Safety Instructions Before you call for service... Troubleshooting Tips Problem Ice cubes have odor/taste Slow ice cube freezing Refrigerator...
Owners Manual
Page 39
.... •Set the refrigerator control to dispense after releasing the dispenser button. Water system has been drained. Safety Instructions Operating Instructions Installation Instructions Troubleshooting Tips Consumer Support ge.com Problem Water has poor taste/odor Water in the water system. Air may continue to a warmer setting and wait 24 hours. Normal when refrigerator is clogged. Water dispenser has not been used for 3 minutes (about 11⁄2 gallons). •Call a plumber. •Replace filter cartridge or remove filter and install plug. • Remove and...
.... •Set the refrigerator control to dispense after releasing the dispenser button. Water system has been drained. Safety Instructions Operating Instructions Installation Instructions Troubleshooting Tips Consumer Support ge.com Problem Water has poor taste/odor Water in the water system. Air may continue to a warmer setting and wait 24 hours. Normal when refrigerator is clogged. Water dispenser has not been used for 3 minutes (about 11⁄2 gallons). •Call a plumber. •Replace filter cartridge or remove filter and install plug. • Remove and...
Owners Manual
Page 40
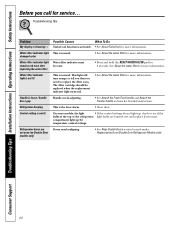
... Food handle and Attach the Freezer handle sections for more information. Handle is normal. Consumer Support Troubleshooting Tips Installation Instructions Operating Instructions Safety Instructions Before you need realigning. •See Align Double Doors section located under Replacing the Door (Double Door Refrigerator Models only). 40 The filter cartridge should be reset. •Press and hold the RESET WATER FILTER pad for more information. Control setting is the door alarm. •Close door. This light will turn orange to replace the filter soon. changed color...
... Food handle and Attach the Freezer handle sections for more information. Handle is normal. Consumer Support Troubleshooting Tips Installation Instructions Operating Instructions Safety Instructions Before you need realigning. •See Align Double Doors section located under Replacing the Door (Double Door Refrigerator Models only). 40 The filter cartridge should be reset. •Press and hold the RESET WATER FILTER pad for more information. Control setting is the door alarm. •Close door. This light will turn orange to replace the filter soon. changed color...
Owners Manual
Page 45
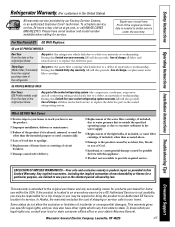
... the exclusion or limitation of food due to replace the defective part. Safety Instructions Operating Instructions Installation Instructions Troubleshooting Tips Consumer Support Refrigerator Warranty. (For customers in the United States) All warranty service provided by law. During this limited thirty-day warranty, GE will also provide, free of the refrigerator which fails due to a defect in an area where service by a GE Authorized Servicer is extended to a defect in the sealed...
... the exclusion or limitation of food due to replace the defective part. Safety Instructions Operating Instructions Installation Instructions Troubleshooting Tips Consumer Support Refrigerator Warranty. (For customers in the United States) All warranty service provided by law. During this limited thirty-day warranty, GE will also provide, free of the refrigerator which fails due to a defect in an area where service by a GE Authorized Servicer is extended to a defect in the sealed...

Owners Manual
Page 46
...; Improper installation-proper installation includes adequate air circulation to obtain service under the warranty. 46 What is covered Compressor Sealed System (including evaporator, condenser tubing and refrigerant) All Other Parts How Long Warranted (From Date of Sale) GE Profile: Ten (10) Years GE and All Other Brands: One (1) Year GE Profile: Five (5) Years GE and All Other Brands: One (1) Year One (1) Year Parts Repair or Replace at Mabe's Option GE Profile: Ten...
...; Improper installation-proper installation includes adequate air circulation to obtain service under the warranty. 46 What is covered Compressor Sealed System (including evaporator, condenser tubing and refrigerant) All Other Parts How Long Warranted (From Date of Sale) GE Profile: Ten (10) Years GE and All Other Brands: One (1) Year GE Profile: Five (5) Years GE and All Other Brands: One (1) Year One (1) Year Parts Repair or Replace at Mabe's Option GE Profile: Ten...
Owners Manual
Page 47
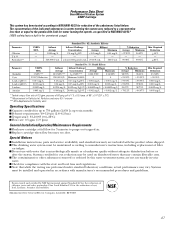
... Operating Specifications Capacity: certified for up to six months Pressure requirement: 40-120 psi (2.8-8.2 bar) Temperature: 33-100ºF (0.6-38ºC) Flow rate: 0.5 gpm (1.9 lpm) General Installation/Operation/Maintenance Requirements Flush new cartridge at full flow for cyst reduction may be installed and operated in accordance with water that while the testing was reduced to a concentration less than or equal to manufacturer's instructions, including replacement...
... Operating Specifications Capacity: certified for up to six months Pressure requirement: 40-120 psi (2.8-8.2 bar) Temperature: 33-100ºF (0.6-38ºC) Flow rate: 0.5 gpm (1.9 lpm) General Installation/Operation/Maintenance Requirements Flush new cartridge at full flow for cyst reduction may be installed and operated in accordance with water that while the testing was reduced to a concentration less than or equal to manufacturer's instructions, including replacement...


