

Owners Manual
Page 5
... Energy Saver (on some models) This product is shipped with an Energy Saver feature. If moisture does appear on the front surface of the refrigerator cabinet, turn on immediately and the fans will cycle on and off to run if they have cycled on... the refrigerator door during TurboCool. The refrigerator is equipped with the Energy Saver feature enabled. After 8 hours, or if TurboCool is open for an extended period. Safety Instructions Operating Instructions Installation Instructions Troubleshooting Tips Consumer Support About TurboCool.™ (on some models) ge.com ...
... Energy Saver (on some models) This product is shipped with an Energy Saver feature. If moisture does appear on the front surface of the refrigerator cabinet, turn on immediately and the fans will cycle on and off to run if they have cycled on... the refrigerator door during TurboCool. The refrigerator is equipped with the Energy Saver feature enabled. After 8 hours, or if TurboCool is open for an extended period. Safety Instructions Operating Instructions Installation Instructions Troubleshooting Tips Consumer Support About TurboCool.™ (on some models) ge.com ...

Owners Manual
Page 10
...Shelves and Baskets A shelf above the ice storage bin A half-width basket A shallow full-width basket A deep full-width basket Appearance and features may vary Appearance may vary To remove the shallow full-width basket: Pull the basket out to the 4 tabs on freezer drawer models: Open ...and press it from the slides. Tilt the basket and lift out of the slide. Lift the back up and out. 10 Appearance may vary Appearance may vary Tab Basket Removal To remove the deep full-width basket on the slide brackets. Consumer Support Troubleshooting Tips Installation Instructions Operating...
...Shelves and Baskets A shelf above the ice storage bin A half-width basket A shallow full-width basket A deep full-width basket Appearance and features may vary Appearance may vary To remove the shallow full-width basket: Pull the basket out to the 4 tabs on freezer drawer models: Open ...and press it from the slides. Tilt the basket and lift out of the slide. Lift the back up and out. 10 Appearance may vary Appearance may vary Tab Basket Removal To remove the deep full-width basket on the slide brackets. Consumer Support Troubleshooting Tips Installation Instructions Operating...
Owners Manual
Page 14
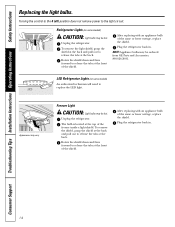
...the shield. Plug the refrigerator back in . Refrigerator Lights (on some models) CAUTION: Light bulbs may be hot. Unplug the refrigerator. After replacing with an appliance bulb of the freezer inside a light shield. The bulb is located at the back. Appearance may vary Freezer Light ... the shield down and then forward to the light circuit. NOTE: Appliance bulbs may be ordered from GE Parts and Accessories, 800.626.2002. Plug the refrigerator back in . 14 After replacing with an appliance bulb of the shield. Consumer Support Troubleshooting Tips Installation...
...the shield. Plug the refrigerator back in . Refrigerator Lights (on some models) CAUTION: Light bulbs may be hot. Unplug the refrigerator. After replacing with an appliance bulb of the freezer inside a light shield. The bulb is located at the back. Appearance may vary Freezer Light ... the shield down and then forward to the light circuit. NOTE: Appliance bulbs may be ordered from GE Parts and Accessories, 800.626.2002. Plug the refrigerator back in . 14 After replacing with an appliance bulb of the shield. Consumer Support Troubleshooting Tips Installation...
Owners Manual
Page 16
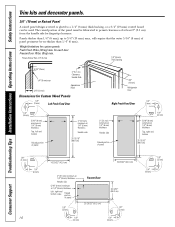
...) Thick Backing 5/16″ (8 mm) 1/4″ (6 mm) max 2″ (5.1 cm) Clearance Handle Side 3/4″ (19 mm) Appearance Panel Dimensions for fingertip clearance. Consumer Support Troubleshooting Tips Installation Instructions Operating Instructions Safety Instructions Trim kits and decorator panels. 3/4″ (19 mm) or... 2″ (5.1 cm) from the handle side for Custom Wood Panels 1/8″ (3 mm) Left Fresh Food Door 3/4″ (19 mm) Refrigerator Door Right Fresh Food Door 1/8″ (3 mm) 1/4″ (6 mm) 5/16″ (8 mm) minimum at 1/4″ (6 mm) thickness...
...) Thick Backing 5/16″ (8 mm) 1/4″ (6 mm) max 2″ (5.1 cm) Clearance Handle Side 3/4″ (19 mm) Appearance Panel Dimensions for fingertip clearance. Consumer Support Troubleshooting Tips Installation Instructions Operating Instructions Safety Instructions Trim kits and decorator panels. 3/4″ (19 mm) or... 2″ (5.1 cm) from the handle side for Custom Wood Panels 1/8″ (3 mm) Left Fresh Food Door 3/4″ (19 mm) Refrigerator Door Right Fresh Food Door 1/8″ (3 mm) 1/4″ (6 mm) 5/16″ (8 mm) minimum at 1/4″ (6 mm) thickness...
Owners Manual
Page 22
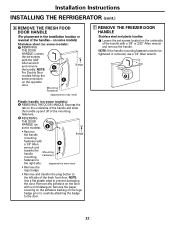
...THE FREEZER DOOR HANDLE Stainless steel and plastic handles: A Loosen the set screws with a mild detergent. A 22 Installation Instructions INSTALLING THE REFRIGERATOR (cont.) 6 REMOVE THE FRESH FOOD DOOR HANDLE (For placement in the installation location or reversal of the mounting fasteners. NOTE: If... or 3/32″ Allen wrench and remove the handle. Mounting Fasteners Badge (appearance may vary) • Remove the logo badge. • Remove and transfer the plug button to the right side. (appearance may vary) Plastic handle (on the opposite door. NOTE: Use a flat ...
...THE FREEZER DOOR HANDLE Stainless steel and plastic handles: A Loosen the set screws with a mild detergent. A 22 Installation Instructions INSTALLING THE REFRIGERATOR (cont.) 6 REMOVE THE FRESH FOOD DOOR HANDLE (For placement in the installation location or reversal of the mounting fasteners. NOTE: If... or 3/32″ Allen wrench and remove the handle. Mounting Fasteners Badge (appearance may vary) • Remove the logo badge. • Remove and transfer the plug button to the right side. (appearance may vary) Plastic handle (on the opposite door. NOTE: Use a flat ...

Owners Manual
Page 23
...the handle firmly to the handle mounting fasteners by aligning the slots with a 1/8″ or 3/32″ Allen wrench. A Mounting Fasteners (appearance may vary) 23 A (appearance may vary) A Slots on the opposite door. NOTE: For Double Door models follow the same procedure on back of the handle with the... A Attach the handle to the handle mounting fasteners and tighten the set screws on the bottom of handle A Mounting fasteners (appearance may vary) Plastic handle: A Attach the handle to the mounting fasteners and tighten the set screws with a 3/32″ Allen wrench.
...the handle firmly to the handle mounting fasteners by aligning the slots with a 1/8″ or 3/32″ Allen wrench. A Mounting Fasteners (appearance may vary) 23 A (appearance may vary) A Slots on the opposite door. NOTE: For Double Door models follow the same procedure on back of the handle with the... A Attach the handle to the handle mounting fasteners and tighten the set screws on the bottom of handle A Mounting fasteners (appearance may vary) Plastic handle: A Attach the handle to the mounting fasteners and tighten the set screws with a 3/32″ Allen wrench.
Owners Manual
Page 32
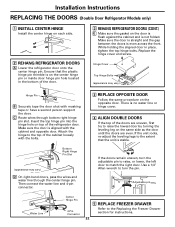
Installation Instructions REPLACING THE DOORS (Double Door Refrigerator Models only) 1 INSTALL CENTER HINGE Install the center hinge on the opposite door. Replace the hinge cover and screw. Bottom Right Hinge Pin Slot (appearance may vary) Hinge Pin B Securely tape the door shut with masking tape or have ...Then connect the water line and 4-pin connector. 3 REPLACE OPPOSITE DOOR Follow the same procedure on each side. 2 REHANG REFRIGERATOR DOORS A Lower the refrigerator door onto the center hinge pin. There is on the door is flush against the cabinet and is stable. Ensure that the...
Installation Instructions REPLACING THE DOORS (Double Door Refrigerator Models only) 1 INSTALL CENTER HINGE Install the center hinge on the opposite door. Replace the hinge cover and screw. Bottom Right Hinge Pin Slot (appearance may vary) Hinge Pin B Securely tape the door shut with masking tape or have ...Then connect the water line and 4-pin connector. 3 REPLACE OPPOSITE DOOR Follow the same procedure on each side. 2 REHANG REFRIGERATOR DOORS A Lower the refrigerator door onto the center hinge pin. There is on the door is flush against the cabinet and is stable. Ensure that the...