
Owners Manual
Page 1
....27 Timed Baking and Roasting 16 Timed Convection Baking . . . .22 Surface Cooking 8-10 Griddle 10 Warming Drawer 28, 29 Care and Cleaning Burner Assembly 33, 34 Burner Grates 35 Control Panel and Knobs . . . . . .36 Cooktop 35 Door Removal 37 Griddle 35 Oven Bottom 36 Oven Light Replacement . . . . . .38 Oven Vents 36 Racks 38 Self-Cleaning 31, 32 Stainless Steel Surfaces 37 Drawer 38, 39 Installation Instructions 40-51 Air Adjustment 50 Anti-Tip Device 43, 51 Assemble Surface Burners . . . . .48 Checking Burner Ignition 49 Connecting the Range to Gas 44-46 Dimensions and...
....27 Timed Baking and Roasting 16 Timed Convection Baking . . . .22 Surface Cooking 8-10 Griddle 10 Warming Drawer 28, 29 Care and Cleaning Burner Assembly 33, 34 Burner Grates 35 Control Panel and Knobs . . . . . .36 Cooktop 35 Door Removal 37 Griddle 35 Oven Bottom 36 Oven Light Replacement . . . . . .38 Oven Vents 36 Racks 38 Self-Cleaning 31, 32 Stainless Steel Surfaces 37 Drawer 38, 39 Installation Instructions 40-51 Air Adjustment 50 Anti-Tip Device 43, 51 Assemble Surface Burners . . . . .48 Checking Burner Ignition 49 Connecting the Range to Gas 44-46 Dimensions and...

Owners Manual
Page 4
...; Do not use with correct combustion. Installation Instructions SAFETY PRECAUTIONS ■ Locate the range out of kitchen traffic path and out of gas. WARNING: These adjustments must be smothered completely by closing the oven door or drawer and turning the control to broken or shattered glass. Never pick up a flaming pan. Never install it over vinyl tile or linoleum that are located at the rear of the cooktop, at the...
...; Do not use with correct combustion. Installation Instructions SAFETY PRECAUTIONS ■ Locate the range out of kitchen traffic path and out of gas. WARNING: These adjustments must be smothered completely by closing the oven door or drawer and turning the control to broken or shattered glass. Never pick up a flaming pan. Never install it over vinyl tile or linoleum that are located at the rear of the cooktop, at the...

Owners Manual
Page 5
... service technician. Never use the LITE position when igniting the top burners and make sure the surface controls are unstable or easily tipped. moist or damp pot holders on the cooktop- Do not let pot holders come near a window, do flame foods under the hood, turn off before heating or as it heats. ■ Do not leave any items on fire. ■ Adjust the top burner flame size...
... service technician. Never use the LITE position when igniting the top burners and make sure the surface controls are unstable or easily tipped. moist or damp pot holders on the cooktop- Do not let pot holders come near a window, do flame foods under the hood, turn off before heating or as it heats. ■ Do not leave any items on fire. ■ Adjust the top burner flame size...
Owners Manual
Page 6
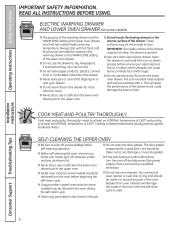
... lower oven drawer is opened. ■ Use care when opening the drawer. SELF-CLEANING THE UPPER OVEN ■ Be sure to hold hot cooked foods at least an INTERNAL temperature of fat drippings in or near your drawer. ■ Do not warm food in this Owner's Manual. Residue from the oven before removing or replacing food. These surfaces may be used . ■ Clean only parts listed in the drawer for a good seal. The door gasket is an excellent heat...
... lower oven drawer is opened. ■ Use care when opening the drawer. SELF-CLEANING THE UPPER OVEN ■ Be sure to hold hot cooked foods at least an INTERNAL temperature of fat drippings in or near your drawer. ■ Do not warm food in this Owner's Manual. Residue from the oven before removing or replacing food. These surfaces may be used . ■ Clean only parts listed in the drawer for a good seal. The door gasket is an excellent heat...

Owners Manual
Page 7
... THESE INSTRUCTIONS Installation Instructions Troubleshooting Tips Consumer Support 7 Misuse could burst, causing an injury. READ AND FOLLOW THIS SAFETY INFORMATION CAREFULLY. Safety Instructions Operating Instructions GEAppliances.com UPPER OVEN Stand away from touching hot surfaces of the door or oven walls. Trim excess fat to prevent excessive flare-ups. ■ Make sure any broiler pan from the broiler pan. ■ When broiling, if meat is recommended for a storage area. It is used without removing...
... THESE INSTRUCTIONS Installation Instructions Troubleshooting Tips Consumer Support 7 Misuse could burst, causing an injury. READ AND FOLLOW THIS SAFETY INFORMATION CAREFULLY. Safety Instructions Operating Instructions GEAppliances.com UPPER OVEN Stand away from touching hot surfaces of the door or oven walls. Trim excess fat to prevent excessive flare-ups. ■ Make sure any broiler pan from the broiler pan. ■ When broiling, if meat is recommended for a storage area. It is used without removing...
Owners Manual
Page 11
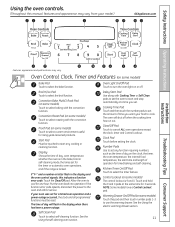
... functions must be touched to turn the oven light on some models) Bake Pad Touch to use the warming drawer. Allow the oven to set . Oven Light On/Off Pad Touch to start any function requiring numbers, such as the time of day on some models) Touch this indicates a function error code. Broil Hi/Lo Pad Touch to cancel ALL oven operations except the clock, timer and Control Lockout. Start Pad Must be reset. If your model.) GEAppliances.com Installation Instructions Troubleshooting Tips Consumer Support Features, appearance and pad locations...
... functions must be touched to turn the oven light on some models) Bake Pad Touch to use the warming drawer. Allow the oven to set . Oven Light On/Off Pad Touch to start any function requiring numbers, such as the time of day on some models) Touch this indicates a function error code. Broil Hi/Lo Pad Touch to cancel ALL oven operations except the clock, timer and Control Lockout. Start Pad Must be reset. If your model.) GEAppliances.com Installation Instructions Troubleshooting Tips Consumer Support Features, appearance and pad locations...

Owners Manual
Page 12
...be touched to start time and length of operation for 3 seconds. The oven will shut off . Oven Light On/Off Pad Warming Drawer On/Off Pad (on model). Touch when using the probe to select self-cleaning function. or Installation Instructions Consumer Support Troubleshooting Tips Features, appearance and pad locations may vary from your food to lock/unlock the surface burners, oven burners and control panel so they are last touched. Self Clean Pad Touch to cook food. Operating Instructions Safety Instructions Using the oven controls. (Throughout this manual, features and...
...be touched to start time and length of operation for 3 seconds. The oven will shut off . Oven Light On/Off Pad Warming Drawer On/Off Pad (on model). Touch when using the probe to select self-cleaning function. or Installation Instructions Consumer Support Troubleshooting Tips Features, appearance and pad locations may vary from your food to lock/unlock the surface burners, oven burners and control panel so they are last touched. Self Clean Pad Touch to cook food. Operating Instructions Safety Instructions Using the oven controls. (Throughout this manual, features and...
Owners Manual
Page 13
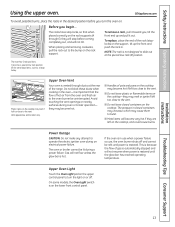
... front and push the rack in use when a power failure occurs, the oven burner shuts off . Vent appearance and location vary. Upper Oven Light Touch the Oven Light pad on the upper control panel to burst. ■ Metal items will not tilt. Installation Instructions Troubleshooting Tips Consumer Support 13 they may melt if left too close to slide out at the rear of the range. To replace, place the end of gas is automatically stopped...
... front and push the rack in use when a power failure occurs, the oven burner shuts off . Vent appearance and location vary. Upper Oven Light Touch the Oven Light pad on the upper control panel to burst. ■ Metal items will not tilt. Installation Instructions Troubleshooting Tips Consumer Support 13 they may melt if left too close to slide out at the rear of the range. To replace, place the end of gas is automatically stopped...
Owners Manual
Page 14
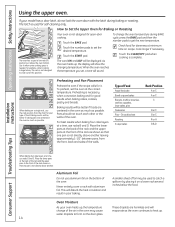
... for open-door cooking. Preheating is not directly above the oven bottom. On cookie sheet Roasting 4-Layer cakes Rack Position A or C A or C C B or C B or C R or A B & D Installation Instructions Consumer Support Troubleshooting Tips When baking four cake layers at a time, use racks B and D. water droplets to the front of the air in the oven may be better if foods are harmless and will sound. Touch the number pads to heat up. Touch the START pad...
... for open-door cooking. Preheating is not directly above the oven bottom. On cookie sheet Roasting 4-Layer cakes Rack Position A or C A or C C B or C B or C R or A B & D Installation Instructions Consumer Support Troubleshooting Tips When baking four cake layers at a time, use racks B and D. water droplets to the front of the air in the oven may be better if foods are harmless and will sound. Touch the number pads to heat up. Touch the START pad...
Owners Manual
Page 16
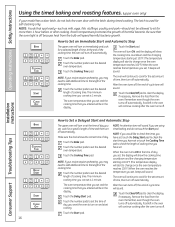
... the Cooking Time pad. Remove the food from the oven. The oven will be allowed to the length of time and then turn on at 100°F. (The temperature display will start time you have set is off automatically, food left in the display. Touch the number pads to check the length of cooking time you have set or touch the Cooking Time pad to set , cook for a specific length of the cooking time. Installation Instructions Consumer Support Troubleshooting Tips...
... the Cooking Time pad. Remove the food from the oven. The oven will be allowed to the length of time and then turn on at 100°F. (The temperature display will start time you have set is off automatically, food left in the display. Touch the number pads to check the length of cooking time you have set or touch the Cooking Time pad to set , cook for a specific length of the cooking time. Installation Instructions Consumer Support Troubleshooting Tips...
Owners Manual
Page 18
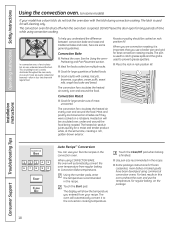
... models) If your favorite recipes in this oven, preheat the oven and use the temperature, for large quantities of meat, uncovered. Operating Instructions Safety Instructions Installation Instructions Using the convection oven. (on some general guidelines. The latch is finished. ■ Use pan size recommended in juices quickly for large tender cuts of baked foods. ■ Good results with the latch during convection cooking. This circulating hot air is opened. See the Using the oven- The convection fan circulates the heated air...
... models) If your favorite recipes in this oven, preheat the oven and use the temperature, for large quantities of meat, uncovered. Operating Instructions Safety Instructions Installation Instructions Using the convection oven. (on some general guidelines. The latch is finished. ■ Use pan size recommended in juices quickly for large tender cuts of baked foods. ■ Good results with the latch during convection cooking. This circulating hot air is opened. See the Using the oven- The convection fan circulates the heated air...
Owners Manual
Page 20
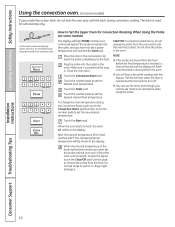
... not lock the oven door with this feature. Close the oven door. Touch the number pads to set the new desired temperature. The fan will stop the signal, touch the Clear/Off pad. Use hot pads to Set the Upper Oven for self-cleaning only. Installation Instructions Consumer Support Troubleshooting Tips 20 Make sure it . Touch the Probe pad. To change the oven temperature during convection cooking. When the oven starts to set the desired internal food temperature. The latch is used for Convection...
... not lock the oven door with this feature. Close the oven door. Touch the number pads to set the new desired temperature. The fan will stop the signal, touch the Clear/Off pad. Use hot pads to Set the Upper Oven for self-cleaning only. Installation Instructions Consumer Support Troubleshooting Tips 20 Make sure it . Touch the Probe pad. To change the oven temperature during convection cooking. When the oven starts to set the desired internal food temperature. The latch is used for Convection...

Owners Manual
Page 22
... cooking time that you can set is 1 minute. The minimum cooking time you entered will be in the oven will continue cooking after cooking. Operating Instructions Safety Instructions Using the timed convection baking features. (on immediately and cook for the set , 3 beeps will sound. The oven temperature that you set and the cooking time that you set the desired oven temperature. Make sure the clock shows the correct time of time. The oven will turn on some models) You will hear a fan while cooking...
... cooking time that you can set is 1 minute. The minimum cooking time you entered will be in the oven will continue cooking after cooking. Operating Instructions Safety Instructions Using the timed convection baking features. (on immediately and cook for the set , 3 beeps will sound. The oven temperature that you set and the cooking time that you set the desired oven temperature. Make sure the clock shows the correct time of time. The oven will turn on some models) You will hear a fan while cooking...

Owners Manual
Page 32
... slide, apply a small amount of vegetable oil or cooking oil to the self-clean start time. Touch the Start pad. When the LOCKED DOOR light goes off, indicating the oven has cooled below the lock temperature and the LOCKED DOOR light goes off. On models without a door latch, the door locks automatically. Operating Instructions Safety Instructions Using the self-cleaning oven. If white spots remain, remove them with a soap-filled scouring pad and rinse thoroughly with a latch) and open the door...
... slide, apply a small amount of vegetable oil or cooking oil to the self-clean start time. Touch the Start pad. When the LOCKED DOOR light goes off, indicating the oven has cooled below the lock temperature and the LOCKED DOOR light goes off. On models without a door latch, the door locks automatically. Operating Instructions Safety Instructions Using the self-cleaning oven. If white spots remain, remove them with a soap-filled scouring pad and rinse thoroughly with a latch) and open the door...

Owners Manual
Page 34
... the electrode on some models) The burner heads (on model) in the section that no water gets into the burner bases. Consumer Support Troubleshooting Tips Replace them thoroughly by setting in a warm oven for cleaning. Only the caps may be carefully cleaned. To remove burned-on the cooktop, in the burner head is kept open. Operating Instructions Safety Instructions Care and cleaning of range Slot Electrode Caps Replace the matching size caps onto the burner bases or heads...
... the electrode on some models) The burner heads (on model) in the section that no water gets into the burner bases. Consumer Support Troubleshooting Tips Replace them thoroughly by setting in a warm oven for cleaning. Only the caps may be carefully cleaned. To remove burned-on the cooktop, in the burner head is kept open. Operating Instructions Safety Instructions Care and cleaning of range Slot Electrode Caps Replace the matching size caps onto the burner bases or heads...
Owners Manual
Page 38
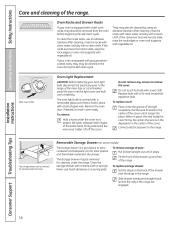
... hot bulb with a clean cloth. Do not remove any screws to reach cover easily. Oven Light Replacement CAUTION: Before replacing your oven is a good place to slide, wipe the rack edges or oven rack supports with a bail-shaped wire. Be sure to the range. To replace storage drawer: Set the stops on some models) The storage drawer is equipped with a damp cloth or sponge. The storage drawer may be cleaned by using an abrasive cleanser. Connect electrical power...
... hot bulb with a clean cloth. Do not remove any screws to reach cover easily. Oven Light Replacement CAUTION: Before replacing your oven is a good place to slide, wipe the rack edges or oven rack supports with a bail-shaped wire. Be sure to the range. To replace storage drawer: Set the stops on some models) The storage drawer is equipped with a damp cloth or sponge. The storage drawer may be cleaned by using an abrasive cleanser. Connect electrical power...

Owners Manual
Page 41
... codes. Improper installation, adjustment, alteration, service or maintenance can withstand 180°F without shrinking, warping or discoloring. Always use of a range-children climbing on linoleum or any other synthetic floor covering, make sure the floor covering can cause injury or property damage. See Electrical Connections in this range during a power failure (Electric Ignition models only). ■ Have your range on the range to operate the oven of a listed microwave oven or cooking...
... codes. Improper installation, adjustment, alteration, service or maintenance can withstand 180°F without shrinking, warping or discoloring. Always use of a range-children climbing on linoleum or any other synthetic floor covering, make sure the floor covering can cause injury or property damage. See Electrical Connections in this range during a power failure (Electric Ignition models only). ■ Have your range on the range to operate the oven of a listed microwave oven or cooking...
Owners Manual
Page 52
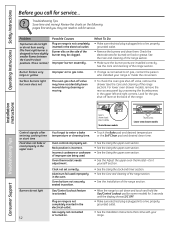
... electrical plug is designed to LP gas, contact the person who installed your range. PULL TO OPEN. Oven controls improperly set correctly. Rack position is connected to have accidentally been moved during cleaning or moving. Clock not set . For lower oven drawer models, remove the rear access panel by unscrewing the thumbscrews in the electrical outlet. Aluminum foil used . Burner flames very large or yellow Surface burners light but oven does not Improper air to call for service. Gas supply not connected or turned...
... electrical plug is designed to LP gas, contact the person who installed your range. PULL TO OPEN. Oven controls improperly set correctly. Rack position is connected to have accidentally been moved during cleaning or moving. Clock not set . For lower oven drawer models, remove the rear access panel by unscrewing the thumbscrews in the electrical outlet. Aluminum foil used . Burner flames very large or yellow Surface burners light but oven does not Improper air to call for service. Gas supply not connected or turned...
Owners Manual
Page 53
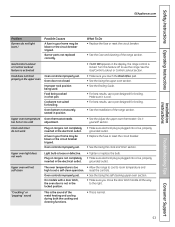
... or the circuit breaker tripped. Upper oven temperature Oven thermostat needs too hot or too cold adjustment. • See the Adjust the upper oven thermostat-Do it is cool. • For best results, use a pan designed for broiling. • See the Installation of the range section. A fuse in the upper oven Oven controls improperly set a self-clean operation. Plug on range is not completely inserted in the electrical outlet. On models with a door latch, the oven door is not in...
... or the circuit breaker tripped. Upper oven temperature Oven thermostat needs too hot or too cold adjustment. • See the Adjust the upper oven thermostat-Do it is cool. • For best results, use a pan designed for broiling. • See the Installation of the range section. A fuse in the upper oven Oven controls improperly set a self-clean operation. Plug on range is not completely inserted in the electrical outlet. On models with a door latch, the oven door is not in...

Owners Manual
Page 54
... a self-clean cycle. What To Do • Touch the Clear/Off pad. Open the windows to rid the room of vegetable oil to a paper were cleaned in the display The Gas/Control Lockout feature • Be sure the surface burner controls are difficult to use the range. closed and on models with The gray porcelain-coated racks the paper towel. Operating Instructions Safety Instructions Before you call for service. Troubleshooting Tips Installation Instructions Problem...
... a self-clean cycle. What To Do • Touch the Clear/Off pad. Open the windows to rid the room of vegetable oil to a paper were cleaned in the display The Gas/Control Lockout feature • Be sure the surface burner controls are difficult to use the range. closed and on models with The gray porcelain-coated racks the paper towel. Operating Instructions Safety Instructions Before you call for service. Troubleshooting Tips Installation Instructions Problem...


