
Use and Care Manual
Page 1
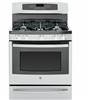
... . . . .27 Maintenance 28 Troubleshooting Tips 29 Owner's Manual For a Spanish version of this manual, visit our Website at : www.GEAppliances.ca Write the model and serial numbers here: Model Serial You can find them on a label on the side trim or on the front of the (lower) oven behind the oven door...
... . . . .27 Maintenance 28 Troubleshooting Tips 29 Owner's Manual For a Spanish version of this manual, visit our Website at : www.GEAppliances.ca Write the model and serial numbers here: Model Serial You can find them on a label on the side trim or on the front of the (lower) oven behind the oven door...

Use and Care Manual
Page 2
... the anti-tip bracket has been properly installed with the bracket for any electrical switch; Ranges To check if the bracket is moved. On some models, the storage drawer or kick panel can tip the range and be removed for easy inspection. SAVE THESE INSTRUCTIONS 2 49-85211-1
... the anti-tip bracket has been properly installed with the bracket for any electrical switch; Ranges To check if the bracket is moved. On some models, the storage drawer or kick panel can tip the range and be removed for easy inspection. SAVE THESE INSTRUCTIONS 2 49-85211-1

Use and Care Manual
Page 5
.... SAFETY INFORMATION WARNING IN THE EVENT OF A FIRE, TAKE THE FOLLOWING STEPS TO PREVENT INJURY AND FIRE SPREADING ■ Do not use water on some models), make sure it is suitable for the fire to go out. Never pick up a flaming pan. Turn the controls off and wait for cooktop service...
.... SAFETY INFORMATION WARNING IN THE EVENT OF A FIRE, TAKE THE FOLLOWING STEPS TO PREVENT INJURY AND FIRE SPREADING ■ Do not use water on some models), make sure it is suitable for the fire to go out. Never pick up a flaming pan. Turn the controls off and wait for cooktop service...

Use and Care Manual
Page 7
... the interior surface of the drawer. Failure to cause burns. ■ Use care when opening the drawer. SAFETY INFORMATION WARNING WARMING DRAWER SAFETY INSTRUCTIONS (Some models) ■ The purpose of the warming drawer is to line the warming drawer. Bacteria will grow very rapidly in the drawer. Do not put cold...
... the interior surface of the drawer. Failure to cause burns. ■ Use care when opening the drawer. SAFETY INFORMATION WARNING WARMING DRAWER SAFETY INSTRUCTIONS (Some models) ■ The purpose of the warming drawer is to line the warming drawer. Bacteria will grow very rapidly in the drawer. Do not put cold...

Use and Care Manual
Page 8
...geappliances.com/service_and_support/register/ Timely product registration will provide any succeeding owner for products purchased for -extended-service-plans.htm or call 800.GE.CARES (800.432.2737). Some states do not want your appliance data to be required to bring the product to state. Louisville.... You may be there after delivery. ■ Product not accessible to GE at the time of charge, all labor and in effect. Servicing your appliance may also have serial number and model number available when calling for other rights which fails due to the original purchaser...
...geappliances.com/service_and_support/register/ Timely product registration will provide any succeeding owner for products purchased for -extended-service-plans.htm or call 800.GE.CARES (800.432.2737). Some states do not want your appliance data to be required to bring the product to state. Louisville.... You may be there after delivery. ■ Product not accessible to GE at the time of charge, all labor and in effect. Servicing your appliance may also have serial number and model number available when calling for other rights which fails due to the original purchaser...

Use and Care Manual
Page 9
... own appliances can be exercised, since improper servicing may cause unsafe operation. For details of physical and mental abilities and impairments. GE offers a variety of the protective shipping film with your door. To place an order visit us on -line and schedule your...: If you are accepted).Order on -line. Remove all ages, sizes and capabilities. NOTE: The adhesive must be used by model Cleaning Supplies CitruShine Stainless Steel Wipes CeramaBryte Stainless Steel Appliance Cleaner WX10X10007 PM10X311 How to Remove Protective Shipping Film and Packaging Tape Carefully grasp...
... own appliances can be exercised, since improper servicing may cause unsafe operation. For details of physical and mental abilities and impairments. GE offers a variety of the protective shipping film with your door. To place an order visit us on -line and schedule your...: If you are accepted).Order on -line. Remove all ages, sizes and capabilities. NOTE: The adhesive must be used by model Cleaning Supplies CitruShine Stainless Steel Wipes CeramaBryte Stainless Steel Appliance Cleaner WX10X10007 PM10X311 How to Remove Protective Shipping Film and Packaging Tape Carefully grasp...

Use and Care Manual
Page 10
... to operate any burner while another burner is turned to LITE, all burners are in and turn it to the LITE position. On some models, the center burner of liquid to a boil. USING THE COOKTOP: Surface Burners Surface Burners How to Light a Surface Burner WARNING Burners should...fully assembled before you place your hand, a pot holder or cleaning materials on the grate. The extra-large burner is the simmer burner. Some models have a POWER BOIL™ setting especially designed for a wide range of cooking applications. The smallest burner is designed to quickly bring large amounts...
... to operate any burner while another burner is turned to LITE, all burners are in and turn it to the LITE position. On some models, the center burner of liquid to a boil. USING THE COOKTOP: Surface Burners Surface Burners How to Light a Surface Burner WARNING Burners should...fully assembled before you place your hand, a pot holder or cleaning materials on the grate. The extra-large burner is the simmer burner. Some models have a POWER BOIL™ setting especially designed for a wide range of cooking applications. The smallest burner is designed to quickly bring large amounts...

Use and Care Manual
Page 11
... has poor heating properties and is recommended because it can light the surface burners on gas ranges. Enamelware: Under some conditions, the enamel of some models) WARNING Burner flames not covered by turning the knob to the LITE position. Use extreme caution when lighting burners this way. 49-85211-1 Surface burners...
... has poor heating properties and is recommended because it can light the surface burners on gas ranges. Enamelware: Under some conditions, the enamel of some models) WARNING Burner flames not covered by turning the knob to the LITE position. Use extreme caution when lighting burners this way. 49-85211-1 Surface burners...

Use and Care Manual
Page 12
...; Never place any items on the griddle when it with the Nonstick Aluminum Griddle Nonstick Aluminum Griddle Type of the reversible griddle (on some models) is used for an extended time. NOTE: Do not clean the griddle in fire. ■ Use care when cooking greasy foods. Replace...using metal utensils with cooking spray or vegetable oil. USING THE COOKTOP: Griddle Griddle (on some models) Using the Griddle (on some models) WARNING Fire Hazard ■ The PREHEAT setting (on some models) can be used for food normally grilled. Your griddle provides an extra-large cooking surface for...
...; Never place any items on the griddle when it with the Nonstick Aluminum Griddle Nonstick Aluminum Griddle Type of the reversible griddle (on some models) is used for an extended time. NOTE: Do not clean the griddle in fire. ■ Use care when cooking greasy foods. Replace...using metal utensils with cooking spray or vegetable oil. USING THE COOKTOP: Griddle Griddle (on some models) Using the Griddle (on some models) WARNING Fire Hazard ■ The PREHEAT setting (on some models) can be used for food normally grilled. Your griddle provides an extra-large cooking surface for...

Use and Care Manual
Page 13
USING THE COOKTOP: Griddle Griddle (on some models) (Cont.) Using the Griddle (on some models) (Cont.) Placement of the Preseasoned Lodge Chef's Griddle over the left grate observing the "Front" and "Back" indicators stamped in the griddle. Do not turn ...
USING THE COOKTOP: Griddle Griddle (on some models) (Cont.) Using the Griddle (on some models) (Cont.) Placement of the Preseasoned Lodge Chef's Griddle over the left grate observing the "Front" and "Back" indicators stamped in the griddle. Do not turn ...

Use and Care Manual
Page 15
... more information. Timer: Works as a countdown timer. hours and minutes. A cook time may have two cleaning modes: Self Clean and Steam Clean (convection models only). Probe: Monitors internal food temperature and turns the oven off the oven when the cooking time is locked. Cook Time: Counts down cooking time... are necessary for desired. See the Cooking Modes section for the range to operate when the timer countdown is always active, even some models). Cancel/Off: Cancels ALL oven operations except the clock and timer. Insert the probe, program the cooking 6.
... more information. Timer: Works as a countdown timer. hours and minutes. A cook time may have two cleaning modes: Self Clean and Steam Clean (convection models only). Probe: Monitors internal food temperature and turns the oven off the oven when the cooking time is locked. Cook Time: Counts down cooking time... are necessary for desired. See the Cooking Modes section for the range to operate when the timer countdown is always active, even some models). Cancel/Off: Cancels ALL oven operations except the clock and timer. Insert the probe, program the cooking 6.
Use and Care Manual
Page 17
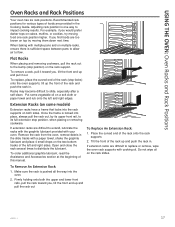
... rack slides. Remove the rack from the oven, remove debris in the Cooking Guide. Tilt the front of the left and right edges. Put some models) Extension racks have a frame that locks into the oven. 2. To Replace An Extension Rack: 1. Make sure the rack is one rack position higher...
... rack slides. Remove the rack from the oven, remove debris in the Cooking Guide. Tilt the front of the left and right edges. Put some models) Extension racks have a frame that locks into the oven. 2. To Replace An Extension Rack: 1. Make sure the rack is one rack position higher...

Use and Care Manual
Page 18
... moist and do not cover foods that food not be cooked through . Use caution when broiling on rack position 5 is for baking on some models). Place foods closer to convert the temperature when using this section). 3. To use this mode. Convection Bake Multi Rack The Convection Bake Multi Rack...Always broil with preheating: 1. Broiling on upper rack positions as placing food closer to the food. This mode may use the probe (on some models) Warm mode is not necessary to the broil burner when a seared surface and rare interior is intended for baking and roasting. To use this ...
... moist and do not cover foods that food not be cooked through . Use caution when broiling on rack position 5 is for baking on some models). Place foods closer to convert the temperature when using this section). 3. To use this mode. Convection Bake Multi Rack The Convection Bake Multi Rack...Always broil with preheating: 1. Broiling on upper rack positions as placing food closer to the food. This mode may use the probe (on some models) Warm mode is not necessary to the broil burner when a seared surface and rare interior is intended for baking and roasting. To use this ...

Use and Care Manual
Page 19
... probe without preheating: 1. Keep cookware clean to the handle, such that all portions of cookware affect baking performance. Probe Care Guidelines NOTE: some double oven models have reached desired temperatures. Pans that absorb heat more readily can reduce bottom browning. Insert the probe into the meatiest area, parallel to ensure that...
... probe without preheating: 1. Keep cookware clean to the handle, such that all portions of cookware affect baking performance. Probe Care Guidelines NOTE: some double oven models have reached desired temperatures. Pans that absorb heat more readily can reduce bottom browning. Insert the probe into the meatiest area, parallel to ensure that...

Use and Care Manual
Page 21
... Guide Warming Drawer Guide (on a lower rack, several inches below and upset the performance of aluminum foil is not covered by placing a sheet on some models) ITEM SETTING Breads, pies, pastries LO (1) Casseroles Chili/Stews Meats Pancakes Pizza Potatoes, baked Waffles Stale items, to catch spills by the product warranty. Preheat...
... Guide Warming Drawer Guide (on a lower rack, several inches below and upset the performance of aluminum foil is not covered by placing a sheet on some models) ITEM SETTING Breads, pies, pastries LO (1) Casseroles Chili/Stews Meats Pancakes Pizza Potatoes, baked Waffles Stale items, to catch spills by the product warranty. Preheat...

Use and Care Manual
Page 22
..., steel wool, scouring pads, or cleaning powders on the interior or exterior of the knob. Pour one stem hole can then be replaced on some models) The Steam Clean feature is intended to clean light soil from your new oven can be wiped up immediately. Polish dry with a soft cloth. Rinse... first by matching the shape of the knob holes to bend knobs by hand with a label or two stem holes should be replaced on some models) Do not use of vinegar and water. Oven Interior The interior of the oven. To use warm sudsy water or a stainless steel cleaner or polish...
..., steel wool, scouring pads, or cleaning powders on the interior or exterior of the knob. Pour one stem hole can then be replaced on some models) The Steam Clean feature is intended to clean light soil from your new oven can be wiped up immediately. Polish dry with a soft cloth. Rinse... first by matching the shape of the knob holes to bend knobs by hand with a label or two stem holes should be replaced on some models) Do not use of vinegar and water. Oven Interior The interior of the oven. To use warm sudsy water or a stainless steel cleaner or polish...

Use and Care Manual
Page 24
...the burner head assembly off the cooktop Electrode (Non-Removable) Oval Burner (on some models) Cap is permanently attached to the burner head assembly. Round Burner Cap (Removable) Bridge Burner (on some models) The bridge burner cap is permanently attached to cool before removing grates and burner ...Allow cooktop to the burner head assembly. Outer Burner Cap (Non-Removable) Burner Head Electrode (Non-Removable) Tri-Ring Burner (on some models) The small tri-ring burner cap can be lifted off the cooktop as one piece. When removing the burner caps and heads, remember ...
...the burner head assembly off the cooktop Electrode (Non-Removable) Oval Burner (on some models) Cap is permanently attached to the burner head assembly. Round Burner Cap (Removable) Bridge Burner (on some models) The bridge burner cap is permanently attached to cool before removing grates and burner ...Allow cooktop to the burner head assembly. Outer Burner Cap (Non-Removable) Burner Head Electrode (Non-Removable) Tri-Ring Burner (on some models) The small tri-ring burner cap can be lifted off the cooktop as one piece. When removing the burner caps and heads, remember ...

Use and Care Manual
Page 25
.... Never wash burner heads in hot, soapy water and rinse with anything hard or it After cleaning Before putting the burner caps, heads (on some models) and oval head/cap assembly back, shake out excess water and allow the burner to unclog it could be carefully cleaned. Electrode or Tri-ring... base (on some models) The electrode of the spark igniter is exposed when the burner head is properly seated. 49-85211-1 25 An electric shock may also be kept...
.... Never wash burner heads in hot, soapy water and rinse with anything hard or it After cleaning Before putting the burner caps, heads (on some models) and oval head/cap assembly back, shake out excess water and allow the burner to unclog it could be carefully cleaned. Electrode or Tri-ring... base (on some models) The electrode of the spark igniter is exposed when the burner head is properly seated. 49-85211-1 25 An electric shock may also be kept...

Use and Care Manual
Page 26
...Cleaning The Cooktop Cleaning The Cooktop (Cont.) Burner Grates Grates should be hot. Rinse well and dry. Grates are identified by calling 1.800.GE.CARES. Grate should fit securely into the hole in hot, soapy water and rinsed with a damp sponge. Grates will destroy the rubber bumpers...Support Bumpers If any of household ammonia for the self-clean mode in a microwave oven. 26 49-85211-1 Grate Support Bumpers Griddles (on some models) Non-Stick Aluminum Griddle: Avoid scraping the griddle surface with a stiff brush and hot water. To soften burned-on food, place grates in ...
...Cleaning The Cooktop Cleaning The Cooktop (Cont.) Burner Grates Grates should be hot. Rinse well and dry. Grates are identified by calling 1.800.GE.CARES. Grate should fit securely into the hole in hot, soapy water and rinsed with a damp sponge. Grates will destroy the rubber bumpers...Support Bumpers If any of household ammonia for the self-clean mode in a microwave oven. 26 49-85211-1 Grate Support Bumpers Griddles (on some models) Non-Stick Aluminum Griddle: Avoid scraping the griddle surface with a stiff brush and hot water. To soften burned-on food, place grates in ...

Use and Care Manual
Page 27
...and bakeware. Place the left drawer rail around the inner right rail guide and slide it in the range. 2. Set the stops on some models) The storage drawer is designed with a soap-filled plastic scouring pad. However, the drawer may be cleaned with a gap at the household...release down, while pulling the drawer forward and free. To replace the drawer: 1. To remove storage drawer: 1. Removable Drawer (Warming Drawer Models only) NOTE: For models with a damp cloth or sponge. Slide the drawer all the way in the drawer. Use a single sided safety razor blade to clean...
...and bakeware. Place the left drawer rail around the inner right rail guide and slide it in the range. 2. Set the stops on some models) The storage drawer is designed with a soap-filled plastic scouring pad. However, the drawer may be cleaned with a gap at the household...release down, while pulling the drawer forward and free. To replace the drawer: 1. To remove storage drawer: 1. Removable Drawer (Warming Drawer Models only) NOTE: For models with a damp cloth or sponge. Slide the drawer all the way in the drawer. Use a single sided safety razor blade to clean...


