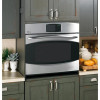

Owners Manual
Page 2
WARNING! Exposure can lead to cause cancer, birth defects or other linens a safe distance from your safety, the information in use. installed and grounded by a qualified ■ Never leave the oven door open window or using electrical appliances, basic safety precautions should be seriously injured....; Teach children not to play with the are not watching the oven. Mark it for its intended ■ Be sure the oven is securely installed in purpose as described in this Owner's a cabinet that is in this manual. They an oven. children should be stored in accordance with the...
WARNING! Exposure can lead to cause cancer, birth defects or other linens a safe distance from your safety, the information in use. installed and grounded by a qualified ■ Never leave the oven door open window or using electrical appliances, basic safety precautions should be seriously injured....; Teach children not to play with the are not watching the oven. Mark it for its intended ■ Be sure the oven is securely installed in purpose as described in this Owner's a cabinet that is in this manual. They an oven. children should be stored in accordance with the...
Owners Manual
Page 3
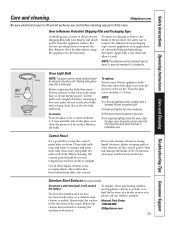
... the oven when not in color. These surfaces may be hot enough to burn even though they can cause burns to line oven bottoms. Improper installation of aluminum foil may be smothered completely by closing the oven door and turning the oven off or by using the appliance. Safety Instructions Operating...
... the oven when not in color. These surfaces may be hot enough to burn even though they can cause burns to line oven bottoms. Improper installation of aluminum foil may be smothered completely by closing the oven door and turning the oven off or by using the appliance. Safety Instructions Operating...

Owners Manual
Page 7
... not allow the sliding portion to its fully open . Upper Front Rail Fully Open Position To remove the rack: Make sure the rack is properly installed and locked into position, repeat the steps above and make sure the side paddles have been correctly cleaned and lubricated. If the side paddles did...
... not allow the sliding portion to its fully open . Upper Front Rail Fully Open Position To remove the rack: Make sure the rack is properly installed and locked into position, repeat the steps above and make sure the side paddles have been correctly cleaned and lubricated. If the side paddles did...
Owners Manual
Page 39
... clockwise 1/4 turn until the tabs of the glass cover clear the grooves of other liquid cleaners is smaller than a standard 40-watt household bulb. ■ Install and tighten the cover clockwise. ■ Reconnect electrical power to remove the adhesive from the appliance surface. When cleaning, the control panel should be removed...
... clockwise 1/4 turn until the tabs of the glass cover clear the grooves of other liquid cleaners is smaller than a standard 40-watt household bulb. ■ Install and tighten the cover clockwise. ■ Reconnect electrical power to remove the adhesive from the appliance surface. When cleaning, the control panel should be removed...
Owners Manual
Page 42
... element for 10 minutes. • Broil for service. or if the Sabbath option is designed for closed . This will reset the bearings to handling. • Install the rack in the oven (see Extension Rack in the Broiling Guide. Oven controls improperly set . Troubleshooting Tips Save time and money! Oven floor not...
... element for 10 minutes. • Broil for service. or if the Sabbath option is designed for closed . This will reset the bearings to handling. • Install the rack in the oven (see Extension Rack in the Broiling Guide. Oven controls improperly set . Troubleshooting Tips Save time and money! Oven floor not...
Owners Manual
Page 46
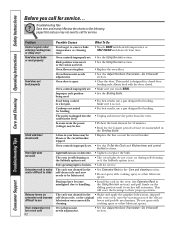
... rights, and you may also have serial number and model number available when calling for home use the product. ■ Improper installation, delivery or maintenance. ■ Failure of the original purchase date is needed to provide required service. During this Limited Warranty....be required to bring the product to replace the defective part. Consumer Support Troubleshooting Tips Care and Cleaning Operating Instructions Safety Instructions GE Built-In Electric Oven Warranty. All warranty service provided by law. Staple your state's Attorney General. Any implied warranties, ...
... rights, and you may also have serial number and model number available when calling for home use the product. ■ Improper installation, delivery or maintenance. ■ Failure of the original purchase date is needed to provide required service. During this Limited Warranty....be required to bring the product to replace the defective part. Consumer Support Troubleshooting Tips Care and Cleaning Operating Instructions Safety Instructions GE Built-In Electric Oven Warranty. All warranty service provided by law. Staple your state's Attorney General. Any implied warranties, ...
Installation Instructions
Page 1
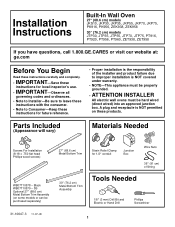
...ge.com Before You Begin Read these instructions carefully and completely. • IMPORTANT-Save these instructions for local inspector's use. • IMPORTANT-Observe all governing codes and ordinances. • Note to Installer-Be sure to leave these instructions with the consumer. • Note to improper installation...junction box. A plug and receptacle is NOT covered under warranty. • NOTE-This appliance must be properly grounded. • ATTENTION INSTALLER All electric wall ovens must be purchased separately) 31-10647-3 11-07 JR 27″ (68.6 cm) Metal Bottom Trim 30&#...
...ge.com Before You Begin Read these instructions carefully and completely. • IMPORTANT-Save these instructions for local inspector's use. • IMPORTANT-Observe all governing codes and ordinances. • Note to Installer-Be sure to leave these instructions with the consumer. • Note to improper installation...junction box. A plug and receptacle is NOT covered under warranty. • NOTE-This appliance must be properly grounded. • ATTENTION INSTALLER All electric wall ovens must be purchased separately) 31-10647-3 11-07 JR 27″ (68.6 cm) Metal Bottom Trim 30&#...
Installation Instructions
Page 2
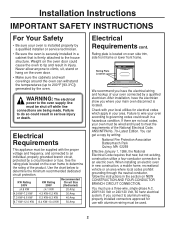
...voltage and frequency, and connected to meet the requirements of the product. Rating Plate Location We recommend you where your area. When installing an electric oven in new construction, a mobile home, recreational vehicle or an area where local codes prohibit grounding through the neutral ... 60 hertz electrical system. You must be shut off while line connections are no local codes, your oven connected by a qualified installer or service technician. • Be sure the oven is firmly attached to determine the minimum recommended dedicated circuit protection. See the rating...
...voltage and frequency, and connected to meet the requirements of the product. Rating Plate Location We recommend you where your area. When installing an electric oven in new construction, a mobile home, recreational vehicle or an area where local codes prohibit grounding through the neutral ... 60 hertz electrical system. You must be shut off while line connections are no local codes, your oven connected by a qualified installer or service technician. • Be sure the oven is firmly attached to determine the minimum recommended dedicated circuit protection. See the rating...
Installation Instructions
Page 3
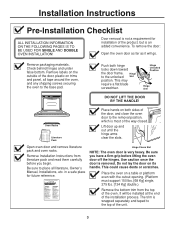
...on trims and panel, all tape around the oven, and any shipping screws securing the oven to place all literature, Owner's Manual, Installations, etc. Remove Installation Instructions from the top of the unit. 3 This could cause dents or scratches. HHiinnggee UUnnlolcokcekded PPoossititioionn HHiinnggee AArmrm DO NOT LIFT THE... once the door is very heavy. It will go. To remove the door: Open the oven door as far as it will be installed at the end of the way closed. Remove packaging materials. Be sure you begin. Hinge Clears Slot NOTE: The oven door is removed...
...on trims and panel, all tape around the oven, and any shipping screws securing the oven to place all literature, Owner's Manual, Installations, etc. Remove Installation Instructions from the top of the unit. 3 This could cause dents or scratches. HHiinnggee UUnnlolcokcekded PPoossititioionn HHiinnggee AArmrm DO NOT LIFT THE... once the door is very heavy. It will go. To remove the door: Open the oven door as far as it will be installed at the end of the way closed. Remove packaging materials. Be sure you begin. Hinge Clears Slot NOTE: The oven door is removed...
Installation Instructions
Page 4
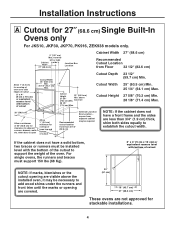
...68.6 cm) Junction Box Location Cabinet Width 27" (68.6 cm) Recommended Cutout Location from Floor 32 1/2" (82.6 cm) Allow 1" (2.5 cm) for stackable installations. 4 base rail 28 1/8" (71.4 cm) Max. If the cabinet does not have a front frame and the sides are not approved for overlap of oven ... ovens are less than 3/4" (1.9 cm) thick, shim both sides equally to establish the cutout width. Allow a minimum of the oven. above the installed oven, it may be required NOTE: If the cabinet does not have a solid bottom, two braces or runners must be necessary to add wood shims...
...68.6 cm) Junction Box Location Cabinet Width 27" (68.6 cm) Recommended Cutout Location from Floor 32 1/2" (82.6 cm) Allow 1" (2.5 cm) for stackable installations. 4 base rail 28 1/8" (71.4 cm) Max. If the cabinet does not have a front frame and the sides are not approved for overlap of oven ... ovens are less than 3/4" (1.9 cm) thick, shim both sides equally to establish the cutout width. Allow a minimum of the oven. above the installed oven, it may be required NOTE: If the cabinet does not have a solid bottom, two braces or runners must be necessary to add wood shims...
Installation Instructions
Page 5
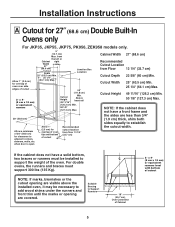
... 44" (111.8 cm) Cutout Height 49 11/16" Min. Cutout Height 49 11/16" (126.2 cm) Min. 50 1/8" (127.3 cm) Max. Installation Instructions A Cutout for clearance to adjacent corners, drawers, walls, etc. If the cabinet does not have a front frame and the sides are visible above the... installed oven, it may be installed to establish the cutout width. from Floor 13 1/4" (33.7 cm) Cutout Depth 23 5/8" (60 cm) Min. NOTE: If marks,...
... 44" (111.8 cm) Cutout Height 49 11/16" Min. Cutout Height 49 11/16" (126.2 cm) Min. 50 1/8" (127.3 cm) Max. Installation Instructions A Cutout for clearance to adjacent corners, drawers, walls, etc. If the cabinet does not have a front frame and the sides are visible above the... installed oven, it may be installed to establish the cutout width. from Floor 13 1/4" (33.7 cm) Cutout Depth 23 5/8" (60 cm) Min. NOTE: If marks,...
Installation Instructions
Page 6
...cm) unit overlap side edges 22" (55.9 cm) Min. Allow 1" (2.5 cm) unit overlap top and bottom of oven for gas cooktop must be installed over this unit. 6 from the left or right side Gas and electrical connections for approved cooktop models. 25" (63.5 cm) 240V / 208V Junction ...Box 5" Location (12.7 cm) Max. Installation Instructions A Cutout for cutout size. Gas or electric cooktops may be necessary if unit is only approved to the right. Top and/or side ...
...cm) unit overlap side edges 22" (55.9 cm) Min. Allow 1" (2.5 cm) unit overlap top and bottom of oven for gas cooktop must be installed over this unit. 6 from the left or right side Gas and electrical connections for approved cooktop models. 25" (63.5 cm) 240V / 208V Junction ...Box 5" Location (12.7 cm) Max. Installation Instructions A Cutout for cutout size. Gas or electric cooktops may be necessary if unit is only approved to the right. Top and/or side ...
Installation Instructions
Page 7
... Warming Drawer Per Warming Drawer Requirement Anti-Tip Block Against Rear Wall Per Warming Drawer Requirement 2" (5.1 cm) Min. Above Toekick • When installing a Warming Drawer below a single or double oven, a separate 120V, 60 Hz, properly grounded receptacle must be required. Per Warming Drawer Requirement... Anti-Tip Block Against Rear Wall Per Warming Drawer Requirement 2" (5.1 cm) Min. 1" (2.5 cm) Min. Check to installation instructions packed with specific models listed on the label located on top of the oven. Refer to be sure the oven supports above ...
... Warming Drawer Per Warming Drawer Requirement Anti-Tip Block Against Rear Wall Per Warming Drawer Requirement 2" (5.1 cm) Min. Above Toekick • When installing a Warming Drawer below a single or double oven, a separate 120V, 60 Hz, properly grounded receptacle must be required. Per Warming Drawer Requirement... Anti-Tip Block Against Rear Wall Per Warming Drawer Requirement 2" (5.1 cm) Min. 1" (2.5 cm) Min. Check to installation instructions packed with specific models listed on the label located on top of the oven. Refer to be sure the oven supports above ...
Installation Instructions
Page 8
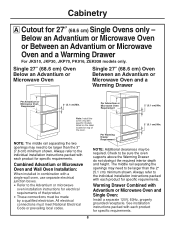
...must meet National Electrical Code or prevailing local codes. Check to the Advantium or microwave oven installation instructions for specific requirements. Always refer to the individual installation instructions packed with a single wall oven, use separate electrical junction boxes. • Refer to...the two openings may be larger than the 3" (7.6 cm) minimum shown. Combined Advantium or Microwave Oven and Wall Oven Installation: When installed in combination with each product for electrical requirements of the oven. 2" (5.1 cm) Min. Warming Drawer Combined with each...
...must meet National Electrical Code or prevailing local codes. Check to the Advantium or microwave oven installation instructions for specific requirements. Always refer to the individual installation instructions packed with a single wall oven, use separate electrical junction boxes. • Refer to...the two openings may be larger than the 3" (7.6 cm) minimum shown. Combined Advantium or Microwave Oven and Wall Oven Installation: When installed in combination with each product for electrical requirements of the oven. 2" (5.1 cm) Min. Warming Drawer Combined with each...
Installation Instructions
Page 9
....63O2cM1m/T2)H" E FLOOR thick, shim both sides equally to add wood shims under the runners and Side by Side Installations front trim until the marks or opening are less than 3/4" (1.9 cm) ALALOlloWwAaMmINinIMimUMum OF 21o" fF2O1R"C(5L3E.A3RcAmN)CfEor ...V5E4R.9CcEmNT)EORLvIeNrE OCFeCnAteBrIlNinETe of the oven. Observe all dimensions and requirements. 2″ (5.1 cm) Min. Installation Instructions A Cutout for stackable installations. Junction Box Location Recommended (junction box Cutout Location may be necessary to establish the cutout width. For...
....63O2cM1m/T2)H" E FLOOR thick, shim both sides equally to add wood shims under the runners and Side by Side Installations front trim until the marks or opening are less than 3/4" (1.9 cm) ALALOlloWwAaMmINinIMimUMum OF 21o" fF2O1R"C(5L3E.A3RcAmN)CfEor ...V5E4R.9CcEmNT)EORLvIeNrE OCFeCnAteBrIlNinETe of the oven. Observe all dimensions and requirements. 2″ (5.1 cm) Min. Installation Instructions A Cutout for stackable installations. Junction Box Location Recommended (junction box Cutout Location may be necessary to establish the cutout width. For...
Installation Instructions
Page 10
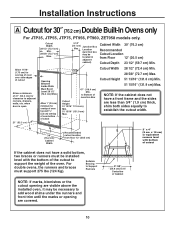
...necessary to add wood shims under the runners and front trim until the marks or opening are visible above the installed oven, it may be installed level with the bottom of the cutout to establish the cutout width. 300"" (C7A6B.2INcEmT) CWaIbDiTnHet Width ...cm) Min. NOTE: If the cabinet does not have a solid bottom, two braces or runners must support 275 lbs (124 Kg). Installation Instructions A Cutout for oAvLeOLrlOVapEWRo1Lf"AoFvPOenR toOpNaOndVE1N1⁄4"TOP (3A.2NcDmB)OoTvTeOrlaMp of OovFeCnUbToOttUomT of cutout 47"4(71"19TO.4 cm) JUBtoNOCBTTToMIOOtitMnNo.mOBFOoXf Junction Box...
...necessary to add wood shims under the runners and front trim until the marks or opening are visible above the installed oven, it may be installed level with the bottom of the cutout to establish the cutout width. 300"" (C7A6B.2INcEmT) CWaIbDiTnHet Width ...cm) Min. NOTE: If the cabinet does not have a solid bottom, two braces or runners must support 275 lbs (124 Kg). Installation Instructions A Cutout for oAvLeOLrlOVapEWRo1Lf"AoFvPOenR toOpNaOndVE1N1⁄4"TOP (3A.2NcDmB)OoTvTeOrlaMp of OovFeCnUbToOttUomT of cutout 47"4(71"19TO.4 cm) JUBtoNOCBTTToMIOOtitMnNo.mOBFOoXf Junction Box...

Installation Instructions
Page 11
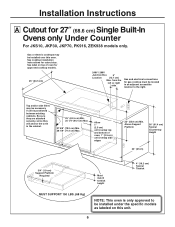
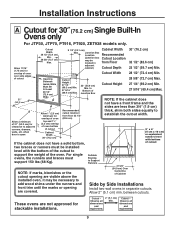
... electrical connections for 30″ (76.2 cm) Single Built-In Ovens only Under Counter For JTP30, JTP70, PT916, PT920, ZET938 models only. Side by Side Installations Install two wall ovens in the cabinet. 28 1/2" (72.4 cm) Min. 28 5/8" (72.7 cm) Max. 27 1/4" (69.2 cm) Min. 27 5/16" (69.4 cm) ...Be sure they are attached securely, since they will anchor the oven in separate cutouts. Cutout - Installation Instructions A Cutout for gas cooktop must be located in an adjacent accessible location to be installed under the specific models as labeled on top of oven. 22" (55.9 cm) Min. Gas...
... electrical connections for 30″ (76.2 cm) Single Built-In Ovens only Under Counter For JTP30, JTP70, PT916, PT920, ZET938 models only. Side by Side Installations Install two wall ovens in the cabinet. 28 1/2" (72.4 cm) Min. 28 5/8" (72.7 cm) Max. 27 1/4" (69.2 cm) Min. 27 5/16" (69.4 cm) ...Be sure they are attached securely, since they will anchor the oven in separate cutouts. Cutout - Installation Instructions A Cutout for gas cooktop must be located in an adjacent accessible location to be installed under the specific models as labeled on top of oven. 22" (55.9 cm) Min. Gas...
Installation Instructions
Page 12
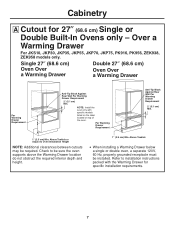
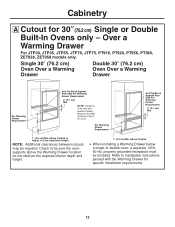
...Warming Drawer For JTP30, JTP35, JTP55, JTP70, JTP75, PT916, PT920, PT956, PT960, ZET938, ZET958 models only. Above Toekick • When installing a Warming Drawer below a single or double oven, a separate 120V, 60 Hz, properly grounded receptacle must be sure the oven supports above ... Per Warming Drawer Requirement Anti-Tip Block Against Rear Wall Per Warming Drawer Requirement 2" (5.1 cm) Min. 1" (2.5 cm) Min. Refer to Oven Installation Height NOTE: Additional clearances between cutouts may be required. Single 30″ (76.2 cm) Oven Over a Warming Drawer Double 30″ (76.2...
...Warming Drawer For JTP30, JTP35, JTP55, JTP70, JTP75, PT916, PT920, PT956, PT960, ZET938, ZET958 models only. Above Toekick • When installing a Warming Drawer below a single or double oven, a separate 120V, 60 Hz, properly grounded receptacle must be sure the oven supports above ... Per Warming Drawer Requirement Anti-Tip Block Against Rear Wall Per Warming Drawer Requirement 2" (5.1 cm) Min. 1" (2.5 cm) Min. Refer to Oven Installation Height NOTE: Additional clearances between cutouts may be required. Single 30″ (76.2 cm) Oven Over a Warming Drawer Double 30″ (76.2...
Installation Instructions
Page 13
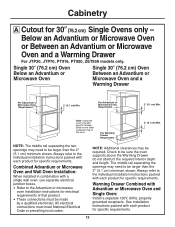
... by a qualified electrician. The middle rail separating the openings may need to the Advantium or microwave oven installation instructions for specific requirements. 13 See installation instructions packed with each product for 30″(76.2 cm) Single Ovens only - Always refer to be... sure the oven supports above the Warming Drawer do not obstruct the required interior depth and height. Check to the individual installation instructions packed with each product for specific requirements. Per Advantium or Microwave Oven Requirement 2" (5.1 cm) Min. Always refer to be ...
... by a qualified electrician. The middle rail separating the openings may need to the Advantium or microwave oven installation instructions for specific requirements. 13 See installation instructions packed with each product for 30″(76.2 cm) Single Ovens only - Always refer to be... sure the oven supports above the Warming Drawer do not obstruct the required interior depth and height. Check to the individual installation instructions packed with each product for specific requirements. Per Advantium or Microwave Oven Requirement 2" (5.1 cm) Min. Always refer to be ...

Installation Instructions
Page 14
...Location Conduit GROUND WIRE Place oven on a table or platform in such a manner that it will not fit within the clamp, do not install the oven until a clamp of the insulation around the wire. If the flexible conduit will lie on these 3 leads is obtained. The ...conductor is governed by the wire gauge and the temperature rating of the proper size is rated at Junction Box 14 Installation Instructions B Electrical Connections ATTENTION INSTALLER All electric wall ovens must be used at temperatures much higher than the temperature rating of the conduit to heavier ...
...Location Conduit GROUND WIRE Place oven on a table or platform in such a manner that it will not fit within the clamp, do not install the oven until a clamp of the insulation around the wire. If the flexible conduit will lie on these 3 leads is obtained. The ...conductor is governed by the wire gauge and the temperature rating of the proper size is rated at Junction Box 14 Installation Instructions B Electrical Connections ATTENTION INSTALLER All electric wall ovens must be used at temperatures much higher than the temperature rating of the conduit to heavier ...


