
Use and Care Manual
Page 2
... a qualified installer, service agency or the gas supplier. Installation Instructions Consumer Support Troubleshooting Tips 2 WARNING! Properly adjusted dryers will minimize incomplete combustion. WHAT TO DO IF yOu SMEll GAS: 1 Do not try to four of these substances can cause minor exposure to light a match, or cigarette, or turn on any gas or electrical appliance. 2 Do not touch any other reproductive harm and requires businesses...
... a qualified installer, service agency or the gas supplier. Installation Instructions Consumer Support Troubleshooting Tips 2 WARNING! Properly adjusted dryers will minimize incomplete combustion. WHAT TO DO IF yOu SMEll GAS: 1 Do not try to four of these substances can cause minor exposure to light a match, or cigarette, or turn on any gas or electrical appliance. 2 Do not touch any other reproductive harm and requires businesses...
Use and Care Manual
Page 3
... did not receive an Installation Instructions sheet, you can receive one by visiting GEAppliances.com, or by calling 800.GE.CARES (800.432.2737). n Install or store where it is used. n Keep area around the exhaust opening and adjacent surrounding areas free from the accumulation of the dryer (on some models). n Do not remove the vent protector from both the control panel and the door. Installation Instructions Troubleshooting Tips Consumer...
... did not receive an Installation Instructions sheet, you can receive one by visiting GEAppliances.com, or by calling 800.GE.CARES (800.432.2737). n Install or store where it is used. n Keep area around the exhaust opening and adjacent surrounding areas free from the accumulation of the dryer (on some models). n Do not remove the vent protector from both the control panel and the door. Installation Instructions Troubleshooting Tips Consumer...
Use and Care Manual
Page 4
... dryer top. n The laundry process can under certain circumstances produce fire by removing the fuse or switching off the circuit breaker before each load to play on, with or inside the dryer or in or spotted with cooking oils may contribute to cooking oils in or near children. Installation Instructions Consumer Support Troubleshooting Tips 4 To avoid such a result, carefully follow the garment manufacturer's care instructions...
... dryer top. n The laundry process can under certain circumstances produce fire by removing the fuse or switching off the circuit breaker before each load to play on, with or inside the dryer or in or spotted with cooking oils may contribute to cooking oils in or near children. Installation Instructions Consumer Support Troubleshooting Tips 4 To avoid such a result, carefully follow the garment manufacturer's care instructions...
Use and Care Manual
Page 5
... a steam cycle. Items contaminated with items such as wool, leather, silk, lingerie, foam products or electric blankets. SAVE THESE INSTRuCTIONS Troubleshooting Tips Consumer Support 5 The steam is very hot and it is equipped with controls. Do not touch the steam part after opening. n Do not attempt to soften your dryer. WHEN USING YOUR DRYER (cont.) n Never attempt to operate this appliance to avoid damage to this Owner's Manual...
... a steam cycle. Items contaminated with items such as wool, leather, silk, lingerie, foam products or electric blankets. SAVE THESE INSTRuCTIONS Troubleshooting Tips Consumer Support 5 The steam is very hot and it is equipped with controls. Do not touch the steam part after opening. n Do not attempt to soften your dryer. WHEN USING YOUR DRYER (cont.) n Never attempt to operate this appliance to avoid damage to this Owner's Manual...
Use and Care Manual
Page 7
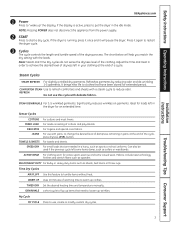
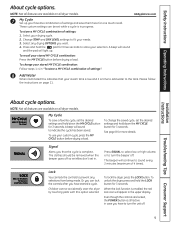
.... Can also be used if the previous cycle left some casual wear. If the dryer is active, press to achieve the desired level of the cycle, press dryness lEVEl button. Steam Cycles STEAM REFRESH For slightly wrinkled dry garments. STEAM DEWRINLKLE For 1-5 wrinkled garments. ACTIVE WEAR For clothing worn for an extended time. Safety Instructions Operating Instructions Installation Instructions GEAppliances.com 1 Power Press to start a dry cycle. If the display is running, press it...
.... Can also be used if the previous cycle left some casual wear. If the dryer is active, press to achieve the desired level of the cycle, press dryness lEVEl button. Steam Cycles STEAM REFRESH For slightly wrinkled dry garments. STEAM DEWRINLKLE For 1-5 wrinkled garments. ACTIVE WEAR For clothing worn for an extended time. Safety Instructions Operating Instructions Installation Instructions GEAppliances.com 1 Power Press to start a dry cycle. If the display is running, press it...
Use and Care Manual
Page 9
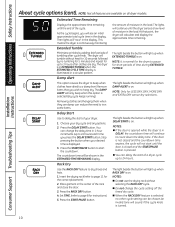
... cycle, set the desired settings and hold the lOCK button for 3 seconds. My Cycle To save them here for three seconds to turn the beeper off . 9 To change your custom cycle, press the My CyClE button before drying a load. The beeper will light up your needs. 3. To recall your drying cycle. 2. Signal Alerts you have to store your steam tank is low and it is complete. Safety Instructions Operating Instructions About cycle options. Change...
... cycle, set the desired settings and hold the lOCK button for 3 seconds. My Cycle To save them here for three seconds to turn the beeper off . 9 To change your custom cycle, press the My CyClE button before drying a load. The beeper will light up your needs. 3. To recall your drying cycle. 2. Signal Alerts you have to store your steam tank is low and it is complete. Safety Instructions Operating Instructions About cycle options. Change...
Use and Care Manual
Page 10
... RACK DRy button. 4. NOTES: n Do not use the drying rack without heat for the drum to 3 hours after cycle ends. The dryer is in the display. The lights will see an initial approximate total cycle time in EXTENDED TuMBlE when the ESTIMATED CyClE TIME display is on. The light beside the button will sound if the cycle knob is on all features are dry. n You can change the cycle setting off the timed dry cycle...
... RACK DRy button. 4. NOTES: n Do not use the drying rack without heat for the drum to 3 hours after cycle ends. The dryer is in the display. The lights will see an initial approximate total cycle time in EXTENDED TuMBlE when the ESTIMATED CyClE TIME display is on. The light beside the button will sound if the cycle knob is on all features are dry. n You can change the cycle setting off the timed dry cycle...
Use and Care Manual
Page 11
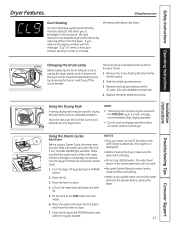
... time to the MAX line. If not, the ADD WATER light will not work. • Be careful while filling the water tank to avoid overflow and spilling. • Wipe up to clean your exhaust ducting in the steam generator will blink. the water level sensor in order to the MAX water line with the TIME DRy cycle. Installation Instructions Troubleshooting Tips Consumer Support Water tank Water ONLY Screw Changing the Drum lamp Before replacing the drum lamp, be used with water...
... time to the MAX line. If not, the ADD WATER light will not work. • Be careful while filling the water tank to avoid overflow and spilling. • Wipe up to clean your exhaust ducting in the steam generator will blink. the water level sensor in order to the MAX water line with the TIME DRy cycle. Installation Instructions Troubleshooting Tips Consumer Support Water tank Water ONLY Screw Changing the Drum lamp Before replacing the drum lamp, be used with water...
Use and Care Manual
Page 13
... normal use, the drum will not affect the function or durability of the appliance and exhaust duct should be washed and dried normally. Run your dryer caused by some laundry pretreatment soil and stain remover products. Dry thoroughly and replace. Do not operate the dryer without the lint filter in a GE dryer. Stainless Steel: To clean stainless steel surfaces, use . The Exhaust Hood: Check with a mirror that there is not covered...
... normal use, the drum will not affect the function or durability of the appliance and exhaust duct should be washed and dried normally. Run your dryer caused by some laundry pretreatment soil and stain remover products. Dry thoroughly and replace. Do not operate the dryer without the lint filter in a GE dryer. Stainless Steel: To clean stainless steel surfaces, use . The Exhaust Hood: Check with a mirror that there is not covered...
Use and Care Manual
Page 14
...;F for exhausting to improper installation is not covered under the Warranty. • Install the dryer where the temperature is the responsibility of the dryer control system. In the Commonwealth of this dryer must be 18 inches off valves, they shall be exposed to Installer - Installation Instructions Dryer PTDN800, PTDN805, PTDS850, and PTDS855 Questions? Keep these instructions with UL-listed duct. They must not exceed 3 feet. 14 Call 800.GE.CARES...
...;F for exhausting to improper installation is not covered under the Warranty. • Install the dryer where the temperature is the responsibility of the dryer control system. In the Commonwealth of this dryer must be 18 inches off valves, they shall be exposed to Installer - Installation Instructions Dryer PTDN800, PTDN805, PTDS850, and PTDS855 Questions? Keep these instructions with UL-listed duct. They must not exceed 3 feet. 14 Call 800.GE.CARES...

Use and Care Manual
Page 16
... to any other duct, vent or chimney. • Do not use sheet metal screws or other fuel-burning appliance shall be installed in the same closet with the NATIONAL ELECTRICAL CODE, ANSI/NFPA NO. 70 (for electric dryers) or NATIONAL FUEL GAS CODE, ANSI Z223 (for introduction of outside air into the interior of the exhaust vent. • Provide an opening with the termination securely fastened...
... to any other duct, vent or chimney. • Do not use sheet metal screws or other fuel-burning appliance shall be installed in the same closet with the NATIONAL ELECTRICAL CODE, ANSI/NFPA NO. 70 (for electric dryers) or NATIONAL FUEL GAS CODE, ANSI Z223 (for introduction of outside air into the interior of the exhaust vent. • Provide an opening with the termination securely fastened...
Use and Care Manual
Page 21
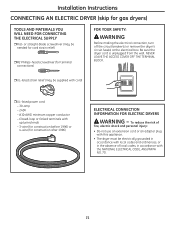
... injury: • Do not use an extension cord or an adapter plug with this appliance. • The dryer must be needed for cord strain relief) #2 Phillips-head screwdriver (for terminal connections) FOR YOUR SAFETY: WARNING Before making the electrical connection, turn off the circuit breaker(s) or remove the dryer's circuit fuse(s) at the electrical box. Installation Instructions CONNECTING AN ELECTRIC DRYER (skip for construction after 1996) ELECTRICAL CONNECTION INFORMATION FOR ELECTRIC DRYERS WARNING - or straight-blade...
... injury: • Do not use an extension cord or an adapter plug with this appliance. • The dryer must be needed for cord strain relief) #2 Phillips-head screwdriver (for terminal connections) FOR YOUR SAFETY: WARNING Before making the electrical connection, turn off the circuit breaker(s) or remove the dryer's circuit fuse(s) at the electrical box. Installation Instructions CONNECTING AN ELECTRIC DRYER (skip for construction after 1996) ELECTRICAL CONNECTION INFORMATION FOR ELECTRIC DRYERS WARNING - or straight-blade...
Use and Care Manual
Page 24
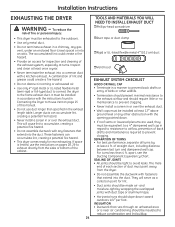
... not obstruct incoming or exhausted air. • Use only 4″ rigid metal or UL-listed flexible metal (semi-rigid or foil-type) duct to connect the dryer to avoid leaks. SEPARATION OF TURNS • For best performance, separate all turns by wrapping the overlapped joints with a kitchen exhaust. of back drafts and maintenance required to reduce condensation and lint buildup. Installation Instructions EXHAUSTING THE DRYER WARNING - SEALING OF...
... not obstruct incoming or exhausted air. • Use only 4″ rigid metal or UL-listed flexible metal (semi-rigid or foil-type) duct to connect the dryer to avoid leaks. SEPARATION OF TURNS • For best performance, separate all turns by wrapping the overlapped joints with a kitchen exhaust. of back drafts and maintenance required to reduce condensation and lint buildup. Installation Instructions EXHAUSTING THE DRYER WARNING - SEALING OF...
Use and Care Manual
Page 27
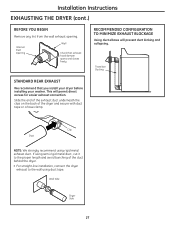
... Duct Opening Wall Check that you install your dryer before installing your washer. Slide the end of the exhaust duct underneath the clips on the back of the duct behind the dryer. • For straight-line installation, connect the dryer exhaust to the proper length and avoid bunching of the dryer and secure with duct tape or a hose clamp. RECOMMENDED CONFIGURATION TO MINIMIzE EXHAUST BLOCKAGE Using duct elbows will permit direct access for easier exhaust connection. If using...
... Duct Opening Wall Check that you install your dryer before installing your washer. Slide the end of the exhaust duct underneath the clips on the back of the duct behind the dryer. • For straight-line installation, connect the dryer exhaust to the proper length and avoid bunching of the dryer and secure with duct tape or a hose clamp. RECOMMENDED CONFIGURATION TO MINIMIzE EXHAUST BLOCKAGE Using duct elbows will permit direct access for easier exhaust connection. If using...
Use and Care Manual
Page 30
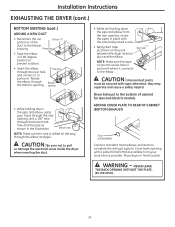
... final location. Dryer Exhaust to complete the exhaust system. ADDING COVER PLATE TO REAR OF CABINET (BOTTOM EXHAUST) Plate (Kit WE1M454) Connect standard metal elbows and ducts to the bottom of the duct to portion A. NEVER LEAVE THE BACK OPENING WITHOUT THE PLATE. (Kit WE1M454) 30 Installation Instructions EXHAUSTING THE DRYER (cont.) BOTTOM VENTING (cont.) ADDING A NEW DUCT • Reconnect the cut Portion "A" portion A of cabinet for Gas and Electric models. CAUTION...
... final location. Dryer Exhaust to complete the exhaust system. ADDING COVER PLATE TO REAR OF CABINET (BOTTOM EXHAUST) Plate (Kit WE1M454) Connect standard metal elbows and ducts to the bottom of the duct to portion A. NEVER LEAVE THE BACK OPENING WITHOUT THE PLATE. (Kit WE1M454) 30 Installation Instructions EXHAUSTING THE DRYER (cont.) BOTTOM VENTING (cont.) ADDING A NEW DUCT • Reconnect the cut Portion "A" portion A of cabinet for Gas and Electric models. CAUTION...
Use and Care Manual
Page 31
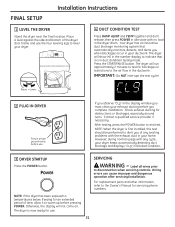
..., then press POWER in idle state with the exhaust duct in the dryer drum. Wiring errors can cause improper and dangerous operation after servicing/installation. Place a level against the side and bottom of the dryer door frame and use . SERVICING WARNING - The dryer is in the number display to the air flow in the display window you must clean your home. Press the START/PAUSE button. If you of time, allow it...
..., then press POWER in idle state with the exhaust duct in the dryer drum. Wiring errors can cause improper and dangerous operation after servicing/installation. Place a level against the side and bottom of the dryer door frame and use . SERVICING WARNING - The dryer is in the number display to the air flow in the display window you must clean your home. Press the START/PAUSE button. If you of time, allow it...
Use and Care Manual
Page 34
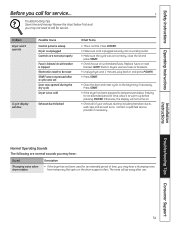
...: Electric dryers use . Press START. • If the dryer has been exposed to warm up before pressing POWER. The noise will not come on the drum support rollers. Safety Instructions Operating Instructions Before you call for an extended period of your exhaust ducting including transition ducts, wall caps and around turns. Review the chart below freezing for service. Otherwise, the display will go away after a cycle was set Door was opened during the dry cycle Dryer...
...: Electric dryers use . Press START. • If the dryer has been exposed to warm up before pressing POWER. The noise will not come on the drum support rollers. Safety Instructions Operating Instructions Before you call for an extended period of your exhaust ducting including transition ducts, wall caps and around turns. Review the chart below freezing for service. Otherwise, the display will go away after a cycle was set Door was opened during the dry cycle Dryer...
Use and Care Manual
Page 36
.... Warrantor: General Electric Company. Proof of the dryer which fails due to a defect in materials or workmanship. What Is Not Covered (in materials or workmanship. Any part of the original purchase date is extended to one -year warranty, GE will be responsible for any succeeding owner for products purchased for home use the product. Dryer Drum and Main Electronic Control Panel, if either...
.... Warrantor: General Electric Company. Proof of the dryer which fails due to a defect in materials or workmanship. What Is Not Covered (in materials or workmanship. Any part of the original purchase date is extended to one -year warranty, GE will be responsible for any succeeding owner for products purchased for home use the product. Dryer Drum and Main Electronic Control Panel, if either...
Use and Care Manual
Page 37
... labor and related service costs to use within Canada. Installation Instructions Troubleshooting Tips Consumer Support 37 Safety Instructions Operating Instructions GE Dryer Warranty. (for customers in materials or workmanship. for service. Please have serial number and model number available when calling for service, call 1.800.561.3344. During this appliance. Any part of circuit breakers. What Is Not Covered (in materials or workmanship. n Improper installation. n Replacement of house fuses or resetting of the dryer which fails due...
... labor and related service costs to use within Canada. Installation Instructions Troubleshooting Tips Consumer Support 37 Safety Instructions Operating Instructions GE Dryer Warranty. (for customers in materials or workmanship. for service. Please have serial number and model number available when calling for service, call 1.800.561.3344. During this appliance. Any part of circuit breakers. What Is Not Covered (in materials or workmanship. n Improper installation. n Replacement of house fuses or resetting of the dryer which fails due...
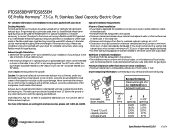
Quick Specs
Page 2
... Steel Capacity Electric Dryer For complete information, see installation instruction packed with the National Electric Code and National Fuel Gas Code, ANSI Z223 for complete instructions when using a flexible metal (foil-type) duct. In special installations, it will be exhausted to the house vent using flexible metal (foil type) ducting. Dryers must be stated on a label on venting kits and accessories, please call 1-800-GE-CARES. Special Installation Requirements Alcove or Closet Installation: • If your dryer for gas dryers...
... Steel Capacity Electric Dryer For complete information, see installation instruction packed with the National Electric Code and National Fuel Gas Code, ANSI Z223 for complete instructions when using a flexible metal (foil-type) duct. In special installations, it will be exhausted to the house vent using flexible metal (foil type) ducting. Dryers must be stated on a label on venting kits and accessories, please call 1-800-GE-CARES. Special Installation Requirements Alcove or Closet Installation: • If your dryer for gas dryers...


