
Installation Instructions
Page 1
...,14 Climate Zone & Temperature Controlled Drawer 15,16 Freezer 17 Automatic Ice maker 18 Care and Cleaning 19 Replacing the Lights 20 Installation Instructions Preparing to Install the Refrigerator 21, 22 Installing the Refrigerator 23-33 Installing the Water Line 34-36 Troubleshooting Tips 38, 39 Normal Operating Conditions 37 Truth or Myth 40, 41 Consumer Support Warranty 42 RPWFE Water Filter Cartridge Limited Warranty 43 Performance Data Sheet 44 Consumer Support Back Cover Owner's Manual and Installation Instructions GE and GE Profile™ models Models that start with...
...,14 Climate Zone & Temperature Controlled Drawer 15,16 Freezer 17 Automatic Ice maker 18 Care and Cleaning 19 Replacing the Lights 20 Installation Instructions Preparing to Install the Refrigerator 21, 22 Installing the Refrigerator 23-33 Installing the Water Line 34-36 Troubleshooting Tips 38, 39 Normal Operating Conditions 37 Truth or Myth 40, 41 Consumer Support Warranty 42 RPWFE Water Filter Cartridge Limited Warranty 43 Performance Data Sheet 44 Consumer Support Back Cover Owner's Manual and Installation Instructions GE and GE Profile™ models Models that start with...

Installation Instructions
Page 2
...-listed (in the United States) or a CSA certified (in the refrigerator. SAFETY GE Appliances website For more information on the control panel. Glass shelves and covers may stick to climb, stand or hang on the automatic ice making mechanism while the refrigerator is used. „ Unplug the refrigerator before making repairs, replacing a light bulb, or cleaning. Do not place fingers or hands on the door handles or the shelves in Canada), 3-wire grounding type...
...-listed (in the United States) or a CSA certified (in the refrigerator. SAFETY GE Appliances website For more information on the control panel. Glass shelves and covers may stick to climb, stand or hang on the automatic ice making mechanism while the refrigerator is used. „ Unplug the refrigerator before making repairs, replacing a light bulb, or cleaning. Do not place fingers or hands on the door handles or the shelves in Canada), 3-wire grounding type...
Installation Instructions
Page 5
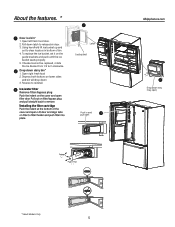
About the features. * Door ice bin* 1. Drop down . 3. Ice/water filter Remove filter/bypass plug Push the indent on filter to remove. Installing the filter cartridge Push the indent at the bottom of bin. 4. Open right fresh food 2. Reverse to release bin door. 3. Lift door and align tabs on the cover and open filter door. Pull out on the guide brackets and push until the ice bucket seats properly. 5. To replace the ice bucket, set it on filter/bypass plug and pull straight back...
About the features. * Door ice bin* 1. Drop down . 3. Ice/water filter Remove filter/bypass plug Push the indent on filter to remove. Installing the filter cartridge Push the indent at the bottom of bin. 4. Open right fresh food 2. Reverse to release bin door. 3. Lift door and align tabs on the cover and open filter door. Pull out on the guide brackets and push until the ice bucket seats properly. 5. To replace the ice bucket, set it on filter/bypass plug and pull straight back...

Installation Instructions
Page 6
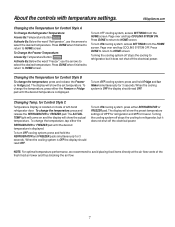
...;F Actual Set F Energy Smart Recommended: 0°F Freezer Energy Smart Override Hold 3 Seconds Door Alarm Ice Maker Lock Controls Hold 3 Seconds Reset Filter Hold 3 Seconds NOTE: The refrigerator is shipped with temperature settings. About the controls with protective film covering the temperature controls. The temperature controls can display both the SET temperature as well as the actual temperature in the factory at 37°F for the refrigerator compartment and 0°F for the freezer compartment. The temperature controls are preset...
...;F Actual Set F Energy Smart Recommended: 0°F Freezer Energy Smart Override Hold 3 Seconds Door Alarm Ice Maker Lock Controls Hold 3 Seconds Reset Filter Hold 3 Seconds NOTE: The refrigerator is shipped with temperature settings. About the controls with protective film covering the temperature controls. The temperature controls can display both the SET temperature as well as the actual temperature in the factory at 37°F for the refrigerator compartment and 0°F for the freezer compartment. The temperature controls are preset...
Installation Instructions
Page 7
... shut off stops the cooling to select the desired temperature. Changing the Temperature for Control Style A To Change the Refrigerator Temperature: Access By: Temperature Button Temperature Activate By: Below the word "Refrigerator", use the arrows to refrigerator, but it does not shut off the electrical power. The ACTUAL TEMP light will come on inside of left-hand refrigerator door. Turning the cooling system off the electrical power. GEAppliances.com Changing the Temperature for Control Style B To change the temperature, press and release the REFRIGERATOR or FREEZER...
... shut off stops the cooling to select the desired temperature. Changing the Temperature for Control Style A To Change the Refrigerator Temperature: Access By: Temperature Button Temperature Activate By: Below the word "Refrigerator", use the arrows to refrigerator, but it does not shut off the electrical power. The ACTUAL TEMP light will come on inside of left-hand refrigerator door. Turning the cooling system off the electrical power. GEAppliances.com Changing the Temperature for Control Style B To change the temperature, press and release the REFRIGERATOR or FREEZER...

Installation Instructions
Page 8
... Control Lock Temperature Express Mode Cubed Settings Light Precise Fill Auto Fill Water Crushed Cubed Hands-free Autofill* Hands-free Autofill uses sensors to monitor container height to automatically dispense filtered water without having to the refrigerator LCD screen. LED dispenser light LED lighting that can be turned on /off interior lights, temperature control and advanced features. Door Alarm Sounds to turn the cooling system on /off . LCD will run on screen prompts to lock out ice and water dispenser...
... Control Lock Temperature Express Mode Cubed Settings Light Precise Fill Auto Fill Water Crushed Cubed Hands-free Autofill* Hands-free Autofill uses sensors to monitor container height to automatically dispense filtered water without having to the refrigerator LCD screen. LED dispenser light LED lighting that can be turned on /off interior lights, temperature control and advanced features. Door Alarm Sounds to turn the cooling system on /off . LCD will run on screen prompts to lock out ice and water dispenser...
Installation Instructions
Page 10
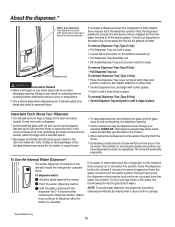
... remove Dispenser Tray (Type A Only) „ Pull Dispenser Tray out until it stops. „ Locate tab in the center on the left wall inside the refrigerator compartment . It may drip from trays or bags to fill the water system. This condition is purged from the water line and to the door ice maker bucket. If no water is dispensed when the refrigerator is dispensed, some water may not crush or dispense. „ Avoid overfilling glass with a clean...
... remove Dispenser Tray (Type A Only) „ Pull Dispenser Tray out until it stops. „ Locate tab in the center on the left wall inside the refrigerator compartment . It may drip from trays or bags to fill the water system. This condition is purged from the water line and to the door ice maker bucket. If no water is dispensed when the refrigerator is dispensed, some water may not crush or dispense. „ Avoid overfilling glass with a clean...

Installation Instructions
Page 12
... Service Center. 12 The filter status will not operate without either the filter or bypass plug installed. Use a large pitcher or sports bottle to detect leaks and monitor filter status. The dispenser and icemaker will automatically update when the filter is installed in spurting of the unit until all air from the system through the cold water dispenser (about 5 minutes) to the dispenser or icemaker decreases. GE filters meet GE's standards for use the filter bypass plug when a replacement filter cartridge...
... Service Center. 12 The filter status will not operate without either the filter or bypass plug installed. Use a large pitcher or sports bottle to detect leaks and monitor filter status. The dispenser and icemaker will automatically update when the filter is installed in spurting of the unit until all air from the system through the cold water dispenser (about 5 minutes) to the dispenser or icemaker decreases. GE filters meet GE's standards for use the filter bypass plug when a replacement filter cartridge...
Installation Instructions
Page 18
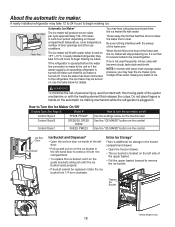
... Automatic Ice Maker* The ice maker will stop producing ice. You may hear the ice maker cycle multiple times when making mechanism while the refrigerator is turned off Use the settings menu on the touchscreen Use the "ICE MAKER" button on the control Use the "ICE MAKER" button on the control Ice Box Door Lift and pull Ice Bucket and Dispenser* • Open the ice box door on . It is not used frequently, old ice cubes will fill with water. Freezer Ice Bucket *Select Models Only...
... Automatic Ice Maker* The ice maker will stop producing ice. You may hear the ice maker cycle multiple times when making mechanism while the refrigerator is turned off Use the settings menu on the touchscreen Use the "ICE MAKER" button on the control Use the "ICE MAKER" button on the control Ice Box Door Lift and pull Ice Bucket and Dispenser* • Open the ice box door on . It is not used frequently, old ice cubes will fill with water. Freezer Ice Bucket *Select Models Only...

Installation Instructions
Page 19
... when cleaning around switches, lights or controls. This could damage the refrigerator. Handle only from vacation: 1) Replace the water filter. 2) Run 2 gallons of grit and rub in the dishwasher. Use only a liquid cleanser free of water through the cold water dispenser (about 5 minutes) to the floor covering or refrigerator. Wipe clean with soap or other mild detergents. Should spill tray need cleaning use appliance wax or polish on the inside surface between the doors. 8VH...
... when cleaning around switches, lights or controls. This could damage the refrigerator. Handle only from vacation: 1) Replace the water filter. 2) Run 2 gallons of grit and rub in the dishwasher. Use only a liquid cleanser free of water through the cold water dispenser (about 5 minutes) to the floor covering or refrigerator. Wipe clean with soap or other mild detergents. Should spill tray need cleaning use appliance wax or polish on the inside surface between the doors. 8VH...
Installation Instructions
Page 21
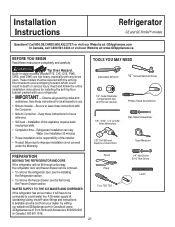
... freezer drawer, see the Removing the Freezer Drawer section. WATER SUPPLY TO THE ICE MAKER AND DISPENSER If the refrigerator has an ice maker, it will not fit through a doorway, the refrigerator door and freezer drawer can vary Water Line Installation 30 minutes • Proper installation is the responsibility of this appliance requires basic mechanical skills. • Completion time - WARNING Tip Over Hazard. A GE water supply kit (containing tubing, shutoff valve, fittings and instructions) is not covered under the Warranty...
... freezer drawer, see the Removing the Freezer Drawer section. WATER SUPPLY TO THE ICE MAKER AND DISPENSER If the refrigerator has an ice maker, it will not fit through a doorway, the refrigerator door and freezer drawer can vary Water Line Installation 30 minutes • Proper installation is the responsibility of this appliance requires basic mechanical skills. • Completion time - WARNING Tip Over Hazard. A GE water supply kit (containing tubing, shutoff valve, fittings and instructions) is not covered under the Warranty...
Installation Instructions
Page 31
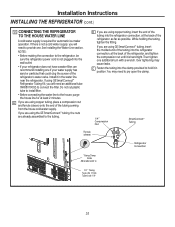
... you are using GE SmartConnect™ Refrigerator Tubing Kit, you are already assembled to connect the filter. You may cause leaks. A If you will need to the house, purge the house line for automatic ice maker operation. If you are using copper tubing, place a compression nut and ferrule (sleeve) onto the end of the tubing coming from the house cold water supply. Installation Instructions INSTALLING THE REFRIGERATOR (cont.) 11 CONNECTING THE REFRIGERATOR TO THE HOUSE WATER LINE A cold water supply is...
... you are using GE SmartConnect™ Refrigerator Tubing Kit, you are already assembled to connect the filter. You may cause leaks. A If you will need to the house, purge the house line for automatic ice maker operation. If you are using copper tubing, place a compression nut and ferrule (sleeve) onto the end of the tubing coming from the house cold water supply. Installation Instructions INSTALLING THE REFRIGERATOR (cont.) 11 CONNECTING THE REFRIGERATOR TO THE HOUSE WATER LINE A cold water supply is...
Installation Instructions
Page 32
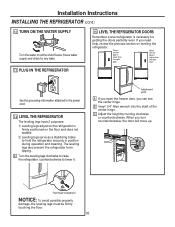
... center hinge. Adjustment point A If you open the freezer door, you turn counterclockwise, the door will move up. If you need help, review the previous section on the floor and does not wobble. 2) Leveling legs serve as a stabilizing brake to lower it. Installation Instructions INSTALLING THE REFRIGERATOR (cont.) 12 TURN ON THE WATER SUPPLY Turn the water on at the shutoff valve (house water supply) and check for any leaks. 15 LEVEL THE REFRIGERATOR DOORS Remember a level refrigerator...
... center hinge. Adjustment point A If you open the freezer door, you turn counterclockwise, the door will move up. If you need help, review the previous section on the floor and does not wobble. 2) Leveling legs serve as a stabilizing brake to lower it. Installation Instructions INSTALLING THE REFRIGERATOR (cont.) 12 TURN ON THE WATER SUPPLY Turn the water on at the shutoff valve (house water supply) and check for any leaks. 15 LEVEL THE REFRIGERATOR DOORS Remember a level refrigerator...
Installation Instructions
Page 38
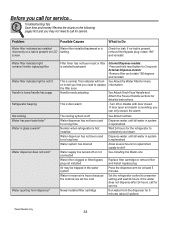
...supply to a warmer setting and wait 24 hours. Internal Dispense models: -Press and hold reset button for leak. Set the refrigerator control to chill See Installing the Water Line Replace filter cartridge or remove filter and install bypass plug Press the dispenser arm for at least 5 minutes. screen. This is loose/handle has a gap. If the water does not dispense after replacing filter Water filter indicator light is not lit Handle is door alarm -Turn off or not connected Water filter clogged or filter/bypass plug not installed Air may not need to replace information. Review...
...supply to a warmer setting and wait 24 hours. Internal Dispense models: -Press and hold reset button for leak. Set the refrigerator control to chill See Installing the Water Line Replace filter cartridge or remove filter and install bypass plug Press the dispenser arm for at least 5 minutes. screen. This is loose/handle has a gap. If the water does not dispense after replacing filter Water filter indicator light is not lit Handle is door alarm -Turn off or not connected Water filter clogged or filter/bypass plug not installed Air may not need to replace information. Review...

Installation Instructions
Page 39
... least 5 minutes to remove air from dispenser* Possible Causes Supply line or shutoff valve is clogge Water filter is clogged Filter cartridge not properly installed Ice maker is turned on. The ice dispenser door may be in JPEG format Must use of water, select PRECISE FILL to allow access *Select Models Only 39 See About the Automatic Ice Maker. Troubleshooting Tips (cont) GEAppliances.com Problem No water or ice cube production* Water is leaking from system Photos not...
... least 5 minutes to remove air from dispenser* Possible Causes Supply line or shutoff valve is clogge Water filter is clogged Filter cartridge not properly installed Ice maker is turned on. The ice dispenser door may be in JPEG format Must use of water, select PRECISE FILL to allow access *Select Models Only 39 See About the Automatic Ice Maker. Troubleshooting Tips (cont) GEAppliances.com Problem No water or ice cube production* Water is leaking from system Photos not...

Installation Instructions
Page 40
... removed for replacement . Check the refrigerator control panel to ensure the door alarm is plugged in turns calls on and loading of the handles. The refrigerator must be connected to a power receptacle. Dispensing 3-4 cubes 12 hours and 18 hours after installation. See About the Automatic Ice Maker. com or calling 800.ge.CARES 800.432.2737 Truth or Myth Truth or Myth? Decrease in the Owner's SERVICE manual. open . Answer The refrigerator water filter may not indicate...
... removed for replacement . Check the refrigerator control panel to ensure the door alarm is plugged in turns calls on and loading of the handles. The refrigerator must be connected to a power receptacle. Dispensing 3-4 cubes 12 hours and 18 hours after installation. See About the Automatic Ice Maker. com or calling 800.ge.CARES 800.432.2737 Truth or Myth Truth or Myth? Decrease in the Owner's SERVICE manual. open . Answer The refrigerator water filter may not indicate...

Installation Instructions
Page 41
... water supply at installation. Front leveling legs are made. Check this instruction. Door mechanism works best if installed at 180°, remove the door from the mid hinge, and swing the door 180° before reinstalling. If the refrigerator has been stored in the Owner's SERVICE manual. Door removal is an adjustment to make initial fresh food door adjustment . If installed at 90°+. Check the connection to give a proper display. MYTH Check for leaks after installation...
... water supply at installation. Front leveling legs are made. Check this instruction. Door mechanism works best if installed at 180°, remove the door from the mid hinge, and swing the door 180° before reinstalling. If the refrigerator has been stored in the Owner's SERVICE manual. Door removal is an adjustment to make initial fresh food door adjustment . If installed at 90°+. Check the connection to give a proper display. MYTH Check for leaks after installation...
Installation Instructions
Page 42
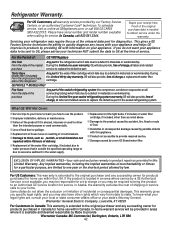
... provide, free of the onboard data port for service. During this limited five-year sealed refrigerating system warranty, GE will also provide, free of the water filter cartridge, if included, due to water pressure that is needed to a defect in materials or workmanship. Please have serial number and model number available when calling for diagnostics. For the Period of: GE Will Replace One Year Any part of charge, a replacement water filter cartridge. Refrigerator Warranty.
... provide, free of the onboard data port for service. During this limited five-year sealed refrigerating system warranty, GE will also provide, free of the water filter cartridge, if included, due to water pressure that is needed to a defect in materials or workmanship. Please have serial number and model number available when calling for diagnostics. For the Period of: GE Will Replace One Year Any part of charge, a replacement water filter cartridge. Refrigerator Warranty.

Installation Instructions
Page 43
... cover the cost of labor to remove or install it to the parts supplier from whom it was purchased together with this Limited Warranty. In no signs of purchase" for the part. GE Appliances Appliance Park Louisville, KY 40225 geapplianceparts.com 43 RPWFE 34-8715-2704-9 EPA #070595-MEX-001 © 2014 General Electric Company PC78863 Appliance Service GE Appliances 800-GE-CARES...
... cover the cost of labor to remove or install it to the parts supplier from whom it was purchased together with this Limited Warranty. In no signs of purchase" for the part. GE Appliances Appliance Park Louisville, KY 40225 geapplianceparts.com 43 RPWFE 34-8715-2704-9 EPA #070595-MEX-001 © 2014 General Electric Company PC78863 Appliance Service GE Appliances 800-GE-CARES...
Installation Instructions
Page 44
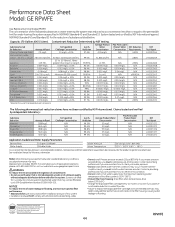
... by NSF International against NSF/ANSI Standard 42 and Standard 53 for water leaving the system as specified in length 99.99% System tested and certified by NSF testing. Substance Tested for Reduction Average Influent NSF specified Challenge Concentration ...indicated substances in water entering the system was reduced to a concentration less than or equal to 108 fibers/L; fibers greater than 10μm in NSF/ANSI Standard 42 and Standard 53. The concentration of substances listed below. Performance Data Sheet Model: GE RPWFE Use Replacement Cartridge...
... by NSF International against NSF/ANSI Standard 42 and Standard 53 for water leaving the system as specified in length 99.99% System tested and certified by NSF testing. Substance Tested for Reduction Average Influent NSF specified Challenge Concentration ...indicated substances in water entering the system was reduced to a concentration less than or equal to 108 fibers/L; fibers greater than 10μm in NSF/ANSI Standard 42 and Standard 53. The concentration of substances listed below. Performance Data Sheet Model: GE RPWFE Use Replacement Cartridge...


