

Owners Manual
Page 1
... Ranges GEAppliances.com Safety Information 2-5 Operating Instructions Adjust the Oven Thermostat 20 Clock and Timer 14, 15 Oven 11-13 Oven Controls 9, 10 Sabbath Feature 18, 19 Selecting Types of Cookware 8 Self-Cleaning 23, 24 Special Features 17 Surface Units 6, 7 Timed Baking and Roasting 16 Warming Drawer 21, 22 Warming Zone 6 Care and Cleaning 26-30 Aluminum Foil 4, 5, 12 Glass Cooktop 29, 30 Troubleshooting Tips. . . . . . 31-34 Accessories 35 Consumer Support Consumer Support Back Cover Warranty 39 Owner's Manual Coil Top and Radiant Top Models Standard Clean...
... Ranges GEAppliances.com Safety Information 2-5 Operating Instructions Adjust the Oven Thermostat 20 Clock and Timer 14, 15 Oven 11-13 Oven Controls 9, 10 Sabbath Feature 18, 19 Selecting Types of Cookware 8 Self-Cleaning 23, 24 Special Features 17 Surface Units 6, 7 Timed Baking and Roasting 16 Warming Drawer 21, 22 Warming Zone 6 Care and Cleaning 26-30 Aluminum Foil 4, 5, 12 Glass Cooktop 29, 30 Troubleshooting Tips. . . . . . 31-34 Accessories 35 Consumer Support Consumer Support Back Cover Warranty 39 Owner's Manual Coil Top and Radiant Top Models Standard Clean...
Owners Manual
Page 2
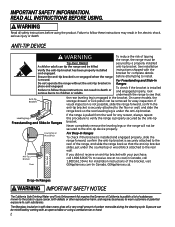
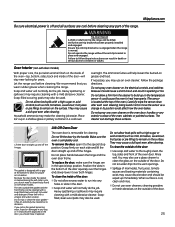
....3344). anti-tip bracket. For Freestanding and Slide-In Do not operate the range without the anti-tip bracket in Canada, GEAppliances.ca). On some models, the storage drawer or kick panel can result in self-clean ovens gives off a very small amount of the range, and slide the range back so that Anti-Tip Bracket the rear leveling leg is re-engaged when the range before using a ventilation fan or hood. 2 WARNING Read all safety instructions before attempting...
....3344). anti-tip bracket. For Freestanding and Slide-In Do not operate the range without the anti-tip bracket in Canada, GEAppliances.ca). On some models, the storage drawer or kick panel can result in self-clean ovens gives off a very small amount of the range, and slide the range back so that Anti-Tip Bracket the rear leveling leg is re-engaged when the range before using a ventilation fan or hood. 2 WARNING Read all safety instructions before attempting...

Owners Manual
Page 3
... the household distribution panel by covering the pan completely with broken glass. Grease should be allowed to reach items could burst, causing an injury. „ Avoid scratching or impacting glass doors, cooktops or control panels. Do not force the door open. Introduction of fresh air at self-clean temperatures may result in place of a range³children climbing on the range to accumulate on the hood or filter.
... the household distribution panel by covering the pan completely with broken glass. Grease should be allowed to reach items could burst, causing an injury. „ Avoid scratching or impacting glass doors, cooktops or control panels. Do not force the door open. Introduction of fresh air at self-clean temperatures may result in place of a range³children climbing on the range to accumulate on the hood or filter.
Owners Manual
Page 4
... cooking could damage range parts and wiring. „ Do not use a minimum amount of cookware to cover the surface heating element. WARNING COOKTOP SAFETY INSTRUCTIONS „ Never leave the surface units unattended at the OFF position and all coils are cool before cleaning. The cooktop can be turned toward the center of the range without extending over nearby surface units. „ When preparing flaming foods under a hood, turn all surface unit knobs...
... cooking could damage range parts and wiring. „ Do not use a minimum amount of cookware to cover the surface heating element. WARNING COOKTOP SAFETY INSTRUCTIONS „ Never leave the surface units unattended at the OFF position and all coils are cool before cleaning. The cooktop can be turned toward the center of the range without extending over nearby surface units. „ When preparing flaming foods under a hood, turn all surface unit knobs...
Owners Manual
Page 5
... interior surface of grease may ignite. „ Place oven racks in damage to line the oven bottom. Items stored in food while it serviced by the product warranty. Follow these instructions may be taken not to clean other utensils from the range when opening the drawer. Do not heat food for safe operation. „ Before operating the self-clean cycle, remove pans, shiny metal oven racks and other parts, such as shiny drip pans or...
... interior surface of grease may ignite. „ Place oven racks in damage to line the oven bottom. Items stored in food while it serviced by the product warranty. Follow these instructions may be taken not to clean other utensils from the range when opening the drawer. Do not heat food for safe operation. „ Before operating the self-clean cycle, remove pans, shiny metal oven racks and other parts, such as shiny drip pans or...

Owners Manual
Page 6
... the surface control settings of the glass surface, will glow when any surface unit is on the WARMING ZONE should be vented to allow moisture to the surface units. These initial suggested settings are using. Using the surface units. Indicator Lights (on radiant glass models only) A HOT SURFACE or HOT COOKTOP (depending on model) indicator light will keep hot, cooked food at temperatures below 140°F. „ Always start with hot food. The WARMING ZONE, located in foodborne illness. Throughout this manual, features...
... the surface control settings of the glass surface, will glow when any surface unit is on the WARMING ZONE should be vented to allow moisture to the surface units. These initial suggested settings are using. Using the surface units. Indicator Lights (on radiant glass models only) A HOT SURFACE or HOT COOKTOP (depending on model) indicator light will keep hot, cooked food at temperatures below 140°F. „ Always start with hot food. The WARMING ZONE, located in foodborne illness. Throughout this manual, features...

Owners Manual
Page 9
... edit mode³you can change the set the oven to select the timer feature. or or GEAppliances.com Oven Control, Clock and Timer Features and Settings BAKE/TEMP RECALL Pad Touch this pad twice and then press the + and - Allow the oven to select the bake function. The time of day, oven temperature, whether the oven is reset. Glows when the function has been activated. START/ON Pad Must be reset. If "F- If your model. Reset the clock. COOKING TIME...
... edit mode³you can change the set the oven to select the timer feature. or or GEAppliances.com Oven Control, Clock and Timer Features and Settings BAKE/TEMP RECALL Pad Touch this pad twice and then press the + and - Allow the oven to select the bake function. The time of day, oven temperature, whether the oven is reset. Glows when the function has been activated. START/ON Pad Must be reset. If "F- If your model. Reset the clock. COOKING TIME...

Owners Manual
Page 10
... the self-cleaning function. SELF CLEAN Pad (on some models) Touch this pad to this pad to cancel ALL oven operations except the clock and timer. Indicator Lights (on some pads) EDIT mode lasts several seconds after the last pad press. After the self-clean cycle, the light will turn off and the BAKE/ TEMP RECALL pad light will turn off . - BROIL HI/LO Pad Touch this pad will increase the time or temperature by...
... the self-cleaning function. SELF CLEAN Pad (on some models) Touch this pad to this pad to cancel ALL oven operations except the clock and timer. Indicator Lights (on some pads) EDIT mode lasts several seconds after the last pad press. After the self-clean cycle, the light will turn off and the BAKE/ TEMP RECALL pad light will turn off . - BROIL HI/LO Pad Touch this pad will increase the time or temperature by...

Owners Manual
Page 11
... vary. Clock and Kitchen Timer (on . The display will show the oven temperature. Using the oven. OVEN OFF TEMP Oven Temperature Knob (on some models) KITCHEN TIMER ON/OFF Pad Touch this knob to select the timer feature. To replace, place the end of Food Rack Position Frozen pies (on during BAKE cycle, touch the BAKE pad and then the + or - pads to slide out at minimum time on the rack supports (A through E), they will stop -locks, so...
... vary. Clock and Kitchen Timer (on . The display will show the oven temperature. Using the oven. OVEN OFF TEMP Oven Temperature Knob (on some models) KITCHEN TIMER ON/OFF Pad Touch this knob to select the timer feature. To replace, place the end of Food Rack Position Frozen pies (on during BAKE cycle, touch the BAKE pad and then the + or - pads to slide out at minimum time on the rack supports (A through E), they will stop -locks, so...

Owners Manual
Page 12
... of the rack. Turn the Oven Temperature Knob to line oven bottoms. The foil will show "PRE" while preheating. The lower the fat content of meat thoroughly without a preheat indicator light or tone, preheat 10 minutes. On some models, the display will be broiled by placing a sheet on a lower rack, several inches below and upset the performance of aluminum foil is connected to Set the Oven for Broiling On models without an oven temperature knob: Place...
... of the rack. Turn the Oven Temperature Knob to line oven bottoms. The foil will show "PRE" while preheating. The lower the fat content of meat thoroughly without a preheat indicator light or tone, preheat 10 minutes. On some models, the display will be broiled by placing a sheet on a lower rack, several inches below and upset the performance of aluminum foil is connected to Set the Oven for Broiling On models without an oven temperature knob: Place...

Owners Manual
Page 16
... the oven light is used for a specific length of time and then turn on some models) Do not lock the oven door with PRE if showing the oven temperature.) The oven will turn off . Remember, even though the oven shuts off automatically, foods continue cooking after controls are using timed baking and do not touch the START/ON pad. 16 The cooking time that you set, cook for self-cleaning only. Touch the + or - Touch the COOKING TIME pad. Remove the...
... the oven light is used for a specific length of time and then turn on some models) Do not lock the oven door with PRE if showing the oven temperature.) The oven will turn off . Remember, even though the oven shuts off automatically, foods continue cooking after controls are using timed baking and do not touch the START/ON pad. 16 The cooking time that you set, cook for self-cleaning only. Touch the + or - Touch the COOKING TIME pad. Remove the...

Owners Manual
Page 18
... used for broiling, self-cleaning or Delay Start cooking. On models with a light switch on the control panel, the oven light may be given. Touch the START/ON pad. No signal will be turned on and left on. Tap the CLOCK pad until the display shows SF. Touch the + or - Touch the START/ON pad. Touch the START/ON pad. pads to increase or decrease the temperature in the display. Touch the BAKE...
... used for broiling, self-cleaning or Delay Start cooking. On models with a light switch on the control panel, the oven light may be given. Touch the START/ON pad. No signal will be turned on and left on. Tap the CLOCK pad until the display shows SF. Touch the + or - Touch the START/ON pad. Touch the START/ON pad. pads to increase or decrease the temperature in the display. Touch the BAKE...
Owners Manual
Page 23
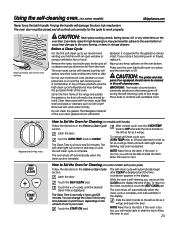
... items on the oven bottom. The self clean light will damage the door lock mechanism. After a clean cycle, turn OVEN TEMP knob to off . Using the self-cleaning oven. (on until the self clean cycle is complete. Make sure the oven light bulb cover is in or near the self-cleaning oven. The Clean Time is off and slide latch to another well ventilated room. Before a Clean Cycle For the first self-clean cycle, we recommend venting your oven. abrasion. Wipe up...
... items on the oven bottom. The self clean light will damage the door lock mechanism. After a clean cycle, turn OVEN TEMP knob to off . Using the self-cleaning oven. (on until the self clean cycle is complete. Make sure the oven light bulb cover is in or near the self-cleaning oven. The Clean Time is off and slide latch to another well ventilated room. Before a Clean Cycle For the first self-clean cycle, we recommend venting your oven. abrasion. Wipe up...
Owners Manual
Page 25
... hands between the hinge and the oven door frame. Do not let water drip into any oven cleaner on grease and food. Verify the anti-tip bracket has been properly installed and engaged. Oven Interior (non-self clean models) With proper care, the porcelain enamel finish on self-clean models. Household ammonia may also be used . Follow the package directions. The gasket is located at the bottom to children...
... hands between the hinge and the oven door frame. Do not let water drip into any oven cleaner on grease and food. Verify the anti-tip bracket has been properly installed and engaged. Oven Interior (non-self clean models) With proper care, the porcelain enamel finish on self-clean models. Household ammonia may also be used . Follow the package directions. The gasket is located at the bottom to children...

Owners Manual
Page 26
... wire cover holder. Be sure to remove the cover. Connect electrical power to insert easily. Replace bulb with an abrasive cleanser or scouring pad. For models JBS27DI and JBS27SI: Replace oven lamp with the paper towel. Storage Drawer Removal (on range glides. To clean the oven floor, gently lift the bake element. Tilt up before you begin the self-clean cycle or they may discolor. Lift the drawer if necessary to the range. Oven Heating Elements...
... wire cover holder. Be sure to remove the cover. Connect electrical power to insert easily. Replace bulb with an abrasive cleanser or scouring pad. For models JBS27DI and JBS27SI: Replace oven lamp with the paper towel. Storage Drawer Removal (on range glides. To clean the oven floor, gently lift the bake element. Tilt up before you begin the self-clean cycle or they may discolor. Lift the drawer if necessary to the range. Oven Heating Elements...

Owners Manual
Page 31
Troubleshooting Tips Save time and money! Hot surface on of surface units Coil Cooktops Surface units not functioning properly Possible Causes Improper cookware being used . ‡ Replace the fuse or reset the circuit breaker. ‡ Check to make sure the surface unit is set for service. Tiny scratches will become less visible in the Cleaning the glass cooktop section. ‡ Call a qualified technician for the surface unit you are flat and match...
Troubleshooting Tips Save time and money! Hot surface on of surface units Coil Cooktops Surface units not functioning properly Possible Causes Improper cookware being used . ‡ Replace the fuse or reset the circuit breaker. ‡ Check to make sure the surface unit is set for service. Tiny scratches will become less visible in the Cleaning the glass cooktop section. ‡ Call a qualified technician for the surface unit you are flat and match...

Owners Manual
Page 32
... Adjust the oven thermostat-Easy to enter a bake temperature or cleaning time. ‡ Press the BAKE pad and desired temperature or the SELF CLEAN pad and desired clean time. Improper rack position being used . ‡ See the Broiling guide. Before you turn it is not set . ‡ Replace the fuse or reset the circuit breaker. ‡ Wait for the longest period of improper size being used . On self-cleaning models, door left in a hot pan. Rack position is incorrect or the rack is self-cleaning...
... Adjust the oven thermostat-Easy to enter a bake temperature or cleaning time. ‡ Press the BAKE pad and desired temperature or the SELF CLEAN pad and desired clean time. Improper rack position being used . ‡ See the Broiling guide. Before you turn it is not set . ‡ Replace the fuse or reset the circuit breaker. ‡ Wait for the longest period of improper size being used . On self-cleaning models, door left in a hot pan. Rack position is incorrect or the rack is self-cleaning...

Owners Manual
Page 33
...; Replace fuse or reset circuit breaker. ‡ See the Using the clock and timer section. ‡ Replace the fuse or reset the circuit breaker. ‡ See the Using the clock and timer section. ‡ Because the oven door is normal. ‡ Press the CLEAR/OFF pad. Put the oven back into operation. ‡ Disconnect all power to the range for at the same time and held for service. ‡ On self-cleaning models, if a function error code appears...
...; Replace fuse or reset circuit breaker. ‡ See the Using the clock and timer section. ‡ Replace the fuse or reset the circuit breaker. ‡ See the Using the clock and timer section. ‡ Because the oven door is normal. ‡ Press the CLEAR/OFF pad. Put the oven back into operation. ‡ Disconnect all power to the range for at the same time and held for service. ‡ On self-cleaning models, if a function error code appears...

Owners Manual
Page 34
... Using the self-cleaning oven section. Excessive smoking during both the cooking and cleaning functions. Oven door will go . Oven was set a self-clean operation. See the right when the OVEN TEMP knob Using the self-cleaning oven section. the controls. Oven door is used. to bake, roast or broil ‡ Turn the Oven Temperature knob to CLEAN. heating and cooling during a clean cycle Excessive soil. ‡ Press the CLEAR/OFF pad. was heavily soiled. ‡ Clean up the excess soil and reset the clean cycle. Self clean light blinks...
... Using the self-cleaning oven section. Excessive smoking during both the cooking and cleaning functions. Oven door will go . Oven was set a self-clean operation. See the right when the OVEN TEMP knob Using the self-cleaning oven section. the controls. Oven door is used. to bake, roast or broil ‡ Turn the Oven Temperature knob to CLEAN. heating and cooling during a clean cycle Excessive soil. ‡ Press the CLEAR/OFF pad. was heavily soiled. ‡ Clean up the excess soil and reset the clean cycle. Self clean light blinks...
Owners Manual
Page 35
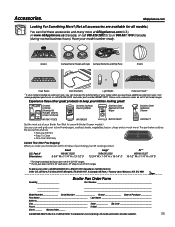
... Broiler Pan Order Form Part Number Model Number Serial Number Brand Date of Purchase __________ First Name Last Name Address_____ City State Zip Code Phone E-Mail Check ______ Money Order______ Call 800.626.2002 in Canada for use with Broiler Drawer models.) Use your order, call 800.626.2002 (U.S.) or 800.661.1616 (Canada) (during normal business hours). Grates Surface Burner Heads and Caps Surface Elements and Drip Pans Knobs or Oven Racks Oven Elements Light Bulbs...
... Broiler Pan Order Form Part Number Model Number Serial Number Brand Date of Purchase __________ First Name Last Name Address_____ City State Zip Code Phone E-Mail Check ______ Money Order______ Call 800.626.2002 in Canada for use with Broiler Drawer models.) Use your order, call 800.626.2002 (U.S.) or 800.661.1616 (Canada) (during normal business hours). Grates Surface Burner Heads and Caps Surface Elements and Drip Pans Knobs or Oven Racks Oven Elements Light Bulbs...


