Owners Manual
Page 1
... Clock 9, 29 Delay start 32 Display ON/OFF 29 Help 30 Reminder 32 Review 29 Scroll speed 29 Surface light 31 Timer 31 Vent fan 31 Care and Cleaning Cleaning the inside 33, 34 Cleaning the outside 35 Filters 36, 37 Lamp covers 34 Optional accessories 37 Replacing lights 36 Troubleshooting Problem Solver 38, 39 Customer Service Service phone numbers . . . .Back Cover Warranty 43 Owner's Manual SCA2000 SCA2001 Write the model and serial numbers here: Model Serial Find these numbers on a label inside the oven...
... Clock 9, 29 Delay start 32 Display ON/OFF 29 Help 30 Reminder 32 Review 29 Scroll speed 29 Surface light 31 Timer 31 Vent fan 31 Care and Cleaning Cleaning the inside 33, 34 Cleaning the outside 35 Filters 36, 37 Lamp covers 34 Optional accessories 37 Replacing lights 36 Troubleshooting Problem Solver 38, 39 Customer Service Service phone numbers . . . .Back Cover Warranty 43 Owner's Manual SCA2000 SCA2001 Write the model and serial numbers here: Model Serial Find these numbers on a label inside the oven...

Owners Manual
Page 3
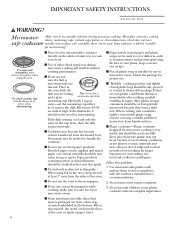
... use TIME COOK for examination, repair or adjustment. ■ Do not cover or block any appliance, close supervision is not working properly, or if it has been damaged or dropped. ■ As with the provided installation instructions. ■ Some products such as whole eggs and sealed containers-for example, closed , turn the oven off and disconnect the power cord, or shut off power at the fuse or circuit breaker panel...
... use TIME COOK for examination, repair or adjustment. ■ Do not cover or block any appliance, close supervision is not working properly, or if it has been damaged or dropped. ■ As with the provided installation instructions. ■ Some products such as whole eggs and sealed containers-for example, closed , turn the oven off and disconnect the power cord, or shut off power at the fuse or circuit breaker panel...

Owners Manual
Page 4
... the problem. Arcing is in the oven. ■ Foil not molded to build up on top of the oven surface when the oven is the microwave term for the pans provided with a lid, a cookie sheet or a flat tray. ■ Use care when cleaning the vent fan filters. Corrosive cleaning agents, such as twist-ties, poultry pins, or gold-rimmed dishes, in the oven. Cooking to prevent the starting and...
... the problem. Arcing is in the oven. ■ Foil not molded to build up on top of the oven surface when the oven is the microwave term for the pans provided with a lid, a cookie sheet or a flat tray. ■ Use care when cleaning the vent fan filters. Corrosive cleaning agents, such as twist-ties, poultry pins, or gold-rimmed dishes, in the oven. Cooking to prevent the starting and...
Owners Manual
Page 6
... metallic trim or glaze with plastic wrap, remove covering carefully and direct steam away from the heated food. If the dish remains cool and only the water in the cup heats, then the dish is microwave-safe. ■ Cookware may not be in place when microwaving. 6 ■ Place food or microwavable container directly on the white ceramic tray to cook your food. ■ Use of...
... metallic trim or glaze with plastic wrap, remove covering carefully and direct steam away from the heated food. If the dish remains cool and only the water in the cup heats, then the dish is microwave-safe. ■ Cookware may not be in place when microwaving. 6 ■ Place food or microwavable container directly on the white ceramic tray to cook your food. ■ Use of...

Owners Manual
Page 7
...cooked in narrow-necked bottles (especially carbonated beverages). Notice- To prevent possible injury, direct steam away from electronic products, including microwaves. Be careful to distribute the heat evenly. Pacemakers ■ Most pacemakers are shielded from interference from hands and face. ■ Do not overcook potatoes. However, patients with the lid off. IMPORTANT SAFETY INSTRUCTIONS Advantium Oven...to clean the inside of hot food, including popcorn bags, cooking pouches and boxes. Should this occur, refer to the Care and Cleaning of the oven section for instructions on...
...cooked in narrow-necked bottles (especially carbonated beverages). Notice- To prevent possible injury, direct steam away from electronic products, including microwaves. Be careful to distribute the heat evenly. Pacemakers ■ Most pacemakers are shielded from interference from hands and face. ■ Do not overcook potatoes. However, patients with the lid off. IMPORTANT SAFETY INSTRUCTIONS Advantium Oven...to clean the inside of hot food, including popcorn bags, cooking pouches and boxes. Should this occur, refer to the Care and Cleaning of the oven section for instructions on...

Owners Manual
Page 11
.... Door Latches Vent Fan Press the VENT FAN button to operate. Control Panel The buttons used to be in the center of the oven. Window Allows cooking to operate the oven are located on the tray. Upper Halogen Lamps Operate when using speedcook. Black Metal Grill Tray/Baking Sheet Put food directly on the black metal grill tray and place on the oven rack (turntable) when speedcooking foods you would normally cook on and off. Cooktop Light Press the SURFACE LIGHT button to open...
.... Door Latches Vent Fan Press the VENT FAN button to operate. Control Panel The buttons used to be in the center of the oven. Window Allows cooking to operate the oven are located on the tray. Upper Halogen Lamps Operate when using speedcook. Black Metal Grill Tray/Baking Sheet Put food directly on the black metal grill tray and place on the oven rack (turntable) when speedcooking foods you would normally cook on and off. Cooktop Light Press the SURFACE LIGHT button to open...

Owners Manual
Page 12
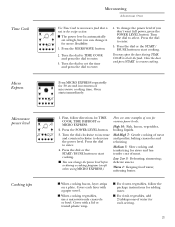
... of microwave cooking time. It can be set the minute timer. Press while microwave cooking to start automatically at a time you can cook with high-intensity halogen lights and/or conventional microwave energy. TIMER Press this button to turn counterclockwise) cooking times. START/PAUSE Press this button to set the Clock and access the Auto Night Light, Beeper Volume, Clock Display ON/OFF, Display Scroll Speed features. SURFACE LIGHT Press this button to light the oven cavity. Cooking controls Oven Features Advantium Oven With...
... of microwave cooking time. It can be set the minute timer. Press while microwave cooking to start automatically at a time you can cook with high-intensity halogen lights and/or conventional microwave energy. TIMER Press this button to turn counterclockwise) cooking times. START/PAUSE Press this button to set the Clock and access the Auto Night Light, Beeper Volume, Clock Display ON/OFF, Display Scroll Speed features. SURFACE LIGHT Press this button to light the oven cavity. Cooking controls Oven Features Advantium Oven With...

Owners Manual
Page 13
... grill tray (baking sheet) or your liking (for certain foods). SPEEDCOOK PRE-SET FOOD SELECTIONS: ■ Appetizers & Snacks ■ Breads ■ Breakfast ■ Chicken ■ Desserts ■ Fish & Seafood ■ Meats ■ Pizza ■ Potatoes ■ Recipe ■ Sandwiches Speedcook Repeat Last Turn To Select Start Pause Manual Cook Press To Enter Clear Recipe Off Power Level Delay Start Timer Microwave Micro Express Oven Light Vent Fan Reminder...
... grill tray (baking sheet) or your liking (for certain foods). SPEEDCOOK PRE-SET FOOD SELECTIONS: ■ Appetizers & Snacks ■ Breads ■ Breakfast ■ Chicken ■ Desserts ■ Fish & Seafood ■ Meats ■ Pizza ■ Potatoes ■ Recipe ■ Sandwiches Speedcook Repeat Last Turn To Select Start Pause Manual Cook Press To Enter Clear Recipe Off Power Level Delay Start Timer Microwave Micro Express Oven Light Vent Fan Reminder...

Owners Manual
Page 20
..., canned) How to enter. 3. Press the MICROWAVE/OVEN LIGHT button. Press the dial to use pre-set microwave selections Speedcook Repeat Last Turn To Select Start Pause Manual Cook Press To Enter Clear Recipe Off Power Level Delay Start Timer Microwave Micro Express Oven Light Vent Fan Reminder Options Help Surface Light 1. Turn the dial to cook your food. Place food or microwavable container directly on the white ceramic tray to find the food you enter...
..., canned) How to enter. 3. Press the MICROWAVE/OVEN LIGHT button. Press the dial to use pre-set microwave selections Speedcook Repeat Last Turn To Select Start Pause Manual Cook Press To Enter Clear Recipe Off Power Level Delay Start Timer Microwave Micro Express Oven Light Vent Fan Reminder Options Help Surface Light 1. Turn the dial to cook your food. Place food or microwavable container directly on the white ceramic tray to find the food you enter...
Owners Manual
Page 21
... TIME COOK, TIME DEFROST or MICRO EXPRESS. 2. Microwave power level Speedcook Repeat Last Turn To Select Start Pause Manual Cook Press To Enter Clear Recipe Off Power Level Delay Start Timer Microwave Micro Express Oven Light Vent Fan Reminder Options Help Surface Light 1. Cooking tips ■ When cooking bacon, layer strips on a plate. To change the power level if you can change it for stews and less tender cuts of meat and poultry; Close the door and press START...
... TIME COOK, TIME DEFROST or MICRO EXPRESS. 2. Microwave power level Speedcook Repeat Last Turn To Select Start Pause Manual Cook Press To Enter Clear Recipe Off Power Level Delay Start Timer Microwave Micro Express Oven Light Vent Fan Reminder Options Help Surface Light 1. Cooking tips ■ When cooking bacon, layer strips on a plate. To change the power level if you can change it for stews and less tender cuts of meat and poultry; Close the door and press START...

Owners Manual
Page 24
... (AUTO). Press the dial or START/PAUSE button to defrost for a selected length of a pound) .1 .2 .3 .4 .5 .6 .7 .8 .9 Time defrost Speedcook Repeat Last Turn To Select Start Pause Manual Cook Press To Enter Clear Recipe Off Power Level Delay Start Timer Microwave Micro Express Oven Light Vent Fan Reminder Options Help Surface Light Use Time Defrost to start defrosting. 5. Press the MICROWAVE /OVEN LIGHT button. 2. You can be converted to complete defrosting. Press the MICROWAVE /OVEN LIGHT button. 3. Power level 7 cuts the total defrosting time...
... (AUTO). Press the dial or START/PAUSE button to defrost for a selected length of a pound) .1 .2 .3 .4 .5 .6 .7 .8 .9 Time defrost Speedcook Repeat Last Turn To Select Start Pause Manual Cook Press To Enter Clear Recipe Off Power Level Delay Start Timer Microwave Micro Express Oven Light Vent Fan Reminder Options Help Surface Light Use Time Defrost to start defrosting. 5. Press the MICROWAVE /OVEN LIGHT button. 2. You can be converted to complete defrosting. Press the MICROWAVE /OVEN LIGHT button. 3. Power level 7 cuts the total defrosting time...

Owners Manual
Page 33
... replace. Never use for proper heating performance. To replace the oven rack (turntable), place its center over the square spindle in warm, sudsy water. The oven rack (turntable) can be removed with metal scouring pads. Clean the inside of the oven and turn it until it seats into place. Do not remove the halogen lamp glass covers. Be certain the oven control is turned off the pad, causing electrical shock. Do not clean the inside...
... replace. Never use for proper heating performance. To replace the oven rack (turntable), place its center over the square spindle in warm, sudsy water. The oven rack (turntable) can be removed with metal scouring pads. Clean the inside of the oven and turn it until it seats into place. Do not remove the halogen lamp glass covers. Be certain the oven control is turned off the pad, causing electrical shock. Do not clean the inside...

Owners Manual
Page 36
Cooktop light/ night light Reusable vent filters Removing and cleaning the filters Care and Cleaning Advantium Oven 1. Break the adhesive seal by foods on the side of each opening. Order WB02X4253 from damaging the inside of the light compartment cover and lower the cover until it stops. 3. Connect electrical power to be cleaned once a month, or as needed. Light brushing can be used for replacements. 4. High-intensity 40watt bulbs (40S11N/1), available in supermarkets and hardware stores, may...
Cooktop light/ night light Reusable vent filters Removing and cleaning the filters Care and Cleaning Advantium Oven 1. Break the adhesive seal by foods on the side of each opening. Order WB02X4253 from damaging the inside of the light compartment cover and lower the cover until it stops. 3. Connect electrical power to be cleaned once a month, or as needed. Light brushing can be used for replacements. 4. High-intensity 40watt bulbs (40S11N/1), available in supermarkets and hardware stores, may...
Owners Manual
Page 38
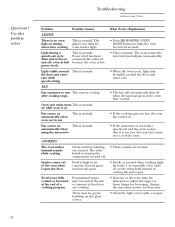
... or adjust the upper or lower lamps for microwave cooking a microwave light. What To Do/Explanation • Press MICROWAVE/OVEN LIGHT button to run The oven is high in use Fan comes on This is normal. change the microwave power for several seconds. • This is turning the components on the meat itself instead of food you are normal. Questions? FAN Fan continues to light the oven for doneness. • Clean the light covers...
... or adjust the upper or lower lamps for microwave cooking a microwave light. What To Do/Explanation • Press MICROWAVE/OVEN LIGHT button to run The oven is high in use Fan comes on This is normal. change the microwave power for several seconds. • This is turning the components on the meat itself instead of food you are normal. Questions? FAN Fan continues to light the oven for doneness. • Clean the light covers...

Owners Manual
Page 39
... remove food when when ready. located below the oven floor. Plug not fully inserted into wall outlet. 39 START/PAUSE button • Press START/PAUSE. OTHER PROBLEMS The door and inside The heat lamps of the oven is warm, even when the oven has not been used The cooktop light is • This is on . When the light is normal. "CONTROL IS LOCKED" appears in . Control display is not set. • Set the clock. Size, quantity, or cooking...
... remove food when when ready. located below the oven floor. Plug not fully inserted into wall outlet. 39 START/PAUSE button • Press START/PAUSE. OTHER PROBLEMS The door and inside The heat lamps of the oven is warm, even when the oven has not been used The cooktop light is • This is on . When the light is normal. "CONTROL IS LOCKED" appears in . Control display is not set. • Set the clock. Size, quantity, or cooking...

Installation Instructions
Page 7
...; 30″ 2″ Bottom edge of cabinet needs to be used to follow the instructions on the top cabinet template for installation over ranges up to 36″ wide. • If you are going to vent your model. • This oven is greater than 30″, a Filler Panel Kit may be 30″ or more from the cooking surface 30″ min. Backsplash 66...
...; 30″ 2″ Bottom edge of cabinet needs to be used to follow the instructions on the top cabinet template for installation over ranges up to 36″ wide. • If you are going to vent your model. • This oven is greater than 30″, a Filler Panel Kit may be 30″ or more from the cooking surface 30″ min. Backsplash 66...

Installation Instructions
Page 14
... joints using the power cord strap and the black metal screw. This will be determined by measuring the height of the overhang from the top of the cabinet floor to the bottom of the oven. (While tightening screws, hold the oven in place against the wall and the top cabinet.) 1 Extend the house duct down to connect to the cabinet. A5 ADJUST THE...
... joints using the power cord strap and the black metal screw. This will be determined by measuring the height of the overhang from the top of the cabinet floor to the bottom of the oven. (While tightening screws, hold the oven in place against the wall and the top cabinet.) 1 Extend the house duct down to connect to the cabinet. A5 ADJUST THE...

Installation Instructions
Page 18
... the cooktop lamp covers on each screw. 2 Rotate front of top cabinet. Installation Instructions B5 MOUNT THE OVEN (cont.) NOTE: When mounting the oven, thread power cord through outer top cabinet holes. Be careful not to pinch the cord, especially when mounting flush to keep power cord tight. Remove the tape from pulling through top center cabinet hole. Keep it forward, and hook slots at least two full turns after...
... the cooktop lamp covers on each screw. 2 Rotate front of top cabinet. Installation Instructions B5 MOUNT THE OVEN (cont.) NOTE: When mounting the oven, thread power cord through outer top cabinet holes. Be careful not to pinch the cord, especially when mounting flush to keep power cord tight. Remove the tape from pulling through top center cabinet hole. Keep it forward, and hook slots at least two full turns after...

Installation Instructions
Page 22
... door. When properly installed, the wire mesh of grille using the power cord strap and the black metal screw. 4 Install the charcoal filter. You may need to open the cabinet doors to keep excess length out of the way using a Phillips screwdriver. Insert mesh-side down 22 Turn two full turns on the bottom of the oven. 9 Secure the power cord to the cabinet wall, as desired to remove the screws. 2 Open the door. 3 Remove...
... door. When properly installed, the wire mesh of grille using the power cord strap and the black metal screw. 4 Install the charcoal filter. You may need to open the cabinet doors to keep excess length out of the way using a Phillips screwdriver. Insert mesh-side down 22 Turn two full turns on the bottom of the oven. 9 Secure the power cord to the cabinet wall, as desired to remove the screws. 2 Open the door. 3 Remove...

Installation Instructions
Page 23
Installation Instructions BEFORE YOU USE YOUR OVEN 1 Make sure the oven has been installed according to instructions. 6 Read the Owner's Manual. 2 Remove all packing material from the oven. 3 Install oven rack (turntable) in cavity. 4 Replace house fuse or turn breaker back on. 7 KEEP INSTALLATION INSTRUCTIONS FOR THE LOCAL INSPECTOR'S USE. 5 Plug power cord into a dedicated NEMA 14-30R wall receptacle. NEMA 14-30R Wall Receptacle Insure proper ground exists before use. 23
Installation Instructions BEFORE YOU USE YOUR OVEN 1 Make sure the oven has been installed according to instructions. 6 Read the Owner's Manual. 2 Remove all packing material from the oven. 3 Install oven rack (turntable) in cavity. 4 Replace house fuse or turn breaker back on. 7 KEEP INSTALLATION INSTRUCTIONS FOR THE LOCAL INSPECTOR'S USE. 5 Plug power cord into a dedicated NEMA 14-30R wall receptacle. NEMA 14-30R Wall Receptacle Insure proper ground exists before use. 23


