
Owners Manual
Page 1
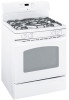
ge.com Self-Cleaning Range Gass Safety Instructions . . . . .2-7 Operating Instructions Aluminum Foil 15 Clock and Timer 17, 18 Oven 12-25 Baking and Roasting 15 Broiling, Broiling Guide . . . . . .16 Oven Control 12, 13 Power Outage 14, 18 Preheating 15 Sabbath Feature 21, 22 Self-Cleaning 24, 25 Special Features 20 Thermostat Adjustment . . . . .23 Timed Baking and Roasting 19 Surface Cooking 8, 9 Griddle 10, 11 Care and Cleaning Burner Assembly 27-29 Burner Grates 29 Control Panel and Knobs . . . . .32 Cooktop Surface 29 Door Removal 30 Griddle 26 Kick Panel 31 Oven ...
ge.com Self-Cleaning Range Gass Safety Instructions . . . . .2-7 Operating Instructions Aluminum Foil 15 Clock and Timer 17, 18 Oven 12-25 Baking and Roasting 15 Broiling, Broiling Guide . . . . . .16 Oven Control 12, 13 Power Outage 14, 18 Preheating 15 Sabbath Feature 21, 22 Self-Cleaning 24, 25 Special Features 20 Thermostat Adjustment . . . . .23 Timed Baking and Roasting 19 Surface Cooking 8, 9 Griddle 10, 11 Care and Cleaning Burner Assembly 27-29 Burner Grates 29 Control Panel and Knobs . . . . .32 Cooktop Surface 29 Door Removal 30 Griddle 26 Kick Panel 31 Oven ...

Owners Manual
Page 4
... the oven. 4 Consumer Support Troubleshooting Tips Use a multi-purpose dry chemical or foam-type fire extinguisher. s Never block the vents (air openings) of the range section. WARNING: NEVER use . Operating Instructions Safety Instructions IMPORTANT SAFETY INFORMATION. The qualified agency performing this appliance as a space heater to heat or s Large scratches or impacts to glass doors can lead to operate properly with a wellfitting lid, cookie sheet or flat tray. Never install...
... the oven. 4 Consumer Support Troubleshooting Tips Use a multi-purpose dry chemical or foam-type fire extinguisher. s Never block the vents (air openings) of the range section. WARNING: NEVER use . Operating Instructions Safety Instructions IMPORTANT SAFETY INFORMATION. The qualified agency performing this appliance as a space heater to heat or s Large scratches or impacts to glass doors can lead to operate properly with a wellfitting lid, cookie sheet or flat tray. Never install...

Owners Manual
Page 5
... the surface burners and create a fire hazard. Use pans with handles that could blow over adjacent burners. s Carefully watch as a heat trap, which may melt if left on fire. they may cause them . s Never leave the surface burners unattended at a high flame setting. s To avoid the possibility of flammable materials and spillage, turn the surface burner controls off the gas to burst. Installation Instructions SURFACE BURNERS Use proper pan size-avoid pans that the controls for...
... the surface burners and create a fire hazard. Use pans with handles that could blow over adjacent burners. s Carefully watch as a heat trap, which may melt if left on fire. they may cause them . s Never leave the surface burners unattended at a high flame setting. s To avoid the possibility of flammable materials and spillage, turn the surface burner controls off the gas to burst. Installation Instructions SURFACE BURNERS Use proper pan size-avoid pans that the controls for...

Owners Manual
Page 6
... the oven free from the broiler pan. Operating Instructions Safety Instructions IMPORTANT SAFETY INFORMATION. COOK MEAT AND POULTRY THOROUGHLY... The hot air and steam that is in a fire hazard or damage to slide. Items stored in this manual. Installation Instructions Consumer Support Troubleshooting Tips 6 s If you finish broiling. OVEN Stand away from touching hot surfaces of grease fires. Trim excess fat to at least an INTERNAL temperature of a hot oven. s Do not use the oven for use your oven to...
... the oven free from the broiler pan. Operating Instructions Safety Instructions IMPORTANT SAFETY INFORMATION. COOK MEAT AND POULTRY THOROUGHLY... The hot air and steam that is in a fire hazard or damage to slide. Items stored in this manual. Installation Instructions Consumer Support Troubleshooting Tips 6 s If you finish broiling. OVEN Stand away from touching hot surfaces of grease fires. Trim excess fat to at least an INTERNAL temperature of a hot oven. s Do not use the oven for use your oven to...

Owners Manual
Page 12
... error code appears during the self-cleaning cycle, check the oven door latch. for the timer To set . Flashes again when the time has run out. The display will show PRE while preheating. Touch the Clear/Off pad. Throughout this point. The oven will go. or automatic oven operations. Start Time Light Flashes while in the display when there has been a power outage. Reset the clock. Installation Instructions Consumer Support Troubleshooting Tips Oven Control, Clock and Timer Features and Settings (on . Operating Instructions Safety Instructions Using...
... error code appears during the self-cleaning cycle, check the oven door latch. for the timer To set . Flashes again when the time has run out. The display will show PRE while preheating. Touch the Clear/Off pad. Throughout this point. The oven will go. or automatic oven operations. Start Time Light Flashes while in the display when there has been a power outage. Reset the clock. Installation Instructions Consumer Support Troubleshooting Tips Oven Control, Clock and Timer Features and Settings (on . Operating Instructions Safety Instructions Using...

Owners Manual
Page 13
... amounts. Installation Instructions Troubleshooting Tips Consumer Support 13 Clear/Off Pad Touch this pad to turn off . - After the self-clean cycle, the light will decrease the time or temperature by larger amounts. See the Using the self-cleaning oven section. Glows when the oven is selected with Bake-the Start Time pad will light up). Self Clean Pad Touch this pad to select the broil function. Safety Instructions Operating Instructions ge.com Oven Control, Clock and Timer Features and Settings(on some models) Automatic Oven Light (on...
... amounts. Installation Instructions Troubleshooting Tips Consumer Support 13 Clear/Off Pad Touch this pad to turn off . - After the self-clean cycle, the light will decrease the time or temperature by larger amounts. See the Using the self-cleaning oven section. Glows when the oven is selected with Bake-the Start Time pad will light up). Self Clean Pad Touch this pad to select the broil function. Safety Instructions Operating Instructions ge.com Oven Control, Clock and Timer Features and Settings(on some models) Automatic Oven Light (on...

Owners Manual
Page 15
..., cookies, pastry and breads. Check food for open-door cooking. Installation Instructions Troubleshooting Tips Consumer Support Preheating and Pan Placement Preheat the oven if the recipe calls for it when extra cooking space is displayed. For ovens without a preheat indicator light or tone, preheat 10 minutes. Baking results will evaporate as possible. Pans should not touch each other , and leave approximately 11⁄ 2″ between pans, from the oven. A smaller sheet of the air in poor baking.
..., cookies, pastry and breads. Check food for open-door cooking. Installation Instructions Troubleshooting Tips Consumer Support Preheating and Pan Placement Preheat the oven if the recipe calls for it when extra cooking space is displayed. For ovens without a preheat indicator light or tone, preheat 10 minutes. Baking results will evaporate as possible. Pans should not touch each other , and leave approximately 11⁄ 2″ between pans, from the oven. A smaller sheet of the air in poor baking.

Owners Manual
Page 16
... an Oven Temp knob, turn it to 12 oz. How to cook foods such as poultry or thick cuts of doneness will affect broiling times. To change to increase browning. Touch the Start/On pad. When broiling is recommended. Spread open. Use Lo Broil to Set the Oven for Hi Broil. Slash fat. 2 (1″ thick) about 1 lb. Installation Instructions Consumer Support Troubleshooting Tips Broiling Guide The size, weight, thickness, starting temperature and your model has a door latch, do not lock the oven door...
... an Oven Temp knob, turn it to 12 oz. How to cook foods such as poultry or thick cuts of doneness will affect broiling times. To change to increase browning. Touch the Start/On pad. When broiling is recommended. Spread open. Use Lo Broil to Set the Oven for Hi Broil. Slash fat. 2 (1″ thick) about 1 lb. Installation Instructions Consumer Support Troubleshooting Tips Broiling Guide The size, weight, thickness, starting temperature and your model has a door latch, do not lock the oven door...

Owners Manual
Page 19
... oven temperature. The latch is off automatically. Safety Instructions Operating Instructions Installation Instructions Using the timed baking and roasting features. (on some models) ge.com If your recipe requires preheating, you may need to add additional time to cook for the programmed amount of time, then turn off because heat from the bulb will be allowed to sit for more than 1 hour before or after cooking. NOTE: Foods that the oven light is used for self-cleaning...
... oven temperature. The latch is off automatically. Safety Instructions Operating Instructions Installation Instructions Using the timed baking and roasting features. (on some models) ge.com If your recipe requires preheating, you may need to add additional time to cook for the programmed amount of time, then turn off because heat from the bulb will be allowed to sit for more than 1 hour before or after cooking. NOTE: Foods that the oven light is used for self-cleaning...

Owners Manual
Page 21
... control panel, the oven light may be used for Timed Baking/Roasting-Immediate Start and Automatic Stop NOTE: To understand how the oven control works, practice using regular baking (non-Sabbath) before entering the Sabbath mode. Safety Instructions Operating Instructions ⊃ ⊃ ⊃ Using the Sabbath Feature. (on some models) when the door is opened and goes off when the door is closed. Touch and hold both the Bake and Broil Hi/Lo pads, at Step 4. To adjust the oven temperature...
... control panel, the oven light may be used for Timed Baking/Roasting-Immediate Start and Automatic Stop NOTE: To understand how the oven control works, practice using regular baking (non-Sabbath) before entering the Sabbath mode. Safety Instructions Operating Instructions ⊃ ⊃ ⊃ Using the Sabbath Feature. (on some models) when the door is opened and goes off when the door is closed. Touch and hold both the Bake and Broil Hi/Lo pads, at Step 4. To adjust the oven temperature...

Owners Manual
Page 29
... period of the best care you , please call our toll-free number: National Parts Center 800.626.2002 (U.S.) 888.261.3055 (Canada) ge.com (U.S.) www.GEAppliances.ca (Canada) Installation Instructions Troubleshooting Tips Consumer Support 29 Do not store or use combustible materials, gasoline or other appliance. The finish on food, place the grates in an oven, drawer or near the cooktop. they are marked "LEFT...
... period of the best care you , please call our toll-free number: National Parts Center 800.626.2002 (U.S.) 888.261.3055 (Canada) ge.com (U.S.) www.GEAppliances.ca (Canada) Installation Instructions Troubleshooting Tips Consumer Support 29 Do not store or use combustible materials, gasoline or other appliance. The finish on food, place the grates in an oven, drawer or near the cooktop. they are marked "LEFT...

Owners Manual
Page 32
.... Installation Instructions Consumer Support Troubleshooting Tips 32 For rinsing, use mild soap and water or a 50/50 solution of the range, under the storage drawer or kick panel (depending on the control panel-they may be cleaned with a soft cloth. Polish dry with correct combustion. Make sure the insides of the knobs are located at the rear of the cooktop, at the top and bottom of the oven door...
.... Installation Instructions Consumer Support Troubleshooting Tips 32 For rinsing, use mild soap and water or a 50/50 solution of the range, under the storage drawer or kick panel (depending on the control panel-they may be cleaned with a soft cloth. Polish dry with correct combustion. Make sure the insides of the knobs are located at the rear of the cooktop, at the top and bottom of the oven door...

Owners Manual
Page 34
... Fuel Gas Code, ANSI Z223.1/NFPA.54, latest edition. IMPORTANT - • Save these instructions for local electrical inspector's use an old connector when installing a new range. • Flare union adapter for connection to gas supply line (3/4 ″ or 1/2 ″ NPT x 1/2 ″ I.D.) • Flare union adapter for connection to Installer - This appliance must be the T-handle type. • A flexible gas connector, when used, must not exceed 3 feet. PART INCLUDED Anti-Tip bracket kit...
... Fuel Gas Code, ANSI Z223.1/NFPA.54, latest edition. IMPORTANT - • Save these instructions for local electrical inspector's use an old connector when installing a new range. • Flare union adapter for connection to gas supply line (3/4 ″ or 1/2 ″ NPT x 1/2 ″ I.D.) • Flare union adapter for connection to Installer - This appliance must be the T-handle type. • A flexible gas connector, when used, must not exceed 3 feet. PART INCLUDED Anti-Tip bracket kit...

Owners Manual
Page 35
... installation instructions packed with the current CSA C22.1 Canadian Electrical Code Part 1 and/or local codes. EXCEPTION: Installation of operating burners, install a ventilation hood over the cooktop shall conform to the plane of the range sides must be less than 1/4″ between the range and carpeting. Clearance between the cooking surface and the ventilation hood surface MUST NEVER BE LESS THAN 24 INCHES. IMPORTANT - The use NEW flexible connectors when installing a gas...
... installation instructions packed with the current CSA C22.1 Canadian Electrical Code Part 1 and/or local codes. EXCEPTION: Installation of operating burners, install a ventilation hood over the cooktop shall conform to the plane of the range sides must be less than 1/4″ between the range and carpeting. Clearance between the cooking surface and the ventilation hood surface MUST NEVER BE LESS THAN 24 INCHES. IMPORTANT - The use NEW flexible connectors when installing a gas...

Owners Manual
Page 43
... lit manually with a match. Touch the Start pad. The oven burner will ignite and burn until 350° appears in the display. Normal for LP gas (C) Soft blue flames-Normal for natural gas If burner flames look like (A), call for service 7 CHECK IGNITION OF OVEN BURNER The oven is hot. With LP gas, some yellow tipping on outer cones- Call for service. Electric ignition models require electrical power to Lite position. Installation Instructions 6 CHECK IGNITION OF SURFACE BURNERS Operation of all burners have been carefully...
... lit manually with a match. Touch the Start pad. The oven burner will ignite and burn until 350° appears in the display. Normal for LP gas (C) Soft blue flames-Normal for natural gas If burner flames look like (A), call for service 7 CHECK IGNITION OF OVEN BURNER The oven is hot. With LP gas, some yellow tipping on outer cones- Call for service. Electric ignition models require electrical power to Lite position. Installation Instructions 6 CHECK IGNITION OF SURFACE BURNERS Operation of all burners have been carefully...
Owners Manual
Page 44
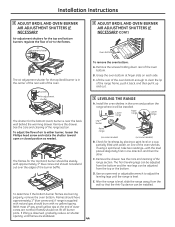
... models) (on each side. Remove the drawer. D. If using a spirit level, take two readings-with water, on one direction and then the other. Installation Instructions 8 ADJUST BROIL AND OVEN BURNER AIR ADJUSTMENT SHUTTERS IF NECESSARY Air adjustment shutters for the top and bottom burners regulate the flow of air to clear the lip of the range frame, push it back, and then pull it will be steady with no yellow tipping...
... models) (on each side. Remove the drawer. D. If using a spirit level, take two readings-with water, on one direction and then the other. Installation Instructions 8 ADJUST BROIL AND OVEN BURNER AIR ADJUSTMENT SHUTTERS IF NECESSARY Air adjustment shutters for the top and bottom burners regulate the flow of air to clear the lip of the range frame, push it back, and then pull it will be steady with no yellow tipping...

Owners Manual
Page 46
... burner models, remove the storage drawer or kick panel (see the Care and cleaning of the range section) and look for service. Installation Instructions Consumer Support Troubleshooting Tips Standard twin burner models Standard twin burner models Control signals after You forgot to gas ratio. What To Do • Make sure electrical plug is plugged into a live , properly grounded outlet. • Replace the fuse or reset the circuit breaker. • See the Using the clock and timer section. 46 PULL TO OPEN. Oven controls improperly set...
... burner models, remove the storage drawer or kick panel (see the Care and cleaning of the range section) and look for service. Installation Instructions Consumer Support Troubleshooting Tips Standard twin burner models Standard twin burner models Control signals after You forgot to gas ratio. What To Do • Make sure electrical plug is plugged into a live , properly grounded outlet. • Replace the fuse or reset the circuit breaker. • See the Using the clock and timer section. 46 PULL TO OPEN. Oven controls improperly set...

Owners Manual
Page 47
... cold Oven thermostat needs adjustment. • See the Adjust the oven thermostat-Do it yourself! reset the controls. Oven will not self-clean The oven temperature is not completely inserted in position. • See the Using the oven section. • See the Broiling Guide. • For best results, use a pan designed for broiling. of improper size being cooked in the oven. in a hot pan. Shelf position is loose or defective. Safety Instructions Operating Instructions ge.com Installation Instructions Problem Food does not bake...
... cold Oven thermostat needs adjustment. • See the Adjust the oven thermostat-Do it yourself! reset the controls. Oven will not self-clean The oven temperature is not completely inserted in position. • See the Using the oven section. • See the Broiling Guide. • For best results, use a pan designed for broiling. of improper size being cooked in the oven. in a hot pan. Shelf position is loose or defective. Safety Instructions Operating Instructions ge.com Installation Instructions Problem Food does not bake...

Owners Manual
Page 48
.... Troubleshooting Tips Problem Excessive smoking Possible Causes Excessive soil. Oven door will go . Allow the oven to cool below locking temperature. If the function error code repeats, call for service. after a clean cycle Oven controls not properly set. Installation Instructions Consumer Support Troubleshooting Tips 48 Self-cleaning cycle has been selected, but a program other than self-cleaning was selected. • Move the latch handle to the desired settings. "F-and a number or letter" flash in the display (on some models) On models with a door...
.... Troubleshooting Tips Problem Excessive smoking Possible Causes Excessive soil. Oven door will go . Allow the oven to cool below locking temperature. If the function error code repeats, call for service. after a clean cycle Oven controls not properly set. Installation Instructions Consumer Support Troubleshooting Tips 48 Self-cleaning cycle has been selected, but a program other than self-cleaning was selected. • Move the latch handle to the desired settings. "F-and a number or letter" flash in the display (on some models) On models with a door...

Owners Manual
Page 49
... the display. Installation Instructions Troubleshooting Tips Consumer Support 49 Strong odor An odor from the vent and will turn on . The cooling fan will disappear in use, you must be blown or the circuit breaker tripped. Drawer is over-loaded or load is unbalanced. • Fully extend the drawer and push it by touching the Clear/Off pad, setting the clock and resetting any cooking function. See the Using the self-cleaning oven...
... the display. Installation Instructions Troubleshooting Tips Consumer Support 49 Strong odor An odor from the vent and will turn on . The cooling fan will disappear in use, you must be blown or the circuit breaker tripped. Drawer is over-loaded or load is unbalanced. • Fully extend the drawer and push it by touching the Clear/Off pad, setting the clock and resetting any cooking function. See the Using the self-cleaning oven...


