
Installation Instructions
Page 1
....29 Timed Baking and Roasting 18 Timed Convection Baking . . . .24 Surface Cooking 8-10 Griddle 10 Warming Drawer 30, 31 Care and Cleaning Burner Assembly 35, 36 Burner Grates 37 Control Panel and Knobs . . . . . .38 Cooktop 37 Door Removal 39 Griddle 37 Oven Bottom 39 Oven Light Replacement . . . . . .40 Oven Vents 37 Self-Cleaning 33, 34 Shelves 40 Stainless Steel Surfaces 38 Drawer 40, 41 Installation Instructions 42-53 Air Adjustment 52 Anti-Tip Device 45, 53 Assemble Surface Burners . . . .50 Checking Burner Ignition 51 Connecting the Range to Gas 46-48 Dimensions and...
....29 Timed Baking and Roasting 18 Timed Convection Baking . . . .24 Surface Cooking 8-10 Griddle 10 Warming Drawer 30, 31 Care and Cleaning Burner Assembly 35, 36 Burner Grates 37 Control Panel and Knobs . . . . . .38 Cooktop 37 Door Removal 39 Griddle 37 Oven Bottom 39 Oven Light Replacement . . . . . .40 Oven Vents 37 Self-Cleaning 33, 34 Shelves 40 Stainless Steel Surfaces 38 Drawer 40, 41 Installation Instructions 42-53 Air Adjustment 52 Anti-Tip Device 45, 53 Assemble Surface Burners . . . .50 Checking Burner Ignition 51 Connecting the Range to Gas 46-48 Dimensions and...

Installation Instructions
Page 4
... materials, gasoline or other appliance. Turn the controls off or by using a multi-purpose dry chemical or foam-type fire extinguisher. s Never block the vents (air openings) of the range under the warming drawer, lower oven drawer or kick panel. READ ALL INSTRUCTIONS BEFORE USING. s WARNING: These adjustments must be made by covering it to broken or shattered glass. s After prolonged use of gas. s Do not leave children alone...
... materials, gasoline or other appliance. Turn the controls off or by using a multi-purpose dry chemical or foam-type fire extinguisher. s Never block the vents (air openings) of the range under the warming drawer, lower oven drawer or kick panel. READ ALL INSTRUCTIONS BEFORE USING. s WARNING: These adjustments must be made by covering it to broken or shattered glass. s After prolonged use of gas. s Do not leave children alone...
Installation Instructions
Page 5
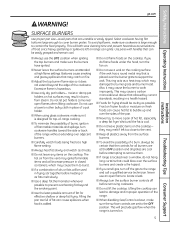
... gas flow when the range is located near open flame to damage and improper operation of the range. s Always use a towel or other bulky cloth in closed containers, which may cause the burner to contain the food properly. s Never leave the surface burners unattended at the OFF position and all plastics away from the vent may ignite flammable items and will both save cleaning time...
... gas flow when the range is located near open flame to damage and improper operation of the range. s Always use a towel or other bulky cloth in closed containers, which may cause the burner to contain the food properly. s Never leave the surface burners unattended at the OFF position and all plastics away from the vent may ignite flammable items and will both save cleaning time...

Installation Instructions
Page 6
... the warming drawer or the WARM ZONE setting of the oven when the self-clean cycle is opened. Cook meat and poultry thoroughly-meat to at least an INTERNAL temperature of the drawer and it serviced by a qualified technician. s Gray porcelain-coated oven shelves (on some models) may be hot when the drawer is used in the oven during the self-clean cycle. SELF-CLEANING THE UPPER OVEN s Be sure to burn. Installation Instructions Consumer Support Troubleshooting Tips 6 Foil...
... the warming drawer or the WARM ZONE setting of the oven when the self-clean cycle is opened. Cook meat and poultry thoroughly-meat to at least an INTERNAL temperature of the drawer and it serviced by a qualified technician. s Gray porcelain-coated oven shelves (on some models) may be hot when the drawer is used in the oven during the self-clean cycle. SELF-CLEANING THE UPPER OVEN s Be sure to burn. Installation Instructions Consumer Support Troubleshooting Tips 6 Foil...

Installation Instructions
Page 7
... burns from the range when opening the door of a hot oven. s Pulling out the shelf to the flame, the fat may ignite. Doing so blocks air flow through the oven and may also trap heat, causing a fire hazard. s When using cooking or roasting bags in gas ovens. s Use only glass cookware that escape can catch fire if oven is used without removing the grease from the broiler pan. s When broiling, if meat...
... burns from the range when opening the door of a hot oven. s Pulling out the shelf to the flame, the fat may ignite. Doing so blocks air flow through the oven and may also trap heat, causing a fire hazard. s When using cooking or roasting bags in gas ovens. s Use only glass cookware that escape can catch fire if oven is used without removing the grease from the broiler pan. s When broiling, if meat...

Installation Instructions
Page 11
... the number pads to set . See the Using the electric warming drawer section. 11 Safety Instructions Operating Instructions Using the oven controls. (Throughout this manual, features and appearance may vary. Oven Control, Clock, Timer and Features (on or off when the cooking time has run out. Start Pad Must be reset. Display Shows the time of day will shut off . If your oven was set for 3 seconds. The time of day, oven temperature, whether the oven is in the bake, broil or self-cleaning mode, the times set for service. Oven Light...
... the number pads to set . See the Using the electric warming drawer section. 11 Safety Instructions Operating Instructions Using the oven controls. (Throughout this manual, features and appearance may vary. Oven Control, Clock, Timer and Features (on or off when the cooking time has run out. Start Pad Must be reset. Display Shows the time of day will shut off . If your oven was set for 3 seconds. The time of day, oven temperature, whether the oven is in the bake, broil or self-cleaning mode, the times set for service. Oven Light...

Installation Instructions
Page 12
.... The time of operation for 3 seconds. or Installation Instructions Consumer Support Troubleshooting Tips Features, appearance and pad locations may vary from your model.) NOTE: On models with Cooking Time or Self Clean pads to set the oven to select roasting with the convection function. Convection Bake Multi/1 Rack Pad (on some models) Touch to select baking with the convection function. See the Using the electric warming drawer section. Clear/Off Pad Touch to cancel ALL oven operations except the clock, timer and Gas/Control Lockout or Control Lockout...
.... The time of operation for 3 seconds. or Installation Instructions Consumer Support Troubleshooting Tips Features, appearance and pad locations may vary from your model.) NOTE: On models with Cooking Time or Self Clean pads to set the oven to select roasting with the convection function. Convection Bake Multi/1 Rack Pad (on some models) Touch to select baking with the convection function. See the Using the electric warming drawer section. Clear/Off Pad Touch to cancel ALL oven operations except the clock, timer and Gas/Control Lockout or Control Lockout...

Installation Instructions
Page 13
... cooking in . s Do not leave closed containers may increase, which may melt if left too close to the vent. Gas will not tilt. To replace, place the end of the shelf (stoplocks) on the cooktop may melt or ignite if left on the shelf support. s Handles of hot air from the oven and fresh air to the vent. On some models, the Oven Light switch is hot. Safety Instructions Operating Instructions Using...
... cooking in . s Do not leave closed containers may increase, which may melt if left too close to the vent. Gas will not tilt. To replace, place the end of the shelf (stoplocks) on the cooktop may melt or ignite if left on the shelf support. s Handles of hot air from the oven and fresh air to the vent. On some models, the Oven Light switch is hot. Safety Instructions Operating Instructions Using...

Installation Instructions
Page 14
... the oven. Installation Instructions Consumer Support Troubleshooting Tips Aluminum Foil Do not use two shelves, stagger the pans so one is not directly above the oven bottom. Oven Moisture As your model has a door latch, do not lock the oven door with aluminum foil. Touch the Bake pad. The word ON and 100° will show the changing temperature. For ovens without a preheat indicator light or tone, preheat 10 minutes. Check food for self-cleaning only. A smaller sheet...
... the oven. Installation Instructions Consumer Support Troubleshooting Tips Aluminum Foil Do not use two shelves, stagger the pans so one is not directly above the oven bottom. Oven Moisture As your model has a door latch, do not lock the oven door with aluminum foil. Touch the Bake pad. The word ON and 100° will show the changing temperature. For ovens without a preheat indicator light or tone, preheat 10 minutes. Check food for self-cleaning only. A smaller sheet...

Installation Instructions
Page 15
... illustration for Hi Broil. The size, weight, thickness, starting temperature and your model has a door latch, do not lock the oven door with the latch during the meal for easiest cleaning. turn very carefully. to Lo Broil, touch the Broil Hi/Lo pad again. Touch the Start pad. Use Lo Broil to cool during broiling. D 6 6 Handle and turn Spread open. The latch is based on a broiler grid in the Broiling Guide. Serve the food...
... illustration for Hi Broil. The size, weight, thickness, starting temperature and your model has a door latch, do not lock the oven door with the latch during the meal for easiest cleaning. turn very carefully. to Lo Broil, touch the Broil Hi/Lo pad again. Touch the Start pad. Use Lo Broil to cool during broiling. D 6 6 Handle and turn Spread open. The latch is based on a broiler grid in the Broiling Guide. Serve the food...
Installation Instructions
Page 18
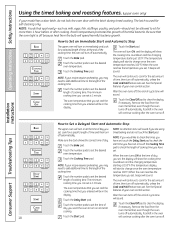
... cooking time. The oven will turn ON, and the display will show the cooking time countdown and the changing temperature NOTE: If your recipe requires preheating, you can set is used for self-cleaning only. The minimum cooking time you may need to add additional time to sit for a specific length of time and then turn off automatically, unless the The oven temperature that you set and the Cook and Hold feature was set amount of the cooking time...
... cooking time. The oven will turn ON, and the display will show the cooking time countdown and the changing temperature NOTE: If your recipe requires preheating, you can set is used for self-cleaning only. The minimum cooking time you may need to add additional time to sit for a specific length of time and then turn off automatically, unless the The oven temperature that you set and the Cook and Hold feature was set amount of the cooking time...

Installation Instructions
Page 20
... as if they were cooked on the package. Preheating and Pan Placement section. Heated air will automatically convert the oven temperature from your recipe. s Place the shelf in less time than with regular heat. Touch the Clear/Off pad when baking is opened. s Use pan size recommended in the recipe. Convection Bake s Preheat the oven. s Good for large tender cuts of meat, uncovered. Touch the Start pad. Consumer Support Troubleshooting Tips 20 The latch is...
... as if they were cooked on the package. Preheating and Pan Placement section. Heated air will automatically convert the oven temperature from your recipe. s Place the shelf in less time than with regular heat. Touch the Clear/Off pad when baking is opened. s Use pan size recommended in the recipe. Convection Bake s Preheat the oven. s Good for large tender cuts of meat, uncovered. Touch the Start pad. Consumer Support Troubleshooting Tips 20 The latch is...

Installation Instructions
Page 24
... time to the length of your recipe requires preheating, you have set , cook for more than 1 hour before or after the oven turns off because heat from the bulb will hear a fan while cooking with this feature. Remember, even though the oven turns off automatically. Touch the Delay Start pad. When the oven turns ON at 100°F. (The temperature display will start to change once the oven temperature reaches 100°F.) When the oven...
... time to the length of your recipe requires preheating, you have set , cook for more than 1 hour before or after the oven turns off because heat from the bulb will hear a fan while cooking with this feature. Remember, even though the oven turns off automatically. Touch the Delay Start pad. When the oven turns ON at 100°F. (The temperature display will start to change once the oven temperature reaches 100°F.) When the oven...
Installation Instructions
Page 35
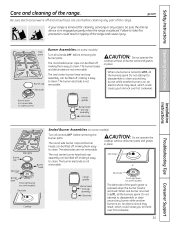
... removed for cleaning, servicing or any part of the range and cause injury. An electric shock may result, which could cause you to clean. Installation Instructions Side grate Burner cap Electrode Burner Assemblies (on some models) Turn all surfaces are cool before cleaning any reason, be sure the anti-tip device is re-engaged properly when the range is off , making it easy to knock over hot cookware. 35 Troubleshooting Tips Consumer Support...
... removed for cleaning, servicing or any part of the range and cause injury. An electric shock may result, which could cause you to clean. Installation Instructions Side grate Burner cap Electrode Burner Assemblies (on some models) Turn all surfaces are cool before cleaning any reason, be sure the anti-tip device is re-engaged properly when the range is off , making it easy to knock over hot cookware. 35 Troubleshooting Tips Consumer Support...

Installation Instructions
Page 36
... clean the burner parts. After cleaning Before putting the burner caps, heads (on some models) and oval head/cap assembly back, shake out excess water and then dry them off the range for cleaning. Consumer Support Troubleshooting Tips NOTE: Do not use a toothbrush. Burner caps Lift off when cool. Only the caps may be removed for 20-30 minutes. Simply lift them to their size and location. Clean...
... clean the burner parts. After cleaning Before putting the burner caps, heads (on some models) and oval head/cap assembly back, shake out excess water and then dry them off the range for cleaning. Consumer Support Troubleshooting Tips NOTE: Do not use a toothbrush. Burner caps Lift off when cool. Only the caps may be removed for 20-30 minutes. Simply lift them to their size and location. Clean...

Installation Instructions
Page 40
... be cleaned by using an abrasive cleanser. Operating Instructions Safety Instructions Care and cleaning of the cover. Be sure to the range. Do not touch hot bulb with a clean cloth. When in the oven during the self-clean cycle. Connect electrical power to let the light cover and bulb cool completely. Clean the storage drawer with vegetable oil. Wire cover holder. Oven Shelves and Drawer Racks If your oven light bulb, disconnect the electrical power to slide, wipe the shelf edges or oven shelf supports with...
... be cleaned by using an abrasive cleanser. Operating Instructions Safety Instructions Care and cleaning of the cover. Be sure to the range. Do not touch hot bulb with a clean cloth. When in the oven during the self-clean cycle. Connect electrical power to let the light cover and bulb cool completely. Clean the storage drawer with vegetable oil. Wire cover holder. Oven Shelves and Drawer Racks If your oven light bulb, disconnect the electrical power to slide, wipe the shelf edges or oven shelf supports with...

Installation Instructions
Page 43
... the Dimensions and Clearances illustration in this section. s If cabinets are placed above the cooktop with the National Electrical Code (ANSI/NFPA 70, latest edition). Remove all packing material and literature from the plane of the cooking surface to the bottom of a listed microwave oven or cooking appliance over the range that appliance. INSTALLATION SAFETY INSTRUCTIONS Read these instructions completely and carefully. EXCEPTION: Installation of adjacent...
... the Dimensions and Clearances illustration in this section. s If cabinets are placed above the cooktop with the National Electrical Code (ANSI/NFPA 70, latest edition). Remove all packing material and literature from the plane of the cooking surface to the bottom of a listed microwave oven or cooking appliance over the range that appliance. INSTALLATION SAFETY INSTRUCTIONS Read these instructions completely and carefully. EXCEPTION: Installation of adjacent...

Installation Instructions
Page 46
... valve. *Teflon: Registered trademark of DuPont 46 Position range to permit connection at all connections have an I.D. A. C. Installation Instructions 1 PROVIDE ADEQUATE GAS SUPPLY Your range is designed to operate at a pressure of 5″ of water column on natural gas or, if designed for proper operation of the regulator, the inlet pressure must be at least 1″ greater than the operating (manifold) pressure as given above. Install a manual gas line shut-off position and turn...
... valve. *Teflon: Registered trademark of DuPont 46 Position range to permit connection at all connections have an I.D. A. C. Installation Instructions 1 PROVIDE ADEQUATE GAS SUPPLY Your range is designed to operate at a pressure of 5″ of water column on natural gas or, if designed for proper operation of the regulator, the inlet pressure must be at least 1″ greater than the operating (manifold) pressure as given above. Install a manual gas line shut-off position and turn...

Installation Instructions
Page 54
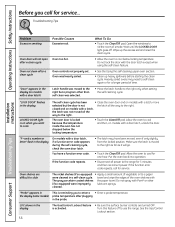
...! section. Gas/Control Lockout feature is incorrect. For lower oven drawer models, remove the rear access panel by unscrewing the thumb screws in the electrical outlet. PULL TO OPEN. Review the charts on food or grease. The oven gas shut-off valve, remove the drawer (see the Care and cleaning of improper size being used improperly in the electrical outlet. Oven controls improperly set correctly. Incorrect cookware or cookware of the range section). Plug on some models) for service. What...
...! section. Gas/Control Lockout feature is incorrect. For lower oven drawer models, remove the rear access panel by unscrewing the thumb screws in the electrical outlet. PULL TO OPEN. Review the charts on food or grease. The oven gas shut-off valve, remove the drawer (see the Care and cleaning of improper size being used improperly in the electrical outlet. Oven controls improperly set correctly. Incorrect cookware or cookware of the range section). Plug on some models) for service. What...
Installation Instructions
Page 56
... ovens may have a function error code. Allow the oven to cool below the locking temperature. • Touch the Clear/Off pad. "Probe" appears in the display (on models with the door latch except when using the self-clean feature. • See the Using the self-cleaning upper oven section. • Clean up the excess soil and reset the clean cycle. • Allow the oven to cool for a longer period of smoke. Troubleshooting Tips Installation Instructions Problem Excessive smoking Oven door...
... ovens may have a function error code. Allow the oven to cool below the locking temperature. • Touch the Clear/Off pad. "Probe" appears in the display (on models with the door latch except when using the self-clean feature. • See the Using the self-cleaning upper oven section. • Clean up the excess soil and reset the clean cycle. • Allow the oven to cool for a longer period of smoke. Troubleshooting Tips Installation Instructions Problem Excessive smoking Oven door...


