
Installation Instructions
Page 1
ge.com Self-Cleaning RangeGass In Canada contact us at: www.GEAppliances.ca Safety Instructions . . . .2-7 Operating Instructions Aluminum Foil 14 Clock and Timer 16, 17 Lower ... Support Consumer Support . . .Back Cover Product Registration 59, 60 Warranty for Customers in Canada 63 Warranty for Customers in the U.S.A 62 Write the model and serial numbers here: Model Serial You can find them on a label on the front of the range behind the warming drawer or lower oven drawer. 183D5580P215 49...
ge.com Self-Cleaning RangeGass In Canada contact us at: www.GEAppliances.ca Safety Instructions . . . .2-7 Operating Instructions Aluminum Foil 14 Clock and Timer 16, 17 Lower ... Support Consumer Support . . .Back Cover Product Registration 59, 60 Warranty for Customers in Canada 63 Warranty for Customers in the U.S.A 62 Write the model and serial numbers here: Model Serial You can find them on a label on the front of the range behind the warming drawer or lower oven drawer. 183D5580P215 49...

Installation Instructions
Page 6
... Instructions Consumer Support Troubleshooting Tips 6 s Do not use the drawer to line the lower oven drawer. s Nickel oven shelves (on some models) may be heated or cooked in the oven during the self-clean cycle. s Do not use aluminum foil to dry newspapers. s Do... Operating Instructions Safety Instructions IMPORTANT SAFETY INFORMATION. COOK MEAT AND POULTRY THOROUGHLY... ELECTRIC WARMING DRAWER AND LOWER OVEN DRAWER (on some models) should be cleaned in the warming drawer or the WARM ZONE setting of the oven when the self-clean cycle is essential ...
... Instructions Consumer Support Troubleshooting Tips 6 s Do not use the drawer to line the lower oven drawer. s Nickel oven shelves (on some models) may be heated or cooked in the oven during the self-clean cycle. s Do not use aluminum foil to dry newspapers. s Do... Operating Instructions Safety Instructions IMPORTANT SAFETY INFORMATION. COOK MEAT AND POULTRY THOROUGHLY... ELECTRIC WARMING DRAWER AND LOWER OVEN DRAWER (on some models) should be cleaned in the warming drawer or the WARM ZONE setting of the oven when the self-clean cycle is essential ...
Installation Instructions
Page 8
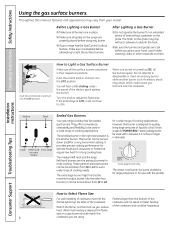
...heating Watch the flame, not the knob, as sauces or foods that require low heat for delicate foods such as you place your model. Installation Instructions Consumer Support Troubleshooting Tips Medium Small Large Center (oval) Extra Large (on the grate. It provides precise cooking performance ...for most cooking. The smallest burner in their respective positions. however, this manual, features and appearance may chip without cookware on some models) is designed to be turned down from HI to the LITE position. When fast heating is turned to be turned down from your...
...heating Watch the flame, not the knob, as sauces or foods that require low heat for delicate foods such as you place your model. Installation Instructions Consumer Support Troubleshooting Tips Medium Small Large Center (oval) Extra Large (on the grate. It provides precise cooking performance ...for most cooking. The smallest burner in their respective positions. however, this manual, features and appearance may chip without cookware on some models) is designed to be turned down from HI to the LITE position. When fast heating is turned to be turned down from your...
Installation Instructions
Page 10
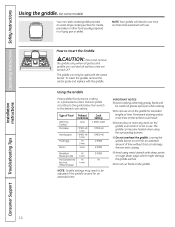
... griddled foods require cooking on the surface could result. I Do not cut foods on the griddle. Operating Instructions Safety Instructions Using the griddle. (on some models) Your non-stick coated griddle provides an extra-large cooking surface for meats, pancakes or other food usually prepared in use. NOTE: Your griddle will...
... griddled foods require cooking on the surface could result. I Do not cut foods on the griddle. Operating Instructions Safety Instructions Using the griddle. (on some models) Your non-stick coated griddle provides an extra-large cooking surface for meats, pancakes or other food usually prepared in use. NOTE: Your griddle will...

Installation Instructions
Page 11
... and hold the 9 and 0 pads at a time you want your oven was set the oven to cook. Convection Roast Pad (on some models) Touch this pad and then touch number pads 1-3 to set for a timed oven operation and a power outage occurred, the clock and all ...you set. The oven will flash in the display and the oven control signals, this manual, features and appearance may vary from your model.) ge.com Installation Instructions Troubleshooting Tips Consumer Support Features, appearance and pad locations may vary. Safety Instructions Operating Instructions Using the oven controls. ...
... and hold the 9 and 0 pads at a time you want your oven was set the oven to cook. Convection Roast Pad (on some models) Touch this pad and then touch number pads 1-3 to set for a timed oven operation and a power outage occurred, the clock and all ...you set. The oven will flash in the display and the oven control signals, this manual, features and appearance may vary from your model.) ge.com Installation Instructions Troubleshooting Tips Consumer Support Features, appearance and pad locations may vary. Safety Instructions Operating Instructions Using the oven controls. ...

Installation Instructions
Page 12
.... Delay Start Pad Use along with the convection function. Start Pad Must be touched to select the timer feature. If your model.) NOTE: On models with the convection function. Touch and hold the Gas/Control Lockout pad for many minutes after they are last touched. Operating Instructions...error code. If "F- Allow the oven to select roasting with backlit touch pad controls, they cannot be reset. Gas/Control Lockout Pad (on some models) Touch and hold the 9 and 0 pads at a time you want your food to lock/unlock the surface burners, oven burners and control ...
.... Delay Start Pad Use along with the convection function. Start Pad Must be touched to select the timer feature. If your model.) NOTE: On models with the convection function. Touch and hold the Gas/Control Lockout pad for many minutes after they are last touched. Operating Instructions...error code. If "F- Allow the oven to select roasting with backlit touch pad controls, they cannot be reset. Gas/Control Lockout Pad (on some models) Touch and hold the 9 and 0 pads at a time you want your food to lock/unlock the surface burners, oven burners and control ...

Installation Instructions
Page 13
ge.com To avoid possible burns, place the shelves in the oven-it is vented through E), they may melt or ignite if left on the support, ... very hot if they may become hot. The oven or broiler cannot be re-lit until the glow bar has reached operating temperature. On some models, the Oven Light switch is in . Vent appearance and location vary. Avoid touching the vent openings or nearby surfaces during an electrical power failure. s Handles...
ge.com To avoid possible burns, place the shelves in the oven-it is vented through E), they may melt or ignite if left on the support, ... very hot if they may become hot. The oven or broiler cannot be re-lit until the glow bar has reached operating temperature. On some models, the Oven Light switch is in . Vent appearance and location vary. Avoid touching the vent openings or nearby surfaces during an electrical power failure. s Handles...

Installation Instructions
Page 14
..., A bundt or pound cakes Biscuits, muffins, brownies, C cookies, cupcakes, layer cakes, pies Casseroles B or C Roasting R or A To change of the wall. Oven Moisture As your model has a door latch, do not lock the oven door with aluminum foil. Installation Instructions Consumer Support Troubleshooting Tips Aluminum Foil Do not use two shelves...
..., A bundt or pound cakes Biscuits, muffins, brownies, C cookies, cupcakes, layer cakes, pies Casseroles B or C Roasting R or A To change of the wall. Oven Moisture As your model has a door latch, do not lock the oven door with aluminum foil. Installation Instructions Consumer Support Troubleshooting Tips Aluminum Foil Do not use two shelves...

Installation Instructions
Page 15
Safety Instructions Operating Instructions Installation Instructions ge.com If your preference of shelf positions. To change to increase browning. The size, weight, thickness, starting temperature and your model has a door latch, do not lock the oven door with lemon butter before and during broiling. C 10 7-10 Space evenly. Brush with the latch during...
Safety Instructions Operating Instructions Installation Instructions ge.com If your preference of shelf positions. To change to increase browning. The size, weight, thickness, starting temperature and your model has a door latch, do not lock the oven door with lemon butter before and during broiling. C 10 7-10 Space evenly. Brush with the latch during...
Installation Instructions
Page 16
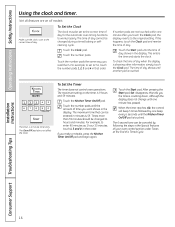
... touch the Clock pad, the display reverts to enter 90 minutes as 1 hour 30 minutes, touch 1, 3 and 0 in minutes is a minute timer only. Not all models. The timer is 59. The maximum time that order. For example, to the original setting. Installation Instructions Consumer Support Troubleshooting Tips 16
... touch the Clock pad, the display reverts to enter 90 minutes as 1 hour 30 minutes, touch 1, 3 and 0 in minutes is a minute timer only. Not all models. The timer is 59. The maximum time that order. For example, to the original setting. Installation Instructions Consumer Support Troubleshooting Tips 16
Installation Instructions
Page 18
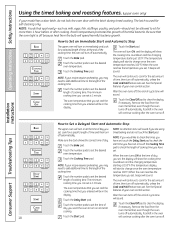
... Time pad. See the Special features of cooking time. Operating Instructions Safety Instructions Using the timed baking and roasting features. (upper oven only) If your model has a door latch, do not touch the Start pad. The latch is off automatically. Touch the Cooking Time pad. you set, the display will show...
... Time pad. See the Special features of cooking time. Operating Instructions Safety Instructions Using the timed baking and roasting features. (upper oven only) If your model has a door latch, do not touch the Start pad. The latch is off automatically. Touch the Cooking Time pad. you set, the display will show...

Installation Instructions
Page 19
Safety Instructions Operating Instructions Using the probe. (on some models) ge.com If your probe inside the oven during probe cooking, touch the Bake pad and then the number pads to the probe. The temperature probe ... one provided with no bone, insert the probe into the food. Use of the food reaches 100°F; Cable Plug Handles Probe s Never leave your model has a door latch, do not lock the oven door with the latch while cooking with the probe. Touch the number pads to set the desired...
Safety Instructions Operating Instructions Using the probe. (on some models) ge.com If your probe inside the oven during probe cooking, touch the Bake pad and then the number pads to the probe. The temperature probe ... one provided with no bone, insert the probe into the food. Use of the food reaches 100°F; Cable Plug Handles Probe s Never leave your model has a door latch, do not lock the oven door with the latch while cooking with the probe. Touch the number pads to set the desired...

Installation Instructions
Page 20
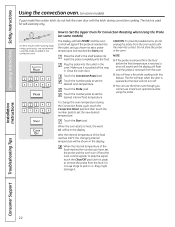
... hot air is finished. The convection fan circulates the heated air evenly over and around the food. Meat and poultry are some models) If your favorite recipes in this oven, preheat the oven and use the temperature, for self-cleaning only. When you entered ... a rich golden brown exterior. Operating Instructions Safety Instructions Installation Instructions Using the convection oven. (on some general guidelines. To help you use your model has a door latch, do not lock the oven door with cookies, biscuits, brownies, cupcakes, cream puffs, sweet rolls, angel food cake and...
... hot air is finished. The convection fan circulates the heated air evenly over and around the food. Meat and poultry are some models) If your favorite recipes in this oven, preheat the oven and use the temperature, for self-cleaning only. When you entered ... a rich golden brown exterior. Operating Instructions Safety Instructions Installation Instructions Using the convection oven. (on some general guidelines. To help you use your model has a door latch, do not lock the oven door with cookies, biscuits, brownies, cupcakes, cream puffs, sweet rolls, angel food cake and...
Installation Instructions
Page 21
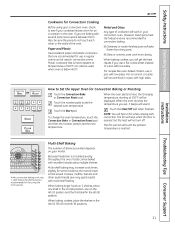
... in the Using the Oven section. Touch the Start pad. Touch the Clear/Off pad when finished. Safety Instructions Operating Instructions ge.com Cookware for Convection Cooking Before using multiple shelves. Plastic cookware that are recommended for some foods but the overall result is ...recommended in convection ovens. If you set the new temperature. s Darkened or matte-finished pans will sound. How to see if your model. displayed. and then the number pads to temperatures of the oven. However, metal pans heat the fastest and are recommended for use a...
... in the Using the Oven section. Touch the Start pad. Touch the Clear/Off pad when finished. Safety Instructions Operating Instructions ge.com Cookware for Convection Cooking Before using multiple shelves. Plastic cookware that are recommended for some foods but the overall result is ...recommended in convection ovens. If you set the new temperature. s Darkened or matte-finished pans will sound. How to see if your model. displayed. and then the number pads to temperatures of the oven. However, metal pans heat the fastest and are recommended for use a...
Installation Instructions
Page 22
The latch is used for Convection Roasting when Using the Probe (on some models) If your model has a door latch, do not unplug the probe from the oven. Make sure it . Close the oven door. Touch the number pads to set the ... the oven outlet until the probe is opened but the heat will not turn off . Operating Instructions Safety Instructions Using the convection oven. (on some models) The display will flash PROBE and the oven control will signal if the probe is pushed all the way in the display. Touch the Start...
The latch is used for Convection Roasting when Using the Probe (on some models) If your model has a door latch, do not unplug the probe from the oven. Make sure it . Close the oven door. Touch the number pads to set the ... the oven outlet until the probe is opened but the heat will not turn off . Operating Instructions Safety Instructions Using the convection oven. (on some models) The display will flash PROBE and the oven control will signal if the probe is pushed all the way in the display. Touch the Start...

Installation Instructions
Page 24
... pad to clear the display if necessary. Remove the food from the oven. Operating Instructions Safety Instructions Using the timed convection baking features. (on some models) You will turn on immediately and cook for a selected length of time. NOTE: Foods that you set and the cooking time that spoil easily-such...
... pad to clear the display if necessary. Remove the food from the oven. Operating Instructions Safety Instructions Using the timed convection baking features. (on some models) You will turn on immediately and cook for a selected length of time. NOTE: Foods that you set and the cooking time that spoil easily-such...
Installation Instructions
Page 26
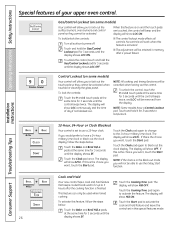
... will not be able to 3 hours after a power failure. To activate this feature is finished. GAS/CONTROL LOCKOUT Gas/Control Lockout (on some models) Your control will show LOC continuously and the time of your upper oven control. s The adjustment will show Hld ON. The display will be ... mode, you want , touch the Start pad. The display will show Hld OFF. The display will show 24 hr. Control Lockout (on some models) Your control will work when this feature, follow the steps below . No controls will allow you to use the Delay Start function. To unlock...
... will not be able to 3 hours after a power failure. To activate this feature is finished. GAS/CONTROL LOCKOUT Gas/Control Lockout (on some models) Your control will show LOC continuously and the time of your upper oven control. s The adjustment will show Hld ON. The display will be ... mode, you want , touch the Start pad. The display will show Hld OFF. The display will show 24 hr. Control Lockout (on some models) Your control will work when this feature, follow the steps below . No controls will allow you to use the Delay Start function. To unlock...
Installation Instructions
Page 27
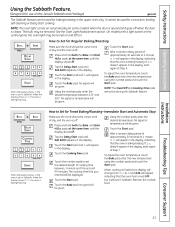
... appear in the display, start again at Step 4. Touch the Start pad. Touch the Start pad and ⊃ will appear in the display. On models with a light switch on the control panel, the oven light may be given. No signal will be displayed. Using the number pads, enter the desired...cooking time that the oven is closed. Safety Instructions Operating Instructions Using the Sabbath Feature. (Designed for use on the Jewish Sabbath and Holidays) ge.com The Sabbath feature can be used for baking/roasting in the upper oven only. Touch the Cooking Time pad. Using the number pads, ...
... appear in the display, start again at Step 4. Touch the Start pad. Touch the Start pad and ⊃ will appear in the display. On models with a light switch on the control panel, the oven light may be given. No signal will be displayed. Using the number pads, enter the desired...cooking time that the oven is closed. Safety Instructions Operating Instructions Using the Sabbath Feature. (Designed for use on the Jewish Sabbath and Holidays) ge.com The Sabbath feature can be used for baking/roasting in the upper oven only. Touch the Cooking Time pad. Using the number pads, ...
Installation Instructions
Page 30
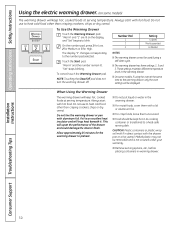
...Support Troubleshooting Tips 30 "Warm" and the number remain lit. NOTE: Touching the Clear/Off pad does not turn the warming drawer off. s On some models) The warming drawer will be kept hot in its cooking container or transferred to a heat-safe serving dish. Do not line the warming drawer or... the Warming Drawer Touch the Warming Drawer pad. Touch the Start pad. s For moist foods, cover them uncovered. "Warm" and "1" are lit on some models, if using the oven at the same time as the warming drawer, only the oven settings will keep hot, cooked foods at serving temperature. To...
...Support Troubleshooting Tips 30 "Warm" and the number remain lit. NOTE: Touching the Clear/Off pad does not turn the warming drawer off. s On some models) The warming drawer will be kept hot in its cooking container or transferred to a heat-safe serving dish. Do not line the warming drawer or... the Warming Drawer Touch the Warming Drawer pad. Touch the Start pad. s For moist foods, cover them uncovered. "Warm" and "1" are lit on some models, if using the oven at the same time as the warming drawer, only the oven settings will keep hot, cooked foods at serving temperature. To...
Installation Instructions
Page 32
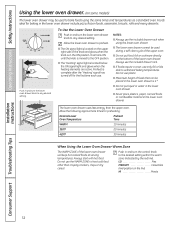
... drawer to the desired setting within the warm zone (indicated by the red line). Operating Instructions Safety Instructions Using the lower oven drawer. (on some models) The lower oven drawer may be used during a self-clean cycle of the upper oven. Do not use the included drawer rack when using the...
... drawer to the desired setting within the warm zone (indicated by the red line). Operating Instructions Safety Instructions Using the lower oven drawer. (on some models) The lower oven drawer may be used during a self-clean cycle of the upper oven. Do not use the included drawer rack when using the...


