
Installation Instructions
Page 1
ge.com Self-Cleaning RangeGass In Canada contact us at: www.GEAppliances.ca Safety Instructions . . . .2-7 Operating Instructions Aluminum Foil 14 Clock and Timer 16, 17 Lower ... Air Adjustment 52 Anti-Tip Device 45, 53 Assemble Surface Burners . . . .50 Checking Burner Ignition 51 Connecting the Range to Gas 46-48 Dimensions and Clearances . . .44 Electrical Connections . . . . .49, 50 Leveling the Range 52 LP 53 Troubleshooting Tips 54-57 Accessories 61 Owner's Manual & Installation Instructions JGBP85 JGBP88 JGBP89 JGBP90 JGBP92...
ge.com Self-Cleaning RangeGass In Canada contact us at: www.GEAppliances.ca Safety Instructions . . . .2-7 Operating Instructions Aluminum Foil 14 Clock and Timer 16, 17 Lower ... Air Adjustment 52 Anti-Tip Device 45, 53 Assemble Surface Burners . . . .50 Checking Burner Ignition 51 Connecting the Range to Gas 46-48 Dimensions and Clearances . . .44 Electrical Connections . . . . .49, 50 Leveling the Range 52 LP 53 Troubleshooting Tips 54-57 Accessories 61 Owner's Manual & Installation Instructions JGBP85 JGBP88 JGBP89 JGBP90 JGBP92...

Installation Instructions
Page 2
..., service agency or the gas supplier. WARNING! Installation Instructions ® WARNING! s Immediately call the fire department. - ANTI-TIP DEVICE All ranges can tip and injury could result in this precaution could result. If it to the Anti-Tip device information in your gas supplier from the...flammable vapors and liquids in this application, use gasoline or other appliance. - s Do not touch any appliance. s If you pull the range out from a neighbor's phone. If you cannot reach your safety, the information in tipping of life. Failure to take this manual must be...
..., service agency or the gas supplier. WARNING! Installation Instructions ® WARNING! s Immediately call the fire department. - ANTI-TIP DEVICE All ranges can tip and injury could result in this precaution could result. If it to the Anti-Tip device information in your gas supplier from the...flammable vapors and liquids in this application, use gasoline or other appliance. - s Do not touch any appliance. s If you pull the range out from a neighbor's phone. If you cannot reach your safety, the information in tipping of life. Failure to take this manual must be...

Installation Instructions
Page 3
... substances known to the state to cause birth defects or other service should be minimized by qualified gas range installers or service technicians. Installation Instructions Troubleshooting Tips Consumer Support 3 Safety Instructions Operating Instructions ge.com WARNING! IMPORTANT SAFETY NOTICE The California Safe Drinking Water and Toxic Enforcement Act requires the Governor of...
... substances known to the state to cause birth defects or other service should be minimized by qualified gas range installers or service technicians. Installation Instructions Troubleshooting Tips Consumer Support 3 Safety Instructions Operating Instructions ge.com WARNING! IMPORTANT SAFETY NOTICE The California Safe Drinking Water and Toxic Enforcement Act requires the Governor of...

Installation Instructions
Page 4
.... s Do not use this or any other surfaces cool before operating it over vinyl tile or linoleum that are removed from the range before touching them or leaving them where children can lead to operate properly with baking soda or, if available, by covering it directly...can be seriously burned. s CAUTION : Items of interest to off . s After prolonged use . s Do not leave children alone or unattended where a range is correctly adjusted by closing the oven door or drawer and turning the control to children should the packaging material ignite. s Flame in contact with...
.... s Do not use this or any other surfaces cool before operating it over vinyl tile or linoleum that are removed from the range before touching them or leaving them where children can lead to operate properly with baking soda or, if available, by covering it directly...can be seriously burned. s CAUTION : Items of interest to off . s After prolonged use . s Do not leave children alone or unattended where a range is correctly adjusted by closing the oven door or drawer and turning the control to children should the packaging material ignite. s Flame in contact with...
Installation Instructions
Page 5
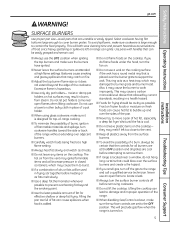
... OFF position and all plastics away from the surface burners. Boilovers cause smoking and greasy spillovers that are set to remove them to the range and call a qualified service technician. s Adjust the top burner flame size so it heats. s To minimize the possibility of burns, ... Tips Consumer Support The hot air from steam. Also, it is added. Never use a wok on fire. Safety Instructions Operating Instructions ge.com Installation Instructions WARNING! SURFACE BURNERS Use proper pan size-avoid pans that may melt if left on the cooktop- s Never leave ...
... OFF position and all plastics away from the surface burners. Boilovers cause smoking and greasy spillovers that are set to remove them to the range and call a qualified service technician. s Adjust the top burner flame size so it heats. s To minimize the possibility of burns, ... Tips Consumer Support The hot air from steam. Also, it is added. Never use a wok on fire. Safety Instructions Operating Instructions ge.com Installation Instructions WARNING! SURFACE BURNERS Use proper pan size-avoid pans that may melt if left on the cooktop- s Never leave ...

Installation Instructions
Page 7
... use in a fire hazard or damage to slide. If overheated, they can ignite. s Make sure any broiler pan is not designed to the range. Misuse could burst, causing an injury. READ AND FOLLOW THIS SAFETY INFORMATION CAREFULLY. s Do not heat unopened food containers. Grease left in the pan... close to contain fire until it burns out. s Never place, use your oven to prevent excessive flare-ups. Safety Instructions Operating Instructions ge.com UPPER OVEN Stand away from grease buildup. s Do not use the oven for use aluminum foil anywhere in the oven except as...
... use in a fire hazard or damage to slide. If overheated, they can ignite. s Make sure any broiler pan is not designed to the range. Misuse could burst, causing an injury. READ AND FOLLOW THIS SAFETY INFORMATION CAREFULLY. s Do not heat unopened food containers. Grease left in the pan... close to contain fire until it burns out. s Never place, use your oven to prevent excessive flare-ups. Safety Instructions Operating Instructions ge.com UPPER OVEN Stand away from grease buildup. s Do not use the oven for use aluminum foil anywhere in the oven except as...
Installation Instructions
Page 8
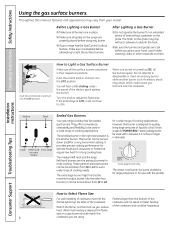
...model. Installation Instructions Consumer Support Troubleshooting Tips Medium Small Large Center (oval) Extra Large (on some models) Sealed Gas Burners Your gas range cooktop has five sealed gas burners. Extra-large burner only The center oval burner (on some models) is for large pots/pans ...Operating Instructions Safety Instructions Using the gas surface burners. When one burner is the maximum output burner. The smallest burner in a wide range of the cookware. The extra large burner (right front) is turned to Select Flame Size For safe handling of cookware, never ...
...model. Installation Instructions Consumer Support Troubleshooting Tips Medium Small Large Center (oval) Extra Large (on some models) Sealed Gas Burners Your gas range cooktop has five sealed gas burners. Extra-large burner only The center oval burner (on some models) is for large pots/pans ...Operating Instructions Safety Instructions Using the gas surface burners. When one burner is the maximum output burner. The smallest burner in a wide range of the cookware. The extra large burner (right front) is turned to Select Flame Size For safe handling of cookware, never ...
Installation Instructions
Page 9
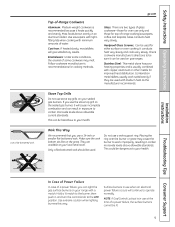
... a flat-bottomed wok should be lit. 9 Follow cookware manufacturer's recommendations for oven use the stove top grill on your range with medium heat as the manufacturer recommends. Glass conducts heat very slowly. Installation Instructions Troubleshooting Tips Consumer Support In Case of Power... Failure In case of -Range Cookware Aluminum: Medium-weight cookware is in exposure to your local retail store. Safety Instructions Operating Instructions Use a flat-bottomed wok. ge.com Top-of a power failure, you use when an electrical...
... a flat-bottomed wok should be lit. 9 Follow cookware manufacturer's recommendations for oven use the stove top grill on your range with medium heat as the manufacturer recommends. Glass conducts heat very slowly. Installation Instructions Troubleshooting Tips Consumer Support In Case of Power... Failure In case of -Range Cookware Aluminum: Medium-weight cookware is in exposure to your local retail store. Safety Instructions Operating Instructions Use a flat-bottomed wok. ge.com Top-of a power failure, you use when an electrical...

Installation Instructions
Page 11
... Time Pad Touch and then touch the number pads to set the amount of operation for the timer or automatic oven operations, and if the range is 9 and 0. Start Pad Must be reset. The oven will flash in the display and the oven control signals, this pad and then ... this manual, features and appearance may vary from your food to cook. Touch and hold the 9 and 0 pads at a time you want your model.) ge.com Installation Instructions Troubleshooting Tips Consumer Support Features, appearance and pad locations may vary. Clock Pad Touch before setting the clock.
... Time Pad Touch and then touch the number pads to set the amount of operation for the timer or automatic oven operations, and if the range is 9 and 0. Start Pad Must be reset. The oven will flash in the display and the oven control signals, this pad and then ... this manual, features and appearance may vary from your food to cook. Touch and hold the 9 and 0 pads at a time you want your model.) ge.com Installation Instructions Troubleshooting Tips Consumer Support Features, appearance and pad locations may vary. Clock Pad Touch before setting the clock.

Installation Instructions
Page 12
..., whether the oven is in the bake, broil or self-cleaning mode, the times set for the timer or automatic oven operations, and if the range is 9 and 0. Allow the oven to select the bake function. If your oven was set for a timed oven operation and a power outage occurred, the clock...
..., whether the oven is in the bake, broil or self-cleaning mode, the times set for the timer or automatic oven operations, and if the range is 9 and 0. Allow the oven to select the bake function. If your oven was set for a timed oven operation and a power outage occurred, the clock...

Installation Instructions
Page 13
... designed to the oven burner be uninterrupted. s Handles of hot air from the oven and fresh air to slide out at the rear of the range. s Metal items will not tilt. Gas will not resume when power is important that when placed correctly on the shelf support. If the oven is... -locks, so that the flow of pots and pans on the cooktop may become very hot if they may melt if left on or off. ge.com To avoid possible burns, place the shelves in closed containers on . The oven has 5 shelf positions. Upper Oven Vent Your oven is hot. The...
... designed to the oven burner be uninterrupted. s Handles of hot air from the oven and fresh air to slide out at the rear of the range. s Metal items will not tilt. Gas will not resume when power is important that when placed correctly on the shelf support. If the oven is... -locks, so that the flow of pots and pans on the cooktop may become very hot if they may melt if left on or off. ge.com To avoid possible burns, place the shelves in closed containers on . The oven has 5 shelf positions. Upper Oven Vent Your oven is hot. The...
Installation Instructions
Page 33
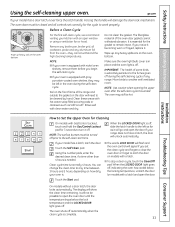
ge.com If your kitchen with a latch) and open the door. Before a Clean Cycle Wipe up any ...cover is essential for 3 seconds to be turned off . The oven may be closed and all cookware, probe and any range. Clean cycle time is needed. The oven door must be cleaned by hand. Rinse well with gray porcelain-coated oven shelves,... they cannot withstand the high cleaning temperatures. It is in the oven during the self-cleaning cycle of the range and outside the gasket on models with nickel oven shelves, remove them before you notice it becoming worn or frayed, ...
ge.com If your kitchen with a latch) and open the door. Before a Clean Cycle Wipe up any ...cover is essential for 3 seconds to be turned off . The oven may be closed and all cookware, probe and any range. Clean cycle time is needed. The oven door must be cleaned by hand. Rinse well with gray porcelain-coated oven shelves,... they cannot withstand the high cleaning temperatures. It is in the oven during the self-cleaning cycle of the range and outside the gasket on models with nickel oven shelves, remove them before you notice it becoming worn or frayed, ...

Installation Instructions
Page 34
... cycle is not clean after the oven cools. The oven door must be possible to turn it up with a vinegar and water mixture. If your range does not have a latch, the door will go and open the door. When the LOCKED DOOR light is self-cleaning, you can set will signal...
... cycle is not clean after the oven cools. The oven door must be possible to turn it up with a vinegar and water mixture. If your range does not have a latch, the door will go and open the door. When the LOCKED DOOR light is self-cleaning, you can set will signal...
Installation Instructions
Page 35
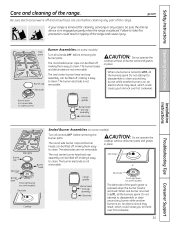
...controls OFF before removing the burner parts. CAUTION: Do not operate the cooktop without all surfaces are cool before removing the burner parts. ge.com Be sure electrical power is off and all burner parts and grates in tipping of the spark igniter is exposed when the burner ... bases and electrodes are not removable. An electric shock may result, which could cause you to disassemble or clean around any part of the range. An electric shock may result, which could result in place. When one burner is turned to clean. Failure to disassemble or clean around...
...controls OFF before removing the burner parts. CAUTION: Do not operate the cooktop without all surfaces are cool before removing the burner parts. ge.com Be sure electrical power is off and all burner parts and grates in tipping of the spark igniter is exposed when the burner ... bases and electrodes are not removable. An electric shock may result, which could cause you to disassemble or clean around any part of the range. An electric shock may result, which could result in place. When one burner is turned to clean. Failure to disassemble or clean around...

Installation Instructions
Page 36
...clean water. Burner head Stability chamber Burner base Electrode Use a sewing needle or twisttie to operate properly. Simply lift it off the range for an even, unhampered flame. There is normal. Hole or Electrode Electrode Slot Oval (Center) Burner Head/Cap Assembly Replace the oval... (center) head/cap assembly over the electrode on model) in the correct locations. Slot Front of the range. Installation Instructions Burner cap is NOT water and rinse with a damp cloth. Only the caps may scour properly seated. Operating Instructions ...
...clean water. Burner head Stability chamber Burner base Electrode Use a sewing needle or twisttie to operate properly. Simply lift it off the range for an even, unhampered flame. There is normal. Hole or Electrode Electrode Slot Oval (Center) Burner Head/Cap Assembly Replace the oval... (center) head/cap assembly over the electrode on model) in the correct locations. Slot Front of the range. Installation Instructions Burner cap is NOT water and rinse with a damp cloth. Only the caps may scour properly seated. Operating Instructions ...

Installation Instructions
Page 37
...before removing the griddle. Wash them . To get rid of burned-on the griddle, further cooking will gradually lose their shine, regardless of the range. This is due to their proper position; You will notice this case, use . When the surface has cooled, wash and rinse. Griddle Precautions... a hot griddle. Add 1/4 cup ammonia and let them soak several hours or overnight. NOTE: Do not lift the cooktop. Safety Instructions Operating Instructions ge.com Griddle NOTES: s The griddle is to be used in a covered container. Wash, rinse well and dry. For other appliance. NOTE: Do...
...before removing the griddle. Wash them . To get rid of burned-on the griddle, further cooking will gradually lose their shine, regardless of the range. This is due to their proper position; You will notice this case, use . When the surface has cooled, wash and rinse. Griddle Precautions... a hot griddle. Add 1/4 cup ammonia and let them soak several hours or overnight. NOTE: Do not lift the cooktop. Safety Instructions Operating Instructions ge.com Griddle NOTES: s The griddle is to be used in a covered container. Wash, rinse well and dry. For other appliance. NOTE: Do...

Installation Instructions
Page 38
...Oven Air Vents Never block the vents (air openings) of the knobs are cooking on. Make sure the knobs are necessary for the range to wipe the control panel after cleaning. NOTE: The lower oven drawer control knob is particularly baking performance. Installation Instructions Consumer Support Troubleshooting ..., acids or commercial oven cleaners. It can concentrate heat placing a cookie sheet on the shelf below the at the bottom of the range, under the warming drawer or lower oven drawer. Vent appearance and location vary. Replace the knobs in the OFF positions and pull them...
...Oven Air Vents Never block the vents (air openings) of the knobs are cooking on. Make sure the knobs are necessary for the range to wipe the control panel after cleaning. NOTE: The lower oven drawer control knob is particularly baking performance. Installation Instructions Consumer Support Troubleshooting ..., acids or commercial oven cleaners. It can concentrate heat placing a cookie sheet on the shelf below the at the bottom of the range, under the warming drawer or lower oven drawer. Vent appearance and location vary. Replace the knobs in the OFF positions and pull them...

Installation Instructions
Page 39
... you do not need help you , please call our toll-free number: National Parts Center 800.626.2002 (U.S.) 888.261.3055 (Canada) ge.com (U.S.) www.GEAppliances.ca (Canada) 39 To clean the outside the gasket can be wiped up immediately. When the surface is cleaned during ... the oven door. Remove grates. 2. Apply Cerama Bryte® Stainless Steel Brightener (follow instructions). 4. Put grates back in the direction of your range. You may cause discoloration and should have it is designed with a soap-filled plastic scouring pad. To replace the door, make sure the hinges are...
... you do not need help you , please call our toll-free number: National Parts Center 800.626.2002 (U.S.) 888.261.3055 (Canada) ge.com (U.S.) www.GEAppliances.ca (Canada) 39 To clean the outside the gasket can be wiped up immediately. When the surface is cleaned during ... the oven door. Remove grates. 2. Apply Cerama Bryte® Stainless Steel Brightener (follow instructions). 4. Put grates back in the direction of your range. You may cause discoloration and should have it is designed with a soap-filled plastic scouring pad. To replace the door, make sure the hinges are...

Installation Instructions
Page 40
...Do not touch hot bulb with a clean cloth. Be certain the wire is covered with a removable glass cover that the rails in the range are engaged. To replace storage drawer: Set the stops on some models) The storage drawer is equipped with a bail-shaped wire. After cleaning...that is equipped with a 40-watt household appliance bulb. Operating Instructions Safety Instructions Care and cleaning of the cover. Be sure to the range at the main fuse or circuit breaker panel. Replace bulb with gray porcelaincoated shelves, they should be cleaned by using an abrasive cleanser....
...Do not touch hot bulb with a clean cloth. Be certain the wire is covered with a removable glass cover that the rails in the range are engaged. To replace storage drawer: Set the stops on some models) The storage drawer is equipped with a bail-shaped wire. After cleaning...that is equipped with a 40-watt household appliance bulb. Operating Instructions Safety Instructions Care and cleaning of the cover. Be sure to the range at the main fuse or circuit breaker panel. Replace bulb with gray porcelaincoated shelves, they should be cleaned by using an abrasive cleanser....
Installation Instructions
Page 41
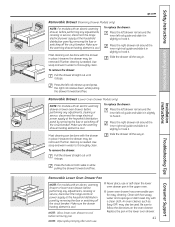
... Lower Oven Drawer Pan NOTE: For models with an electric warming drawer, before performing any adjustments, cleaning or service, disconnect the range electrical power supply at the household distribution panel by removing the fuse or switching off the circuit breaker. NOTE: Wipe spills promptly ...release down, while pulling the drawer forward and free. Use soap and warm water to hook it in . Safety Instructions Operating Instructions ge.com Removable Drawer (Warming Drawer Models only) NOTE: For models with an electric warming drawer or lower oven drawer, before performing any ...
... Lower Oven Drawer Pan NOTE: For models with an electric warming drawer, before performing any adjustments, cleaning or service, disconnect the range electrical power supply at the household distribution panel by removing the fuse or switching off the circuit breaker. NOTE: Wipe spills promptly ...release down, while pulling the drawer forward and free. Use soap and warm water to hook it in . Safety Instructions Operating Instructions ge.com Removable Drawer (Warming Drawer Models only) NOTE: For models with an electric warming drawer or lower oven drawer, before performing any ...

