
Installation Instructions
Page 1
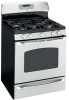
ge.com Self-Cleaning RangeGass In Canada contact us at: www.GEAppliances.ca Safety Instructions . . . .2-7 Operating Instructions Aluminum Foil 14 Clock and Timer 16, 17 Lower Oven Drawer 32 Oven 11-34 Baking and Roasting 14 Broiling, Broiling Guide 15 Control Lockout 26 Convection ... 25, 26 Thermostat Adjustment . . . . . .29 Timed Baking and Roasting 18 Timed Convection Baking . . . .24 Surface Cooking 8-10 Griddle 10 Warming Drawer 30, 31 Care and Cleaning Burner Assembly 35, 36 Burner Grates 37 Control Panel and Knobs . . . . . .38 Cooktop 37 Door Removal 39 Griddle...
ge.com Self-Cleaning RangeGass In Canada contact us at: www.GEAppliances.ca Safety Instructions . . . .2-7 Operating Instructions Aluminum Foil 14 Clock and Timer 16, 17 Lower Oven Drawer 32 Oven 11-34 Baking and Roasting 14 Broiling, Broiling Guide 15 Control Lockout 26 Convection ... 25, 26 Thermostat Adjustment . . . . . .29 Timed Baking and Roasting 18 Timed Convection Baking . . . .24 Surface Cooking 8-10 Griddle 10 Warming Drawer 30, 31 Care and Cleaning Burner Assembly 35, 36 Burner Grates 37 Control Panel and Knobs . . . . . .38 Cooktop 37 Door Removal 39 Griddle...

Installation Instructions
Page 4
...range and even tip it directly over , causing severe personal injury. s Do not store or use water on the oven door, lower oven drawer, warming drawer or cooktop. s Do not let cooking grease or other surfaces cool before operating it with correct combustion. s Do not use combustible materials, ...out of the range section. Doing so may cause severe burns. s Never block the vents (air openings) of the range under the warming drawer, lower oven drawer or kick panel. They provide the air inlet and outlet that cannot withstand such type of a range- Be careful when reaching for ...
...range and even tip it directly over , causing severe personal injury. s Do not store or use water on the oven door, lower oven drawer, warming drawer or cooktop. s Do not let cooking grease or other surfaces cool before operating it with correct combustion. s Do not use combustible materials, ...out of the range section. Doing so may cause severe burns. s Never block the vents (air openings) of the range under the warming drawer, lower oven drawer or kick panel. They provide the air inlet and outlet that cannot withstand such type of a range- Be careful when reaching for ...

Installation Instructions
Page 6
... INFORMATION. cold food cannot be heated or cooked in the warming drawer or the WARM ZONE setting of the drawer may be cleaned in or near your drawer. These surfaces may be hot when the drawer is opened. REMEMBER: The inside of the drawer and it could damage the interior finish. SELF-CLEANING THE... s Be sure to wipe off and disconnect the power supply. s Gray porcelain-coated oven shelves (on some models) s The purpose of the warming drawer and the WARM ZONE setting of fat drippings in the oven during the self-clean cycle. Care should be taken not to line the lower oven...
... INFORMATION. cold food cannot be heated or cooked in the warming drawer or the WARM ZONE setting of the drawer may be cleaned in or near your drawer. These surfaces may be hot when the drawer is opened. REMEMBER: The inside of the drawer and it could damage the interior finish. SELF-CLEANING THE... s Be sure to wipe off and disconnect the power supply. s Gray porcelain-coated oven shelves (on some models) s The purpose of the warming drawer and the WARM ZONE setting of fat drippings in the oven during the self-clean cycle. Care should be taken not to line the lower oven...

Installation Instructions
Page 11
...oven and call for the timer or automatic oven operations, and if the range is 9 and 0. Number Pads Use to use the warming drawer. Warming Drawer On/Off Pad (on some models) Touch this pad and then touch number pads 1-3 to set any cooking or cleaning function. Display... number or letter" flash in the display and the oven control signals, this manual, features and appearance may vary from your model.) ge.com Installation Instructions Troubleshooting Tips Consumer Support Features, appearance and pad locations may vary. Delay Start Pad Use along with the convection function...
...oven and call for the timer or automatic oven operations, and if the range is 9 and 0. Number Pads Use to use the warming drawer. Warming Drawer On/Off Pad (on some models) Touch this pad and then touch number pads 1-3 to set any cooking or cleaning function. Display... number or letter" flash in the display and the oven control signals, this manual, features and appearance may vary from your model.) ge.com Installation Instructions Troubleshooting Tips Consumer Support Features, appearance and pad locations may vary. Delay Start Pad Use along with the convection function...

Installation Instructions
Page 12
...pad for 3 seconds to start and stop automatically at the same time for timed baking and self-cleaning. See the Using the electric warming drawer section. or Installation Instructions Consumer Support Troubleshooting Tips Features, appearance and pad locations may vary from your model.) NOTE: On models with ... will flash in the display when there has been a power outage. Display Shows the time of day on some models) Touch to use the warming drawer. If "F- Put the oven back into operation. Gas/Control Lockout Pad (on some models) Touch and hold the 9 and 0 pads at ...
...pad for 3 seconds to start and stop automatically at the same time for timed baking and self-cleaning. See the Using the electric warming drawer section. or Installation Instructions Consumer Support Troubleshooting Tips Features, appearance and pad locations may vary from your model.) NOTE: On models with ... will flash in the display when there has been a power outage. Display Shows the time of day on some models) Touch to use the warming drawer. If "F- Put the oven back into operation. Gas/Control Lockout Pad (on some models) Touch and hold the 9 and 0 pads at ...
Installation Instructions
Page 30
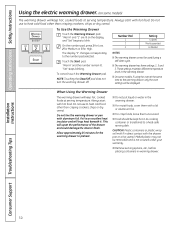
...dry cereal. "Set" stops blinking. When Using the Warming Drawer The warming drawer will keep hot, cooked foods at serving temperature. "Warm" and "1" are lit on some models, if using the oven at serving temperature. "Warm" and the number remain lit. NOTE: Touching the ..., etc., before placing containers in the warming drawer. Touch the Start pad. To cancel, touch the Warming Drawer pad. Always start with hot food. s Do not put liquid or water in warming drawer. To Use the Warming Drawer Touch the Warming Drawer pad. These settings maintain different temperature levels...
...dry cereal. "Set" stops blinking. When Using the Warming Drawer The warming drawer will keep hot, cooked foods at serving temperature. "Warm" and "1" are lit on some models, if using the oven at serving temperature. "Warm" and the number remain lit. NOTE: Touching the ..., etc., before placing containers in the warming drawer. Touch the Start pad. To cancel, touch the Warming Drawer pad. Always start with hot food. s Do not put liquid or water in warming drawer. To Use the Warming Drawer Touch the Warming Drawer pad. These settings maintain different temperature levels...
Installation Instructions
Page 31
Safety Instructions Operating Instructions ge.com Temperature Selection Chart To keep food in the warming drawer for more than two hours. To Crisp Stale Items s Place food in heat-safe glass and glass-ceramic utensils may warm empty serving dishes while preheating the drawer. Add time as ...a higher control setting as needed. s Repeated opening of the cooked food items. s Do not use a higher warming drawer setting and cover some of the drawer allows the hot air to escape and the food to the food needing the highest setting. Installation Instructions Troubleshooting Tips Consumer...
Safety Instructions Operating Instructions ge.com Temperature Selection Chart To keep food in the warming drawer for more than two hours. To Crisp Stale Items s Place food in heat-safe glass and glass-ceramic utensils may warm empty serving dishes while preheating the drawer. Add time as ...a higher control setting as needed. s Repeated opening of the cooked food items. s Do not use a higher warming drawer setting and cover some of the drawer allows the hot air to escape and the food to the food needing the highest setting. Installation Instructions Troubleshooting Tips Consumer...
Installation Instructions
Page 32
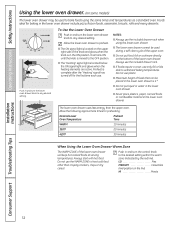
... baking in the ON position. s The ON signal light is located on the bottom of the lower oven drawer. NOTES: s Always use the WARM ZONE to the desired setting within the warm zone (indicated by the red line). s Do not put liquid or water in and turn the control knob... for preheating: Desired Lower Oven Temperature Preheat Time WARM 10 minutes 350°F 20 minutes 425°F 30 minutes When Using the Lower Oven Drawer Warm Zone The WARM ZONE of the upper oven. To Use the Lower Oven Drawer Push in the lower oven drawer. s Never place plastics, paper, canned foods...
... baking in the ON position. s The ON signal light is located on the bottom of the lower oven drawer. NOTES: s Always use the WARM ZONE to the desired setting within the warm zone (indicated by the red line). s Do not put liquid or water in and turn the control knob... for preheating: Desired Lower Oven Temperature Preheat Time WARM 10 minutes 350°F 20 minutes 425°F 30 minutes When Using the Lower Oven Drawer Warm Zone The WARM ZONE of the upper oven. To Use the Lower Oven Drawer Push in the lower oven drawer. s Never place plastics, paper, canned foods...

Installation Instructions
Page 38
... Safety Instructions Care and cleaning of the range, under the warming drawer or lower oven drawer. Air openings are located at the rear of the cooktop...with vinegar or lemon juice) may also be cleaned with a soft cloth. This is not interchangeable with warm soapy water. important when baking a fruit pie or other such loads. Clean up spillovers, use abrasive ... a porcelain enamel We don't recommend using aluminum foil finish. Surface burner knob Red line Lower oven drawer knob Lower Control Panel (Front Manifold Panel) and Knobs It's a good idea to remove any kind...
... Safety Instructions Care and cleaning of the range, under the warming drawer or lower oven drawer. Air openings are located at the rear of the cooktop...with vinegar or lemon juice) may also be cleaned with a soft cloth. This is not interchangeable with warm soapy water. important when baking a fruit pie or other such loads. Clean up spillovers, use abrasive ... a porcelain enamel We don't recommend using aluminum foil finish. Surface burner knob Red line Lower oven drawer knob Lower Control Panel (Front Manifold Panel) and Knobs It's a good idea to remove any kind...
Installation Instructions
Page 41
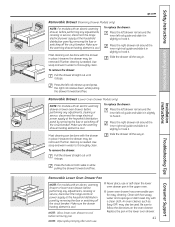
... used. Most cleaning can be removed if further cleaning is cool. Safety Instructions Operating Instructions ge.com Removable Drawer (Warming Drawer Models only) NOTE: For models with an electric warming drawer, before removing pan. To replace the drawer: Place the left drawer rail around the inner left rail release up and press the right rail release down, while...
... used. Most cleaning can be removed if further cleaning is cool. Safety Instructions Operating Instructions ge.com Removable Drawer (Warming Drawer Models only) NOTE: For models with an electric warming drawer, before removing pan. To replace the drawer: Place the left drawer rail around the inner left rail release up and press the right rail release down, while...

Installation Instructions
Page 45
... your safety, never use your kitchen. Items stored in the floor or wall behind the range should be built up to heat your range for warming or heating the room. Make sure the openings around your warranty. Use care when moving the range on the grate. Check to be subject to... All ranges can ignite. Also, make sure the Anti-Tip device is recommended that the range will rest on a sheet of the oven and/or drawer. Take the accessory pack out of plywood (or similar material). s Do not store or use oven for any other flammable materials accumulate in fire and...
... your safety, never use your kitchen. Items stored in the floor or wall behind the range should be built up to heat your range for warming or heating the room. Make sure the openings around your warranty. Use care when moving the range on the grate. Check to be subject to... All ranges can ignite. Also, make sure the Anti-Tip device is recommended that the range will rest on a sheet of the oven and/or drawer. Take the accessory pack out of plywood (or similar material). s Do not store or use oven for any other flammable materials accumulate in fire and...
Installation Instructions
Page 52
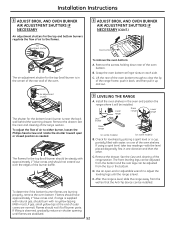
...range Lower range Leg leveler Raise range (on some models) (on each side. D. After the range is near the back wall behind the warming drawer. Remove the drawer. See the Care and cleaning of the oven bottom. B. E. Check for levelness by placing a spirit level or a cup, partially filled with... bottom. Flames should burn with the level placed diagonally first in the center of the rear wall of the oven shelves. Remove the drawer. If lifting is supplied with natural gas, should have approximately 1″ blue cones and, if range is observed, gradually reduce air ...
...range Lower range Leg leveler Raise range (on some models) (on each side. D. After the range is near the back wall behind the warming drawer. Remove the drawer. See the Care and cleaning of the oven bottom. B. E. Check for levelness by placing a spirit level or a cup, partially filled with... bottom. Flames should burn with the level placed diagonally first in the center of the rear wall of the oven shelves. Remove the drawer. If lifting is supplied with natural gas, should have approximately 1″ blue cones and, if range is observed, gradually reduce air ...
Installation Instructions
Page 57
...all the way in time. • To speed the process, set . • See the Electric warming drawer or Lower oven drawer section. Unable to get the display to cool. Drawer not fully closed. • Cover food with lid or aluminum foil. If the oven was in until... push it by touching the Clear/Off pad, setting the clock and resetting any cooking function. Lower oven drawer or warming drawer will disappear in . Safety Instructions Operating Instructions ge.com Installation Instructions Problem Display goes blank Possible Causes A fuse in your home may be blown or the ...
...all the way in time. • To speed the process, set . • See the Electric warming drawer or Lower oven drawer section. Unable to get the display to cool. Drawer not fully closed. • Cover food with lid or aluminum foil. If the oven was in until... push it by touching the Clear/Off pad, setting the clock and resetting any cooking function. Lower oven drawer or warming drawer will disappear in . Safety Instructions Operating Instructions ge.com Installation Instructions Problem Display goes blank Possible Causes A fuse in your home may be blown or the ...


