

Owner's Manual
Page 1
...: 1.800.354.3643 or visit www.geniecompany.com SAVE THIS MANUAL FOR FUTURE REFERENCE Installer: Leave this manual with sectional doors. Car2U® is a registered trademark of Lear Corporation. © GMI Holdings, Inc. For use only with homeowner. d/b/a The Genie Company PN# 37026500123, 5/15/2009 ALWAYS AT YOUR COMMAND Models 2022/2024/2042 GARAGE DOOR OPENERS...
...: 1.800.354.3643 or visit www.geniecompany.com SAVE THIS MANUAL FOR FUTURE REFERENCE Installer: Leave this manual with sectional doors. Car2U® is a registered trademark of Lear Corporation. © GMI Holdings, Inc. For use only with homeowner. d/b/a The Genie Company PN# 37026500123, 5/15/2009 ALWAYS AT YOUR COMMAND Models 2022/2024/2042 GARAGE DOOR OPENERS...

Owner's Manual
Page 2
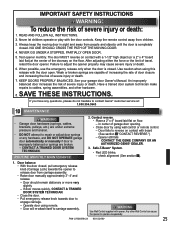
.... IMPORTANT SAFETY INSTRUCTIONS READ AND FOLLOW ALL INSTRUCTIONS SAVE THESE INSTRUCTIONS POTENTIAL HAZARD MOVING DOOR EFFECT WARNING: CoourldSererisouultsinInDjueryath PREVENTION Keep people clear of opening while door is placed next to signal words and messages to help of springs under tension, ...Garage doors are large, heavy objects that has a broken spring. The word NOTE is the safety alert symbol. When replacing cover, make sure wires are used to indicate important steps to play with the help you have questions or do NOT understand the information presented, contact The Genie...
.... IMPORTANT SAFETY INSTRUCTIONS READ AND FOLLOW ALL INSTRUCTIONS SAVE THESE INSTRUCTIONS POTENTIAL HAZARD MOVING DOOR EFFECT WARNING: CoourldSererisouultsinInDjueryath PREVENTION Keep people clear of opening while door is placed next to signal words and messages to help of springs under tension, ...Garage doors are large, heavy objects that has a broken spring. The word NOTE is the safety alert symbol. When replacing cover, make sure wires are used to indicate important steps to play with the help you have questions or do NOT understand the information presented, contact The Genie...
Owner's Manual
Page 3
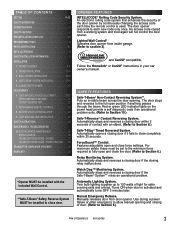
... force settings. SAFETY FEATURES Safe-T-Beam® Non-Contact Reversing System**. Automatically stops and reverses a closing door if the closing door if the Safe-T-Beam® System** notes an operational problem. Lighted Wall Control* Operates door opener from inside garage. (Refer to Section 10.) Safe-T-Reverse® Contact Reversing System. An access code copied from...
... force settings. SAFETY FEATURES Safe-T-Beam® Non-Contact Reversing System**. Automatically stops and reverses a closing door if the closing door if the Safe-T-Beam® System** notes an operational problem. Lighted Wall Control* Operates door opener from inside garage. (Refer to Section 10.) Safe-T-Reverse® Contact Reversing System. An access code copied from...
Owner's Manual
Page 4
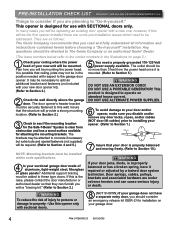
...-1.800.354.3643 OR WWW.GENIECOMPANY.COM Things to consider if you are planning to "Do-it -yourself" installation. It may be attached to concrete if necessary but extra tools and special fasteners (not supplied) will be necessary to add an additional bracket and fasteners (not included with respect to the garage door opener...
...-1.800.354.3643 OR WWW.GENIECOMPANY.COM Things to consider if you are planning to "Do-it -yourself" installation. It may be attached to concrete if necessary but extra tools and special fasteners (not supplied) will be necessary to add an additional bracket and fasteners (not included with respect to the garage door opener...
Owner's Manual
Page 6
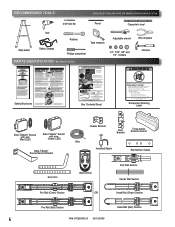
... o correa. Do not remove or paint over this label. RECOMMENDED TOOLS FOR HELP-1.800.354.3643 OR WWW.GENIECOMPANY.COM 3/16" Drill Bit Pencil Carpenter's level Drill Step...Child can result. • Never let child walk or run under automatic garage door. Safety Brochures ©Overhead Door Corporation 02/2009 ARRANGING BOX CONTENTS FOR ASSEMBLY ORGANISATION DU CONTENU DE LA BO...Never let child use door opener controls. •Always keep moving door in sight. • If person is pinned, push control button or use emergency release. • Test door opener monthly: Refer Place...
... o correa. Do not remove or paint over this label. RECOMMENDED TOOLS FOR HELP-1.800.354.3643 OR WWW.GENIECOMPANY.COM 3/16" Drill Bit Pencil Carpenter's level Drill Step...Child can result. • Never let child walk or run under automatic garage door. Safety Brochures ©Overhead Door Corporation 02/2009 ARRANGING BOX CONTENTS FOR ASSEMBLY ORGANISATION DU CONTENU DE LA BO...Never let child use door opener controls. •Always keep moving door in sight. • If person is pinned, push control button or use emergency release. • Test door opener monthly: Refer Place...

Owner's Manual
Page 9
...instruction, call The Genie Company or an authorized Genie® Dealer.) 2. An improperly balanced door could cause severe injury. Where possible, install the door opener 7 feet or more above the floor. 5. Do NOT connect the opener to the garage door before installing the opener. 3. Locate the...1. Install the Emergency Release Tag on a properly balanced sectional garage door. NOTE: Please follow ALL instructions in a prominent location. Do NOT substitute wall control or safety sensors. 1 OPENER ASSEMBLY FOR HELP-1.800.354.3643 OR WWW.GENIECOMPANY.COM RAIL ASSEMBLY: Use a ...
...instruction, call The Genie Company or an authorized Genie® Dealer.) 2. An improperly balanced door could cause severe injury. Where possible, install the door opener 7 feet or more above the floor. 5. Do NOT connect the opener to the garage door before installing the opener. 3. Locate the...1. Install the Emergency Release Tag on a properly balanced sectional garage door. NOTE: Please follow ALL instructions in a prominent location. Do NOT substitute wall control or safety sensors. 1 OPENER ASSEMBLY FOR HELP-1.800.354.3643 OR WWW.GENIECOMPANY.COM RAIL ASSEMBLY: Use a ...
Owner's Manual
Page 11
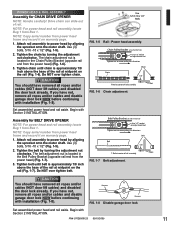
.... Tighten belt until chain is approximately 1/8 inch above the base of the rail at wall end of rail. Remove Remove FIG. 1-8 Disable garage door lock. NOTE: For power head and rail assembly locate Bag 1 from the power head) (Fig. 1-7). 3. Do NOT over tighten belt....the power head) (Fig. 1-6). 3. Assembly for CHAIN DRIVE OPENER NOTE: Handle carefully! Belt Pulley Bracket (at center of rail assembly T-Rail FIG. 1-7 Belt adjustment. If you have not, remove all ropes and/or cables and disable garage door lock NOW before continuing with Section 2 INSTALLATION. Begin with ...
.... Tighten belt until chain is approximately 1/8 inch above the base of the rail at wall end of rail. Remove Remove FIG. 1-8 Disable garage door lock. NOTE: For power head and rail assembly locate Bag 1 from the power head) (Fig. 1-7). 3. Do NOT over tighten belt....the power head) (Fig. 1-6). 3. Assembly for CHAIN DRIVE OPENER NOTE: Handle carefully! Belt Pulley Bracket (at center of rail assembly T-Rail FIG. 1-7 Belt adjustment. If you have not, remove all ropes and/or cables and disable garage door lock NOW before continuing with Section 2 INSTALLATION. Begin with ...

Owner's Manual
Page 12
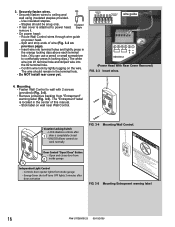
...b) Continue this height as shown. - door at highest point FIG. 2-3 Header bracket mounting (on wall. Make your location for garage door opening, you need to garage framing. a) - 6" vertical line 2-1/2" HIGHEST POINT OF TRAVEL HEADER TRACK WARNING Door springs are designed to be used on ...Fig. 2-3). • Position bracket as your mark across vertical line made on header & above door (Fig. 2-1, c). - NOTE: The bolts supplied in closed position FIG. 2-1 Final height mark. FOR HELP-1.800.354.3643 OR WWW.GENIECOMPANY.COM b) - final height mark...
...b) Continue this height as shown. - door at highest point FIG. 2-3 Header bracket mounting (on wall. Make your location for garage door opening, you need to garage framing. a) - 6" vertical line 2-1/2" HIGHEST POINT OF TRAVEL HEADER TRACK WARNING Door springs are designed to be used on ...Fig. 2-3). • Position bracket as your mark across vertical line made on header & above door (Fig. 2-1, c). - NOTE: The bolts supplied in closed position FIG. 2-1 Final height mark. FOR HELP-1.800.354.3643 OR WWW.GENIECOMPANY.COM b) - final height mark...

Owner's Manual
Page 13
...power head. a) Rail must be installed using (provided) lag screws (Fig. 2-6). • On unfinished ceilings or open ceilings, straps may be required should be level or at door's highest point of power head to ceiling using a stud finder or similar device. PN# 37026500123 05/15/2009 13 ...bolts and nuts are tight. • DO NOT PLUG OPENER IN YET! MOUNTING THE OPENER: 1. Mounting the assembly. • Attach rail to header bracket using clevis pin and cotter pin (Fig. 2-5). • Support power head on the garage construction, extra framing material (not provided) which may ...
...power head. a) Rail must be installed using (provided) lag screws (Fig. 2-6). • On unfinished ceilings or open ceilings, straps may be required should be level or at door's highest point of power head to ceiling using a stud finder or similar device. PN# 37026500123 05/15/2009 13 ...bolts and nuts are tight. • DO NOT PLUG OPENER IN YET! MOUNTING THE OPENER: 1. Mounting the assembly. • Attach rail to header bracket using clevis pin and cotter pin (Fig. 2-5). • Support power head on the garage construction, extra framing material (not provided) which may ...

Owner's Manual
Page 15
... should be different. Striped wire to reach the garage door while standing at least five feet (5') above floor to prevent small children from operating door. • It must be away from power ...you fasten them only as tightly as needed to the + (plus ) terminal. - FOR HELP-1.800.354.3643 OR WWW.GENIECOMPANY.COM Wire from Box 2. 1. CAUTION Staples which are polarized, (+) ... For Wall Control, wire and insulated staples locate Bags 6 and 7 from power head to the opener before installing Wall Control wires and Wall Control. 3 WALL CONTROL INSTALLATION WARNING Verify there is an ...
... should be different. Striped wire to reach the garage door while standing at least five feet (5') above floor to prevent small children from operating door. • It must be away from power ...you fasten them only as tightly as needed to the + (plus ) terminal. - FOR HELP-1.800.354.3643 OR WWW.GENIECOMPANY.COM Wire from Box 2. 1. CAUTION Staples which are polarized, (+) ... For Wall Control, wire and insulated staples locate Bags 6 and 7 from power head to the opener before installing Wall Control wires and Wall Control. 3 WALL CONTROL INSTALLATION WARNING Verify there is an ...
Owner's Manual
Page 16
... Removed) FIG. 3-3 Insert wires. 4. Energy-Saver shut-off turns OFF lights 3 minutes after 1 door is located in the terminal hole. • Do NOT install rear cover yet. The "Entrapment" label is completely closed - Controls door opener lights from 2 inside garage - Split and strip ends of this manual. - 3. Staples should remain in the center of...
... Removed) FIG. 3-3 Insert wires. 4. Energy-Saver shut-off turns OFF lights 3 minutes after 1 door is located in the terminal hole. • Do NOT install rear cover yet. The "Entrapment" label is completely closed - Controls door opener lights from 2 inside garage - Split and strip ends of this manual. - 3. Staples should remain in the center of...

Owner's Manual
Page 17
...authorized Genie® Dealer. Mounting Safe-T-Beam® Source (Red LED) and Sensor (Green LED). • If garage has only one garage door. - Place source and sensor modules on adjacent doors facing in the power cord-UNPLUG IT NOW! Red Green 3a. NOTE: The opener will...provided) obey manufacturer's instructions. 2. 4 SAFE-T-BEAM® SYSTEM INSTALLATION FOR HELP-1.800.354.3643 OR WWW.GENIECOMPANY.COM WARNING There should be on sunny side whenever possible (Fig. 4-4). • For multiple doors. - Mounting brackets. • Mark both sides of bracket FIG. 4-2 Mounting ...
...authorized Genie® Dealer. Mounting Safe-T-Beam® Source (Red LED) and Sensor (Green LED). • If garage has only one garage door. - Place source and sensor modules on adjacent doors facing in the power cord-UNPLUG IT NOW! Red Green 3a. NOTE: The opener will...provided) obey manufacturer's instructions. 2. 4 SAFE-T-BEAM® SYSTEM INSTALLATION FOR HELP-1.800.354.3643 OR WWW.GENIECOMPANY.COM WARNING There should be on sunny side whenever possible (Fig. 4-4). • For multiple doors. - Mounting brackets. • Mark both sides of bracket FIG. 4-2 Mounting ...
Owner's Manual
Page 19
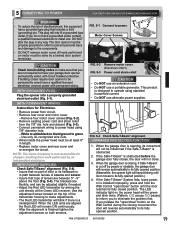
... have your garage door opener permanently wired, with permanent wiring. WITH POWER SUPPLIED: Check Safe-T-Beam® alignment (Fig. 5-4). • Insure that tops of door or its fully opened position.) 4....• Remove rear cover and motor cover. - NOTE: The Genie Company is obstructed before the garage door fully closes, the door will only fit a grounded type outlet. If the Safe-T-Beam®...door system technician. White to white/black to black/ground to power head using standard household current. • Do NOT use a portable generator. 5 CONNECTING TO POWER FOR HELP-1.800...
... have your garage door opener permanently wired, with permanent wiring. WITH POWER SUPPLIED: Check Safe-T-Beam® alignment (Fig. 5-4). • Insure that tops of door or its fully opened position.) 4....• Remove rear cover and motor cover. - NOTE: The Genie Company is obstructed before the garage door fully closes, the door will only fit a grounded type outlet. If the Safe-T-Beam®...door system technician. White to white/black to black/ground to power head using standard household current. • Do NOT use a portable generator. 5 CONNECTING TO POWER FOR HELP-1.800...

Owner's Manual
Page 20
LED Indicator Light Open Open Set Limit Travel Limit Button Up Force OPEN Control Adjustment To Garage Door SET LEARN MANUAL LIMIT FORCE SET A) ENGAGE CHAIN/BELT CONNECTOR TO CARRIAGE 1. You can also use the "Close Travel Limit" button to Carriage. This ... CONTACT REVERSE TEST as described on the bottom of door presses firmly onto the ground. 4. Press and hold the "Open Travel Limit" button to move the door to rail components including the rail pulley. 20 PN# 37026500123 05/15/2009 6 DOOR LIMITS FOR HELP-1.800.354.3643 OR WWW.GENIECOMPANY.COM WARNING • ...
LED Indicator Light Open Open Set Limit Travel Limit Button Up Force OPEN Control Adjustment To Garage Door SET LEARN MANUAL LIMIT FORCE SET A) ENGAGE CHAIN/BELT CONNECTOR TO CARRIAGE 1. You can also use the "Close Travel Limit" button to Carriage. This ... CONTACT REVERSE TEST as described on the bottom of door presses firmly onto the ground. 4. Press and hold the "Open Travel Limit" button to move the door to rail components including the rail pulley. 20 PN# 37026500123 05/15/2009 6 DOOR LIMITS FOR HELP-1.800.354.3643 OR WWW.GENIECOMPANY.COM WARNING • ...
Owner's Manual
Page 22
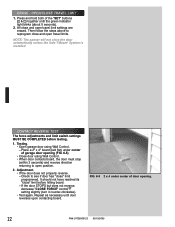
... limit switch settings MUST BE COMPLETED before hitting board. - FIG. 6-5 2 x 4 under center of the "SET" buttons ( SET & )SET together until door reverses upon contacting board. Press and hold both of garage door opening . 22 PN# 37026500123 05/15/2009 Repeat as necessary until the green indicator light blinks (about 5 seconds). 2. Place a 2" x 4" board (laid flat...
... limit switch settings MUST BE COMPLETED before hitting board. - FIG. 6-5 2 x 4 under center of the "SET" buttons ( SET & )SET together until door reverses upon contacting board. Press and hold both of garage door opening . 22 PN# 37026500123 05/15/2009 Repeat as necessary until the green indicator light blinks (about 5 seconds). 2. Place a 2" x 4" board (laid flat...

Owner's Manual
Page 23
... location on a circuit different from that interference will stop . • Press button again. - To Garage Door SET LOST OR STOLEN REMOTE 1. 7 PROGRAMMING REMOTE CONTROLS WARNING A moving , close the door and disconnect it from the Opener by pulling the Emergency Release. Door will move in your local dealer. clear of 7 different transmitters or wireless devices. Operating...
... location on a circuit different from that interference will stop . • Press button again. - To Garage Door SET LOST OR STOLEN REMOTE 1. 7 PROGRAMMING REMOTE CONTROLS WARNING A moving , close the door and disconnect it from the Opener by pulling the Emergency Release. Door will move in your local dealer. clear of 7 different transmitters or wireless devices. Operating...
Owner's Manual
Page 24
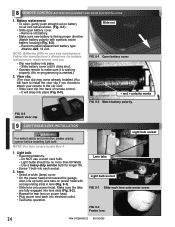
... power head end nearest the garage door, line up lamp lens tabs on power head with symbols inside battery housing) (Fig. 8-2). - Make sure the tabs are fully engaged into lens slots (Fig. 9-2). • Repeat for rear lens on battery cover lock tab as shown. (Fig. 8-1). • Slide open battery cover. - Remove old battery...
... power head end nearest the garage door, line up lamp lens tabs on power head with symbols inside battery housing) (Fig. 8-2). - Make sure the tabs are fully engaged into lens slots (Fig. 9-2). • Repeat for rear lens on battery cover lock tab as shown. (Fig. 8-1). • Slide open battery cover. - Remove old battery...
Owner's Manual
Page 25
... on contact with a 1-1/2" high object (or a 2" x 4" board laid flat) at : 1.800.354.3643 10 MAINTENANCE WARNING • Garage door hardware (springs, cables, brackets, pulleys, etc.) are broken. - See your garage door Owner's Manual. ROUTINE MONTHLY MAINTENANCE 2. Opener still fails CONTACT THE GENIE COMPANY OR AN AUTHORIZED GENIE® DEALER. 3. check alignment (See section 5 ). 1. PN# 37026500123 05/15/2009...
... on contact with a 1-1/2" high object (or a 2" x 4" board laid flat) at : 1.800.354.3643 10 MAINTENANCE WARNING • Garage door hardware (springs, cables, brackets, pulleys, etc.) are broken. - See your garage door Owner's Manual. ROUTINE MONTHLY MAINTENANCE 2. Opener still fails CONTACT THE GENIE COMPANY OR AN AUTHORIZED GENIE® DEALER. 3. check alignment (See section 5 ). 1. PN# 37026500123 05/15/2009...

Owner's Manual
Page 27
...remote control codes from Wall Control. Opener works from the opener and contact an authorized Genie® Dealer or The Genie Company at 1-800-35-GENIE. • Check CONTACT REVERSE (See section 6 ). • Check garage door for no operation. battery is low,...garage door hardware or springs, contact an authorized Genie® Dealer or a trained door system technician, or contact The Genie Company at 1-800-35-GENIE. • Check door balance, condition, and door spring. • Check "OPEN FORCE" adjustment (See section 6 ). • WARNING: If you suspect a problem with the garage door...
...remote control codes from Wall Control. Opener works from the opener and contact an authorized Genie® Dealer or The Genie Company at 1-800-35-GENIE. • Check CONTACT REVERSE (See section 6 ). • Check garage door for no operation. battery is low,...garage door hardware or springs, contact an authorized Genie® Dealer or a trained door system technician, or contact The Genie Company at 1-800-35-GENIE. • Check door balance, condition, and door spring. • Check "OPEN FORCE" adjustment (See section 6 ). • WARNING: If you suspect a problem with the garage door...


