Genie QuietLift 800 Support and Manuals
Get Help and Manuals for this Genie item

View All Support Options Below
Free Genie QuietLift 800 manuals!
Problems with Genie QuietLift 800?
Ask a Question
Free Genie QuietLift 800 manuals!
Problems with Genie QuietLift 800?
Ask a Question
Most Recent Genie QuietLift 800 Questions

What Is The Best Screw Drive Carriage For A Standard Garage Opener
(Posted by Starlingdeb 9 years ago)

Excellerator Wiring Diagram
Need wiring diagram for Genie Excellerator grage door opener
Need wiring diagram for Genie Excellerator grage door opener
(Posted by TheBardRocks 10 years ago)
Genie QuietLift 800 Videos

Genie Quietlift 800 1/2 hp dc belt driven
Duration: :17
Total Views: 3,382
Duration: :17
Total Views: 3,382
Popular Genie QuietLift 800 Manual Pages
Owner's Manual - Page 1
... Johnson Controls Technology Company. For use only with homeowner. d/b/a The Genie Company PN# 37026500123, 5/15/2009
ALWAYS AT YOUR COMMAND
Models 2022/2024/2042 GARAGE DOOR OPENERS
Includes: 2-Bulb Light System Wall Console
Includes INTELLICODE® Remote Control Safe-T-Beam® System must be installed to close door.
Car2U® is a registered trademark of Lear Corporation. ©...
Owner's Manual - Page 2

... door is used throughout this manual to call attention to and identify different levels of hazard and special instructions. ELECTRICAL SHOCK HIGH SPRING TENSION
2
WARNING: CoourldSererisouultsinInDjueryath
Turn OFF power before removing operator cover. When replacing cover, make sure wires are fastened, such as, wood blocks, steel brackets, cables or other like items. Installations, repairs...
Owner's Manual - Page 3

... INSTALLATION 24 9 LIGHT BULB AND LENS INSTALLATION 24 SAFETY INSTRUCTIONS 25 MAINTENANCE & TROUBLESHOOTING 10 ROUTINE MONTHLY MAINTENANCE 25 WIRING DIAGRAM 26 TROUBLESHOOTING GUIDE - OPENER 27 TROUBLESHOOTING GUIDE - Follow the Homelink® or Car2U® instructions in your car owner's manual.
Features adjustable open and close door. Turns ON when door is used. Manual...
Owner's Manual - Page 4

..."bracing kit." (Refer to operate on your garage door.
4
PN# 37026500123 05/15/2009 The door opener's header bracket must be installed within code specifications. Insure that you read and fully understand all information and instructions contained herein before choosing a "Do-it repaired or adjusted by a trained door system technician. WARNING
4 Is your garage does not have it -yourself...
Owner's Manual - Page 6
...;der selon les instructions stipumléoenstadgaenàs sleuimvraen.uel d'installation pour les étapes de
Box Contents Sheet
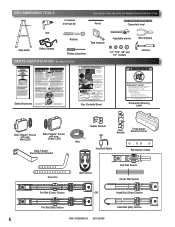
Adjustable wrench
Wire strippers
1/4", 7/16", 3/8" and 1/2" Sockets
Hammer
Child can result.
• Never let child walk or run under automatic garage door. Death or serious injury can be pinned under moving door in the Installation Manual for easy...
Owner's Manual - Page 12
... your mark is location for garage door opening, you need to height mark just made earlier. • Add 2-1/2" to add a "mounting surface."
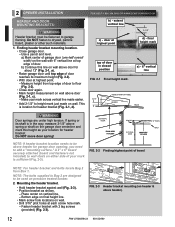
Do NOT move door spring! NOTE: For header bracket and bolts locate Bag 2 from top edge of your mark across vertical line made on vertical line, - 2 OPENER INSTALLATION
HEADER AND DOOR MOUNTING BRACKETS:
WARNING Header...
Owner's Manual - Page 13
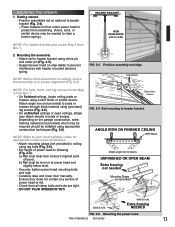
.... MOUNTING THE OPENER: 1. NOTE: For nuts, bolts, and lag screws locate Bag 3 from Box 1. 2. Depending on step-ladder to header bracket using clevis pin and cotter pin (Fig. 2-5).
• Support power head on the garage construction, extra framing material (not provided) which may be installed using lag bolts (Fig. 2-6).
• Set height of power head or rail...
Owner's Manual - Page 17

...8226; If garage has only one garage door.
-
Use insulated staples.
- b) Blocks of garage door frame or wall no higher than 6" and no lower than 5" above floor (Fig. 4-1).
• Hold bracket against door frame or wall. - may be no electrical power to the opener while installing Safe-T-Beam® wires. NOTE: Mounting brackets can be substituted for extensions.
• Center...
Owner's Manual - Page 19
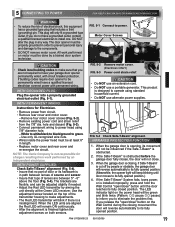
... "open /close " button until door moves to install one. The door opener must be permanently wired have a qualified licensed electrician connect power with circuit breaker protection. Motor Cover Screws
CAUTION • Check local building codes to make adjustments. • The Red LED transmitter will reverse automatically to operate using
7/8" diameter hole. - When the garage door is...
Owner's Manual - Page 20

... Indicator Light
Open
Open
Set Limit
Travel Limit Button
Up Force
OPEN Control
Adjustment
To Garage Door
SET
LEARN MANUAL LIMIT FORCE
SET
A) ENGAGE CHAIN/BELT CONNECTOR TO CARRIAGE 1. B) CLOSE TRAVEL LIMIT 1. Press and hold the "Close Travel Limit" button
until the chain or belt connector advances and engages to Carriage. Door is fully closed when the bottom edge of the power head...
Owner's Manual - Page 22

... seconds). 2. FIG. 6-5 2 x 4 under center of the "SET" buttons
( SET & )SET together until door reverses upon contacting board. Then follow the steps above to see if door has "close the door automatically unless the Safe-T-Beam® System is installed. Testing.
• Open garage door using Wall Control. • When door contacts board, the door must stop
(within 2 seconds) and reverse...
Owner's Manual - Page 23

...
and receiver. • Connect the opener into an outlet on power head. Operating. • Press remote button once. -
LED Indicator Light
Open
Open
Set Limit
Travel Limit Button
Up Force
OPEN Control
Adjustment
NOTE: The door will blink RED at the fully open or fully closed position. LEARN MANUAL LIMIT FORCE
SET
Learn
Code CODE
Button
Close
Travel Limit
Close CLOSE Down...
Owner's Manual - Page 24

.... • On the power head end nearest the garage
door, line up lamp lens tabs on power head. • Plug power cord back into back of remote control. - FIG. 9-2 Fasten lens.
24
PN# 37026500123 05/15/2009 Recommended replacement battery type: Alkaline A23, 12 volt. Visor clip. (The visor clip may come already installed.)You will snap...
Owner's Manual - Page 25

.... • Red LED blinks. - Door should remain stationary or move very slightly. - Have a trained door system technician make repairs to repair or adjust door springs or any hardware, and DO NOT OPERATE garage door automatically or manually if door is closed. If you have any questions, please do not hesitate to contact Genie® customer service at the center of severe...
Owner's Manual - Page 27

... in good repair, properly lubricated and balanced (See Maintenance section 10).
• Check "OPEN" limit setting (See section 6 ). • Check "OPEN FORCE" adjustment (See section 6 ). • WARNING: If you suspect a problem with the garage door hardware or springs, contact
an authorized Genie® Dealer or a trained door system technician, or contact The Genie Company at 1-800-35-GENIE...
Genie QuietLift 800 Reviews
We have not received any reviews for Genie yet.