

Owner's Manual
Page 2
...avoided, may result in Death or Serious Injury Do NOT try to remove, install, repair or adjust springs or anything to which door spring parts are fastened, such as, wood blocks, steel brackets, cables or other like items. Installations, repairs and adjustments must be followed, important considerations,...this manual to call attention to play with the help you have questions or do NOT understand the information presented, contact The Genie Company or an authorized Genie® Dealer. Do NOT operate a door that jams or one that move with the door operator. If you identify important...
...avoided, may result in Death or Serious Injury Do NOT try to remove, install, repair or adjust springs or anything to which door spring parts are fastened, such as, wood blocks, steel brackets, cables or other like items. Installations, repairs and adjustments must be followed, important considerations,...this manual to call attention to play with the help you have questions or do NOT understand the information presented, contact The Genie Company or an authorized Genie® Dealer. Do NOT operate a door that jams or one that move with the door operator. If you identify important...

Owner's Manual
Page 3
... Lighting System. PN# 37026500123, 02/26/2010 REV. 1 3 TABLE OF CONTENTS SECTION PAGE SAFETY INFORMATION 2 OPENER FEATURES 3 SAFETY FEATURES 3 PRE-INSTALLATION CHECK LIST 4-5 RECOMMENDED TOOLS 6 PARTS IDENTIFICATION 6-7 KEY ILLUSTRATIONS 8 SAFETY INSTALLATION INFORMATION 9 INSTALLATION 1 OPENER ASSEMBLY 9-11 2 INSTALLATION 12-14 3 WALL BUTTON INSTALLATION 15-16 4 SAFE-T-BEAM® SYSTEM INSTALLATION 17-18...
... Lighting System. PN# 37026500123, 02/26/2010 REV. 1 3 TABLE OF CONTENTS SECTION PAGE SAFETY INFORMATION 2 OPENER FEATURES 3 SAFETY FEATURES 3 PRE-INSTALLATION CHECK LIST 4-5 RECOMMENDED TOOLS 6 PARTS IDENTIFICATION 6-7 KEY ILLUSTRATIONS 8 SAFETY INSTALLATION INFORMATION 9 INSTALLATION 1 OPENER ASSEMBLY 9-11 2 INSTALLATION 12-14 3 WALL BUTTON INSTALLATION 15-16 4 SAFE-T-BEAM® SYSTEM INSTALLATION 17-18...
Owner's Manual
Page 6
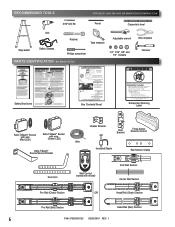
... 3/8" and 1/2" Sockets Hammer Child can result. • Never let child walk or run under automatic garage door. RECOMMENDED TOOLS FOR HELP-1.800.354.3643 OR WWW.GENIECOMPANY.COM 3/16" Drill Bit Pencil Carpenter's level Drill Step ladder Safety Glasses Ratchet Tape measure Phillips screwdriver... PARTS IDENTIFICATION - Enlever soigneusement le troisième rail (avec la chaîne ou courroie attachée) et le placer sur...
... 3/8" and 1/2" Sockets Hammer Child can result. • Never let child walk or run under automatic garage door. RECOMMENDED TOOLS FOR HELP-1.800.354.3643 OR WWW.GENIECOMPANY.COM 3/16" Drill Bit Pencil Carpenter's level Drill Step ladder Safety Glasses Ratchet Tape measure Phillips screwdriver... PARTS IDENTIFICATION - Enlever soigneusement le troisième rail (avec la chaîne ou courroie attachée) et le placer sur...

Owner's Manual
Page 7
... - (located on packaging) • Store, city, state, and date of purchase Shoulder Bolt 5/16 -18 x 1" PN# 37026500123 02/26/2010 REV. 1 7 Shown Full size (See Parts List below for full description.) BAG NO. IMPORTANT! - WHITE QUANTITY 2 8 8 3 1 1 1 2 5 5 2 3 1 3 1 2 1 1 1 2 30 2 4 4 1 1 2 Rail Clamp Bolt - 5/16 -18 x 5/8" #10-16 x 1-1/4" ...20 x 3/4" Clevis pin, long 5/16" x 3" Clevis pin 5/16" x 3/4" Cotter pin Hex Bolt - 5/16 -18 x 3/4" Hex Bolt - 5/16 -18 x 1/2" MISSING ANY PARTS? Please call toll free - 1.800.354.3643 DO NOT RETURN TO POINT OF PURCHASE. FASTENERS -
... - (located on packaging) • Store, city, state, and date of purchase Shoulder Bolt 5/16 -18 x 1" PN# 37026500123 02/26/2010 REV. 1 7 Shown Full size (See Parts List below for full description.) BAG NO. IMPORTANT! - WHITE QUANTITY 2 8 8 3 1 1 1 2 5 5 2 3 1 3 1 2 1 1 1 2 30 2 4 4 1 1 2 Rail Clamp Bolt - 5/16 -18 x 5/8" #10-16 x 1-1/4" ...20 x 3/4" Clevis pin, long 5/16" x 3" Clevis pin 5/16" x 3/4" Cotter pin Hex Bolt - 5/16 -18 x 3/4" Hex Bolt - 5/16 -18 x 1/2" MISSING ANY PARTS? Please call toll free - 1.800.354.3643 DO NOT RETURN TO POINT OF PURCHASE. FASTENERS -

Owner's Manual
Page 9
... 6. Clear a workspace area to unpack and organize box and contents for later use . These boxes contain assembly parts and the contents are for easy access (Fig. 1-1). Bag 0 Rail Connectors Rail Connector Bolts HIGaHuseSSPmeeRrnitIosNromupsGuesrItntTbojeouElmsrNyaandoSderibInODystareNutarcattiinhoends dSmbooraomainnrcNeusdintfdirOasguotc.rcTotCiutbrEoisrounenntrtoseaf.reocotdr...the opener, the door must reverse within reach, but at least 6 feet above the floor. FOR HELP-1.800.354.3643 OR WWW.GENIECOMPANY.COM WARNING To reduce the risk of severe injury or death: 1. For quick...
... 6. Clear a workspace area to unpack and organize box and contents for later use . These boxes contain assembly parts and the contents are for easy access (Fig. 1-1). Bag 0 Rail Connectors Rail Connector Bolts HIGaHuseSSPmeeRrnitIosNromupsGuesrItntTbojeouElmsrNyaandoSderibInODystareNutarcattiinhoends dSmbooraomainnrcNeusdintfdirOasguotc.rcTotCiutbrEoisrounenntrtoseaf.reocotdr...the opener, the door must reverse within reach, but at least 6 feet above the floor. FOR HELP-1.800.354.3643 OR WWW.GENIECOMPANY.COM WARNING To reduce the risk of severe injury or death: 1. For quick...
Owner's Manual
Page 15
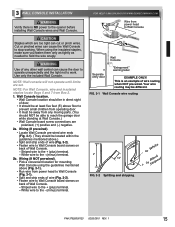
.... ‡ It should be different. 3 WALL CONSOLE INSTALLATION WARNING Verify there is an example of wire routing when NOT pre-wired. FOR HELP-1.800.354.3643 OR WWW.GENIECOMPANY.COM Wire from Box 2. 1. Your wire routing may be at Wall Console.) ‡ Wall Console board screw connections... are polarized, (+) positive and (-) negative. 2a. Use only the included Wall Console. Striped wire to Wall Console board screws on back of any moving parts. (You should be away from power head to Wall Console (Fig. 3-1). ‡ Split and strip ends of wire (Fig. 3-2). ‡ Fasten ...
.... ‡ It should be different. 3 WALL CONSOLE INSTALLATION WARNING Verify there is an example of wire routing when NOT pre-wired. FOR HELP-1.800.354.3643 OR WWW.GENIECOMPANY.COM Wire from Box 2. 1. Your wire routing may be at Wall Console.) ‡ Wall Console board screw connections... are polarized, (+) positive and (-) negative. 2a. Use only the included Wall Console. Striped wire to Wall Console board screws on back of any moving parts. (You should be away from power head to Wall Console (Fig. 3-1). ‡ Split and strip ends of wire (Fig. 3-2). ‡ Fasten ...

Owner's Manual
Page 19
...7/8" diameter hole. - The LED indicator light on Safe-T-Beam®. 6" 5" max min from from the 7/8" dia. 5 CONNECTING TO POWER FOR HELP-1.800.354.3643 OR WWW.GENIECOMPANY.COM WARNING ‡ To reduce the risk of electrical shock, this equipment has a grounded type plug that no... part of door or its hardware is in any way. WITH PERMANENT WIRING: Instructions for charges resulting from circuit. ‡ Remove rear cover and motor cover. - NOTE: The Genie Company is not responsible for Electrician. ‡ Remove power ...
...7/8" diameter hole. - The LED indicator light on Safe-T-Beam®. 6" 5" max min from from the 7/8" dia. 5 CONNECTING TO POWER FOR HELP-1.800.354.3643 OR WWW.GENIECOMPANY.COM WARNING ‡ To reduce the risk of electrical shock, this equipment has a grounded type plug that no... part of door or its hardware is in any way. WITH PERMANENT WIRING: Instructions for charges resulting from circuit. ‡ Remove rear cover and motor cover. - NOTE: The Genie Company is not responsible for Electrician. ‡ Remove power ...

Owner's Manual
Page 23
... power SET head) for use with opener, including wall button, remote control, or Wireless Keypad. 3. This equipment has been tested and found to Part 15 of Industry Canada. Limit controls location on the power head (Fig. 7-1). ‡ Press and release "Learn Code" button. - Single Button... interference will move. 1b. Clear memory. ‡ Press and hold learn up to run, so keep the door from moving door and its parts. Your door opener will move . ‡ Press button again. - During programming, the door opener could begin to 7 transmitter buttons. Indicator LED...
... power SET head) for use with opener, including wall button, remote control, or Wireless Keypad. 3. This equipment has been tested and found to Part 15 of Industry Canada. Limit controls location on the power head (Fig. 7-1). ‡ Press and release "Learn Code" button. - Single Button... interference will move. 1b. Clear memory. ‡ Press and hold learn up to run, so keep the door from moving door and its parts. Your door opener will move . ‡ Press button again. - During programming, the door opener could begin to 7 transmitter buttons. Indicator LED...

Owner's Manual
Page 30
...reconditioned Product of the below identified opener, Model 2022/2024/2042 ("Product"), subject to speak with replacement parts or, at its option, a replacement Product. Purchaser must contact Genie® customer service and provide proof of the date and location of incidental or consequential damages, so ... if Seller has been advised of the possibility of the Product only, and is specifically limited to repairing or replacing, at 1-800-354-3643 to all components thereof will be free from defects in commercial or industrial building applications. Seller warrants the motor for ...
...reconditioned Product of the below identified opener, Model 2022/2024/2042 ("Product"), subject to speak with replacement parts or, at its option, a replacement Product. Purchaser must contact Genie® customer service and provide proof of the date and location of incidental or consequential damages, so ... if Seller has been advised of the possibility of the Product only, and is specifically limited to repairing or replacing, at 1-800-354-3643 to all components thereof will be free from defects in commercial or industrial building applications. Seller warrants the motor for ...
