Manual
Page 8
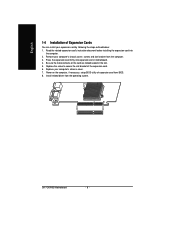
... 1-4 Installation of Expansion Cards You can install your computer's chassis cover, screws and slot bracket from the computer. 3. GA-7CN700ID Motherboard - 8 - Press the expansion card firmly into the computer. 2. Install related driver from BIOS. 8. Replace the screw to secure the slot bracket of the expansion card. 6. Replace your computer's chassis cover. 7. Read the...
... 1-4 Installation of Expansion Cards You can install your computer's chassis cover, screws and slot bracket from the computer. 3. GA-7CN700ID Motherboard - 8 - Press the expansion card firmly into the computer. 2. Install related driver from BIOS. 8. Replace the screw to secure the slot bracket of the expansion card. 6. Replace your computer's chassis cover. 7. Read the...

Manual
Page 12
One IDE connector can connect to one IDE device as Master and the other as Slave (for the Serial ATA and install the proper driver in the IDE connector. 40 39 2 IDE1 1 IDE2 3) SATA1/SATA2 (Serial ATA Connector,) Serial ATA can then connect to work properly. Please ... to connect two IDE devices, please set the jumper on the IDE device). Definition 1 GND 7 1 2 TXP 3 TXN 4 GND 5 RXN 6 RXP 7 GND GA-7CN700ID Motherboard - 12 - Before attaching the IDE cable, please take note of the foolproof groove in order to two IDE devices (hard drive or optical drive). If...
One IDE connector can connect to one IDE device as Master and the other as Slave (for the Serial ATA and install the proper driver in the IDE connector. 40 39 2 IDE1 1 IDE2 3) SATA1/SATA2 (Serial ATA Connector,) Serial ATA can then connect to work properly. Please ... to connect two IDE devices, please set the jumper on the IDE device). Definition 1 GND 7 1 2 TXP 3 TXN 4 GND 5 RXN 6 RXP 7 GND GA-7CN700ID Motherboard - 12 - Before attaching the IDE cable, please take note of the foolproof groove in order to two IDE devices (hard drive or optical drive). If...


