User Manual
Page 9
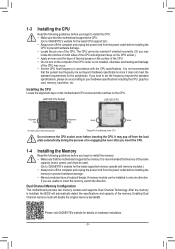
...thermal grease on the surface of the CPU. •• Do not turn off the computer and unplug the power cord from the power outlet before installing the memory to GIGABYTE's website for the latest supported memory speeds and memory modules.) •• Always turn on the CPU Do...power cord from the power outlet before installing the CPU to install the CPU: •• Make sure that the system bus frequency be installed in accordance with the CPU specifications. If you wish to set beyond the standard specifications, please do so according to insert the memory, switch...
...thermal grease on the surface of the CPU. •• Do not turn off the computer and unplug the power cord from the power outlet before installing the memory to GIGABYTE's website for the latest supported memory speeds and memory modules.) •• Always turn on the CPU Do...power cord from the power outlet before installing the CPU to install the CPU: •• Make sure that the system bus frequency be installed in accordance with the CPU specifications. If you wish to set beyond the standard specifications, please do so according to insert the memory, switch...

User Manual
Page 15
...your chassis front panel module to this header according to the pin assignments below. A front panel module mainly consists of power switch, reset switch, power LED, hard drive activity LED, speaker and etc. The system reports system startup status by chassis. Each SATA connector supports ...a single SATA device. Power LED Power Switch Speaker •• PLED/PWR_LED (Power LED): System Status LED S0 On S3/S4/S5 Off Connects to the chassis intrusion switc_h/sensor on the...
...your chassis front panel module to this header according to the pin assignments below. A front panel module mainly consists of power switch, reset switch, power LED, hard drive activity LED, speaker and etc. The system reports system startup status by chassis. Each SATA connector supports ...a single SATA device. Power LED Power Switch Speaker •• PLED/PWR_LED (Power LED): System Status LED S0 On S3/S4/S5 Off Connects to the chassis intrusion switc_h/sensor on the...
User Manual
Page 19
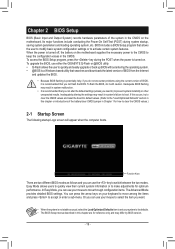
...updates the BIOS. •• Because BIOS flashing is not stable as follows and you not flash the BIOS. Or you can use either the GIGABYTE Q-Flash or @BIOS utility. •• Q-Flash allows the user to quickly and easily upgrade or back up BIOS without entering the operating ... detailed BIOS settings. When the power is turned on your system to its defaults. •• The BIOS Setup menus described in this chapter or introductions of the battery/clear CMOS jumper in Chapter 1 for reference only and may result in system's failure to switch between the two modes.
...updates the BIOS. •• Because BIOS flashing is not stable as follows and you not flash the BIOS. Or you can use either the GIGABYTE Q-Flash or @BIOS utility. •• Q-Flash allows the user to quickly and easily upgrade or back up BIOS without entering the operating ... detailed BIOS settings. When the power is turned on your system to its defaults. •• The BIOS Setup menus described in this chapter or introductions of the battery/clear CMOS jumper in Chapter 1 for reference only and may result in system's failure to switch between the two modes.
User Manual
Page 20
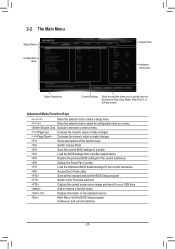
... enter a menu / Increase the numeric value or make changes / Decrease the numeric value or make changes Show descriptions of the function keys Switch to Easy Mode Save the current BIOS settings to a profile Load the BIOS settings from a profile created before Restore the previous BIOS settings...Load the Optimized BIOS default settings for the current submenus Access the Q-Flash utility Save all the changes and exit the BIOS Setup program Switch to the Favorites submenu Capture the current screen as an image and save it to the General Help, Easy Mode, Smart Fan 5, ...
... enter a menu / Increase the numeric value or make changes / Decrease the numeric value or make changes Show descriptions of the function keys Switch to Easy Mode Save the current BIOS settings to a profile Load the BIOS settings from a profile created before Restore the previous BIOS settings...Load the Optimized BIOS default settings for the current submenus Access the Q-Flash utility Save all the changes and exit the BIOS Setup program Switch to the Favorites submenu Capture the current screen as an image and save it to the General Help, Easy Mode, Smart Fan 5, ...
User Manual
Page 21
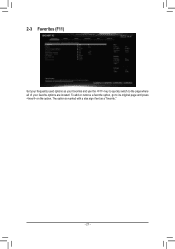
To add or remove a favorite option, go to the page where all of your frequently used options as a "favorite." - 21 - The option is marked with a star sign if set as your favorites and use the key to quickly switch to its original page and press on the option. 2-3 Favorites (F11) Set your favorite options are located.
To add or remove a favorite option, go to the page where all of your frequently used options as a "favorite." - 21 - The option is marked with a star sign if set as your favorites and use the key to quickly switch to its original page and press on the option. 2-3 Favorites (F11) Set your favorite options are located.
User Manual
Page 32
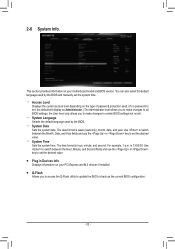
The date format is hour, minute, and second. Use to switch between the Hour, Minute, and Second fields and use the or key to set , the default will display as Administrator.) The Administrator level allows you ... default language used . (If no password is 13:00:00. For example, 1 p.m. This section provides information on your motherboard model and BIOS version. Use to switch between the Month, Date, and Year fields and use the or key to set the system time. && Access Level Displays the current access level depending...
The date format is hour, minute, and second. Use to switch between the Hour, Minute, and Second fields and use the or key to set , the default will display as Administrator.) The Administrator level allows you ... default language used . (If no password is 13:00:00. For example, 1 p.m. This section provides information on your motherboard model and BIOS version. Use to switch between the Month, Date, and Year fields and use the or key to set the system time. && Access Level Displays the current access level depending...


