

OSD Sidekick User Guide
Page 3
CONTENTS Gaming Monitor User Guide SOFTWARE INSTALLATION...4 Preparation...4 Installing the Software...5 Uninstalling the Software 6 USING THE SOFTWARE...7 Launching the Software 7 Configuring the Settings 7 DISPLAY SETTING...8 HOT KEY...17 GENERAL SETTING 19 ABOUT...20 - 3 -
CONTENTS Gaming Monitor User Guide SOFTWARE INSTALLATION...4 Preparation...4 Installing the Software...5 Uninstalling the Software 6 USING THE SOFTWARE...7 Launching the Software 7 Configuring the Settings 7 DISPLAY SETTING...8 HOT KEY...17 GENERAL SETTING 19 ABOUT...20 - 3 -

OSD Sidekick User Guide
Page 7
... the monitor. - 7 - Double-click the icon to the LCD monitor through a USB cable as described in step 1 in > GIGABYTE folder, and select More > Run as an administrator. Configuring the Settings Using the OSD Sidekick software, you need to run it as administrator. Then launch the software. To do so, right-click OSD_Sideclick...
... the monitor. - 7 - Double-click the icon to the LCD monitor through a USB cable as described in step 1 in > GIGABYTE folder, and select More > Run as an administrator. Configuring the Settings Using the OSD Sidekick software, you need to run it as administrator. Then launch the software. To do so, right-click OSD_Sideclick...

OSD Sidekick User Guide
Page 8
... the preset Picture Mode name and click to reset the preset Picture Mode profile to adjust the setting. Gaming Monitor User Guide Note: • Most of the following: DD Drag the slider to its default settings. - 8 - For more information, refer to the monitor user guide. • To make the adjustment, generally, you...
... the preset Picture Mode name and click to reset the preset Picture Mode profile to adjust the setting. Gaming Monitor User Guide Note: • Most of the following: DD Drag the slider to its default settings. - 8 - For more information, refer to the monitor user guide. • To make the adjustment, generally, you...

OSD Sidekick User Guide
Page 9
Browse the location and select the profile file to import the file. - 9 - Note: Make sure to configure the necessary Gaming & Picture settings before creating a new profile. √√ To import other profile. √√ To add an additional profile, select Add profile. Then click OK to import. However, you can still do the following: Gaming Monitor User Guide DD Click E-sports Customize > to add an additional profile or import other profile from the specified folder, select Import profile.
Browse the location and select the profile file to import the file. - 9 - Note: Make sure to configure the necessary Gaming & Picture settings before creating a new profile. √√ To import other profile. √√ To add an additional profile, select Add profile. Then click OK to import. However, you can still do the following: Gaming Monitor User Guide DD Click E-sports Customize > to add an additional profile or import other profile from the specified folder, select Import profile.

OSD Sidekick User Guide
Page 12
Gaming Monitor User Guide Customizing the Crosshair Cursor Set the CROSSHAIR setting to ON to activate the function. Then draw a new crosshair cursor. Then select one of the rectangular grids (marked in the illustration below) and click . The new crosshair cursor will appear on the screen. - 12 - Once complete, click Save. Select the desired color and line thickness.
Gaming Monitor User Guide Customizing the Crosshair Cursor Set the CROSSHAIR setting to ON to activate the function. Then draw a new crosshair cursor. Then select one of the rectangular grids (marked in the illustration below) and click . The new crosshair cursor will appear on the screen. - 12 - Once complete, click Save. Select the desired color and line thickness.

OSD Sidekick User Guide
Page 14
... the q icon to link the profile with an application. - 14 - DD If you have selected the PIP layout, in PIP SIZE, click the q icon to set the sub window location to display the screen image from the main source on the full screen and the second source in a sub window. Linking... Apps to the Profile Click to select the main source. Select any of the following items to configure the PIP/PBP settings: DD Click PBP to Left-Top, Right-Top, LeftBottom, or Right-Bottom. DD Click PIP to display the screen image from two sources side by...
... the q icon to link the profile with an application. - 14 - DD If you have selected the PIP layout, in PIP SIZE, click the q icon to set the sub window location to display the screen image from the main source on the full screen and the second source in a sub window. Linking... Apps to the Profile Click to select the main source. Select any of the following items to configure the PIP/PBP settings: DD Click PBP to Left-Top, Right-Top, LeftBottom, or Right-Bottom. DD Click PIP to display the screen image from two sources side by...

OSD Sidekick User Guide
Page 15
..., then the DASHBOARD items are on the right side of the screen and vice versa. - 15 - Then configure the following settings: DD In LOCATION, click the q icon to set the location of the screen depends on the screen to the profile you linked. For example, if the Game Assist items are... on the left side of the options on the Game Assist location setting. When you open that application, the display setting will automatically change to Up or Down. Gaming Monitor User Guide Then select the application (*.exe) you want to activate the...
..., then the DASHBOARD items are on the right side of the screen and vice versa. - 15 - Then configure the following settings: DD In LOCATION, click the q icon to set the location of the screen depends on the screen to the profile you linked. For example, if the Game Assist items are... on the left side of the options on the Game Assist location setting. When you open that application, the display setting will automatically change to Up or Down. Gaming Monitor User Guide Then select the application (*.exe) you want to activate the...

OSD Sidekick User Guide
Page 16
Customizing the Game Assist Settings Configure the following Game Assist settings: DD Set the REFRESH RATE setting to ON to set the countdown time. - 16 - Select either COUNT UP or COUNT DOWN the timer. - Click the q icon to enable displaying the refresh rate. Note: Uncheck the option to enable displaying the gaming timer. - DD Set the GAMING TIMER setting to ON to hide it from the screen. Gaming Monitor User Guide DD Click SETTINGS and check the desired option(s) to be shown on the screen.
Customizing the Game Assist Settings Configure the following Game Assist settings: DD Set the REFRESH RATE setting to ON to set the countdown time. - 16 - Select either COUNT UP or COUNT DOWN the timer. - Click the q icon to enable displaying the refresh rate. Note: Uncheck the option to enable displaying the gaming timer. - DD Set the GAMING TIMER setting to ON to hide it from the screen. Gaming Monitor User Guide DD Click SETTINGS and check the desired option(s) to be shown on the screen.

OSD Sidekick User Guide
Page 17
DD In LOCATION, click the q icon to set the gaming counter location on the HOT KEYS panel. Assigning a Hot Key 1. Note: By default, the assigned hot keys appears on the screen to enable displaying the gaming counter. Gaming Monitor User Guide DD Set the GAMING COUNTER setting to ON to Left Top, Left Center, Left Bottom, Right Top, Right Center, or Right Bottom. On the FUNCTION panel, scroll down to select the function you want to assign a hot key to access a particular function which you are using frequently. HOT KEY Manage the keyboard shortcut to . - 17 -
DD In LOCATION, click the q icon to set the gaming counter location on the HOT KEYS panel. Assigning a Hot Key 1. Note: By default, the assigned hot keys appears on the screen to enable displaying the gaming counter. Gaming Monitor User Guide DD Set the GAMING COUNTER setting to ON to Left Top, Left Center, Left Bottom, Right Top, Right Center, or Right Bottom. On the FUNCTION panel, scroll down to select the function you want to assign a hot key to access a particular function which you are using frequently. HOT KEY Manage the keyboard shortcut to . - 17 -

OSD Sidekick User Guide
Page 18
.... Modifier keys Symbol field Deleting a Hot Key On the HOT KEYS panel, select the hot key you want to save the settings. Click to add the function to save the settings. b) Click on the HOT KEYS panel and click . 2. b) Click on one or more modifier keys (Alt, Shift, Ctrl) plus a symbol. c) Click...
.... Modifier keys Symbol field Deleting a Hot Key On the HOT KEYS panel, select the hot key you want to save the settings. Click to add the function to save the settings. b) Click on the HOT KEYS panel and click . 2. b) Click on one or more modifier keys (Alt, Shift, Ctrl) plus a symbol. c) Click...

OSD Sidekick User Guide
Page 19
Gaming Monitor User Guide GENERAL SETTING Configure the display screen, system, and hot keys (for the Control button. Then select the desired option. - 19 - Screen resolution & Frequency Display & System RGB Controller Hot Keys for Control button Changing the Hot Key for the Control Button On the QUICK SWITCH panel, you can change the preset hot key function for the Control button) related settings. Select the key position ( / / /( ) and click the q icon.
Gaming Monitor User Guide GENERAL SETTING Configure the display screen, system, and hot keys (for the Control button. Then select the desired option. - 19 - Screen resolution & Frequency Display & System RGB Controller Hot Keys for Control button Changing the Hot Key for the Control Button On the QUICK SWITCH panel, you can change the preset hot key function for the Control button) related settings. Select the key position ( / / /( ) and click the q icon.

OSD Sidekick User Guide
Page 20
Note: Checking and updating software automatically requires Internet connection. - 20 - During the firmware updating process, do not turn off the monitor. Set the AUTO UPDATE setting to ON to allow the system to check for software updates and display a message when a new update is available. Updating the Software Automatically Click LIVE ...
Note: Checking and updating software automatically requires Internet connection. - 20 - During the firmware updating process, do not turn off the monitor. Set the AUTO UPDATE setting to ON to allow the system to check for software updates and display a message when a new update is available. Updating the Software Automatically Click LIVE ...

GIGABYTE User Guide
Page 4
...2015/863 Statement. European Union (EU) Community Waste Electrical & Electronic Equipment (WEEE) Directive Statement GIGABYTE will fulfill the national laws as interpreted from digital apparatus set out in the Radio Interference Regulations of the Canadian Department of Communications. Under the Directive, used ... device should be taken to develop products that this product must be disposed of with Canadian ICES-003. Moreover, we at GIGABYTE are continuing our efforts to the waste collection centers for details of environmentally safe recycling. - 4 - The WEEE Directive specifies...
...2015/863 Statement. European Union (EU) Community Waste Electrical & Electronic Equipment (WEEE) Directive Statement GIGABYTE will fulfill the national laws as interpreted from digital apparatus set out in the Radio Interference Regulations of the Canadian Department of Communications. Under the Directive, used ... device should be taken to develop products that this product must be disposed of with Canadian ICES-003. Moreover, we at GIGABYTE are continuing our efforts to the waste collection centers for details of environmentally safe recycling. - 4 - The WEEE Directive specifies...

GIGABYTE User Guide
Page 10
... Power On/Off 23 User Comfort Recommendations 24 Selecting the Input Source 25 OPERATIONS 26 Quick Menu...26 Function Key Guide...28 Configure the Device Settings 31 APPENDICES 40 Specifications...40 Supported Timing List...41 Troubleshooting...43 Basic Care...44 Notes on USB Charging 44 - 10 -
... Power On/Off 23 User Comfort Recommendations 24 Selecting the Input Source 25 OPERATIONS 26 Quick Menu...26 Function Key Guide...28 Configure the Device Settings 31 APPENDICES 40 Specifications...40 Supported Timing List...41 Troubleshooting...43 Basic Care...44 Notes on USB Charging 44 - 10 -
GIGABYTE User Guide
Page 28
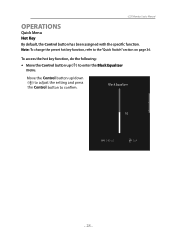
To access the hot key function, do the following: • Move the Control button up /down ( ) to adjust the setting and press the Control Black Equalizer 10 Adjust Exit - 28 - Move the Control button up ( ) to the "Quick Switch" section on page 36. LCD Monitor User's Manual OPERATIONS Quick Menu Hot Key By default, the Control button has been assigned with the specific function. Note: To change the preset hot key function, refer to enter the Black Equalizer menu.
To access the hot key function, do the following: • Move the Control button up /down ( ) to adjust the setting and press the Control Black Equalizer 10 Adjust Exit - 28 - Move the Control button up ( ) to the "Quick Switch" section on page 36. LCD Monitor User's Manual OPERATIONS Quick Menu Hot Key By default, the Control button has been assigned with the specific function. Note: To change the preset hot key function, refer to enter the Black Equalizer menu.
GIGABYTE User Guide
Page 30
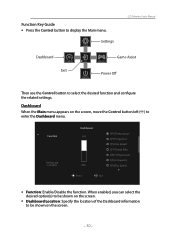
... CPU Temperature CPU Frequency CPU Fan Speed CPU Usage Rate GPU Temperature GPU Frequency CPU Fan Speed Select Exit • Function: Enable/Disable the function. Settings SETTING LCD Monitor User's Manual Dashboard DASHBOARD Exit EXIT POWER OFF GAME ASSIST Game Assist Power O Then use the Control button to display the Main menu...
... CPU Temperature CPU Frequency CPU Fan Speed CPU Usage Rate GPU Temperature GPU Frequency CPU Fan Speed Select Exit • Function: Enable/Disable the function. Settings SETTING LCD Monitor User's Manual Dashboard DASHBOARD Exit EXIT POWER OFF GAME ASSIST Game Assist Power O Then use the Control button to display the Main menu...
GIGABYTE User Guide
Page 32
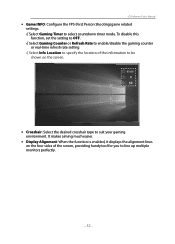
... the alignment lines on the screen. 05:00 0 60 • Crosshair: Select the desired crosshair type to suit your gaming environment. To disable this function, set the setting to OFF. √ Select Gaming Counter or Refresh Rate to enable/disable the gaming counter or real-time refresh rate... setting. √ Select Info Location to specify the location of the information to be shown on the four sides of the screen, providing handy tool for ...
... the alignment lines on the screen. 05:00 0 60 • Crosshair: Select the desired crosshair type to suit your gaming environment. To disable this function, set the setting to OFF. √ Select Gaming Counter or Refresh Rate to enable/disable the gaming counter or real-time refresh rate... setting. √ Select Info Location to specify the location of the information to be shown on the four sides of the screen, providing handy tool for ...

GIGABYTE User Guide
Page 33
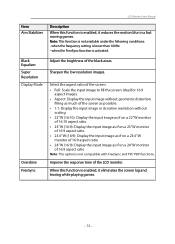
Resolution 2560x1440 Black Equalizer 10 Aim Stabilizer OFF Gaming Picture Display PIP/PBP System Language Save Settings Reset All Aim Stabilizer Black Equalizer Super Resolution Display Mode Overdrive FreeSync Overdrive Balance Refresh Rate 60 HZ FreeSync ON Picture Mode Standard.../Adjust Enter/Con rm - 33 - Note: Use the Control button to enter the Settings menu. Exit Move/Adjust Enter/Con rm Button Guide Gaming Configure the game related settings. LCD Monitor User's Manual Configure the Device Settings When the Main menu appears on the screen, move the Control button up ( ) ...
Resolution 2560x1440 Black Equalizer 10 Aim Stabilizer OFF Gaming Picture Display PIP/PBP System Language Save Settings Reset All Aim Stabilizer Black Equalizer Super Resolution Display Mode Overdrive FreeSync Overdrive Balance Refresh Rate 60 HZ FreeSync ON Picture Mode Standard.../Adjust Enter/Con rm - 33 - Note: Use the Control button to enter the Settings menu. Exit Move/Adjust Enter/Con rm Button Guide Gaming Configure the game related settings. LCD Monitor User's Manual Configure the Device Settings When the Main menu appears on the screen, move the Control button up ( ) ...
GIGABYTE User Guide
Page 34
... this function is lower than 100Hz. - when the FreeSync function is not available under the following conditions: - Sharpen the low resolution images. when the frequency setting is enabled, it reduces the motion blur in its native resolution without geometric distortion filling as possible. • 1:1: Display the input image in a fast moving...
... this function is lower than 100Hz. - when the FreeSync function is not available under the following conditions: - Sharpen the low resolution images. when the frequency setting is enabled, it reduces the motion blur in its native resolution without geometric distortion filling as possible. • 1:1: Display the input image in a fast moving...
GIGABYTE User Guide
Page 35
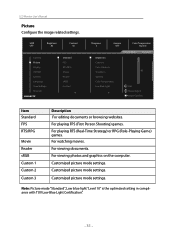
...) games. For viewing documents. LCD Monitor User's Manual Picture Configure the image related settings. Customized picture mode settings. For viewing photos and graphics on the computer. Customized picture mode settings. For playing RTS (Real-Time Strategy) or RPG (Role-Playing Game) games. HDR... Brightness Contrast OFF 85 50 Gaming Picture Display PIP/PBP System Language Save Settings Reset All Standard FPS RTS/RPG Movie Reader sRGB Custon 1 Sharpness 5 Gamma OFF Color Temperature Normal Brightness Contrast Color Vibrance ...
...) games. For viewing documents. LCD Monitor User's Manual Picture Configure the image related settings. Customized picture mode settings. For viewing photos and graphics on the computer. Customized picture mode settings. For playing RTS (Real-Time Strategy) or RPG (Role-Playing Game) games. HDR... Brightness Contrast OFF 85 50 Gaming Picture Display PIP/PBP System Language Save Settings Reset All Standard FPS RTS/RPG Movie Reader sRGB Custon 1 Sharpness 5 Gamma OFF Color Temperature Normal Brightness Contrast Color Vibrance ...
