

OSD Sidekick User Guide
Page 4
... Monitor User Guide SOFTWARE INSTALLATION Preparation 1. HDMI-1 HDMI-2 DP USB 3.0 - 4 - Then plug the power cables of your computer. 3. Connect one end of a USB (A-Male to B-Male) cable to the USB port of the LCD monitor and the other end to the DP port of your computer. 2. Turn on the monitor. Plug the power adapter to the USB port of your computer and the LCD monitor. Connect any of the following: • One end of an HDMI cable to the HDMI port of the LCD monitor...
... Monitor User Guide SOFTWARE INSTALLATION Preparation 1. HDMI-1 HDMI-2 DP USB 3.0 - 4 - Then plug the power cables of your computer. 3. Connect one end of a USB (A-Male to B-Male) cable to the USB port of the LCD monitor and the other end to the DP port of your computer. 2. Turn on the monitor. Plug the power adapter to the USB port of your computer and the LCD monitor. Connect any of the following: • One end of an HDMI cable to the HDMI port of the LCD monitor...

OSD Sidekick User Guide
Page 7
... the driver installation is connected to the LCD monitor through a USB cable as described in step 1 in > GIGABYTE folder, and select More > Run as an administrator. Note: The first time you open the OSD Sidekick software, you can configure the advanced settings for the monitor. - 7 - Before launching the software, make sure your computer is complete, the OSD Sidekick software shortcut icon appears on page 4. Then launch the software...
... the driver installation is connected to the LCD monitor through a USB cable as described in step 1 in > GIGABYTE folder, and select More > Run as an administrator. Note: The first time you open the OSD Sidekick software, you can configure the advanced settings for the monitor. - 7 - Before launching the software, make sure your computer is complete, the OSD Sidekick software shortcut icon appears on page 4. Then launch the software...

OSD Sidekick User Guide
Page 8
... Assist Configuring the Picture Mode Profiles By default, there are similar with the OSD menu and Quick menu that you can directly access using the Control button on the monitor. These profiles cannot be applied directly to the monitor. DISPLAY SETTING Configure the game, image, multi-picture, Dashboard, and Game Assist related settings. DD Click the q icon to select the available option. • All the changes will be...
... Assist Configuring the Picture Mode Profiles By default, there are similar with the OSD menu and Quick menu that you can directly access using the Control button on the monitor. These profiles cannot be applied directly to the monitor. DISPLAY SETTING Configure the game, image, multi-picture, Dashboard, and Game Assist related settings. DD Click the q icon to select the available option. • All the changes will be...

OSD Sidekick User Guide
Page 16
Customizing the Game Assist Settings Configure the following Game Assist settings: DD Set the REFRESH RATE setting to ON to set the countdown time. - 16 - Select either COUNT UP or COUNT DOWN the timer. - Click the q icon to enable displaying the refresh rate. Gaming Monitor User Guide DD Click SETTINGS and check the desired option(s) to enable displaying the gaming timer. - DD Set the GAMING TIMER setting to ON to be shown on the screen. Note: Uncheck the option to hide it from the screen.
Customizing the Game Assist Settings Configure the following Game Assist settings: DD Set the REFRESH RATE setting to ON to set the countdown time. - 16 - Select either COUNT UP or COUNT DOWN the timer. - Click the q icon to enable displaying the refresh rate. Gaming Monitor User Guide DD Click SETTINGS and check the desired option(s) to enable displaying the gaming timer. - DD Set the GAMING TIMER setting to ON to be shown on the screen. Note: Uncheck the option to hide it from the screen.
GIGABYTE User Guide
Page 3
..., which the receiver is connected. • Consult the dealer or an experienced radio/TV technician for a Class B digital device, pursuant to correct the interference by turning the equipment off and on, the user is encouraged to try to Part 15 of Conformity 47 CFR § 2.1077 Compliance Information Product Name: LCD monitor Trade Name: GIGABYTE Model Number: G27QC Responsible Party - This...
..., which the receiver is connected. • Consult the dealer or an experienced radio/TV technician for a Class B digital device, pursuant to correct the interference by turning the equipment off and on, the user is encouraged to try to Part 15 of Conformity 47 CFR § 2.1077 Compliance Information Product Name: LCD monitor Trade Name: GIGABYTE Model Number: G27QC Responsible Party - This...

GIGABYTE User Guide
Page 4
..... LCD Monitor User's Manual Canadian Department of Communications Statement This digital apparatus does not exceed the Class B limits for radio noise emissions from the 2012/19/EU WEEE (Waste Electrical and Electronic Equipment) (recast) directive. European Union (EU) Community Waste Electrical & Electronic Equipment (WEEE) Directive Statement GIGABYTE will fulfill the national laws as interpreted from digital apparatus set...
..... LCD Monitor User's Manual Canadian Department of Communications Statement This digital apparatus does not exceed the Class B limits for radio noise emissions from the 2012/19/EU WEEE (Waste Electrical and Electronic Equipment) (recast) directive. European Union (EU) Community Waste Electrical & Electronic Equipment (WEEE) Directive Statement GIGABYTE will fulfill the national laws as interpreted from digital apparatus set...

GIGABYTE User Guide
Page 9
...; The power cord plug must be scratched, avoid touching the surface with any hard or sharp object. • Use a soft lint-free cloth instead of the power cable is compatible with the power specification in a place that cannot be reached by children. • Before connecting the monitor to the power outlet, make sure that the voltage rating of a tissue to clean the monitor if required. Do not cover or...
...; The power cord plug must be scratched, avoid touching the surface with any hard or sharp object. • Use a soft lint-free cloth instead of the power cable is compatible with the power specification in a place that cannot be reached by children. • Before connecting the monitor to the power outlet, make sure that the voltage rating of a tissue to clean the monitor if required. Do not cover or...

GIGABYTE User Guide
Page 10
Contents LCD Monitor User's Manual SAFETY INFORMATION 3 Regulatory Notices...3 Safety Precautions...7 INTRODUCTION 10 Unpacking...10 Package Contents...12 Product Overview...13 GETTING STARTED 15 Installing the Stand Base 15 Lift the monitor...17 Adjusting the Viewing Angle 18 Installing a Wall-Mount Bracket (Optional 20 Making Connections...22 USING THE DEVICE 23 Turning the Power On/Off 23 User Comfort Recommendations 24 Selecting the Input Source 25 OPERATIONS 26 Quick Menu...26 Function Key Guide...28 Configure...
Contents LCD Monitor User's Manual SAFETY INFORMATION 3 Regulatory Notices...3 Safety Precautions...7 INTRODUCTION 10 Unpacking...10 Package Contents...12 Product Overview...13 GETTING STARTED 15 Installing the Stand Base 15 Lift the monitor...17 Adjusting the Viewing Angle 18 Installing a Wall-Mount Bracket (Optional 20 Making Connections...22 USING THE DEVICE 23 Turning the Power On/Off 23 User Comfort Recommendations 24 Selecting the Input Source 25 OPERATIONS 26 Quick Menu...26 Function Key Guide...28 Configure...
GIGABYTE User Guide
Page 21
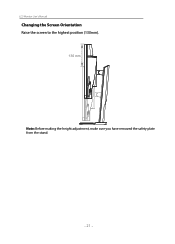
LCD Monitor User's Manual Changing the Screen Orientation Raise the screen to the highest position (130mm). 130 mm Note: Before making the height adjustment, make sure you have removed the safety plate from the stand. - 21 -
LCD Monitor User's Manual Changing the Screen Orientation Raise the screen to the highest position (130mm). 130 mm Note: Before making the height adjustment, make sure you have removed the safety plate from the stand. - 21 -

GIGABYTE User Guide
Page 25
... monitor. Refer to ON. Connect other end of the monitor. 2. Note: When the Main menu appears on the monitor. Press the Control button to turn on the screen, you can also turn off the monitor by moving the Control button down ( ). LCD Monitor User's Manual USING THE DEVICE Turning the Power On/Off Make sure the power switch next to the AC power input jack is ready to use. Power On 1. The Power LED will light in white, indicating the monitor is switched...
... monitor. Refer to ON. Connect other end of the monitor. 2. Note: When the Main menu appears on the monitor. Press the Control button to turn on the screen, you can also turn off the monitor by moving the Control button down ( ). LCD Monitor User's Manual USING THE DEVICE Turning the Power On/Off Make sure the power switch next to the AC power input jack is ready to use. Power On 1. The Power LED will light in white, indicating the monitor is switched...
GIGABYTE User Guide
Page 28
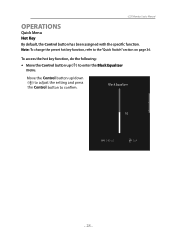
Move the Control button up ( ) to enter the Black Equalizer menu. To access the hot key function, do the following: • Move the Control button up /down ( ) to the "Quick Switch" section on page 36. LCD Monitor User's Manual OPERATIONS Quick Menu Hot Key By default, the Control button has been assigned with the specific function. Note: To change the preset hot key function, refer to adjust the setting and press the Control Black Equalizer 10 Adjust Exit - 28 -
Move the Control button up ( ) to enter the Black Equalizer menu. To access the hot key function, do the following: • Move the Control button up /down ( ) to the "Quick Switch" section on page 36. LCD Monitor User's Manual OPERATIONS Quick Menu Hot Key By default, the Control button has been assigned with the specific function. Note: To change the preset hot key function, refer to adjust the setting and press the Control Black Equalizer 10 Adjust Exit - 28 -

GIGABYTE User Guide
Page 31
LCD Monitor User's Manual Once the Dashboard configuration is properly connected to enter the Game Assist menu. Game Info Crosshair Display Alignment GameAssist Gaming Timer OFF Gaming Counter Count Up Refresh Rate Count Down Info Location Select Exit - 31 - Note: "OSD Sidekick" software installation and execution required. Game Assist • When the Main menu appears on the screen, move the Control button right ( ) to the USB upstream port of...
LCD Monitor User's Manual Once the Dashboard configuration is properly connected to enter the Game Assist menu. Game Info Crosshair Display Alignment GameAssist Gaming Timer OFF Gaming Counter Count Up Refresh Rate Count Down Info Location Select Exit - 31 - Note: "OSD Sidekick" software installation and execution required. Game Assist • When the Main menu appears on the screen, move the Control button right ( ) to the USB upstream port of...

GIGABYTE User Guide
Page 33
LCD Monitor User's Manual Configure the Device Settings When the Main menu appears on the screen, move the Control button up ( ) to navigate through the menu and make adjustments. Note: Use the Control button to enter the Settings menu. Exit Move/Adjust Enter/Con rm Button Guide Gaming Configure the game related settings. Resolution 2560x1440 Black Equalizer 10 Aim Stabilizer OFF Gaming Picture Display PIP/PBP System Language Save Settings Reset All Aim Stabilizer Black Equalizer Super Resolution Display Mode Overdrive FreeSync Overdrive Balance...
LCD Monitor User's Manual Configure the Device Settings When the Main menu appears on the screen, move the Control button up ( ) to navigate through the menu and make adjustments. Note: Use the Control button to enter the Settings menu. Exit Move/Adjust Enter/Con rm Button Guide Gaming Configure the game related settings. Resolution 2560x1440 Black Equalizer 10 Aim Stabilizer OFF Gaming Picture Display PIP/PBP System Language Save Settings Reset All Aim Stabilizer Black Equalizer Super Resolution Display Mode Overdrive FreeSync Overdrive Balance...
GIGABYTE User Guide
Page 35
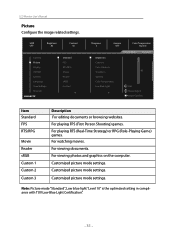
LCD Monitor User's Manual Picture Configure the image related settings. For watching movies. Customized picture mode settings. For playing FPS (First Person Shooting) games. For viewing documents. HDR Brightness Contrast OFF 85 50 Gaming Picture Display PIP/PBP System Language Save Settings Reset All Standard FPS RTS/RPG Movie Reader sRGB Custon 1 Sharpness 5 Gamma OFF Color Temperature Normal Brightness Contrast Color Vibrance Sharpness Gamma Color Temperature Low Blue Light Picture Mode Standard 85 Exit Move/Adjust Enter/Con rm Item...
LCD Monitor User's Manual Picture Configure the image related settings. For watching movies. Customized picture mode settings. For playing FPS (First Person Shooting) games. For viewing documents. HDR Brightness Contrast OFF 85 50 Gaming Picture Display PIP/PBP System Language Save Settings Reset All Standard FPS RTS/RPG Movie Reader sRGB Custon 1 Sharpness 5 Gamma OFF Color Temperature Normal Brightness Contrast Color Vibrance Sharpness Gamma Color Temperature Low Blue Light Picture Mode Standard 85 Exit Move/Adjust Enter/Con rm Item...
GIGABYTE User Guide
Page 36
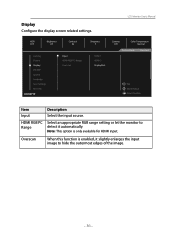
... the display screen related settings. Overscan When this function is only available for HDMI input. LCD Monitor User's Manual HDR Brightness Contrast OFF 85 50 Gaming Picture Display PIP/PBP System Language Save Settings Reset All Input HDMI RGB PC Range Overscan Sharpness 5 HDMI 1 HDMI 2 DisplayPort Gamma OFF Color Temperature Normal Picture Mode Standard Exit Move/Adjust Enter/Con rm Item Input Description Select the input source. Note: This option is enabled, it slightly enlarges the input image to Range detect it automatically. HDMI RGB...
... the display screen related settings. Overscan When this function is only available for HDMI input. LCD Monitor User's Manual HDR Brightness Contrast OFF 85 50 Gaming Picture Display PIP/PBP System Language Save Settings Reset All Input HDMI RGB PC Range Overscan Sharpness 5 HDMI 1 HDMI 2 DisplayPort Gamma OFF Color Temperature Normal Picture Mode Standard Exit Move/Adjust Enter/Con rm Item Input Description Select the input source. Note: This option is enabled, it slightly enlarges the input image to Range detect it automatically. HDMI RGB...
GIGABYTE User Guide
Page 37
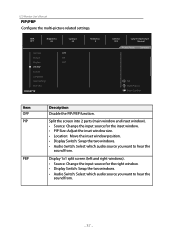
... screen into 2 parts (main window and inset window). • Source: Change the input source for the right window. • Display Switch: Swap the two windows. • Audio Switch: Select which audio source you want to hear the sound from . HDR Brightness Contrast OFF 85 50 Sharpness 5 Gaming OFF Picture PIP Display PBP PIP/PBP System Language Save Settings Reset All Gamma OFF Color Temperature Normal Picture Mode Standard Exit Move/Adjust Enter/Con rm Item OFF PIP PBP Description Disable...
... screen into 2 parts (main window and inset window). • Source: Change the input source for the right window. • Display Switch: Swap the two windows. • Audio Switch: Select which audio source you want to hear the sound from . HDR Brightness Contrast OFF 85 50 Sharpness 5 Gaming OFF Picture PIP Display PBP PIP/PBP System Language Save Settings Reset All Gamma OFF Color Temperature Normal Picture Mode Standard Exit Move/Adjust Enter/Con rm Item OFF PIP PBP Description Disable...
GIGABYTE User Guide
Page 38
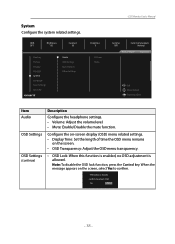
... screen. • OSD Transparency: Adjust the OSD menu transparency. • OSD Lock: When this function is enabled, no OSD adjustment is locked, con rm to confirm. The button is allowed. No Yes - 38 - Note: To disable the OSD lock function, press the Control key. System Configure the system related settings. HDR Brightness Contrast OFF 85 50 Sharpness 5 Gaming Picture Display PIP/PBP System Language Save Settings Reset All Audio OSD Setting Quick Switch Other Settings Volume Mute LCD Monitor User's Manual Gamma OFF Color Temperature Normal Picture Mode...
... screen. • OSD Transparency: Adjust the OSD menu transparency. • OSD Lock: When this function is enabled, no OSD adjustment is locked, con rm to confirm. The button is allowed. No Yes - 38 - Note: To disable the OSD lock function, press the Control key. System Configure the system related settings. HDR Brightness Contrast OFF 85 50 Sharpness 5 Gaming Picture Display PIP/PBP System Language Save Settings Reset All Audio OSD Setting Quick Switch Other Settings Volume Mute LCD Monitor User's Manual Gamma OFF Color Temperature Normal Picture Mode...
GIGABYTE User Guide
Page 39
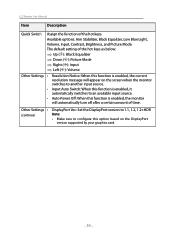
... appear on the DisplayPort version supported by your graphics card. - 39 - Other Settings • DisplayPort Ver.: Set the DisplayPort version to 1.1, 1.2, 1.2+HDR (continue) Note: • Make sure to configure this function is enabled, it automatically switches to another input source. Auto Power Off: When this option based on the screen when the monitor switches to an available input source. LCD Monitor User's Manual Item Description Quick Switch Assign the function of time...
... appear on the DisplayPort version supported by your graphics card. - 39 - Other Settings • DisplayPort Ver.: Set the DisplayPort version to 1.1, 1.2, 1.2+HDR (continue) Note: • Make sure to configure this function is enabled, it automatically switches to another input source. Auto Power Off: When this option based on the screen when the monitor switches to an available input source. LCD Monitor User's Manual Item Description Quick Switch Assign the function of time...
GIGABYTE User Guide
Page 43
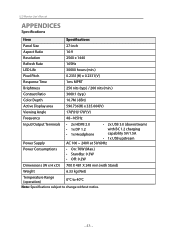
LCD Monitor User's Manual APPENDICES Specifications Item Specifications Panel Size 27-inch Aspect Ratio 16:9 Resolution 2560 x 1440 Refresh Rate 165Hz LED Life 30000 hours (min.) Pixel Pitch 0.2331(H) x 0.2331(V) Response Time 1ms MPRT Brightness 250 nits (typ.) / 200 nits (min.) Contrast Ratio 3000:1 (typ.) Color Depth 16.7M ( 8Bit) Active Display area 596.736(H) x 335.664(V) Viewing Angle 178°(H)/178°(V) Frequency 48~165Hz Input/Output Terminals Power Supply • 2x HDMI 2.0 •...
LCD Monitor User's Manual APPENDICES Specifications Item Specifications Panel Size 27-inch Aspect Ratio 16:9 Resolution 2560 x 1440 Refresh Rate 165Hz LED Life 30000 hours (min.) Pixel Pitch 0.2331(H) x 0.2331(V) Response Time 1ms MPRT Brightness 250 nits (typ.) / 200 nits (min.) Contrast Ratio 3000:1 (typ.) Color Depth 16.7M ( 8Bit) Active Display area 596.736(H) x 335.664(V) Viewing Angle 178°(H)/178°(V) Frequency 48~165Hz Input/Output Terminals Power Supply • 2x HDMI 2.0 •...

GIGABYTE User Guide
Page 45
... 32. • Make sure the input signal cable is properly connected. • Adjust the volume level. No image appears on the screen • Make sure the monitor and the computer are properly connected and both devices are turned on . Refer to page 25 or 34. LCD Monitor User's Manual Troubleshooting Problem No power Possible Solution(s) • Make sure the power cable is properly connected to the power source and the monitor. • Check the cable and plug to make sure they...
... 32. • Make sure the input signal cable is properly connected. • Adjust the volume level. No image appears on the screen • Make sure the monitor and the computer are properly connected and both devices are turned on . Refer to page 25 or 34. LCD Monitor User's Manual Troubleshooting Problem No power Possible Solution(s) • Make sure the power cable is properly connected to the power source and the monitor. • Check the cable and plug to make sure they...

