
GIGABYTE User Guide
Page 2
... in any form or by any means without prior notice. All rights reserved. No part of GIGABYTE. The trademarks mentioned in this manual are legally registered to assist in this monitor, carefully read the User Guide. • For more information, check on our website at: ...https://www.gigabyte.com - 2 - Disclaimer Information in the use of this manual is the property of this manual may be made by copyright laws and is protected by GIGABYTE without GIGABYTE's prior written permission. • In order to their respective owners. Gaming Monitor User Guide Copyright &#...
... in any form or by any means without prior notice. All rights reserved. No part of GIGABYTE. The trademarks mentioned in this manual are legally registered to assist in this monitor, carefully read the User Guide. • For more information, check on our website at: ...https://www.gigabyte.com - 2 - Disclaimer Information in the use of this manual is the property of this manual may be made by copyright laws and is protected by GIGABYTE without GIGABYTE's prior written permission. • In order to their respective owners. Gaming Monitor User Guide Copyright &#...

GIGABYTE User Guide
Page 3
...between the equipment and receiver. - 3 - This equipment has been tested and found to radio communications. SAFETY INFORMATION Gaming Monitor User Guide Regulatory Notices United States of America, Federal Communications Commission Statement Supplier's Declaration of the following two conditions:...the interference by one or more of Conformity 47 CFR § 2.1077 Compliance Information Product Name: LCD monitor Trade Name: GIGABYTE Model Number: G32QC A Responsible Party - If this device must accept any interference received, including interference that interference will not ...
...between the equipment and receiver. - 3 - This equipment has been tested and found to radio communications. SAFETY INFORMATION Gaming Monitor User Guide Regulatory Notices United States of America, Federal Communications Commission Statement Supplier's Declaration of the following two conditions:...the interference by one or more of Conformity 47 CFR § 2.1077 Compliance Information Product Name: LCD monitor Trade Name: GIGABYTE Model Number: G32QC A Responsible Party - If this device must accept any interference received, including interference that interference will not ...

GIGABYTE User Guide
Page 4
... out in the Radio Interference Regulations of the Canadian Department of Conformity This device complies with Canadian ICES-003. Moreover, we at GIGABYTE are continuing our efforts to add and safe from hazardous substances (Cd, Pb, Hg, Cr+6, PBDE, PBB, DEHP, BBP,...the European Commission Delegated Directive (EU) 2015/863 Statement GIGABYTE products have been carefully selected to comply with all essential requirements of Communications Statement This digital apparatus does not exceed the Class B limits for help. Gaming Monitor User Guide • Connect the equipment to an ...
... out in the Radio Interference Regulations of the Canadian Department of Conformity This device complies with Canadian ICES-003. Moreover, we at GIGABYTE are continuing our efforts to add and safe from hazardous substances (Cd, Pb, Hg, Cr+6, PBDE, PBB, DEHP, BBP,...the European Commission Delegated Directive (EU) 2015/863 Statement GIGABYTE products have been carefully selected to comply with all essential requirements of Communications Statement This digital apparatus does not exceed the Class B limits for help. Gaming Monitor User Guide • Connect the equipment to an ...
GIGABYTE User Guide
Page 5
... der entsprechenden Standards zurEuropäischen Normierung beurteilt. - 5 - Instead, the device should be taken to the waste collection centers for details of environmentally safe recycling. Gaming Monitor User Guide WEEE Symbol Statement The symbol shown below is on the product or on its packaging, which indicates that this product must not be...
... der entsprechenden Standards zurEuropäischen Normierung beurteilt. - 5 - Instead, the device should be taken to the waste collection centers for details of environmentally safe recycling. Gaming Monitor User Guide WEEE Symbol Statement The symbol shown below is on the product or on its packaging, which indicates that this product must not be...
GIGABYTE User Guide
Page 7
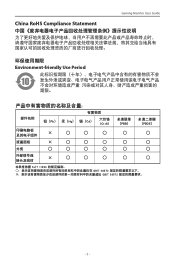
Gaming Monitor User Guide China RoHS Compliance Statement Environment-friendly Use Period ࣷ႘፣ ȡ ɐ ɐ ɐ ɐ ɐ ᇛੰಅ֊ ȡ ɐ ɐ ɐ ɐ ɐ ိ૮ ɐ ɐ ɐ ɐ ɐ ɐ ȡ ɐ ɐ ɐ ɐ ɐ - 7 -
Gaming Monitor User Guide China RoHS Compliance Statement Environment-friendly Use Period ࣷ႘፣ ȡ ɐ ɐ ɐ ɐ ɐ ᇛੰಅ֊ ȡ ɐ ɐ ɐ ɐ ɐ ိ૮ ɐ ɐ ɐ ɐ ɐ ɐ ȡ ɐ ɐ ɐ ɐ ɐ - 7 -

GIGABYTE User Guide
Page 8
Gaming Monitor User Guide Declaration of the Presence Condition of the Restricted Substances Marking GIGABYTE G32QC A Equipment name Type designaƟon (Type) ╖⃫ Unit Restricted substances and its chemical symbols 戃 Lead (Pb) 㰆 Mercury (Hg) 捀 Cadmium (Cd) &#...
Gaming Monitor User Guide Declaration of the Presence Condition of the Restricted Substances Marking GIGABYTE G32QC A Equipment name Type designaƟon (Type) ╖⃫ Unit Restricted substances and its chemical symbols 戃 Lead (Pb) 㰆 Mercury (Hg) 捀 Cadmium (Cd) &#...
GIGABYTE User Guide
Page 9
... compatible with any heat sources such as electric radiators or direct sunlight. • The holes or openings on the monitor are located. • The power cord plug must be connected to a properly wired and grounded power outlet. • Do not touch the plug with wet ... the power outlet, make sure that the voltage rating of the power cable is not being used for ventilation. Gaming Monitor User Guide Safety Precautions Read through the following Safety Precautions before cleaning. • As the screen surface is easy to be reached by the manufacturer. &#...
... compatible with any heat sources such as electric radiators or direct sunlight. • The holes or openings on the monitor are located. • The power cord plug must be connected to a properly wired and grounded power outlet. • Do not touch the plug with wet ... the power outlet, make sure that the voltage rating of the power cable is not being used for ventilation. Gaming Monitor User Guide Safety Precautions Read through the following Safety Precautions before cleaning. • As the screen surface is easy to be reached by the manufacturer. &#...
GIGABYTE User Guide
Page 10
Gaming Monitor User Guide CONTENTS Safety Information...3 Regulatory Notices...3 Safety Precautions...9 Introduction...11 Unpacking...11 Package Contents...13 Product Overview...14 Getting Started...16 Installing the Monitor Base 16 Adjusting the Viewing Angle 18 Installing a Wall-Mount Bracket (Optional 19 Making Connections...21 Using the Device...22 Turning the Power On/Off ... Menu...24 Configure the Device Settings 29 Appendices...39 Specifications...39 Supported Timing List 40 Troubleshooting...41 Basic Care...42 Notes on USB Charging 42 GIGABYTE Service Information 42 - 10 -
Gaming Monitor User Guide CONTENTS Safety Information...3 Regulatory Notices...3 Safety Precautions...9 Introduction...11 Unpacking...11 Package Contents...13 Product Overview...14 Getting Started...16 Installing the Monitor Base 16 Adjusting the Viewing Angle 18 Installing a Wall-Mount Bracket (Optional 19 Making Connections...21 Using the Device...22 Turning the Power On/Off ... Menu...24 Configure the Device Settings 29 Appendices...39 Specifications...39 Supported Timing List 40 Troubleshooting...41 Basic Care...42 Notes on USB Charging 42 GIGABYTE Service Information 42 - 10 -
GIGABYTE User Guide
Page 11
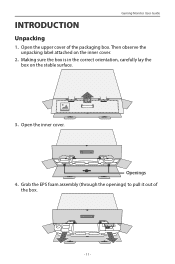
UP 3. Grab the EPS foam assembly (through the openings) to pull it out of the packaging box. Then observe the unpacking label attached on the stable surface. Making sure the box is in the correct orientation, carefully lay the box on the inner cover. 2. Open the upper cover of the box. - 11 - Open the inner cover. Openings 4. INTRODUCTION Gaming Monitor User Guide Unpacking 1.
UP 3. Grab the EPS foam assembly (through the openings) to pull it out of the packaging box. Then observe the unpacking label attached on the stable surface. Making sure the box is in the correct orientation, carefully lay the box on the inner cover. 2. Open the upper cover of the box. - 11 - Open the inner cover. Openings 4. INTRODUCTION Gaming Monitor User Guide Unpacking 1.
GIGABYTE User Guide
Page 12
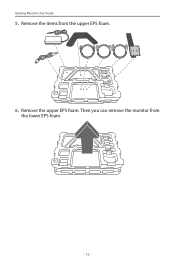
Then you can remove the monitor from the upper EPS foam. 6. Remove the upper EPS foam. Gaming Monitor User Guide 5. Remove the items from the lower EPS foam. - 12 -
Then you can remove the monitor from the upper EPS foam. 6. Remove the upper EPS foam. Gaming Monitor User Guide 5. Remove the items from the lower EPS foam. - 12 -
GIGABYTE User Guide
Page 13
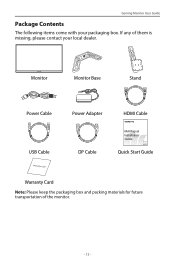
Gaming Monitor User Guide Package Contents The following items come with your local dealer. If any of the monitor. - 13 - Monitor Monitor Base Stand Power Cable Power Adapter HDMI Cable USB Cable Warranty Card DP Cable Multilingual Installation Guide Quick Start Guide Warranty Card Note: Please keep the packaging box and packing materials for future transportation of them is missing, please contact your packaging box.
Gaming Monitor User Guide Package Contents The following items come with your local dealer. If any of the monitor. - 13 - Monitor Monitor Base Stand Power Cable Power Adapter HDMI Cable USB Cable Warranty Card DP Cable Multilingual Installation Guide Quick Start Guide Warranty Card Note: Please keep the packaging box and packing materials for future transportation of them is missing, please contact your packaging box.
GIGABYTE User Guide
Page 16
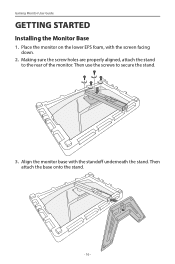
Then use the screws to the rear of the monitor. Then attach the base onto the stand. - 16 - Place the monitor on the lower EPS foam, with the standoff underneath the stand. Align the monitor base with the screen facing down. 2. Making sure the screw holes are properly aligned, attach the stand to secure the stand. 3. Gaming Monitor User Guide GETTING STARTED Installing the Monitor Base 1.
Then use the screws to the rear of the monitor. Then attach the base onto the stand. - 16 - Place the monitor on the lower EPS foam, with the standoff underneath the stand. Align the monitor base with the screen facing down. 2. Making sure the screw holes are properly aligned, attach the stand to secure the stand. 3. Gaming Monitor User Guide GETTING STARTED Installing the Monitor Base 1.
GIGABYTE User Guide
Page 17
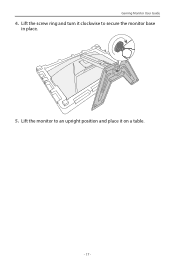
Lift the monitor to an upright position and place it clockwise to secure the monitor base in place. 5. Gaming Monitor User Guide 4. Lift the screw ring and turn it on a table. - 17 -
Lift the monitor to an upright position and place it clockwise to secure the monitor base in place. 5. Gaming Monitor User Guide 4. Lift the screw ring and turn it on a table. - 17 -
GIGABYTE User Guide
Page 18
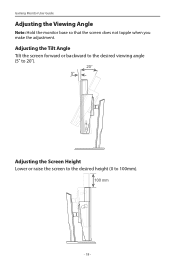
Adjusting the Tilt Angle Tilt the screen forward or backward to the desired viewing angle (5˚ to 20˚). 20° 5° Adjusting the Screen Height Lower or raise the screen to the desired height (0 to 100mm). 100 mm - 18 - Gaming Monitor User Guide Adjusting the Viewing Angle Note: Hold the monitor base so that the screen does not topple when you make the adjustment.
Adjusting the Tilt Angle Tilt the screen forward or backward to the desired viewing angle (5˚ to 20˚). 20° 5° Adjusting the Screen Height Lower or raise the screen to the desired height (0 to 100mm). 100 mm - 18 - Gaming Monitor User Guide Adjusting the Viewing Angle Note: Hold the monitor base so that the screen does not topple when you make the adjustment.
GIGABYTE User Guide
Page 19
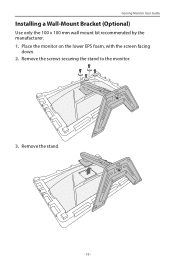
Remove the screws securing the stand to the monitor. 3. Place the monitor on the lower EPS foam, with the screen facing down. 2. Remove the stand. - 19 - Gaming Monitor User Guide Installing a Wall-Mount Bracket (Optional) Use only the 100 x 100 mm wall mount kit recommended by the manufacturer. 1.
Remove the screws securing the stand to the monitor. 3. Place the monitor on the lower EPS foam, with the screen facing down. 2. Remove the stand. - 19 - Gaming Monitor User Guide Installing a Wall-Mount Bracket (Optional) Use only the 100 x 100 mm wall mount kit recommended by the manufacturer. 1.
GIGABYTE User Guide
Page 20
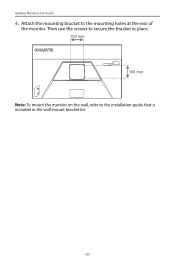
Gaming Monitor User Guide 4. Then use the screws to secure the bracket in place. 100 mm 100 mm Note: To mount the monitor on the wall, refer to the mounting holes at the rear of the monitor. Attach the mounting bracket to the installation guide that is included in the wall-mount bracket kit. - 20 -
Gaming Monitor User Guide 4. Then use the screws to secure the bracket in place. 100 mm 100 mm Note: To mount the monitor on the wall, refer to the mounting holes at the rear of the monitor. Attach the mounting bracket to the installation guide that is included in the wall-mount bracket kit. - 20 -
GIGABYTE User Guide
Page 21
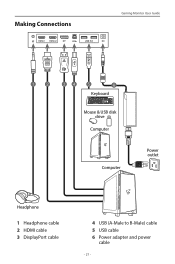
Making Connections HDMI-1 HDMI-2 DP USB 3.0 DC Gaming Monitor User Guide 1 2 34 5 6 Keyboard Mouse & USB disk drive Computer Computer Power outlet Headphone 1 Headphone cable 2 HDMI cable 3 DisplayPort cable 4 USB (A-Male to B-Male) cable 5 USB cable 6 Power adapter and power cable - 21 -
Making Connections HDMI-1 HDMI-2 DP USB 3.0 DC Gaming Monitor User Guide 1 2 34 5 6 Keyboard Mouse & USB disk drive Computer Computer Power outlet Headphone 1 Headphone cable 2 HDMI cable 3 DisplayPort cable 4 USB (A-Male to B-Male) cable 5 USB cable 6 Power adapter and power cable - 21 -
GIGABYTE User Guide
Page 22
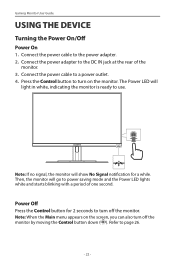
... a power outlet. 4. Note: When the Main menu appears on the monitor. Press the Control button to use. Connect the power adapter to turn off the monitor. Power Off Press the Control button for a while. Gaming Monitor User Guide USING THE DEVICE Turning the Power On/Off Power On 1. ...Connect the power cable to power saving mode and the Power LED lights white and starts blinking with a period of the monitor. 3. Then, the monitor will show No Signal notification for...
... a power outlet. 4. Note: When the Main menu appears on the monitor. Press the Control button to use. Connect the power adapter to turn off the monitor. Power Off Press the Control button for a while. Gaming Monitor User Guide USING THE DEVICE Turning the Power On/Off Power On 1. ...Connect the power cable to power saving mode and the Power LED lights white and starts blinking with a period of the monitor. 3. Then, the monitor will show No Signal notification for...
GIGABYTE User Guide
Page 23
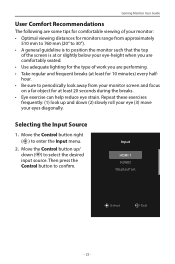
... the Control button to periodically look up / down (2) slowly roll your eye (3) move your monitor screen and focus on a far object for 10 minutes) every halfhour. • Be sure to confirm. Gaming Monitor User Guide User Comfort Recommendations The following are performing. • Take regular and frequent breaks (... frequently: (1) look away from approximately 510 mm to 760 mm (20" to 30"). • A general guideline is to position the monitor such that the top of the screen is at or slightly below your eye-height when you are comfortably seated. • Use adequate lighting...
... the Control button to periodically look up / down (2) slowly roll your eye (3) move your monitor screen and focus on a far object for 10 minutes) every halfhour. • Be sure to confirm. Gaming Monitor User Guide User Comfort Recommendations The following are performing. • Take regular and frequent breaks (... frequently: (1) look away from approximately 510 mm to 760 mm (20" to 30"). • A general guideline is to position the monitor such that the top of the screen is at or slightly below your eye-height when you are comfortably seated. • Use adequate lighting...
GIGABYTE User Guide
Page 24
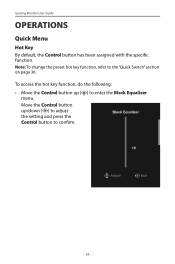
Black Equalizer 10 Adjust Exit - 24 - To access the hot key function, do the following: • Move the Control button up /down ( ) to adjust the setting and press the Control button to confirm. Move the Control button up ( ) to the "Quick Switch" section on page 36. Gaming Monitor User Guide OPERATIONS Quick Menu Hot Key By default, the Control button has been assigned with the specific function. Note: To change the preset hot key function, refer to enter the Black Equalizer menu.
Black Equalizer 10 Adjust Exit - 24 - To access the hot key function, do the following: • Move the Control button up /down ( ) to adjust the setting and press the Control button to confirm. Move the Control button up ( ) to the "Quick Switch" section on page 36. Gaming Monitor User Guide OPERATIONS Quick Menu Hot Key By default, the Control button has been assigned with the specific function. Note: To change the preset hot key function, refer to enter the Black Equalizer menu.
