User Manual
Page 4
... whenever you can still attach the spacers to the base without worrying about short circuits. English GA-7VCSV-RH Motherboard Item Checklist The GA-7VCSV-RH motherboard IDE (ATA100 ) cable x 1 / Floppy cable x 1 CD for motherboard driver & utility GA-7VCSV-RH Quick Reference Guide Serial ATA cable x 6 Serial ATA power cable x 6 I/O Shield Kit...you can still attach the motherboard to the mounting holes. If you do not become alarmed you plug in or remove the ATX power connector on the PCB that came with the holes on the bag that are separated from the system. 5. To protect...
... whenever you can still attach the spacers to the base without worrying about short circuits. English GA-7VCSV-RH Motherboard Item Checklist The GA-7VCSV-RH motherboard IDE (ATA100 ) cable x 1 / Floppy cable x 1 CD for motherboard driver & utility GA-7VCSV-RH Quick Reference Guide Serial ATA cable x 6 Serial ATA power cable x 6 I/O Shield Kit...you can still attach the motherboard to the mounting holes. If you do not become alarmed you plug in or remove the ATX power connector on the PCB that came with the holes on the bag that are separated from the system. 5. To protect...
User Manual
Page 13
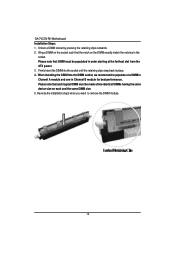
... starting at the farthest slot from the ATX power. 3. Unlock a DIMM socket by pressing the retaining clips outwards. 2. When installing the DIMM into the DIMM socket, we recommend to remove the DIMM module. 13 Please note that each and the same DIMM size. 5. English GA-7VCSV-RH Motherboard Installation Steps: 1. Please note that DIMM...
... starting at the farthest slot from the ATX power. 3. Unlock a DIMM socket by pressing the retaining clips outwards. 2. When installing the DIMM into the DIMM socket, we recommend to remove the DIMM module. 13 Please note that each and the same DIMM size. 5. English GA-7VCSV-RH Motherboard Installation Steps: 1. Please note that DIMM...


