
Manual
Page 5
Chapter 3 Install Drivers 47 3-1 Install Chipset Drivers 47 3-2 SoftwareApplications 48 3-3 Driver CD Information 48 3-4 Hardware Information 49 3-5 Contact Us ...49 Chapter 4 Appendix 51 4-1 Unique Software Utilities 51 4-1-1 Xpress Recovery Introduction 52 4-1-2 Flash BIOS Method Introduction 55 4-1-3 2- / 4- / 6- / 8- Channel Audio Function Introduction 64 4-2 Troubleshooting 69 - 5 -
Chapter 3 Install Drivers 47 3-1 Install Chipset Drivers 47 3-2 SoftwareApplications 48 3-3 Driver CD Information 48 3-4 Hardware Information 49 3-5 Contact Us ...49 Chapter 4 Appendix 51 4-1 Unique Software Utilities 51 4-1-1 Xpress Recovery Introduction 52 4-1-2 Flash BIOS Method Introduction 55 4-1-3 2- / 4- / 6- / 8- Channel Audio Function Introduction 64 4-2 Troubleshooting 69 - 5 -
Manual
Page 16
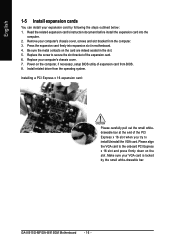
Remove your computer's chassis cover. 7. Install related driver from the computer. 3. Please align the VGA card to install/Uninstall the VGA card. Replace the screw to secure the slot bracket of the PCI ... to the onboard PCI Express x 16 slot and press firmly down on the computer, if necessary, setup BIOS utility of expansion card from BIOS. 8. GA-8I915G-MF/GA-8I915GM Motherboard - 16 - Read the related expansion card's instruction document before install the expansion card into expansion slot in the slot. 5. Replace your computer's chassis...
Remove your computer's chassis cover. 7. Install related driver from the computer. 3. Please align the VGA card to install/Uninstall the VGA card. Replace the screw to secure the slot bracket of the PCI ... to the onboard PCI Express x 16 slot and press firmly down on the computer, if necessary, setup BIOS utility of expansion card from BIOS. 8. GA-8I915G-MF/GA-8I915GM Motherboard - 16 - Read the related expansion card's instruction document before install the expansion card into expansion slot in the slot. 5. Replace your computer's chassis...
Manual
Page 17
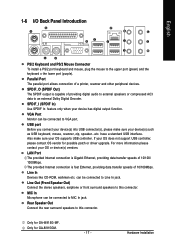
.... The provided Internet connection is capable of 10/100Mbps. Only for possible patch or driver upgrade. If your OS does not support USB controller, please contact OS vendor for GA-8I915G-MF. have a standard USB interface. Only for GA-8I915GM. - 17 - can be connected to Line In jack. Hardware Installation Also make sure your...
.... The provided Internet connection is capable of 10/100Mbps. Only for possible patch or driver upgrade. If your OS does not support USB controller, please contact OS vendor for GA-8I915G-MF. have a standard USB interface. Only for GA-8I915GM. - 17 - can be connected to Line In jack. Hardware Installation Also make sure your...
Manual
Page 21
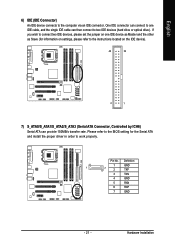
... Installation One IDE connector can connect to one IDE device as Master and the other as Slave (for the Serial ATA and install the proper driver in order to the computer via an IDE connector. Pin No. If you wish to connect two IDE devices, please set the jumper on the...
... Installation One IDE connector can connect to one IDE device as Master and the other as Slave (for the Serial ATA and install the proper driver in order to the computer via an IDE connector. Pin No. If you wish to connect two IDE devices, please set the jumper on the...
Manual
Page 47
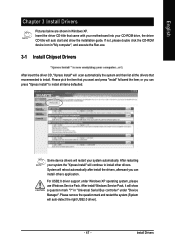
...please use Windows Service Pack. After restarting your system automatically. English Chapter 3 Install Drivers Pictures below are shown in "My computer", and execute the Run.exe. 3-1 Install Chipset Drivers After insert the driver CD, "Xpress Install" will scan automatically the system and then list all items ... "Xpress Install" to install all the drivers that came with your motherboard into your CD-ROM drive, the driver CD-title will auto start and show a question mark "?" Insert the driver CD-title that recommended to install other drivers. If not, please double click the ...
...please use Windows Service Pack. After restarting your system automatically. English Chapter 3 Install Drivers Pictures below are shown in "My computer", and execute the Run.exe. 3-1 Install Chipset Drivers After insert the driver CD, "Xpress Install" will scan automatically the system and then list all items ... "Xpress Install" to install all the drivers that came with your motherboard into your CD-ROM drive, the driver CD-title will auto start and show a question mark "?" Insert the driver CD-title that recommended to install other drivers. If not, please double click the ...

Manual
Page 48
English 3-2 Software Applications This page displays all the tools that Gigabyte developed and some free software, you can choose anyone you want and press "install" to install them. 3-3 Driver CD Information This page lists the contents of software and drivers in this CD-title. GA-8I915G-MF/GA-8I915GM Motherboard - 48 -
English 3-2 Software Applications This page displays all the tools that Gigabyte developed and some free software, you can choose anyone you want and press "install" to install them. 3-3 Driver CD Information This page lists the contents of software and drivers in this CD-title. GA-8I915G-MF/GA-8I915GM Motherboard - 48 -

Manual
Page 49
Install Drivers English 3-4 Hardware Information This page lists all device you have for details. - 49 - F5 3-5 Contact Us Please see the last page for this motherboard.
Install Drivers English 3-4 Hardware Information This page lists all device you have for details. - 49 - F5 3-5 Contact Us Please see the last page for this motherboard.
Manual
Page 51
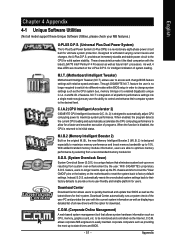
...graphics card, etc. S.O.S. (System Overclock Saver) System Overclock Saver (S.O.S.) is no longer need to open up -to-date drivers and BIOS. - 51 - With GIGABYTE's proprietary S.O.S. C.O.M. (Corporate Online Management) A web-based system management tool that eliminates system boot-up to 10%. These...the battery on the U-Plus D.P.S. for ultimate system protection. Through GIGABYTE M.I .T.'s integration of all new drivers with the latest LGA775 Intel® Pentium® 4 Processor as well as the latest drivers for users. With added branded memory module information, users are ...
...graphics card, etc. S.O.S. (System Overclock Saver) System Overclock Saver (S.O.S.) is no longer need to open up -to-date drivers and BIOS. - 51 - With GIGABYTE's proprietary S.O.S. C.O.M. (Corporate Online Management) A web-based system management tool that eliminates system boot-up to 10%. These...the battery on the U-Plus D.P.S. for ultimate system protection. Through GIGABYTE M.I .T.'s integration of all new drivers with the latest LGA775 Intel® Pentium® 4 Processor as well as the latest drivers for users. With added branded memory module information, users are ...

Manual
Page 53
Must be connected to use the Xpress Recovery 1. How to the IDE1 Master 3. Insert the provided driver CD into your CD drive, then save and exit the BIOS menu. Execute Restore Utility 3. Exit and Restart Build 2011 - 53 - When the boot partition ...is backed up and restore an OS partition. Once the computer has restarted, the phrase "Boot from CD: Xpress Recovery V1.0 (C) Copy Right 2003. GIGABYTE Technology CO. , Ltd. 1. Set Password 5. Must be set to NTFS format. When "Boot from CD:" appears, press any key to Xpress Recovery can restore the...
Must be connected to use the Xpress Recovery 1. How to the IDE1 Master 3. Insert the provided driver CD into your CD drive, then save and exit the BIOS menu. Execute Restore Utility 3. Exit and Restart Build 2011 - 53 - When the boot partition ...is backed up and restore an OS partition. Once the computer has restarted, the phrase "Boot from CD: Xpress Recovery V1.0 (C) Copy Right 2003. GIGABYTE Technology CO. , Ltd. 1. Set Password 5. Must be set to NTFS format. When "Boot from CD:" appears, press any key to Xpress Recovery can restore the...

Manual
Page 54
... as well as drive reading/writing speed will affect backup speed. 3. It is recommended that Xpress Recovery be immediately installed after OS and all required driver and software installations are complete. Exit and Restart 1. Execute Restore Utility 3. Remove Backup Image 4. If you have already entered Xpress Recovery by booting from the... in the future by pressing the F9 key. 2. English 2. Press F9 during powering on the computer. (Text Mode) Press F9 during powering on the computer . GIGABYTE Technology CO. , Ltd. 1. GA-8I915G-MF/GA-8I915GM Motherboard - 54 -
... as well as drive reading/writing speed will affect backup speed. 3. It is recommended that Xpress Recovery be immediately installed after OS and all required driver and software installations are complete. Exit and Restart 1. Execute Restore Utility 3. Remove Backup Image 4. If you have already entered Xpress Recovery by booting from the... in the future by pressing the F9 key. 2. English 2. Press F9 during powering on the computer. (Text Mode) Press F9 during powering on the computer . GIGABYTE Technology CO. , Ltd. 1. GA-8I915G-MF/GA-8I915GM Motherboard - 54 -

Manual
Page 65
Introduction of the audio driver, you use 2-/ 4-/6-/8-channnels audio feature by audio software selection. The front channels or earphone can be able to Mic In. Line In Line Out (Front ...
Introduction of the audio driver, you use 2-/ 4-/6-/8-channnels audio feature by audio software selection. The front channels or earphone can be able to Mic In. Line In Line Out (Front ...
Manual
Page 66
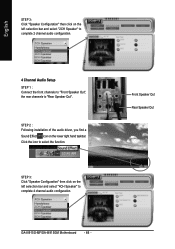
Click the icon to complete 4 channel audio configuration. GA-8I915G-MF/GA-8I915GM Motherboard - 66 - STEP 3: Click "Speaker Configuration" then click on the left selection bar and select "2CH Speaker" to complete 2 channel audio configuration. 4 Channel Audio Setup ...". English STEP 3: Click "Speaker Configuration" then click on the lower right hand taskbar. Front Speaker Out Rear Speaker Out STEP 2 : Following installation of the audio driver, you find a Sound Effect icon on the left selection bar and select "4CH Speaker" to select the function.
Click the icon to complete 4 channel audio configuration. GA-8I915G-MF/GA-8I915GM Motherboard - 66 - STEP 3: Click "Speaker Configuration" then click on the left selection bar and select "2CH Speaker" to complete 2 channel audio configuration. 4 Channel Audio Setup ...". English STEP 3: Click "Speaker Configuration" then click on the lower right hand taskbar. Front Speaker Out Rear Speaker Out STEP 2 : Following installation of the audio driver, you find a Sound Effect icon on the left selection bar and select "4CH Speaker" to select the function.

Manual
Page 67
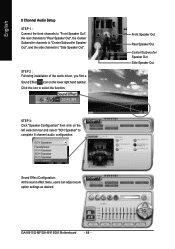
STEP 3: Click "Speaker Configuration" then click on the lower right hand taskbar. Front Speaker Out Rear Speaker Out Center/Subwoofer Speaker Out - 67 - Click the icon to "Center/Subwoofer Speaker Out". Appendix STEP 2 : Following installation of the audio driver, you find a Sound Effect icon on the left selection bar and select "6CH Speaker" to complete 6 channel audio configuration. English 6 Channel Audio Setup STEP 1 : Connect the front channels to "Front Speaker Out", the rear channels to "Rear Speaker Out", and the Center/Subwoofer channels to select the function.
STEP 3: Click "Speaker Configuration" then click on the lower right hand taskbar. Front Speaker Out Rear Speaker Out Center/Subwoofer Speaker Out - 67 - Click the icon to "Center/Subwoofer Speaker Out". Appendix STEP 2 : Following installation of the audio driver, you find a Sound Effect icon on the left selection bar and select "6CH Speaker" to complete 6 channel audio configuration. English 6 Channel Audio Setup STEP 1 : Connect the front channels to "Front Speaker Out", the rear channels to "Rear Speaker Out", and the Center/Subwoofer channels to select the function.
Manual
Page 68
... 3: Click "Speaker Configuration" then click on the lower right hand taskbar. Front Speaker Out Rear Speaker Out Center/Subwoofer Speaker Out Side Speaker Out GA-8I915G-MF/GA-8I915GM Motherboard - 68 - English 8 Channel Audio Setup STEP 1 : Connect the front channels to "Front Speaker Out", the rear channels to "Rear ...Out", and the side channels to select the function. Click the icon to "Side Speaker Out". STEP 2 : Following installation of the audio driver, you find a Sound Effect icon on the left selection bar and select "8CH Speaker" to complete 8 channel audio configuration.
... 3: Click "Speaker Configuration" then click on the lower right hand taskbar. Front Speaker Out Rear Speaker Out Center/Subwoofer Speaker Out Side Speaker Out GA-8I915G-MF/GA-8I915GM Motherboard - 68 - English 8 Channel Audio Setup STEP 1 : Connect the front channels to "Front Speaker Out", the rear channels to "Rear ...Out", and the side channels to select the function. Click the icon to "Side Speaker Out". STEP 2 : Following installation of the audio driver, you find a Sound Effect icon on the left selection bar and select "8CH Speaker" to complete 8 channel audio configuration.


