Manual
Page 10
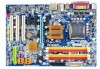
...Onboard Realtek ALC888 chip Š Supports High Definition Audio Š Supports 2 / 4 / 6 / 8 channel audio Š Supports S/PDIF In/Out connection Š Supports CD In connection Storage Š ICH8 Southbrigde - 1 FDD connector, allowing connection of 1 FDD device - 4 SATA 3Gb/s connectors (SATAII0,1, 2, 3), allowing connection of 2 SATA 3Gb/s devices - English 1-2 Feature Summary CPU Š LGA775 for additional 6 ports by cables Š 1 S/PDIF In connector Š 1 COMA connector Š 1 Chassis Intrusion connector Š 1 power LED connector GA-965G-DS3 Motherboard...
...Onboard Realtek ALC888 chip Š Supports High Definition Audio Š Supports 2 / 4 / 6 / 8 channel audio Š Supports S/PDIF In/Out connection Š Supports CD In connection Storage Š ICH8 Southbrigde - 1 FDD connector, allowing connection of 1 FDD device - 4 SATA 3Gb/s connectors (SATAII0,1, 2, 3), allowing connection of 2 SATA 3Gb/s devices - English 1-2 Feature Summary CPU Š LGA775 for additional 6 ports by cables Š 1 S/PDIF In connector Š 1 COMA connector Š 1 Chassis Intrusion connector Š 1 power LED connector GA-965G-DS3 Motherboard...
Manual
Page 13
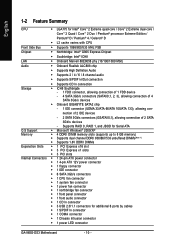
.... (for heat dissipation or using extreme care when removing the CPU cooler. - 13 - If the push pin is inserted as a result of hardening of motherboard after installing. The CPU cooler may adhere to the CPU fan header located on the surface of the installed CPU. Hardware Installation English 1-3-2 Installation of the CPU Cooler Male Push Pin The top of Female Push Pin Female Push Pin Fig.1 Please apply an...
.... (for heat dissipation or using extreme care when removing the CPU cooler. - 13 - If the push pin is inserted as a result of hardening of motherboard after installing. The CPU cooler may adhere to the CPU fan header located on the surface of the installed CPU. Hardware Installation English 1-3-2 Installation of the CPU Cooler Male Push Pin The top of Female Push Pin Female Push Pin Fig.1 Please apply an...
Manual
Page 18
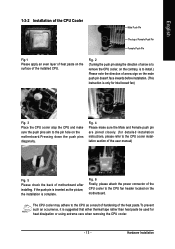
... ~ audio jacks can be connected to MIC In jack. Please refer to Line Out (Front Speaker Out) jack. MIC In The default MIC In jack. channel audio setup steps for detailed software configuration information. 1-7 Connectors Introduction 1 3 2 14 7 6 4 5 20 10 12 9 15 16 17 1) ATX_12V 2) ATX (Power Connector) 3) CPU_FAN 4) SYS_FAN 5) PWR_FAN 6) NB_FAN 7) FDD 8) IDE1 9) SATAII0/1/2/3 10) GSATAII0/1 GA-965G-DS3 Motherboard 18 8 19 11 13 11) PWR_LED 12) BATTERY...
... ~ audio jacks can be connected to MIC In jack. Please refer to Line Out (Front Speaker Out) jack. MIC In The default MIC In jack. channel audio setup steps for detailed software configuration information. 1-7 Connectors Introduction 1 3 2 14 7 6 4 5 20 10 12 9 15 16 17 1) ATX_12V 2) ATX (Power Connector) 3) CPU_FAN 4) SYS_FAN 5) PWR_FAN 6) NB_FAN 7) FDD 8) IDE1 9) SATAII0/1/2/3 10) GSATAII0/1 GA-965G-DS3 Motherboard 18 8 19 11 13 11) PWR_LED 12) BATTERY...
Manual
Page 22
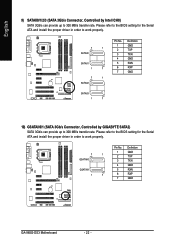
... ICH8) SATA 3Gb/s can provide up to 300 MB/s transfer rate. Please refer to the BIOS setting for the Serial ATA and install the proper driver in order to 300 MB/s transfer rate. English 9) SATAII0/1/2/3 (SATA 3Gb/s Connector, Controlled by GIGABYTE SATA2) SATA 3Gb/s can provide up to work properly. 7 1 GSATAII0 GSATAII1 1 7 Pin No. 1 2 3 4 5 6 7 Definition GND TXP TXN GND RXN RXP GND GA-965G-DS3 Motherboard - 22...
... ICH8) SATA 3Gb/s can provide up to 300 MB/s transfer rate. Please refer to the BIOS setting for the Serial ATA and install the proper driver in order to 300 MB/s transfer rate. English 9) SATAII0/1/2/3 (SATA 3Gb/s Connector, Controlled by GIGABYTE SATA2) SATA 3Gb/s can provide up to work properly. 7 1 GSATAII0 GSATAII1 1 7 Pin No. 1 2 3 4 5 6 7 Definition GND TXP TXN GND RXN RXP GND GA-965G-DS3 Motherboard - 22...

Manual
Page 32
... IDE Auto-Detection Press "Enter" to automatically detect IDE/SATA devices during POST(default) • None Select this option for faster system start up . For example, 1 p.m. The four options are used and the system will skip the • Manual automatic detection step and allow for the hard drive. Extended IDE Drive. IDE Channel 0/1 Master IDE/SATA Device Setup. English 2-1 Standard CMOS Features Date (mm:dd:yy) Time (hh:mm:ss) CMOS Setup Utility-Copyright (C) 1984-2006 Award Software Standard CMOS...
... IDE Auto-Detection Press "Enter" to automatically detect IDE/SATA devices during POST(default) • None Select this option for faster system start up . For example, 1 p.m. The four options are used and the system will skip the • Manual automatic detection step and allow for the hard drive. Extended IDE Drive. IDE Channel 0/1 Master IDE/SATA Device Setup. English 2-1 Standard CMOS Features Date (mm:dd:yy) Time (hh:mm:ss) CMOS Setup Utility-Copyright (C) 1984-2006 Award Software Standard CMOS...
Manual
Page 37
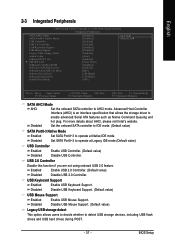
...Native IDE mode. Disabled Set SATA Port0~3 to operate at Legacy IDE mode.(Default value) USB Controller Enabled Enable USB Controller. (Default value) Disabled Disable USB Controller. BIOS Setup English 2-3 Integrated Peripherals CMOS Setup Utility-Copyright (C) 1984-2006 Award Software Integrated Peripherals SATA AHCI Mode SATA Port0-3 Native Mode USB Controller USB 2.0 Controller USB Keyboard Support USB Mouse Support Legacy USB storage detect Azalia Codec Onboard H/W LAN SMART LAN OnBoard LAN Boot ROM Onboard SATA/IDE Device Onboard SATA/IDE Ctrl Mode Onboard Serial Port...
...Native IDE mode. Disabled Set SATA Port0~3 to operate at Legacy IDE mode.(Default value) USB Controller Enabled Enable USB Controller. (Default value) Disabled Disable USB Controller. BIOS Setup English 2-3 Integrated Peripherals CMOS Setup Utility-Copyright (C) 1984-2006 Award Software Integrated Peripherals SATA AHCI Mode SATA Port0-3 Native Mode USB Controller USB 2.0 Controller USB Keyboard Support USB Mouse Support Legacy USB storage detect Azalia Codec Onboard H/W LAN SMART LAN OnBoard LAN Boot ROM Onboard SATA/IDE Device Onboard SATA/IDE Ctrl Mode Onboard Serial Port...
Manual
Page 38
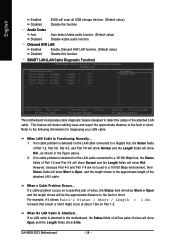
... not used in the figure above. 2. Onboard H/W LAN Enabled Enable Onboard H/W LAN function. (Default value) Disabled Disable this function. SMART LAN (LAN Cable Diagnostic Function) CMOS Setup Utility-Copyright (C) 1984-2006 Award Software SMART LAN Start detecting at about 1.6m on the LAN cable connected to a Gigabit hub, the Status fields of the attached LAN cable. For example, if it shows Pair1-2 Status = Short / Length = 1.6m, it means that a fault or short might occur at Port..... English Enabled Disabled Azalia Codec Auto Disabled BIOS will...
... not used in the figure above. 2. Onboard H/W LAN Enabled Enable Onboard H/W LAN function. (Default value) Disabled Disable this function. SMART LAN (LAN Cable Diagnostic Function) CMOS Setup Utility-Copyright (C) 1984-2006 Award Software SMART LAN Start detecting at about 1.6m on the LAN cable connected to a Gigabit hub, the Status fields of the attached LAN cable. For example, if it shows Pair1-2 Status = Short / Length = 1.6m, it means that a fault or short might occur at Port..... English Enabled Disabled Azalia Codec Auto Disabled BIOS will...

Manual
Page 39
...Disabled Disable onboard Serial port 1. RAID/IDE Set the SATA channel to RAID mode and IDE channel to AHCI mode. Parallel Port Mode SPP Using Parallel port as Standard Parallel Port. (Default value) EPP Using Parallel port as Extended Capabilities Port. Enable onboard LPT port and address is 378/IRQ7. (Default value) 278/IRQ5 3BC/IRQ7 Enable onboard LPT port and address is 2F8/IRQ3. ECP Using Parallel port as Enhanced Parallel Port. Advanced Host Controller Interface (AHCI) is an interface specification that allows the storage driver to invoke the boot ROM...
...Disabled Disable onboard Serial port 1. RAID/IDE Set the SATA channel to RAID mode and IDE channel to AHCI mode. Parallel Port Mode SPP Using Parallel port as Standard Parallel Port. (Default value) EPP Using Parallel port as Extended Capabilities Port. Enable onboard LPT port and address is 378/IRQ7. (Default value) 278/IRQ5 3BC/IRQ7 Enable onboard LPT port and address is 2F8/IRQ3. ECP Using Parallel port as Enhanced Parallel Port. Advanced Host Controller Interface (AHCI) is an interface specification that allows the storage driver to invoke the boot ROM...
Manual
Page 40
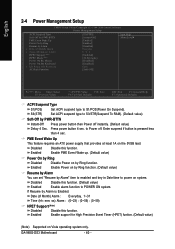
... Keyboard x KB Power ON Password AC Back Function [S3(STR)] [Instant-Off] [Enabled] [Enabled] [Disabled] Everyday 0 : 0 : 0 [Enabled] [32-bit mode] [Disabled] [Disabled] Enter [Soft-Off] Item Help Menu Level : Move Enter: Select F5: Previous Values +/-/PU/PD: Value F10: Save F6: Fail-Safe Defaults ESC: Exit F1: General Help F7: Optimized Defaults ACPI Suspend Type S1(POS) S3(STR) Set ACPI suspend type to power on system. English 2-4 Power Management Setup CMOS Setup Utility-Copyright (C) 1984-2006 Award Software Power Management Setup ACPI...
... Keyboard x KB Power ON Password AC Back Function [S3(STR)] [Instant-Off] [Enabled] [Enabled] [Disabled] Everyday 0 : 0 : 0 [Enabled] [32-bit mode] [Disabled] [Disabled] Enter [Soft-Off] Item Help Menu Level : Move Enter: Select F5: Previous Values +/-/PU/PD: Value F10: Save F6: Fail-Safe Defaults ESC: Exit F1: General Help F7: Optimized Defaults ACPI Suspend Type S1(POS) S3(STR) Set ACPI suspend type to power on system. English 2-4 Power Management Setup CMOS Setup Utility-Copyright (C) 1984-2006 Award Software Power Management Setup ACPI...

Manual
Page 45
... Voltage Control" item to "Auto" to Turbo. Disabled Enabled Disable CPU Host Clock Control. (Default value) Enable CPU Host Clock Control. (Note) This item will automatically assign by CPU detection. Set Robust Graphics Booster to optimize the system voltage settings. Incorrectly using these components. English 2-7 MB Intelligent Tweaker(M.I.T.) CMOS Setup Utility-Copyright (C) 1984-2006 Award Software MB Intelligent Tweaker(M.I.T.) Robust Graphics Booster [Auto] CPU Clock Ratio (Note) [25X] CPU Host Clock Control [Disabled] x CPU Host Frequency (Mhz) 200 PCI Express Frequency...
... Voltage Control" item to "Auto" to Turbo. Disabled Enabled Disable CPU Host Clock Control. (Default value) Enable CPU Host Clock Control. (Note) This item will automatically assign by CPU detection. Set Robust Graphics Booster to optimize the system voltage settings. Incorrectly using these components. English 2-7 MB Intelligent Tweaker(M.I.T.) CMOS Setup Utility-Copyright (C) 1984-2006 Award Software MB Intelligent Tweaker(M.I.T.) Robust Graphics Booster [Auto] CPU Clock Ratio (Note) [25X] CPU Host Clock Control [Disabled] x CPU Host Frequency (Mhz) 200 PCI Express Frequency...
Manual
Page 49
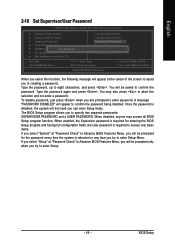
... will boot and you try to enter Setup. - 49 - English 2-10 Set Supervisor/User Password CMOS Setup Utility-Copyright (C) 1984-2006 Award Software Standard CMOS Features Advanced BIOS Features Integrated Peripherals Power Management Setup PnP/PCI ConfigurationEsnter Password: PC Health Status MB Intelligent Tweaker(M.I.T.) Load Fail-Safe Defaults Load Optimized Defaults Set Supervisor Password Set User Password Save & Exit Setup Exit Without Saving Esc: Quit F8: Dual BIOS/Q-Flash : Select Item F10: Save & Exit Setup F11: Save CMOS to BIOS F12: Load CMOS from BIOS Change/Set/Disable...
... will boot and you try to enter Setup. - 49 - English 2-10 Set Supervisor/User Password CMOS Setup Utility-Copyright (C) 1984-2006 Award Software Standard CMOS Features Advanced BIOS Features Integrated Peripherals Power Management Setup PnP/PCI ConfigurationEsnter Password: PC Health Status MB Intelligent Tweaker(M.I.T.) Load Fail-Safe Defaults Load Optimized Defaults Set Supervisor Password Set User Password Save & Exit Setup Exit Without Saving Esc: Quit F8: Dual BIOS/Q-Flash : Select Item F10: Save & Exit Setup F11: Save CMOS to BIOS F12: Load CMOS from BIOS Change/Set/Disable...

Manual
Page 51
English Chapter 3 Install Drivers Pictures below are shown in "Universal Serial Bus controller" under Windows XP operating system, please use Windows Service Pack. Please pick the item that came with your motherboard into your CD-ROM drive, the driver CD-title will reboot automatically after install the drivers, afterward you can press "Xpress Install" to install all the drivers that recommended to install other drivers. System will auto start and show a question mark...
English Chapter 3 Install Drivers Pictures below are shown in "Universal Serial Bus controller" under Windows XP operating system, please use Windows Service Pack. Please pick the item that came with your motherboard into your CD-ROM drive, the driver CD-title will reboot automatically after install the drivers, afterward you can press "Xpress Install" to install all the drivers that recommended to install other drivers. System will auto start and show a question mark...
Manual
Page 56
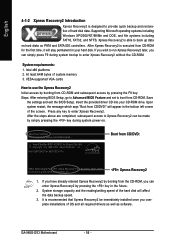
...: After entering BIOS Setup, go to Advanced BIOS Feature and set to enter Xpress Recovery2 without the CD-ROM. VESA-supported VGA cards How to use the Xpress Recovery2 Initial access by booting from CD-ROM. After the steps above are completed, subsequent access to startup XpressRecovery2..... At least 64M bytes of OS and all required drivers as well as software. Insert the provided driver CD into your hard disk...
...: After entering BIOS Setup, go to Advanced BIOS Feature and set to enter Xpress Recovery2 without the CD-ROM. VESA-supported VGA cards How to use the Xpress Recovery2 Initial access by booting from CD-ROM. After the steps above are completed, subsequent access to startup XpressRecovery2..... At least 64M bytes of OS and all required drivers as well as software. Insert the provided driver CD into your hard disk...
Manual
Page 60
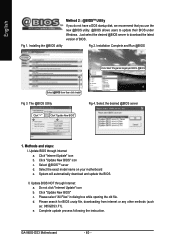
... Update" icon b. Please search for BIOS unzip file, downloading from internet or any other methods (such as: 965GDS3.F1). Installation Complete and Run @BIOS Click Start/ Programs/ Gigabyte/ BIOS/ @BIOS Select @BIOS item than click Install Fig 3. Click "Internet Update" icon b. GA-965G-DS3 Motherboard - 60 - English Method 2 : @BIOSTM Utility If you do not have a DOS startup disk, we recommend that you use the new @BIOS utility. @BIOS allows users to download the latest version of BIOS...
... Update" icon b. Please search for BIOS unzip file, downloading from internet or any other methods (such as: 965GDS3.F1). Installation Complete and Run @BIOS Click Start/ Programs/ Gigabyte/ BIOS/ @BIOS Select @BIOS item than click Install Fig 3. Click "Internet Update" icon b. GA-965G-DS3 Motherboard - 60 - English Method 2 : @BIOSTM Utility If you do not have a DOS startup disk, we recommend that you use the new @BIOS utility. @BIOS allows users to download the latest version of BIOS...
Manual
Page 62
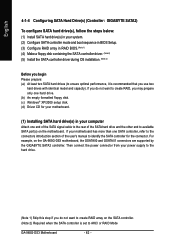
... user's manual to ensure optimal performance, it is set to create RAID array on the GA-965G-DS3 motherboard, the GSATAII0 and GSATAII1 connectors are supported by the GIGABYTE SATA2 controller. Then connect the power connector from your power supply to the hard drive. (Note 1) Skip this step if you do not want to AHCI or RAID Mode GA-965G-DS3 Motherboard - 62 - For example, on the SATA controller. (Note 2) Required when the SATA controller is recommended that you use two hard drives...
... user's manual to ensure optimal performance, it is set to create RAID array on the GA-965G-DS3 motherboard, the GSATAII0 and GSATAII1 connectors are supported by the GIGABYTE SATA2 controller. Then connect the power connector from your power supply to the hard drive. (Note 1) Skip this step if you do not want to AHCI or RAID Mode GA-965G-DS3 Motherboard - 62 - For example, on the SATA controller. (Note 2) Required when the SATA controller is recommended that you use two hard drives...

Manual
Page 63
...actual BIOS Setup menu options you will see shall depend on the motherboard you do not want to create RAID, set this section may not show the exact settings for your motherboard. In BIOS Setup, go to RAID/IDE before configuring RAID. CMOS Setup Utility-Copyright (C) 1984-2006 Award Software Integrated Peripherals SATA AHCI Mode SATA Port0-3 Native Mode USB Controller USB 2.0 Controller USB Keyboard Support USB Mouse Support Legacy USB storage detect Azalia Codec Onboard H/W LAN SMART LAN OnBoard LAN Boot ROM Onboard SATA/IDE Device Onboard SATA/IDE Ctrl Mode Onboard Serial Port 1 Onboard...
...actual BIOS Setup menu options you will see shall depend on the motherboard you do not want to create RAID, set this section may not show the exact settings for your motherboard. In BIOS Setup, go to RAID/IDE before configuring RAID. CMOS Setup Utility-Copyright (C) 1984-2006 Award Software Integrated Peripherals SATA AHCI Mode SATA Port0-3 Native Mode USB Controller USB 2.0 Controller USB Keyboard Support USB Mouse Support Legacy USB storage detect Azalia Codec Onboard H/W LAN SMART LAN OnBoard LAN Boot ROM Onboard SATA/IDE Device Onboard SATA/IDE Ctrl Mode Onboard Serial Port 1 Onboard...
Manual
Page 71
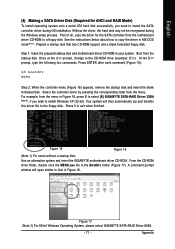
... prepared startup disk and motherboard driver CD-ROM in MS-DOS mode(Note1). if you need to install the SATA controller driver during the Windows setup process. Boot from the menu in Figure 16, press E to select (E) GIGABYTE SATA-RAID Driver 32Bit (Note 2). Once at the A:\> prompt, change to exit when finished. For example, from the startup disk. Figure 17 (Note 2) For 64-bit Windows Operating System, please select GIGABYTE SATA-RAID Driver 64Bit. - 71...
... prepared startup disk and motherboard driver CD-ROM in MS-DOS mode(Note1). if you need to install the SATA controller driver during the Windows setup process. Boot from the menu in Figure 16, press E to select (E) GIGABYTE SATA-RAID Driver 32Bit (Note 2). Once at the A:\> prompt, change to exit when finished. For example, from the startup disk. Figure 17 (Note 2) For 64-bit Windows Operating System, please select GIGABYTE SATA-RAID Driver 64Bit. - 71...
Manual
Page 72
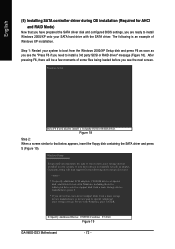
... a screen similar to that you have prepared the SATA driver disk and configured BIOS settings, you have chosen to manually specify an adapter. Windows Setup Press F6 if you do not have any device support disks from a mass storage device manufacturer, or do not want to specify additional mass storage devices for use with the SATA driver. S=Specify Additional Device ENTER=Continue F3=Exit Figure 19 GA-965G-DS3 Motherboard - 72 - Step 1: Restart your SATA hard drive with Windows, including...
... a screen similar to that you have prepared the SATA driver disk and configured BIOS settings, you have chosen to manually specify an adapter. Windows Setup Press F6 if you do not have any device support disks from a mass storage device manufacturer, or do not want to specify additional mass storage devices for use with the SATA driver. S=Specify Additional Device ENTER=Continue F3=Exit Figure 19 GA-965G-DS3 Motherboard - 72 - Step 1: Restart your SATA hard drive with Windows, including...
Manual
Page 73
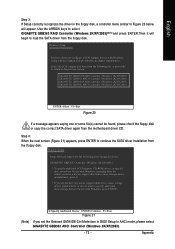
... set the Onboard SATA/IDE Ctrl Mode item in the floppy disk, a controller menu similar to Figure 20 below will begin to load the SATA driver from a mass storage device manufacturer, or do not have chosen to specify additional mass storage devices for use with Windows, using a device support disk provided by an adapter manufacturer. Step 4: When the next screen (Figure 21) appears, press ENTER to AHCI mode, please select GIGABYTE GBB363 AHCI Controller (Windows 2K/XP/2003). - 73 - Windows Setup Setup will load support...
... set the Onboard SATA/IDE Ctrl Mode item in the floppy disk, a controller menu similar to Figure 20 below will begin to load the SATA driver from a mass storage device manufacturer, or do not have chosen to specify additional mass storage devices for use with Windows, using a device support disk provided by an adapter manufacturer. Step 4: When the next screen (Figure 21) appears, press ENTER to AHCI mode, please select GIGABYTE GBB363 AHCI Controller (Windows 2K/XP/2003). - 73 - Windows Setup Setup will load support...
Manual
Page 80
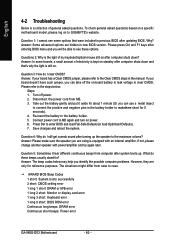
... and turn on . Connect power cord to the battery holder. 5. Save changes and reboot the system. Question 5: Sometimes I cannot see these beeps usually stand for 5 seconds). 4. AWARD BIOS Beep Codes 1 short: System boots successfully 2 short: CMOS setting error 1 long 1 short: DRAM or M/B error 1 long 2 short: Monitor or display card error 1 long 3 short: Keyboard error 1 long 9 short: BIOS ROM error Continuous long beeps: DRAM error Continuous short beeps: Power error GA-965G-DS3 Motherboard - 80 - To check general asked questions. Answer: If your board doesn't have such jumper...
... and turn on . Connect power cord to the battery holder. 5. Save changes and reboot the system. Question 5: Sometimes I cannot see these beeps usually stand for 5 seconds). 4. AWARD BIOS Beep Codes 1 short: System boots successfully 2 short: CMOS setting error 1 long 1 short: DRAM or M/B error 1 long 2 short: Monitor or display card error 1 long 3 short: Keyboard error 1 long 9 short: BIOS ROM error Continuous long beeps: DRAM error Continuous short beeps: Power error GA-965G-DS3 Motherboard - 80 - To check general asked questions. Answer: If your board doesn't have such jumper...


