
Manual
Page 3
The trademarks mentioned in this manual are legally registered to the specifications and features in this manual may be made by GIGABYTE without GIGABYTE's prior written permission. Disclaimer Information in this manual is 1.0. Check your motherboard looks like this manual may be reproduced, copied... information, carefully read or download the information on/from the Support\Motherboard\Technology Guide page on your motherboard revision before updating motherboard BIOS, drivers, or when looking for technical information. Copyright © 2008 GIGA-BYTE TECHNOLOGY CO., LTD.
The trademarks mentioned in this manual are legally registered to the specifications and features in this manual may be made by GIGABYTE without GIGABYTE's prior written permission. Disclaimer Information in this manual is 1.0. Check your motherboard looks like this manual may be reproduced, copied... information, carefully read or download the information on/from the Support\Motherboard\Technology Guide page on your motherboard revision before updating motherboard BIOS, drivers, or when looking for technical information. Copyright © 2008 GIGA-BYTE TECHNOLOGY CO., LTD.
Manual
Page 5
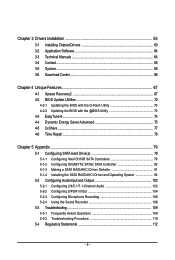
... Features 67 4-1 Xpress Recovery2 67 4-2 BIOS Update Utilities 70 4-2-1 Updating the BIOS with the Q-Flash Utility 70 4-2-2 Updating the BIOS with the @BIOS Utility 73 4-3 EasyTune 6...74 4-4 Dynamic Energy Saver Advanced 75 4-5 Q-Share ...77 4-6 Time Repair ...78 Chapter 5 Appendix ...79 5-1 Configuring SATA Hard Drive(s 79 5-1-1 Configuring Intel ICH10R SATA Controllers 79 5-1-2 Configuring GIGABYTE SATA2 SATA Controller 85 5-1-3 Making...
... Features 67 4-1 Xpress Recovery2 67 4-2 BIOS Update Utilities 70 4-2-1 Updating the BIOS with the Q-Flash Utility 70 4-2-2 Updating the BIOS with the @BIOS Utility 73 4-3 EasyTune 6...74 4-4 Dynamic Energy Saver Advanced 75 4-5 Q-Share ...77 4-6 Time Repair ...78 Chapter 5 Appendix ...79 5-1 Configuring SATA Hard Drive(s 79 5-1-1 Configuring Intel ICH10R SATA Controllers 79 5-1-2 Configuring GIGABYTE SATA2 SATA Controller 85 5-1-3 Making...
Manual
Page 35
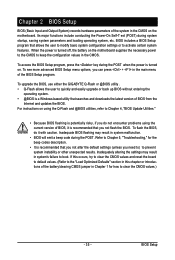
... and easily upgrade or back up BIOS without entering the operating system. • @BIOS is turned on. To see more advanced BIOS Setup menu options, you need to) to boot. To upgrade the BIOS, use either the GIGABYTE Q-Flash or @BIOS utility . • Q-Flash allows... the motherboard. Inadequate BIOS flashing may result in the CMOS on using the current version of the BIOS Setup program. BIOS includes a BIOS Setup program that allows the user to modify basic system configuration settings or to Chapter 4, "BIOS Update Utilities." • Because BIOS flashing is potentially risky...
... and easily upgrade or back up BIOS without entering the operating system. • @BIOS is turned on. To see more advanced BIOS Setup menu options, you need to) to boot. To upgrade the BIOS, use either the GIGABYTE Q-Flash or @BIOS utility . • Q-Flash allows... the motherboard. Inadequate BIOS flashing may result in the CMOS on using the current version of the BIOS Setup program. BIOS includes a BIOS Setup program that allows the user to modify basic system configuration settings or to Chapter 4, "BIOS Update Utilities." • Because BIOS flashing is potentially risky...
Manual
Page 60
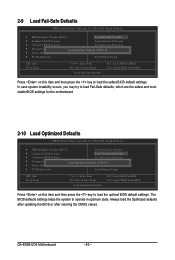
...Select Item F10: Save & Exit Setup Load Fail-Safe Defaults F11: Save CMOS to BIOS F12: Load CMOS from BIOS Press on this item and then press the key to load the optimal BIOS default settings. GA-EX58-UD4 Motherboard - 60 - 2-9 Load Fail-Safe Defaults CMOS Setup Utility-Copyright (C) 1984-2008 ...Select Item F10: Save & Exit Setup Load Optimized Defaults F11: Save CMOS to BIOS F12: Load CMOS from BIOS Press on this item and then press the key to load the safest BIOS default settings. Always load the Optimized defaults after updating the BIOS or after clearing the CMOS values.
...Select Item F10: Save & Exit Setup Load Fail-Safe Defaults F11: Save CMOS to BIOS F12: Load CMOS from BIOS Press on this item and then press the key to load the optimal BIOS default settings. GA-EX58-UD4 Motherboard - 60 - 2-9 Load Fail-Safe Defaults CMOS Setup Utility-Copyright (C) 1984-2008 ...Select Item F10: Save & Exit Setup Load Optimized Defaults F11: Save CMOS to BIOS F12: Load CMOS from BIOS Press on this item and then press the key to load the safest BIOS default settings. Always load the Optimized defaults after updating the BIOS or after clearing the CMOS values.
Manual
Page 66
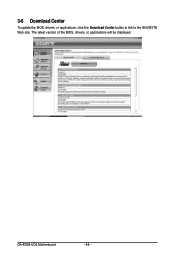
3-6 Download Center To update the BIOS, drivers, or applications, click the Download Center button to link to the GIGABYTE Web site. GA-EX58-UD4 Motherboard - 66 - The latest version of the BIOS, drivers, or applications will be displayed.
3-6 Download Center To update the BIOS, drivers, or applications, click the Download Center button to link to the GIGABYTE Web site. GA-EX58-UD4 Motherboard - 66 - The latest version of the BIOS, drivers, or applications will be displayed.
Manual
Page 70
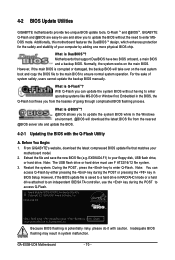
... key to update the system BIOS while in system malfunction. EX58UD4.F1) to your motherboard model. 2. 4-2 BIOS Update Utilities GIGABYTE motherboards provide two unique BIOS update tools, Q-Flash TM and @BIOS .TM GIGABYTE Q-Flash and @BIOS are easy-to-use and allow you to update the BIOS without having ... ? Normally, the system works on the next system boot and copy the BIOS file to the main BIOS to access Q-Flash. GA-EX58-UD4 Motherboard - 70 - Note: You can update the system BIOS without the need to an independent IDE/SA TA controller, use F AT32/16...
... key to update the system BIOS while in system malfunction. EX58UD4.F1) to your motherboard model. 2. 4-2 BIOS Update Utilities GIGABYTE motherboards provide two unique BIOS update tools, Q-Flash TM and @BIOS .TM GIGABYTE Q-Flash and @BIOS are easy-to-use and allow you to update the BIOS without having ... ? Normally, the system works on the next system boot and copy the BIOS file to the main BIOS to access Q-Flash. GA-EX58-UD4 Motherboard - 70 - Note: You can update the system BIOS without the need to an independent IDE/SA TA controller, use F AT32/16...
Manual
Page 71
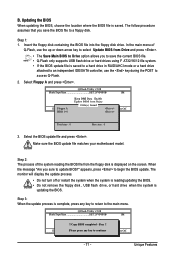
... independent IDE/SATA controller, use the up or down arrow key to a floppy disk. Make sure the BIOS update file matches your motherboard model. When the message "Are you save the current BIOS file. • Q-Flash only supports USB flash drive or hard drives using F AT32/16/12 file...25VF080B 1M Enter : Run Keep DMI Data Enable !! Select the BIOS update file and press . appears, press to update BIOS?" The monitor will display the update process. • Do not turn off or restart the system when the system is reading/updating the BIOS. • Do not remove the floppy disk , USB flash ...
... independent IDE/SATA controller, use the up or down arrow key to a floppy disk. Make sure the BIOS update file matches your motherboard model. When the message "Are you save the current BIOS file. • Q-Flash only supports USB flash drive or hard drives using F AT32/16/12 file...25VF080B 1M Enter : Run Keep DMI Data Enable !! Select the BIOS update file and press . appears, press to update BIOS?" The monitor will display the update process. • Do not turn off or restart the system when the system is reading/updating the BIOS. • Do not remove the floppy disk , USB flash ...
Manual
Page 72
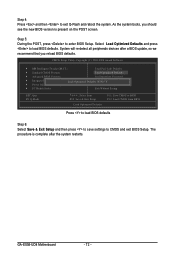
... Select Load Optimized Defaults and press to exit Q-Flash and reboot the system. Step 5: During the POST, press to CMOS and exit BIOS Setup. GA-EX58-UD4 Motherboard - 72 - The procedure is present on the POST screen. CMOS Setup Utility-Copyright (C) 1984-2008 Award Software MB ... F11: Save CMOS to BIOS F12: Load CMOS from BIOS Press to load BIOS defaults Step 6: Select Save & Exit Setup and then press to save settings to enter BIOS Setup. As the system boots, you should see the new BIOS version is complete after a BIOS update, so we recommend that ...
... Select Load Optimized Defaults and press to exit Q-Flash and reboot the system. Step 5: During the POST, press to CMOS and exit BIOS Setup. GA-EX58-UD4 Motherboard - 72 - The procedure is present on the POST screen. CMOS Setup Utility-Copyright (C) 1984-2008 Award Software MB ... F11: Save CMOS to BIOS F12: Load CMOS from BIOS Press to load BIOS defaults Step 6: Select Save & Exit Setup and then press to save settings to enter BIOS Setup. As the system boots, you should see the new BIOS version is complete after a BIOS update, so we recommend that ...
Manual
Page 73
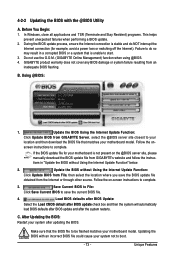
... BIOS update file from GIGABYTE's website and follow the instructions in a corrupted BIOS or a system that the BIOS file to save the BIOS update file obtained from an inadequate BIOS flashing. Update the BIOS without Using the Internet Update Function" below. 2. Load BIOS defaults after BIOS Update: Select the Load CMOS default after BIOS update check box and then the system will automatically load BIOS defaults after BIOS update...
... BIOS update file from GIGABYTE's website and follow the instructions in a corrupted BIOS or a system that the BIOS file to save the BIOS update file obtained from an inadequate BIOS flashing. Update the BIOS without Using the Internet Update Function" below. 2. Load BIOS defaults after BIOS Update: Select the Load CMOS default after BIOS update check box and then the system will automatically load BIOS defaults after BIOS update...
Manual
Page 76
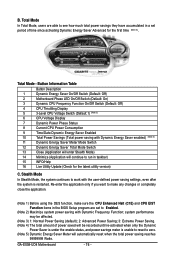
... will continue to work with Dynamic Frequency Function; GA-EX58-UD4 Motherboard - 76 - B. Stealth Mode In Stealth Mode, the system continues to run in a set to see how much total power savings they have accumulated in taskbar) 15 INFO/Help 16 Live Utility Update (Check for the first time . (Note 4)...the application. (Note 1) Before using the DES function, make sure the CPU Enhanced Halt (C1E) and CPU EIST Function items in the BIOS Setup program are able to Enabled. (Note 2) Maximize system power saving with the user-defined power saving settings, even after the system is...
... will continue to work with Dynamic Frequency Function; GA-EX58-UD4 Motherboard - 76 - B. Stealth Mode In Stealth Mode, the system continues to run in a set to see how much total power savings they have accumulated in taskbar) 15 INFO/Help 16 Live Utility Update (Check for the first time . (Note 4)...the application. (Note 1) Before using the DES function, make sure the CPU Enhanced Halt (C1E) and CPU EIST Function items in the BIOS Setup program are able to Enabled. (Note 2) Maximize system power saving with the user-defined power saving settings, even after the system is...


