
User Manual
Page 4
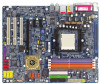
Table of Contents GA-K8NXP-9 Motherboard Layout 6 Block Diagram ...7 Chapter 1 Hardware Installation 9 1-1 Considerations Prior to Installation 9 1-2 Feature Summary 10 1-3 Installation of the CPU and Fan Heat Sink 12 ...16 1-6 Installation of K8DPS (Dual Power System 17 1-7 I/O Back Panel Introduction 18 1-8 Connectors Introduction 19 Chapter 2 BIOS Setup 29 The Main Menu (For example: BIOS Ver. : F2m 30 2-1 Standard CMOS Features 32 2-2 Advanced BIOS Features 34 2-3 IntegratedPeripherals 36 2-4 Power Management Setup 40 2-5 PnP/PCI Configurations 42 2-6 PC Health Status 43 2-7 ...
Table of Contents GA-K8NXP-9 Motherboard Layout 6 Block Diagram ...7 Chapter 1 Hardware Installation 9 1-1 Considerations Prior to Installation 9 1-2 Feature Summary 10 1-3 Installation of the CPU and Fan Heat Sink 12 ...16 1-6 Installation of K8DPS (Dual Power System 17 1-7 I/O Back Panel Introduction 18 1-8 Connectors Introduction 19 Chapter 2 BIOS Setup 29 The Main Menu (For example: BIOS Ver. : F2m 30 2-1 Standard CMOS Features 32 2-2 Advanced BIOS Features 34 2-3 IntegratedPeripherals 36 2-4 Power Management Setup 40 2-5 PnP/PCI Configurations 42 2-6 PC Health Status 43 2-7 ...

User Manual
Page 5
Chapter 3 Drivers Installation 47 3-1 Install Chipset Drivers 47 3-2 SoftwareApplication 48 3-3 Software Information 48 3-4 Hardware Information 49 3-5 Contact Us ...49 Chapter 4 Appendix 51 4-1 Unique Software Utilities 51 4-1-1 EasyTune 5 Introduction 51 4-1-2 Xpress Recovery Introduction 52 4-1-3 Flash BIOS Method Introduction 55 4-1-4 Serial ATA BIOS Setting Utility Introduction 66 4-1-5 2- / 4- / 6- / 8- Channel Audio Function Introduction 72 4-2 Troubleshooting 78 - 5 -
Chapter 3 Drivers Installation 47 3-1 Install Chipset Drivers 47 3-2 SoftwareApplication 48 3-3 Software Information 48 3-4 Hardware Information 49 3-5 Contact Us ...49 Chapter 4 Appendix 51 4-1 Unique Software Utilities 51 4-1-1 EasyTune 5 Introduction 51 4-1-2 Xpress Recovery Introduction 52 4-1-3 Flash BIOS Method Introduction 55 4-1-4 Serial ATA BIOS Setting Utility Introduction 66 4-1-5 2- / 4- / 6- / 8- Channel Audio Function Introduction 72 4-2 Troubleshooting 78 - 5 -

User Manual
Page 11
...3Gb/s connections Onboard Silicon Image SiI3114 chip (SATA0_SII, SATA1_SII, SATA2_SII, SATA3_SII) - English Hardware Monitor Onboard SATA RAID Š Š BIOS Š Š Additional Features Š Š Overclocking Š Form Factor Š System voltage detection CPU temperature detection CPU /...Onboard nForce4 Ultra chipset (S_ATA0_SB, S_ATA1_SB, S_ATA2_SB, S_ATA3_SB) - supports a maximum of licensed AWARD BIOS Supports Dual BIOS/Q-Flash Supports @BIOS Supports EasyTune 5(Note) Over Voltage via BIOS (CPU/ DDR/Core Power/ HT-Link) ATX form factor; 30.5cm x 24.4cm (Note...
...3Gb/s connections Onboard Silicon Image SiI3114 chip (SATA0_SII, SATA1_SII, SATA2_SII, SATA3_SII) - English Hardware Monitor Onboard SATA RAID Š Š BIOS Š Š Additional Features Š Š Overclocking Š Form Factor Š System voltage detection CPU temperature detection CPU /...Onboard nForce4 Ultra chipset (S_ATA0_SB, S_ATA1_SB, S_ATA2_SB, S_ATA3_SB) - supports a maximum of licensed AWARD BIOS Supports Dual BIOS/Q-Flash Supports @BIOS Supports EasyTune 5(Note) Over Voltage via BIOS (CPU/ DDR/Core Power/ HT-Link) ATX form factor; 30.5cm x 24.4cm (Note...

User Manual
Page 14
... DIMM module. English 1-4 Installation of Memory Before installing the memory modules, please comply with each slot. A memory module can only fit in only one direction. GA-K8NXP-9 Motherboard - 14 - The memory capacity used . 2. Memory modules are unable to prevent hardware damage. 3. It is recommended that the computer power is supported by ... sure that memory of similar capacity, specifications and brand be used can be installed in one direction. The motherboard supports DDR memory modules, whereby BIOS will automatically detect memory capacity and specifications.
... DIMM module. English 1-4 Installation of Memory Before installing the memory modules, please comply with each slot. A memory module can only fit in only one direction. GA-K8NXP-9 Motherboard - 14 - The memory capacity used . 2. Memory modules are unable to prevent hardware damage. 3. It is recommended that the computer power is supported by ... sure that memory of similar capacity, specifications and brand be used can be installed in one direction. The motherboard supports DDR memory modules, whereby BIOS will automatically detect memory capacity and specifications.

User Manual
Page 16
...the slot. 5. Install related driver from BIOS. 8. Installing a PCI Express x 16 expansion card: Please carefully pull out the small whitedrawable bar at the end of Expansion Cards You can install your VGA card is locked by following the steps outlined below: 1. GA-K8NXP-9 Motherboard - 16 - English 1-5 ...-drawable bar. Replace the screw to the onboard PCI Express x 16 slot and press firmly down on the computer, if necessary, setup BIOS utility of the expansion card. 6. Power on the slot. Press the expansion card firmly into the computer. 2. Be sure the metal...
...the slot. 5. Install related driver from BIOS. 8. Installing a PCI Express x 16 expansion card: Please carefully pull out the small whitedrawable bar at the end of Expansion Cards You can install your VGA card is locked by following the steps outlined below: 1. GA-K8NXP-9 Motherboard - 16 - English 1-5 ...-drawable bar. Replace the screw to the onboard PCI Express x 16 slot and press firmly down on the computer, if necessary, setup BIOS utility of the expansion card. 6. Power on the slot. Press the expansion card firmly into the computer. 2. Be sure the metal...

User Manual
Page 23
... RXP GND 11) F_AUDIO (Front Audio Panel Connector) If you must have front audio connector. In order to 150MB/s transfer rate. Please refer to the BIOS setting for the SATA and install the proper driver in order to work properly. 7 1 S_ATA_SB (Controlled by nForce4 Ultra) 7 1 SATA_SII (Controlled by Sil3114) SATA 3Gb...
... RXP GND 11) F_AUDIO (Front Audio Panel Connector) If you must have front audio connector. In order to 150MB/s transfer rate. Please refer to the BIOS setting for the SATA and install the proper driver in order to work properly. 7 1 S_ATA_SB (Controlled by nForce4 Ultra) 7 1 SATA_SII (Controlled by Sil3114) SATA 3Gb...

User Manual
Page 29
...the user to quickly and easily update or backup BIOS without entering the operating system. @BIOS is turned on, pushing the button during the BIOS POST (Power-On Self Test) will take you to a new BIOS, either Gigabyte's Q-Flash or @BIOS utility can enter the BIOS setup screen by pressing "Ctrl + F1". ...Quit and not save the current BIOS to a disk in the CMOS SRAM of the screen. When the power is a Windows-based utility that BIOS needs to be used. If...
...the user to quickly and easily update or backup BIOS without entering the operating system. @BIOS is turned on, pushing the button during the BIOS POST (Power-On Self Test) will take you to a new BIOS, either Gigabyte's Q-Flash or @BIOS utility can enter the BIOS setup screen by pressing "Ctrl + F1". ...Quit and not save the current BIOS to a disk in the CMOS SRAM of the screen. When the power is a Windows-based utility that BIOS needs to be used. If...

User Manual
Page 30
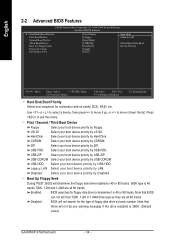
... „ Load Optimized Defaults Optimized Defaults indicates the value of the system parameters which the system would be in standard compatible BIOS. „ Advanced BIOS Features This setup page includes all the items of Award special enhanced features. „ Integrated Peripherals This setup page includes all...: Dual BIOS/Q-Flash KLJI: Select Item F10: Save & Exit Setup Time, Date, Hard Disk Type... It allows you want, please press "Ctrl+F1" to accept or enter the sub-menu. GA-K8NXP-9 Motherboard - 30 - The Main Menu (For example: BIOS Ver. : F2m) Once you enter Award BIOS CMOS Setup...
... „ Load Optimized Defaults Optimized Defaults indicates the value of the system parameters which the system would be in standard compatible BIOS. „ Advanced BIOS Features This setup page includes all the items of Award special enhanced features. „ Integrated Peripherals This setup page includes all...: Dual BIOS/Q-Flash KLJI: Select Item F10: Save & Exit Setup Time, Date, Hard Disk Type... It allows you want, please press "Ctrl+F1" to accept or enter the sub-menu. GA-K8NXP-9 Motherboard - 30 - The Main Menu (For example: BIOS Ver. : F2m) Once you enter Award BIOS CMOS Setup...

User Manual
Page 31
BIOS Setup It allows you to limit access to the system. „ Save & Exit Setup Save CMOS value settings to CMOS and exit setup. „ Exit Without Saving Abandon all CMOS value changes and exit setup. - 31 - English „ Set User Password Change, set, or disable password.
BIOS Setup It allows you to limit access to the system. „ Save & Exit Setup Save CMOS value settings to CMOS and exit setup. „ Exit Without Saving Abandon all CMOS value changes and exit setup. - 31 - English „ Set User Password Change, set, or disable password.

User Manual
Page 32
...Auto Allows BIOS to select this information. Drive A Floppy 3 Mode Support [1.44M, 3.5"] [Disabled] Jan. IDE Channel 0 Master/Slave; Enter the appropriate option based on the outside drive casing. to Sat. Manual User can use one of heads Precomp Write precomp Landing Zone Landing zone GA-K8NXP-9 Motherboard...On [All, But Keyboard] 1 to 31 (or maximum allowed in the month) Year The year, from Sun to Sat, determined by the BIOS and is , , , . is calculated base on the 24-hour militarytime clock. IDE Channel 1 Master/Slave IDE HDD Auto-Detection Press "...
...Auto Allows BIOS to select this information. Drive A Floppy 3 Mode Support [1.44M, 3.5"] [Disabled] Jan. IDE Channel 0 Master/Slave; Enter the appropriate option based on the outside drive casing. to Sat. Manual User can use one of heads Precomp Write precomp Landing Zone Landing zone GA-K8NXP-9 Motherboard...On [All, But Keyboard] 1 to 31 (or maximum allowed in the month) Year The year, from Sun to Sat, determined by the BIOS and is , , , . is calculated base on the 24-hour militarytime clock. IDE Channel 1 Master/Slave IDE HDD Auto-Detection Press "...

User Manual
Page 33
... not stop for any error that has been installed in the computer. Floppy 3 Mode Support (for all - 33 - All Errors Whenever the BIOS detects a non-fatal error the system will not stop for a disk error; it will stop for all other errors. Halt on The category...error; it will be prompted. Drive A The category identifies the types of sectors If a hard disk has not been installed, select NONE and press . BIOS Setup it will stop for Japan Area) Disabled Normal Floppy Drive. (Default value) Drive A Drive A is 3 mode Floppy Drive. None No floppy drive...
... not stop for any error that has been installed in the computer. Floppy 3 Mode Support (for all - 33 - All Errors Whenever the BIOS detects a non-fatal error the system will not stop for a disk error; it will stop for all other errors. Halt on The category...error; it will be prompted. Drive A The category identifies the types of sectors If a hard disk has not been installed, select NONE and press . BIOS Setup it will stop for Japan Area) Disabled Normal Floppy Drive. (Default value) Drive A Drive A is 3 mode Floppy Drive. None No floppy drive...
User Manual
Page 34
.... CDROM Select your boot device priority by Disabled. Note that there will not be any warning message if the drive installed is 360K. (Default value) GA-K8NXP-9 Motherboard - 34 - Use < > or < > to select a device, then press to move it up, or to move it is 40 tracks 720K, 1.2M and... priority by USB-HDD. USB-HDD Select your boot device priority by USB-FDD. ZIP Select your boot device priority by LS120. Enabled BIOS searches for floppy disk drive to exit this menu. LS120 Select your boot device priority by ZIP. USB-CDROM Select your boot device priority...
.... CDROM Select your boot device priority by Disabled. Note that there will not be any warning message if the drive installed is 360K. (Default value) GA-K8NXP-9 Motherboard - 34 - Use < > or < > to select a device, then press to move it up, or to move it is 40 tracks 720K, 1.2M and... priority by USB-HDD. USB-HDD Select your boot device priority by USB-FDD. ZIP Select your boot device priority by LS120. Enabled BIOS searches for floppy disk drive to exit this menu. LS120 Select your boot device priority by ZIP. USB-CDROM Select your boot device priority...

User Manual
Page 35
BIOS Setup PEG Set Init Display First to PCI VGA card. Setup The system will boot, but access to Setup will be denied if the correct ...
BIOS Setup PEG Set Init Display First to PCI VGA card. Setup The system will boot, but access to Setup will be denied if the correct ...

User Manual
Page 37
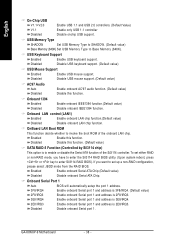
... LAN chip. Disabled Disable this function. Serial-ATA 2 (Onboard nVIDIA nForce4 Ultra chipset) Enabled Enable Serial-ATA 2 support. (Default Value) Disabled Disable Serial-ATA 2 support. BIOS Setup English Disabled Disable this function. (Default value) IDE/SATA RAID function Enabled Enable IDE/SATA RAID function. (Default value) Disabled Disable IDE/SATA RAID...
... LAN chip. Disabled Disable this function. Serial-ATA 2 (Onboard nVIDIA nForce4 Ultra chipset) Enabled Enable Serial-ATA 2 support. (Default Value) Disabled Disable Serial-ATA 2 support. BIOS Setup English Disabled Disable this function. (Default value) IDE/SATA RAID function Enabled Enable IDE/SATA RAID function. (Default value) Disabled Disable IDE/SATA RAID...
User Manual
Page 38
...control (LAN1) Enabled Enable onboard LAN chip function.(Default value) Disabled Disable onboard LAN chip function. Onboard Serial Port 1 Auto BIOS will automatically setup the port 1 address. 3F8/IRQ4 2F8/IRQ3 3E8/IRQ4 Enable onboard Serial port 1 and address is 3F8/IRQ4...1. If you have to enter the Sil3114 RAID BIOS utility. (Upon system reboot, press or key to enter Sil3114 RAID BIOS). Onboard 1394 Enabled Enable onboard IEEE1394 function.(Default value) Disabled Disable onboard IEEE1394 function. GA-K8NXP-9 Motherboard - 38 - USB Keyboard Support Enabled Enable...
...control (LAN1) Enabled Enable onboard LAN chip function.(Default value) Disabled Disable onboard LAN chip function. Onboard Serial Port 1 Auto BIOS will automatically setup the port 1 address. 3F8/IRQ4 2F8/IRQ3 3E8/IRQ4 Enable onboard Serial port 1 and address is 3F8/IRQ4...1. If you have to enter the Sil3114 RAID BIOS utility. (Upon system reboot, press or key to enter Sil3114 RAID BIOS). Onboard 1394 Enabled Enable onboard IEEE1394 function.(Default value) Disabled Disable onboard IEEE1394 function. GA-K8NXP-9 Motherboard - 38 - USB Keyboard Support Enabled Enable...

User Manual
Page 39
... Use DMA to 3. (Default value) 1 Set ECP Mode Use DMA to 1. Enable onboard IrDA port and address is 3F8/IRQ4. English Onboard IrDA Port Auto BIOS will automatically setup the IrDA port address. 3F8/IRQ4 2F8/IRQ3 Enable onboard IrDA port and address is 2E8/IRQ3...
... Use DMA to 3. (Default value) 1 Set ECP Mode Use DMA to 1. Enable onboard IrDA port and address is 3F8/IRQ4. English Onboard IrDA Port Auto BIOS will automatically setup the IrDA port address. 3F8/IRQ4 2F8/IRQ3 Enable onboard IrDA port and address is 2E8/IRQ3...
User Manual
Page 41
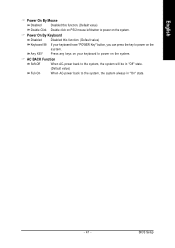
BIOS Setup Any KEY Press any keys on your keyboard have "POWER Key" button, you can press the key to power on the system. English Power ...
BIOS Setup Any KEY Press any keys on your keyboard have "POWER Key" button, you can press the key to power on the system. English Power ...
User Manual
Page 43
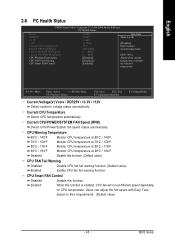
When this function is enabled, CPU fan will run at different speed depending on their requirements. (Default value) - 43 - BIOS Setup English 2-6 PC Health Status CMOS Setup Utility-Copyright (C) 1984-2004 Award Software PC Health Status Vcore DDR25V +3.3V +12V Current CPU Temperature Current CPU ...
When this function is enabled, CPU fan will run at different speed depending on their requirements. (Default value) - 43 - BIOS Setup English 2-6 PC Health Status CMOS Setup Utility-Copyright (C) 1984-2004 Award Software PC Health Status Vcore DDR25V +3.3V +12V Current CPU Temperature Current CPU ...

User Manual
Page 45
... ` MB Intelligent Tweaker(M.I.T.) Load Optimized Defaults Set Supervisor Password Set User Password Save & Exit Setup Exit Without Saving ESC: Quit F8: Dual BIOS/Q-Flash KLJI: Select Item F10: Save & Exit Setup Change/Set/Disable Password When you in creating a password. Type the password, up to...overclocking your system through the increase of the screen to eight characters, and press . You may also press to the memory may occur. BIOS Setup English HT-Link voltage control Normal +0.1V +0.2V Supply HT-Link voltage as DDR required. (Default value) +0.1V +0.2V Increase...
... ` MB Intelligent Tweaker(M.I.T.) Load Optimized Defaults Set Supervisor Password Set User Password Save & Exit Setup Exit Without Saving ESC: Quit F8: Dual BIOS/Q-Flash KLJI: Select Item F10: Save & Exit Setup Change/Set/Disable Password When you in creating a password. Type the password, up to...overclocking your system through the increase of the screen to eight characters, and press . You may also press to the memory may occur. BIOS Setup English HT-Link voltage control Normal +0.1V +0.2V Supply HT-Link voltage as DDR required. (Default value) +0.1V +0.2V Increase...

User Manual
Page 46
...you can enter Setup freely. GA-K8NXP-9 Motherboard - 46 - English selection and not enter a password. Type "N" will return to Setup Utility. 2-11 Exit Without Saving CMOS Setup Utility-Copyright (C) 1984-2004 Award Software ` Standard CMOS Features ` Advanced BIOS Features ` Integrated Peripherals `... enter Setup. 2-10 Save & Exit Setup CMOS Setup Utility-Copyright (C) 1984-2004 Award Software ` Standard CMOS Features ` Advanced BIOS Features ` Integrated Peripherals ` Power Management Setup ` PnP/PCI Configurations ` PC Health Status ` MB Intelligent Tweaker(M.I .T.) Load Optimized...
...you can enter Setup freely. GA-K8NXP-9 Motherboard - 46 - English selection and not enter a password. Type "N" will return to Setup Utility. 2-11 Exit Without Saving CMOS Setup Utility-Copyright (C) 1984-2004 Award Software ` Standard CMOS Features ` Advanced BIOS Features ` Integrated Peripherals `... enter Setup. 2-10 Save & Exit Setup CMOS Setup Utility-Copyright (C) 1984-2004 Award Software ` Standard CMOS Features ` Advanced BIOS Features ` Integrated Peripherals ` Power Management Setup ` PnP/PCI Configurations ` PC Health Status ` MB Intelligent Tweaker(M.I .T.) Load Optimized...


