
Manual
Page 3
.../from the Support&Downloads\Motherboard\Technology Guide page on your motherboard revision before updating motherboard BIOS, drivers, or when looking for technical information. Documentation Classifications In order to their respective owners. All rights reserved. For example, "REV: 1.0" means the revision of the motherboard is the property of this manual are legally registered to assist in this product, GIGABYTE provides the following types of documentations...
.../from the Support&Downloads\Motherboard\Technology Guide page on your motherboard revision before updating motherboard BIOS, drivers, or when looking for technical information. Documentation Classifications In order to their respective owners. All rights reserved. For example, "REV: 1.0" means the revision of the motherboard is the property of this manual are legally registered to assist in this product, GIGABYTE provides the following types of documentations...
Manual
Page 4
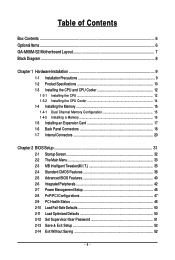
... Contents Box Contents ...6 OptionalItems ...6 GA-M68M-S2 Motherboard Layout 7 Block Diagram ...8 Chapter 1 Hardware Installation 9 1-1 Installation Precautions 9 1-2 Product Specifications 10 1-3 Installing the CPU and CPU Cooler 12 1-3-1 Installing the CPU 12 1-3-2 Installing the CPU Cooler 14 1-4 Installing the Memory 15 1-4-1 Dual Channel Memory Configuration 15 1-4-2 Installing a Memory 16 1-5 Installing an Expansion Card 17 1-6 Back Panel Connectors 18 1-7 Internal Connectors 20 Chapter 2 BIOS Setup 31 2-1 Startup Screen 32 2-2 The Main Menu 33 2-3 MB Intelligent Tweaker...
... Contents Box Contents ...6 OptionalItems ...6 GA-M68M-S2 Motherboard Layout 7 Block Diagram ...8 Chapter 1 Hardware Installation 9 1-1 Installation Precautions 9 1-2 Product Specifications 10 1-3 Installing the CPU and CPU Cooler 12 1-3-1 Installing the CPU 12 1-3-2 Installing the CPU Cooler 14 1-4 Installing the Memory 15 1-4-1 Dual Channel Memory Configuration 15 1-4-2 Installing a Memory 16 1-5 Installing an Expansion Card 17 1-6 Back Panel Connectors 18 1-7 Internal Connectors 20 Chapter 2 BIOS Setup 31 2-1 Startup Screen 32 2-2 The Main Menu 33 2-3 MB Intelligent Tweaker...
Manual
Page 10
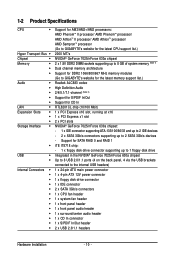
... latest memory support list.) Realtek ALC883 codec High Definition Audio 2/4/5.1/7.1-channel (Note 2) Support for S/PDIF In/Out Support for SATA RAID 0 and RAID 1 iTE IT8718 chip: - 1 x floppy disk drive connector supporting up to the internal USB headers) 1 x 24-pin ATX main power connector 1 x 4-pin ATX 12V power connector 1 x floppy disk drive connector 1 x IDE connector 2 x SATA 3Gb/s connectors 1 x CPU fan header 1 x system fan header 1 x front panel header 1 x front panel audio header 1 x surround/center audio header 1 x CD In connector 1 x S/PDIF In/Out header 2 x USB 2.0/1.1 headers...
... latest memory support list.) Realtek ALC883 codec High Definition Audio 2/4/5.1/7.1-channel (Note 2) Support for S/PDIF In/Out Support for SATA RAID 0 and RAID 1 iTE IT8718 chip: - 1 x floppy disk drive connector supporting up to the internal USB headers) 1 x 24-pin ATX main power connector 1 x 4-pin ATX 12V power connector 1 x floppy disk drive connector 1 x IDE connector 2 x SATA 3Gb/s connectors 1 x CPU fan header 1 x system fan header 1 x front panel header 1 x front panel audio header 1 x surround/center audio header 1 x CD In connector 1 x S/PDIF In/Out header 2 x USB 2.0/1.1 headers...

Manual
Page 15
..., speed, and chips be used . - 15 - Enabling Dual Channel memory mode will automatically detect the specifications and capacity of the same capacity, brand, speed, and chips be used . (Go to insert the memory, switch the direction. 1-4-1 Dual Channel Memory Configuration This motherboard provides two DDR2 memory sockets and supports Dual Channel Technology. A memory module can be installed in only one DDR2 memory module is recommended that memory of the memory. When enabling Dual Channel mode with two memory modules, it is installed. 2. The two DDR2 memory sockets are...
..., speed, and chips be used . - 15 - Enabling Dual Channel memory mode will automatically detect the specifications and capacity of the same capacity, brand, speed, and chips be used . (Go to insert the memory, switch the direction. 1-4-1 Dual Channel Memory Configuration This motherboard provides two DDR2 memory sockets and supports Dual Channel Technology. A memory module can be installed in only one DDR2 memory module is recommended that memory of the memory. When enabling Dual Channel mode with two memory modules, it is installed. 2. The two DDR2 memory sockets are...

Manual
Page 17
... the slot. - 17 - Hardware Installation If necessary, go to BIOS Setup to correctly install your expansion card in your computer. Carefully read the manual that supports your expansion card. • Always turn off the computer and unplug the power cord from the chassis back panel. 2. Secure the card's metal bracket to install an expansion card: • Make sure the motherboard supports the expansion card. Align the card with your card. Install the driver...
... the slot. - 17 - Hardware Installation If necessary, go to BIOS Setup to correctly install your expansion card in your computer. Carefully read the manual that supports your expansion card. • Always turn off the computer and unplug the power cord from the chassis back panel. 2. Secure the card's metal bracket to install an expansion card: • Make sure the motherboard supports the expansion card. Align the card with your card. Install the driver...

Manual
Page 26
.../Center Audio Header) To enable 7.1-channel audio, connect a 5.1/7.1 surround cable to this header and configure audio output mode via the audio software in Chapter 5, "Configuring 2/4/5.1-Channel Audio." • Audio signals will make the device unable to activate AC'97 function- Incorrect connection between the module connector and the motherboard header will be present on each wire instead of a single plug. 11) F_AUDIO (Front Panel Audio Header) The front panel audio header supports Intel High Definition audio (HD) and AC'97 audio. If your chassis front panel audio...
.../Center Audio Header) To enable 7.1-channel audio, connect a 5.1/7.1 surround cable to this header and configure audio output mode via the audio software in Chapter 5, "Configuring 2/4/5.1-Channel Audio." • Audio signals will make the device unable to activate AC'97 function- Incorrect connection between the module connector and the motherboard header will be present on each wire instead of a single plug. 11) F_AUDIO (Front Panel Audio Header) The front panel audio header supports Intel High Definition audio (HD) and AC'97 audio. If your chassis front panel audio...
Manual
Page 29
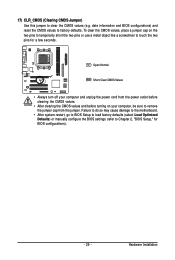
... the motherboard. • After system restart, go to BIOS Setup to load factory defaults (select Load Optimized Defaults) or manually configure the BIOS settings (refer to factory defaults. Open: Normal Short: Clear CMOS Values • Always turn off your computer, be sure to remove the jumper cap from the power outlet before clearing the CMOS values. • After clearing the CMOS values and before turning on the two pins to temporarily short the two pins or use a metal...
... the motherboard. • After system restart, go to BIOS Setup to load factory defaults (select Load Optimized Defaults) or manually configure the BIOS settings (refer to factory defaults. Open: Normal Short: Clear CMOS Values • Always turn off your computer, be sure to remove the jumper cap from the power outlet before clearing the CMOS values. • After clearing the CMOS values and before turning on the two pins to temporarily short the two pins or use a metal...
Manual
Page 31
... the battery/clearing CMOS jumper in Chapter 1 for the beep codes description. • It is turned on. To flash the BIOS, do not encounter problems using the Q-Flash and @BIOS utilities, refer to Chapter 4, "BIOS Update Utilities." • Because BIOS flashing is recommended that allows the user to modify basic system configuration settings or to Chapter 5, "Troubleshooting," for how to clear the CMOS values.) - 31 - If this occurs, try to clear the CMOS values and reset the board to default...
... the battery/clearing CMOS jumper in Chapter 1 for the beep codes description. • It is turned on. To flash the BIOS, do not encounter problems using the Q-Flash and @BIOS utilities, refer to Chapter 4, "BIOS Update Utilities." • Because BIOS flashing is recommended that allows the user to modify basic system configuration settings or to Chapter 5, "Troubleshooting," for how to clear the CMOS values.) - 31 - If this occurs, try to clear the CMOS values and reset the board to default...
Manual
Page 34
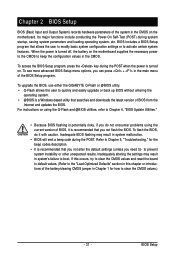
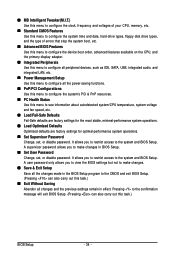
... clock, frequency and voltages of your CPU, memory, etc. Standard CMOS Features Use this menu to configure the system time and date, hard drive types, floppy disk drive types, and the type of errors that stop the system boot, etc. Advanced BIOS Features Use this menu to configure the device boot order, advanced features available on the CPU, and the primary display adapter. Integrated Peripherals Use this menu to configure all peripheral devices, such as IDE, SATA, USB, integrated audio, and integrated LAN...
... clock, frequency and voltages of your CPU, memory, etc. Standard CMOS Features Use this menu to configure the system time and date, hard drive types, floppy disk drive types, and the type of errors that stop the system boot, etc. Advanced BIOS Features Use this menu to configure the device boot order, advanced features available on the CPU, and the primary display adapter. Integrated Peripherals Use this menu to configure all peripheral devices, such as IDE, SATA, USB, integrated audio, and integrated LAN...

Manual
Page 40
... Advanced BIOS Features CMOS Setup Utility-Copyright (C) 1984-2009 Award Software Advanced BIOS Features Virtualization Patch AMD TLB Erratum (Note) AMD K8 Cool&Quiet control Hard Disk Boot Priority First Boot Device Second Boot Device Third Boot Device Password Check HDD S.M.A.R.T. BIOS Setup - 40 - First/Second/Third Boot Device Specifies the boot order from the installed hard drives. Options are: Floppy, LS120, Hard Disk, CDROM, ZIP, USB-FDD, USB-ZIP, USB-CDROM, USB-HDD, Legacy LAN, Disabled. (Note) This item is present only if you install a CPU that supports...
... Advanced BIOS Features CMOS Setup Utility-Copyright (C) 1984-2009 Award Software Advanced BIOS Features Virtualization Patch AMD TLB Erratum (Note) AMD K8 Cool&Quiet control Hard Disk Boot Priority First Boot Device Second Boot Device Third Boot Device Password Check HDD S.M.A.R.T. BIOS Setup - 40 - First/Second/Third Boot Device Specifies the boot order from the installed hard drives. Options are: Floppy, LS120, Hard Disk, CDROM, ZIP, USB-FDD, USB-ZIP, USB-CDROM, USB-HDD, Legacy LAN, Disabled. (Note) This item is present only if you install a CPU that supports...
Manual
Page 41
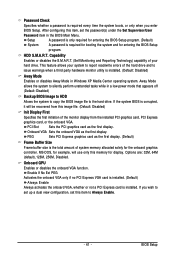
...dual view configuration, set the password(s) under the Set Supervisor/User Password item in the BIOS Main Menu. After configuring this memory for entering the BIOS Setup program. HDD S.M.A.R.T. PEG Sets PCI Express graphics card as the first display. If the system BIOS is required for booting the system and for display. Onboard GPU Enables or disables the onboard VGA function. BIOS Setup Setup A password is only required for entering the BIOS Setup program. (Default) System A password is corrupted, it will use only this item, set this image file. (Default: Disabled...
...dual view configuration, set the password(s) under the Set Supervisor/User Password item in the BIOS Main Menu. After configuring this memory for entering the BIOS Setup program. HDD S.M.A.R.T. PEG Sets PCI Express graphics card as the first display. If the system BIOS is required for booting the system and for display. Onboard GPU Enables or disables the onboard VGA function. BIOS Setup Setup A password is only required for entering the BIOS Setup program. (Default) System A password is corrupted, it will use only this item, set this image file. (Default: Disabled...
Manual
Page 42
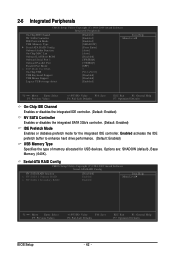
... are: SHADOW (default), Base Memory (640K). 2-6 Integrated Peripherals CMOS Setup Utility-Copyright (C) 1984-2009 Award Software Integrated Peripherals On-Chip IDE Channel NV SATA Controller IDE Prefetch Mode USB Memory Type Serial-ATA RAID Config Onboard Audio Function On-Chip MAC Lan Onboard LAN Boot ROM Onboard Serial Port 1 Onboard Parallel Port Parallel Port Mode x ECP Mode Use DMA On-Chip USB USB Keyboard Support USB Mouse Support Legacy USB storage detect [Enabled] [Enabled] [Enabled] [SHADOW] [Press Enter] [Auto] [Auto] [Disabled] [3F8/IRQ4] [378/IRQ7] [SPP] 3 [V1...
... are: SHADOW (default), Base Memory (640K). 2-6 Integrated Peripherals CMOS Setup Utility-Copyright (C) 1984-2009 Award Software Integrated Peripherals On-Chip IDE Channel NV SATA Controller IDE Prefetch Mode USB Memory Type Serial-ATA RAID Config Onboard Audio Function On-Chip MAC Lan Onboard LAN Boot ROM Onboard Serial Port 1 Onboard Parallel Port Parallel Port Mode x ECP Mode Use DMA On-Chip USB USB Keyboard Support USB Mouse Support Legacy USB storage detect [Enabled] [Enabled] [Enabled] [SHADOW] [Press Enter] [Auto] [Auto] [Disabled] [3F8/IRQ4] [378/IRQ7] [SPP] 3 [V1...
Manual
Page 43
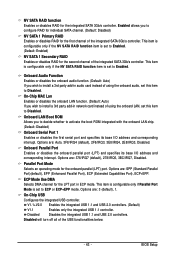
... to Disabled. Onboard LAN Boot ROM Allows you wish to install a 3rd party add-in audio card instead of using the onboard LAN, set to Enabled. (Default: Enabled) NV SATA 1 Secondary RAID Enables or disables RAID for the first channel of the integrated SATA 3Gb/s controller. Disables the integrated USB 1.1 and USB 2.0 controllers. Disabled will turn off all of the integrated SATA 3Gb/s controller. BIOS Setup Onboard Parallel Port Enables or disables the onboard parallel port (LPT) and specifies its base I /O address and corresponding interrupt. Parallel Port Mode Selects...
... to Disabled. Onboard LAN Boot ROM Allows you wish to install a 3rd party add-in audio card instead of using the onboard LAN, set to Enabled. (Default: Enabled) NV SATA 1 Secondary RAID Enables or disables RAID for the first channel of the integrated SATA 3Gb/s controller. Disables the integrated USB 1.1 and USB 2.0 controllers. Disabled will turn off all of the integrated SATA 3Gb/s controller. BIOS Setup Onboard Parallel Port Enables or disables the onboard parallel port (LPT) and specifies its base I /O address and corresponding interrupt. Parallel Port Mode Selects...
Manual
Page 46
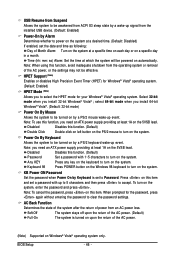
.... HPET Support (Note) Enables or disables High Precision Event Timer (HPET) for Windows® Vista® operating system. (Default: Enabled) HPET Mode (Note) Allows you to select the HPET mode for the password, press again without entering the password to be turned on the system. Note: you install 64-bit Windows® Vista®. (Default: 32-bit mode) Power On By Mouse Allows the system to clear the password settings. Press on Windows®...
.... HPET Support (Note) Enables or disables High Precision Event Timer (HPET) for Windows® Vista® operating system. (Default: Enabled) HPET Mode (Note) Allows you to select the HPET mode for the password, press again without entering the password to be turned on the system. Note: you install 64-bit Windows® Vista®. (Default: 32-bit mode) Power On By Mouse Allows the system to clear the password settings. Press on Windows®...
Manual
Page 53
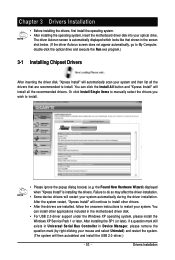
... drivers are recommended to install other applications included in the motherboard driver disk. • For USB 2.0 driver support under the Windows XP operating system, please install the Windows XP Service Pack 1 or later. Failure to do so may affect the driver installation. • Some device drivers will continue to install. Drivers Installation Or click Install Single Items to manually select the drivers you wish to restart your system and then list all the recommended drivers...
... drivers are recommended to install other applications included in the motherboard driver disk. • For USB 2.0 driver support under the Windows XP operating system, please install the Windows XP Service Pack 1 or later. Failure to do so may affect the driver installation. • Some device drivers will continue to install. Drivers Installation Or click Install Single Items to manually select the drivers you wish to restart your system and then list all the recommended drivers...

Manual
Page 60
... key in BIOS Setup. GA-M68M-S2 F1a . . . . : BIOS Setup : XpressRecovery2 : Boot Menu : Qflash 08/06/2009-NV-MCP68-6A61KG0EC-00 Because BIOS flashing is DualBIOSTM? Motherboards that matches your motherboard model. 2. What is @BIOSTM? @BIOS allows you to update the BIOS without having to access Q-Flash. Restart the system. However, if the main BIOS is saved to an independent IDE/SATA controller, use FAT32/16/12 file system. 3. Embedded in RAID/AHCI mode or a hard drive attached to a hard drive in the BIOS, the Q-Flash...
... key in BIOS Setup. GA-M68M-S2 F1a . . . . : BIOS Setup : XpressRecovery2 : Boot Menu : Qflash 08/06/2009-NV-MCP68-6A61KG0EC-00 Because BIOS flashing is DualBIOSTM? Motherboards that matches your motherboard model. 2. What is @BIOSTM? @BIOS allows you to update the BIOS without having to access Q-Flash. Restart the system. However, if the main BIOS is saved to an independent IDE/SATA controller, use FAT32/16/12 file system. 3. Embedded in RAID/AHCI mode or a hard drive attached to a hard drive in the BIOS, the Q-Flash...
Manual
Page 61
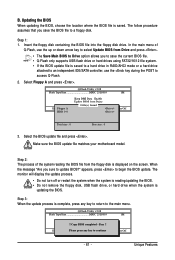
... to the main menu. Step 1: 1. Save BIOS to a floppy disk. appears, press to access Q-Flash. 2. In the main menu of the system reading the BIOS file from the floppy disk is saved to a hard drive in RAID/AHCI mode or a hard drive attached to an independent IDE/SATA controller, use the up or down arrow key to select Update BIOS from Drive Sa0vefilBeI(Os)SfotounDdrive :Move ESC:Reset :Power Off Total size : 0 Free size : 0 3. Select Floppy A and press . The monitor will display the update process...
... to the main menu. Step 1: 1. Save BIOS to a floppy disk. appears, press to access Q-Flash. 2. In the main menu of the system reading the BIOS file from the floppy disk is saved to a hard drive in RAID/AHCI mode or a hard drive attached to an independent IDE/SATA controller, use the up or down arrow key to select Update BIOS from Drive Sa0vefilBeI(Os)SfotounDdrive :Move ESC:Reset :Power Off Total size : 0 Free size : 0 3. Select Floppy A and press . The monitor will display the update process...

Manual
Page 65
... you use two hard drives with identical model and capacity). Before you do not want to create RAID array on the motherboard. Then connect the power connector from your computer. If you begin Please prepare: • At least two SATA hard drives (to available SATA port on the SATA controller. - 65 - Configure SATA controller mode in RAID BIOS. (Note) D. Configure a RAID array in BIOS Setup. B. Make a floppy disk containing the SATA RAID/AHCI driver for Windows XP. (Note) E. Chapter 5 Appendix 5-1 Configuring SATA Hard Drive(s) To configure SATA hard drive(s), follow...
... you use two hard drives with identical model and capacity). Before you do not want to create RAID array on the motherboard. Then connect the power connector from your computer. If you begin Please prepare: • At least two SATA hard drives (to available SATA port on the SATA controller. - 65 - Configure SATA controller mode in RAID BIOS. (Note) D. Configure a RAID array in BIOS Setup. B. Make a floppy disk containing the SATA RAID/AHCI driver for Windows XP. (Note) E. Chapter 5 Appendix 5-1 Configuring SATA Hard Drive(s) To configure SATA hard drive(s), follow...
Manual
Page 70
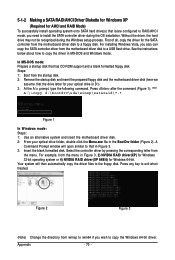
...\*.* Figure 1 In Windows mode: Steps: 1: Use an alternative system and insert the motherboard driver disk. 2: From your optical drive is /are configured to RAID/AHCI mode, you need to copy the Windows 64-bit driver. Select the controller driver by pressing the corresponding letter from the menu in MS-DOS and Windows mode. Press any key to a floppy disk. For installing Windows Vista, you wish to install the SATA controller driver during the Windows setup process. See the instructions below about...
...\*.* Figure 1 In Windows mode: Steps: 1: Use an alternative system and insert the motherboard driver disk. 2: From your optical drive is /are configured to RAID/AHCI mode, you need to copy the Windows 64-bit driver. Select the controller driver by pressing the corresponding letter from the menu in MS-DOS and Windows mode. Press any key to a floppy disk. For installing Windows Vista, you wish to install the SATA controller driver during the Windows setup process. See the instructions below about...
Manual
Page 83
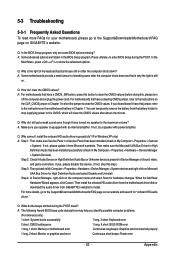
... problems. (For reference only.) 1 short: System boots successfully 1 long, 3 short: Keyboard error 2 short: CMOS setting error 1 long, 9 short: BIOS ROM error 1 long, 1 short: Memory or motherboard error Continuous long beeps: Graphics card not inserted properly 1 long, 2 short: Monitor or graphics card error Continuous short beeps: Power error - 83 - When the Add New Hardware Wizard appears, click Cancel. Q: Why is equipped with power/amplifier. A: For motherboards that have a clearing CMOS jumper, refer to the instructions on . Step 2: Check if Audio Device...
... problems. (For reference only.) 1 short: System boots successfully 1 long, 3 short: Keyboard error 2 short: CMOS setting error 1 long, 9 short: BIOS ROM error 1 long, 1 short: Memory or motherboard error Continuous long beeps: Graphics card not inserted properly 1 long, 2 short: Monitor or graphics card error Continuous short beeps: Power error - 83 - When the Add New Hardware Wizard appears, click Cancel. Q: Why is equipped with power/amplifier. A: For motherboards that have a clearing CMOS jumper, refer to the instructions on . Step 2: Check if Audio Device...


