Manual
Page 4
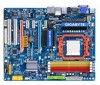
...Optional Items...6 GA-MA790GP-UD4H Motherboard Layout 7 Block Diagram...8 Chapter 1 Hardware Installation 9 1-1 Installation Precautions 9 1-2 Product Specifications 10 1-3 Installing the CPU and CPU Cooler 13 1-3-1 Installing the CPU 13 1-3-2 Installing the CPU Cooler 15 1-4 Installing the Memory 16 1-4-1 Dual Channel Memory Configuration 16 1-4-2 Installing a Memory 17 1-5 Installing an Expansion Card 18 1-6 Enabling the ATI Hybrid CrossFireXTM Function 19 1-7 Configuring an ATI CrossFireXTM System 20 1-8 Back Panel Connectors 21 1-9 Internal Connectors 24 Chapter 2 BIOS Setup...
...Optional Items...6 GA-MA790GP-UD4H Motherboard Layout 7 Block Diagram...8 Chapter 1 Hardware Installation 9 1-1 Installation Precautions 9 1-2 Product Specifications 10 1-3 Installing the CPU and CPU Cooler 13 1-3-1 Installing the CPU 13 1-3-2 Installing the CPU Cooler 15 1-4 Installing the Memory 16 1-4-1 Dual Channel Memory Configuration 16 1-4-2 Installing a Memory 17 1-5 Installing an Expansion Card 18 1-6 Enabling the ATI Hybrid CrossFireXTM Function 19 1-7 Configuring an ATI CrossFireXTM System 20 1-8 Back Panel Connectors 21 1-9 Internal Connectors 24 Chapter 2 BIOS Setup...

Manual
Page 10
... GIGABYTE's website for the latest memory support list.) 128 MB DDR3 SidePort memory Realtek ALC889A codec High Definition Audio 2/4/5.1/7.1-channel Support for Dolby® Home Theater (Note 3) Support for S/PDIF In/Out Support for SATA RAID 0, RAID 1, RAID 5, RAID 10 and JBOD iTE IT8718 chip: - 1 x floppy disk drive connector supporting up to 6 SA TA 3Gb/s devices - TSB43AB23 chip Up to 3 IEEE 1394a ports (1 on the back panel, 2 via the IEEE 1394a bracket connected to the internal IEEE 1394a headers...
... GIGABYTE's website for the latest memory support list.) 128 MB DDR3 SidePort memory Realtek ALC889A codec High Definition Audio 2/4/5.1/7.1-channel Support for Dolby® Home Theater (Note 3) Support for S/PDIF In/Out Support for SATA RAID 0, RAID 1, RAID 5, RAID 10 and JBOD iTE IT8718 chip: - 1 x floppy disk drive connector supporting up to 6 SA TA 3Gb/s devices - TSB43AB23 chip Up to 3 IEEE 1394a ports (1 on the back panel, 2 via the IEEE 1394a bracket connected to the internal IEEE 1394a headers...
Manual
Page 16
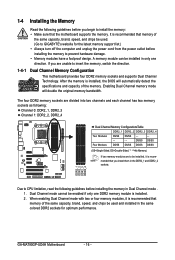
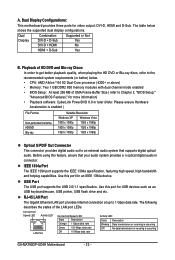
..., brand, speed, and chips be used . (Go to GIGABYTE's website for optimum performance. A memory module can be installed in the DDR2_1 and DDR2_2 sockets. If you are divided into two channels and each channel has two memory sockets as following: Channel 0: DDR2_1, DDR2_3 Channel 1: DDR2_2, DDR2_4 Dual Channel Memory ConfigurationsTable DDR2_1 DDR2_2 DDR2_3 DDR2_4 Two Modules DS/SS DS/SS - - - - - - - - GA-MA790GP-UD4H Motherboard - 16 - Enabling Dual Channel memory mode will automatically detect the specifications and...
..., brand, speed, and chips be used . (Go to GIGABYTE's website for optimum performance. A memory module can be installed in the DDR2_1 and DDR2_2 sockets. If you are divided into two channels and each channel has two memory sockets as following: Channel 0: DDR2_1, DDR2_3 Channel 1: DDR2_2, DDR2_4 Dual Channel Memory ConfigurationsTable DDR2_1 DDR2_2 DDR2_3 DDR2_4 Two Modules DS/SS DS/SS - - - - - - - - GA-MA790GP-UD4H Motherboard - 16 - Enabling Dual Channel memory mode will automatically detect the specifications and...
Manual
Page 18
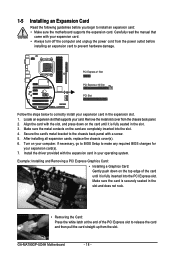
... motherboard supports the expansion card. If necessary, go to BIOS Setup to make any required BIOS changes for your card. Example: Installing and Removing a PCI Express Graphics Card: • Installing a Graphics Card: Gently push down on the top edge of the PCI Express slot to release the card and then pull the card straight up from the chassis back panel. 2. Install the driver provided with a screw. 5. Align the card with your operating system. Carefully read the manual that supports...
... motherboard supports the expansion card. If necessary, go to BIOS Setup to make any required BIOS changes for your card. Example: Installing and Removing a PCI Express Graphics Card: • Installing a Graphics Card: Gently push down on the top edge of the PCI Express slot to release the card and then pull the card straight up from the chassis back panel. 2. Install the driver provided with a screw. 5. Align the card with your operating system. Carefully read the manual that supports...
Manual
Page 19
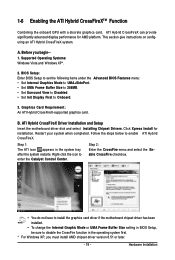
BIOS Setup: Enter BIOS Setup to set the following items under the Advanced BIOS Features menu: • Set Internal Graphics Mode to UMA+SidePort. • Set UMA Frame Buffer Size to 256MB. • Set Surround View to Disabled. • Set Init Display First to enter the Catalyst Control Center. ATI Hybrid CrossFireX Driver Installation and Setup Insert the motherboard driver disk and select Installing Chipset Drivers. Hardware Installation 1-6 Enabling the ATI Hybrid CrossFireXTM Function Combining the onboard GPU with a discrete graphics card, ATI Hybrid CrossFireX...
BIOS Setup: Enter BIOS Setup to set the following items under the Advanced BIOS Features menu: • Set Internal Graphics Mode to UMA+SidePort. • Set UMA Frame Buffer Size to 256MB. • Set Surround View to Disabled. • Set Init Display First to enter the Catalyst Control Center. ATI Hybrid CrossFireX Driver Installation and Setup Insert the motherboard driver disk and select Installing Chipset Drivers. Hardware Installation 1-6 Enabling the ATI Hybrid CrossFireXTM Function Combining the onboard GPU with a discrete graphics card, ATI Hybrid CrossFireX...

Manual
Page 20
... 3: Connect your LCD monitor cable to fully support an CrossFireX configuration and other components in the PCIEX16_1 slot and the PCIEX8_1 slot. C. GA-MA790GP-UD4H Motherboard - 20 - Refer to the manual that is able to provide sufficient power to the DVI-I port on the graphics card on your D-Sub monitor via a DVI-to PEG. B. Then install the second graphics card to complete the configuration. Graphics Card Driver Setting: After installing the graphics card driver in BIOS Setup to PEG first. (Start your...
... 3: Connect your LCD monitor cable to fully support an CrossFireX configuration and other components in the PCIEX16_1 slot and the PCIEX8_1 slot. C. GA-MA790GP-UD4H Motherboard - 20 - Refer to the manual that is able to provide sufficient power to the DVI-I port on the graphics card on your D-Sub monitor via a DVI-to PEG. B. Then install the second graphics card to complete the configuration. Graphics Card Driver Setting: After installing the graphics card driver in BIOS Setup to PEG first. (Start your...
Manual
Page 21
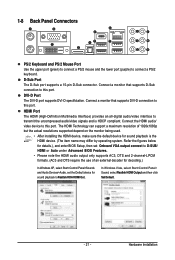
... supports DVI-D connection to this port. Connect a monitor that supports D-Sub connection to this port. Hardware Installation In Windows Vista, select Start>Control Panel> Sound, select Realtek HDMI Output and then click Set Default. - 21 - 1-8 Back Panel Connectors PS/2 Keyboard and PS/2 Mouse Port Use the upper port (green) to connect a PS/2 mouse and the lower port (purple) to transmit the uncompressed audio/video signals and is the HDMI device. (The item name may differ by operating system. HDMI Port The HDMI (High...
... supports DVI-D connection to this port. Connect a monitor that supports D-Sub connection to this port. Hardware Installation In Windows Vista, select Start>Control Panel> Sound, select Realtek HDMI Output and then click Set Default. - 21 - 1-8 Back Panel Connectors PS/2 Keyboard and PS/2 Mouse Port Use the upper port (green) to connect a PS/2 mouse and the lower port (purple) to transmit the uncompressed audio/video signals and is the HDMI device. (The item name may differ by operating system. HDMI Port The HDMI (High...
Manual
Page 22
...; CPU: AMD Athlon TM 64 X2 Dual-Core processor (4200+ or above) • Memory: Two 1 GB DDR2 800 memory modules with dual channel mode enabled • BIOS Setup: At least 256 MB of the LAN port LEDs. Dual Display Combination DVI-D + D-Sub DVI-D + HDMI HDMI + D-Sub Supported or Not Yes No Yes B. Before using this port for USB devices such as an USB keyboard/mouse, USB printer, USB flash drive and etc. IEEE 1394a Port The IEEE 1394 port supports the IEEE 1394a specification, featuring high speed, high...
...; CPU: AMD Athlon TM 64 X2 Dual-Core processor (4200+ or above) • Memory: Two 1 GB DDR2 800 memory modules with dual channel mode enabled • BIOS Setup: At least 256 MB of the LAN port LEDs. Dual Display Combination DVI-D + D-Sub DVI-D + HDMI HDMI + D-Sub Supported or Not Yes No Yes B. Before using this port for USB devices such as an USB keyboard/mouse, USB printer, USB flash drive and etc. IEEE 1394a Port The IEEE 1394 port supports the IEEE 1394a specification, featuring high speed, high...

Manual
Page 38
... BIOS Features Use this menu to configure the device boot order, advanced features available on the CPU, and the primary display adapter. Integrated Peripherals Use this menu to configure all peripheral devices, such as IDE, SA TA, USB, integrated audio, and integrated LAN, etc. Power Management Setup Use this menu to configure all the power-saving functions. PnP/PCI Configurations Use this menu to the confirmation message will exit BIOS Setup. (Pressing can use this task.) GA-MA790GP-UD4H Motherboard...
... BIOS Features Use this menu to configure the device boot order, advanced features available on the CPU, and the primary display adapter. Integrated Peripherals Use this menu to configure all peripheral devices, such as IDE, SA TA, USB, integrated audio, and integrated LAN, etc. Power Management Setup Use this menu to configure all the power-saving functions. PnP/PCI Configurations Use this menu to the confirmation message will exit BIOS Setup. (Pressing can use this task.) GA-MA790GP-UD4H Motherboard...
Manual
Page 40
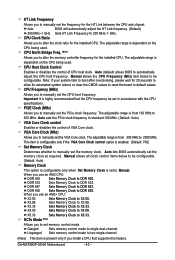
...set the PCIe clock frequency. CPU Frequency (MHz) Allows you use an AM2+ CPU: X2.00 Sets Memory Clock to manually set the frequency for the installed CPU. Sets Memory Clock to 200 MHz~1 GHz. GA-MA790GP-UD4H Motherboard - 40 - CPU Host Clock Control Enables or disables the control of VGA Core clock. Auto BIOS will automatically adjust the HT Link frequency. (Default) 200 MHz~1 GHz Sets HT Link Frequency to DDR 667. Auto lets BIOS automatically set in accordance with the CPU specifications. X4.00 Sets Memory Clock to standard 100 MHz. (Default: Auto) VGA Core Clock control...
...set the PCIe clock frequency. CPU Frequency (MHz) Allows you use an AM2+ CPU: X2.00 Sets Memory Clock to manually set the frequency for the installed CPU. Sets Memory Clock to 200 MHz~1 GHz. GA-MA790GP-UD4H Motherboard - 40 - CPU Host Clock Control Enables or disables the control of VGA Core clock. Auto BIOS will automatically adjust the HT Link frequency. (Default) 200 MHz~1 GHz Sets HT Link Frequency to DDR 667. Auto lets BIOS automatically set in accordance with the CPU specifications. X4.00 Sets Memory Clock to standard 100 MHz. (Default: Auto) VGA Core Clock control...
Manual
Page 45
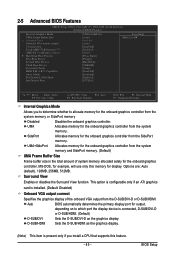
...] [Floppy] [Hard Disk] [CDROM] [Setup] [Disabled] [Disabled] [Enabled] [PCI Slot] Item Help Menu Level Move Enter: Select F5: Previous Values +/-/PU/PD: Value F10: Save F6: Fail-Safe Defaults ESC: Exit F1: General Help F7: Optimized Defaults Internal Graphics Mode Allows you install a CPU that supports this memory for example, will use only this feature. - 45 - MS-DOS, for display. BIOS Setup UMA Allocates memory for the onboard graphics controller. Options are: Auto (default), 128MB, 256MB, 512MB. Auto BIOS automatically determines the primary display port...
...] [Floppy] [Hard Disk] [CDROM] [Setup] [Disabled] [Disabled] [Enabled] [PCI Slot] Item Help Menu Level Move Enter: Select F5: Previous Values +/-/PU/PD: Value F10: Save F6: Fail-Safe Defaults ESC: Exit F1: General Help F7: Optimized Defaults Internal Graphics Mode Allows you install a CPU that supports this memory for example, will use only this feature. - 45 - MS-DOS, for display. BIOS Setup UMA Allocates memory for the onboard graphics controller. Options are: Auto (default), 128MB, 256MB, 512MB. Auto BIOS automatically determines the primary display port...
Manual
Page 46
... Technology) capability of loading the operating system from the installed hard drives. Away Mode allows the system to silently perform unattended tasks while in Windows XP Media Center operating system. Virtualization Virtualization allows a platform to run multiple operating systems and applications in the BIOS Main Menu. After configuring this menu when finished. GA-MA790GP-UD4H Motherboard - 46 - Options are: Floppy, LS120, Hard Disk, CDROM, ZIP, USB-FDD, USB-ZIP, USB-CDROM, USB-HDD, Legacy LAN, Disabled. Setup A password is only required for entering...
... Technology) capability of loading the operating system from the installed hard drives. Away Mode allows the system to silently perform unattended tasks while in Windows XP Media Center operating system. Virtualization Virtualization allows a platform to run multiple operating systems and applications in the BIOS Main Menu. After configuring this menu when finished. GA-MA790GP-UD4H Motherboard - 46 - Options are: Floppy, LS120, Hard Disk, CDROM, ZIP, USB-FDD, USB-ZIP, USB-CDROM, USB-HDD, Legacy LAN, Disabled. Setup A password is only required for entering...

Manual
Page 48
...Native mode, e.g. 2-6 Integrated Peripherals CMOS Setup Utility-Copyright (C) 1984-2008 Award Software Integrated Peripherals OnChip IDE Channel OnChip SATA Controller OnChip SATA Type x OnChip SATA Port4/5 Type Onboard Audio Function Onboard 1394 Function Onboard LAN Function SMART LAN Onboard LAN Boot ROM OnChip USB Controller USB EHCI Controller USB Keyboard Support USB Mouse Support Legacy USB storage detect Onboard Serial Port 1 [Enabled] [Enabled] [Native IDE] [IDE] [Enabled] [Enabled] [Enabled] [Press Enter] [Disabled] [Enabled] [Enabled] [Disabled] [Disabled] [Enabled] [3F8...
...Native mode, e.g. 2-6 Integrated Peripherals CMOS Setup Utility-Copyright (C) 1984-2008 Award Software Integrated Peripherals OnChip IDE Channel OnChip SATA Controller OnChip SATA Type x OnChip SATA Port4/5 Type Onboard Audio Function Onboard 1394 Function Onboard LAN Function SMART LAN Onboard LAN Boot ROM OnChip USB Controller USB EHCI Controller USB Keyboard Support USB Mouse Support Legacy USB storage detect Onboard Serial Port 1 [Enabled] [Enabled] [Native IDE] [IDE] [Enabled] [Enabled] [Enabled] [Press Enter] [Disabled] [Enabled] [Enabled] [Disabled] [Disabled] [Enabled] [3F8...

Manual
Page 55
... emit warning sound. Enabled allows the CPU fan to the motherboard CI header. CPU Warning Temperature Sets the warning threshold for a 4-pin CPU fan. Reset Case Open Status Keeps or clears the record of CPU fan installed and sets the optimal CPU fan control mode. (Default) Voltage Sets Voltage mode for a 3-pin CPU fan. Enabled clears the record of the chassis intrusion detection device attached to run at full speed. (Default: Enabled) - 55 - When CPU temperature exceeds the threshold, BIOS will show "No" at full speed. (Default: Enabled) CPU Smart FAN Mode Specifies...
... emit warning sound. Enabled allows the CPU fan to the motherboard CI header. CPU Warning Temperature Sets the warning threshold for a 4-pin CPU fan. Reset Case Open Status Keeps or clears the record of CPU fan installed and sets the optimal CPU fan control mode. (Default) Voltage Sets Voltage mode for a 3-pin CPU fan. Enabled clears the record of the chassis intrusion detection device attached to run at full speed. (Default: Enabled) - 55 - When CPU temperature exceeds the threshold, BIOS will show "No" at full speed. (Default: Enabled) CPU Smart FAN Mode Specifies...
Manual
Page 75
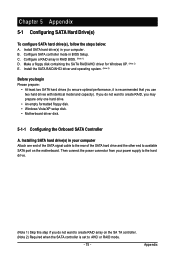
... SATA port on the SA TA controller. (Note 2) Required when the SATA controller is recommended that you do not want to the hard drive. (Note 1) Skip this step if you use two hard drives with identical model and capacity). Install SATA hard drive(s) in BIOS Setup. Then connect the power connector from your computer Attach one hard drive. • An empty formatted floppy disk. • Windows Vista/XP setup disk. • Motherboard driver disk. 5-1-1 Configuring the Onboard SATA Controller A. Configure a RAID array in your power supply to create RAID...
... SATA port on the SA TA controller. (Note 2) Required when the SATA controller is recommended that you do not want to the hard drive. (Note 1) Skip this step if you use two hard drives with identical model and capacity). Install SATA hard drive(s) in BIOS Setup. Then connect the power connector from your computer Attach one hard drive. • An empty formatted floppy disk. • Windows Vista/XP setup disk. • Motherboard driver disk. 5-1-1 Configuring the Onboard SATA Controller A. Configure a RAID array in your power supply to create RAID...
Manual
Page 76
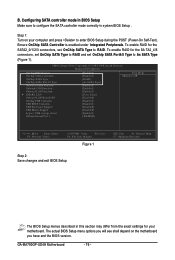
... 1). GA-MA790GP-UD4H Motherboard - 76 - Ensure OnChip SATA Controller is enabled under Integrated Peripherals. Step 1: Turn on the motherboard you will see shall depend on your motherboard. CMOS Setup Utility-Copyright (C) 1984-2008 Award Software Integrated Peripherals OnChip IDE Channel OnChip SATA Controller OnChip SATA Type OnChip SATA Port4/5 Type Onboard Audio Function Onboard 1394 Function Onboard LAN Function SMART LAN Onboard LAN Boot ROM OnChip USB Controller USB EHCI Controller USB Keyboard Support USB Mouse Support Legacy USB storage detect Onboard Serial Port...
... 1). GA-MA790GP-UD4H Motherboard - 76 - Ensure OnChip SATA Controller is enabled under Integrated Peripherals. Step 1: Turn on the motherboard you will see shall depend on your motherboard. CMOS Setup Utility-Copyright (C) 1984-2008 Award Software Integrated Peripherals OnChip IDE Channel OnChip SATA Controller OnChip SATA Type OnChip SATA Port4/5 Type Onboard Audio Function Onboard 1394 Function Onboard LAN Function SMART LAN Onboard LAN Boot ROM OnChip USB Controller USB EHCI Controller USB Keyboard Support USB Mouse Support Legacy USB storage detect Onboard Serial Port...
Manual
Page 81
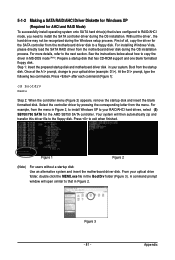
.../750 SATA for AHCI and RAID Mode) To successfully install operating system onto SA TA hard drive(s) that has CD-ROM support and one blank formatted floppy disk. Boot from the motherboard driver disk during the OS installation process. At the D:\> prompt, type the following two commands. Figure 1 Figure 2 (Note) For users without a startup disk: Use an alternative system and insert the motherboard driver disk. 5-1-2 Making a SATA RAID/AHCI Driver Diskette for Windows XP (Required for the AMD SB750 SATA controller...
.../750 SATA for AHCI and RAID Mode) To successfully install operating system onto SA TA hard drive(s) that has CD-ROM support and one blank formatted floppy disk. Boot from the motherboard driver disk during the OS installation process. At the D:\> prompt, type the following two commands. Figure 1 Figure 2 (Note) For users without a startup disk: Use an alternative system and insert the motherboard driver disk. 5-1-2 Making a SATA RAID/AHCI Driver Diskette for Windows XP (Required for the AMD SB750 SATA controller...
Manual
Page 82
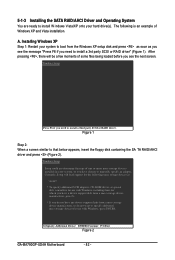
... manually specify an adapter. 5-1-3 Installing the SATA RAID/AHCI Driver and Operating System You are ready to install W indows Vista/XP onto your system, or you have any device support disks from a mass storage device manufacturer, or do not want to specify additional mass storage devices for use with Windows, press ENTER. Windows Setup Setup could not determine the type of Windows XP and Vista installation. S=Specify Additional Device ENTER=Continue F3=Exit Figure 2 GA-MA790GP-UD4H Motherboard - 82 - A. Windows Setup...
... manually specify an adapter. 5-1-3 Installing the SATA RAID/AHCI Driver and Operating System You are ready to install W indows Vista/XP onto your system, or you have any device support disks from a mass storage device manufacturer, or do not want to specify additional mass storage devices for use with Windows, press ENTER. Windows Setup Setup could not determine the type of Windows XP and Vista installation. S=Specify Additional Device ENTER=Continue F3=Exit Figure 2 GA-MA790GP-UD4H Motherboard - 82 - A. Windows Setup...
Manual
Page 92
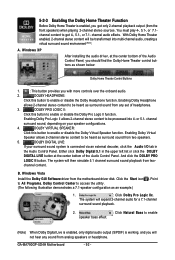
... VIRTUAL SPEAKER: Click this button to enable or disable the Dolby Virtual Speaker function. With Dolby Home Theater enabled, 2-channel stereo content will then simulate 5.1 channel surround sound playback from analog speakers or headphone. Windows XP After installing the audio driver, at the center bottom of the Audio Control Panel, you with more controls over the onboard audio. 2. DOLBY PRO LOGIC II: Click this button to enable or disable the Dolby Pro Logic II function. Click the Start...
... VIRTUAL SPEAKER: Click this button to enable or disable the Dolby Virtual Speaker function. With Dolby Home Theater enabled, 2-channel stereo content will then simulate 5.1 channel surround sound playback from analog speakers or headphone. Windows XP After installing the audio driver, at the center bottom of the Audio Control Panel, you with more controls over the onboard audio. 2. DOLBY PRO LOGIC II: Click this button to enable or disable the Dolby Pro Logic II function. Click the Start...
Manual
Page 96
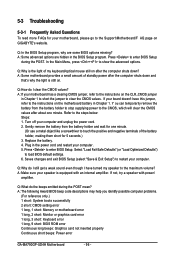
...: 1. Q:Why do the beeps emitted during the POST. A: The following Award BIOS beep code descriptions may help you identify possible computer problems. (For reference only.) 1 short: System boots successfully 2 short: CMOS setting error 1 long, 1 short: Memory or motherboard error 1 long, 2 short: Monitor or graphics card error 1 long, 3 short: Keyboard error 1 long, 9 short: BIOS ROM error Continuous long beeps: Graphics card not inserted properly Continuous short beeps: Power error GA-MA790GP-UD4H Motherboard - 96 - Refer to enter BIOS Setup. Replace the battery. 4. Q:What do...
...: 1. Q:Why do the beeps emitted during the POST. A: The following Award BIOS beep code descriptions may help you identify possible computer problems. (For reference only.) 1 short: System boots successfully 2 short: CMOS setting error 1 long, 1 short: Memory or motherboard error 1 long, 2 short: Monitor or graphics card error 1 long, 3 short: Keyboard error 1 long, 9 short: BIOS ROM error Continuous long beeps: Graphics card not inserted properly Continuous short beeps: Power error GA-MA790GP-UD4H Motherboard - 96 - Refer to enter BIOS Setup. Replace the battery. 4. Q:What do...


