Manual
Page 3
... information, carefully read or download the information on/from the Support\Motherboard\Technology Guide page on your motherboard revision before updating motherboard BIOS, drivers, or when looking for technical information. Check your motherboard looks like this manual are legally registered to use of this product, GIGABYTE provides the following types of documentations: „ For quick set...
... information, carefully read or download the information on/from the Support\Motherboard\Technology Guide page on your motherboard revision before updating motherboard BIOS, drivers, or when looking for technical information. Check your motherboard looks like this manual are legally registered to use of this product, GIGABYTE provides the following types of documentations: „ For quick set...
Manual
Page 6
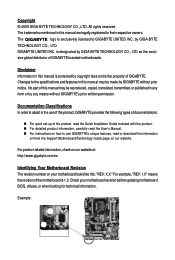
Box Contents GA-P31-S3G motherboard Motherboard driver disk User's Manual Quick Installation Guide One IDE cable and one floppy disk drive cable Two SATA 3Gb/s cables I/O Shield • The box contents above are subject to change without notice. • The motherboard image is for reference only and the actual items shall depend on product package you obtain. Optional Items 2-port USB 2.0 bracket (Part No. 12CR1-1UB030-51R) 2-port SATA power cable (Part No. 12CF1-2SERPW-01R) S/PDIF out cable (Part No. 12CR1-1SPOUT-02R) - 6 - The box contents are for reference only.
Box Contents GA-P31-S3G motherboard Motherboard driver disk User's Manual Quick Installation Guide One IDE cable and one floppy disk drive cable Two SATA 3Gb/s cables I/O Shield • The box contents above are subject to change without notice. • The motherboard image is for reference only and the actual items shall depend on product package you obtain. Optional Items 2-port USB 2.0 bracket (Part No. 12CR1-1UB030-51R) 2-port SATA power cable (Part No. 12CF1-2SERPW-01R) S/PDIF out cable (Part No. 12CR1-1SPOUT-02R) - 6 - The box contents are for reference only.

Manual
Page 18
...BIOS Setup to make any required BIOS changes for your expansion card in the slot. 3. GA-P31-S3G Motherboard - 18 - PCI Express x1 Slot PCI Express x16 Slot PCI Slot Follow the steps...the top edge of the card until it is fully seated in the expansion slot. 1. Install the driver provided with a screw. 5. Align the card with your operating system. Make sure the metal contacts on... damage. Secure the card's metal bracket to install an expansion card: • Make sure the motherboard supports the expansion card. Turn on the slot and then lift the card straight out from the chassis...
...BIOS Setup to make any required BIOS changes for your expansion card in the slot. 3. GA-P31-S3G Motherboard - 18 - PCI Express x1 Slot PCI Express x16 Slot PCI Slot Follow the steps...the top edge of the card until it is fully seated in the expansion slot. 1. Install the driver provided with a screw. 5. Align the card with your operating system. Make sure the metal contacts on... damage. Secure the card's metal bracket to install an expansion card: • Make sure the motherboard supports the expansion card. Turn on the slot and then lift the card straight out from the chassis...
Manual
Page 32
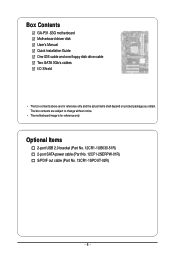
...motherboard driver disk, the key can access Boot Menu again to change the first boot device setting as needed. : Q-Flash Press the key to access the Q-Flash utility directly without entering BIOS Setup. 2-1 Startup Screen The following screens may appear when the computer boots. GA-P31-S3G Motherboard... - 32 - The POST Screen Award Modular BIOS v6.00PG, An Energy Star Ally Copyright (C) 1984-2007, Award Software, Inc. Note: The setting in Boot Menu is effective for P31-S3G E11 . . . . : BIOS Setup...
...motherboard driver disk, the key can access Boot Menu again to change the first boot device setting as needed. : Q-Flash Press the key to access the Q-Flash utility directly without entering BIOS Setup. 2-1 Startup Screen The following screens may appear when the computer boots. GA-P31-S3G Motherboard... - 32 - The POST Screen Award Modular BIOS v6.00PG, An Energy Star Ally Copyright (C) 1984-2007, Award Software, Inc. Note: The setting in Boot Menu is effective for P31-S3G E11 . . . . : BIOS Setup...
Manual
Page 53
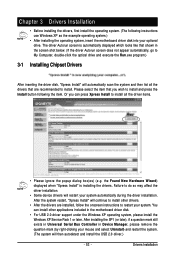
...XP as the example operating system.) • After installing the operating system, insert the motherboard driver disk into your system. After the system restart, "Xpress Install" will then autodetect and install the USB 2.0 driver.) - 53 - After installing the SP1 (or later), if a question mark still exists... in Universal Serial Bus Controller in the motherboard driver disk. • For USB 2.0 driver support under the Windows XP operating system, please install the Windows XP Service Pack 1 or later. the Found New ...
...XP as the example operating system.) • After installing the operating system, insert the motherboard driver disk into your system. After the system restart, "Xpress Install" will then autodetect and install the USB 2.0 driver.) - 53 - After installing the SP1 (or later), if a question mark still exists... in Universal Serial Bus Controller in the motherboard driver disk. • For USB 2.0 driver support under the Windows XP operating system, please install the Windows XP Service Pack 1 or later. the Found New ...

Manual
Page 54
3-2 Software Applications This page displays all the tools and applications that GIGABYTE develops and some free software. GA-P31-S3G Motherboard - 54 - You may press the Install button following an item to install it. 3-3 Driver CD Information This page provides information about the drivers, applications and tools in this driver disk.
3-2 Software Applications This page displays all the tools and applications that GIGABYTE develops and some free software. GA-P31-S3G Motherboard - 54 - You may press the Install button following an item to install it. 3-3 Driver CD Information This page provides information about the drivers, applications and tools in this driver disk.
Manual
Page 55
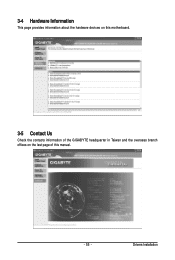
3-4 Hardware Information This page provides information about the hardware devices on this motherboard. 3-5 Contact Us Check the contacts information of the GIGABYTE headquarter in Taiwan and the overseas branch offices on the last page of this manual. - 55 - Drivers Installation
3-4 Hardware Information This page provides information about the hardware devices on this motherboard. 3-5 Contact Us Check the contacts information of the GIGABYTE headquarter in Taiwan and the overseas branch offices on the last page of this manual. - 55 - Drivers Installation
Manual
Page 60
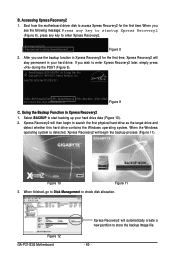
... physical hard drive as the target drive and detect whether this hard drive contains the Windows operating system. Figure 12 GA-P31-S3G Motherboard Xpress Recovery2 will then begin the backup process (Figure 11). B. If you wish to check disk allocation. When ...store the backup image file. - 60 - Boot from the motherboard driver disk to startup XpressRecovery2..... After you see the following message: Press any key to startup Xpress Recovery2 (Figure 8), press any key to access Xpress Recovery2 for P31-S3G E11 . . . . : BIOS Setup/Q-Flash : XpressRecovery2 ...
... physical hard drive as the target drive and detect whether this hard drive contains the Windows operating system. Figure 12 GA-P31-S3G Motherboard Xpress Recovery2 will then begin the backup process (Figure 11). B. If you wish to check disk allocation. When ...store the backup image file. - 60 - Boot from the motherboard driver disk to startup XpressRecovery2..... After you see the following message: Press any key to startup Xpress Recovery2 (Figure 8), press any key to access Xpress Recovery2 for P31-S3G E11 . . . . : BIOS Setup/Q-Flash : XpressRecovery2 ...
Manual
Page 65
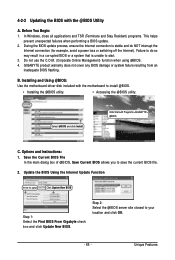
Installing and Using @BIOS: Use the motherboard driver disk included with the @BIOS Utility A. Unique Features In Windows, close all applications and TSR (Terminate and Stay Resident) programs. This helps prevent unexpected failures ... that is unable to your location and click OK. - 65 - Do not use the C.O.M. (Corporate Online Management) function when using @BIOS. 4. Click Start>All Programs>GIGABYTE> @BIOS C. Step 2: Select the @BIOS server site closest to start. 3. Update the BIOS Using the Internet Update Function Select this option Click Update New BIOS...
Installing and Using @BIOS: Use the motherboard driver disk included with the @BIOS Utility A. Unique Features In Windows, close all applications and TSR (Terminate and Stay Resident) programs. This helps prevent unexpected failures ... that is unable to your location and click OK. - 65 - Do not use the C.O.M. (Corporate Online Management) function when using @BIOS. 4. Click Start>All Programs>GIGABYTE> @BIOS C. Step 2: Select the @BIOS server site closest to start. 3. Update the BIOS Using the Internet Update Function Select this option Click Update New BIOS...

Manual
Page 69
... 5 Appendix 5-1 Configuring Audio Input and Output 5-1-1 Configuring 2/4/5.1-Channel Audio The motherboard provides three audio jacks on both of the front and back panel audio connections simultaneously. Before installing the audio driver, make a telephone call over the Internet, and etc. HD Audio features ...1KHz/ 48KHz/ 96KHz sampling rate. Configuring Speakers: (The following for High Definition Audio" has been installed from the motherboard driver disk and your system tray. The picture to be present on the back panel which support 2/4/5.1-channel(Note) audio. all at...
... 5 Appendix 5-1 Configuring Audio Input and Output 5-1-1 Configuring 2/4/5.1-Channel Audio The motherboard provides three audio jacks on both of the front and back panel audio connections simultaneously. Before installing the audio driver, make a telephone call over the Internet, and etc. HD Audio features ...1KHz/ 48KHz/ 96KHz sampling rate. Configuring Speakers: (The following for High Definition Audio" has been installed from the motherboard driver disk and your system tray. The picture to be present on the back panel which support 2/4/5.1-channel(Note) audio. all at...
Manual
Page 74
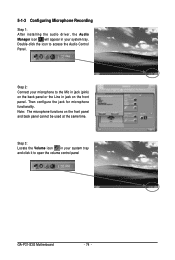
... panel cannot be used at the same time. 5-1-3 Configuring Microphone Recording Step 1: After installing the audio driver, the Audio Manager icon will appear in your system tray and click it to open the volume control panel GA-P31-S3G Motherboard - 74 - Step 3: Locate the Volume icon in your system tray. Note: The microphone functions on...
... panel cannot be used at the same time. 5-1-3 Configuring Microphone Recording Step 1: After installing the audio driver, the Audio Manager icon will appear in your system tray and click it to open the volume control panel GA-P31-S3G Motherboard - 74 - Step 3: Locate the Volume icon in your system tray. Note: The microphone functions on...


