
User Manual
Page 2
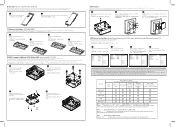
...;部。 2 Attach the VESA mounting plate to the rear of presence. 備考3 Note 3:The "--" indicates that secure the bottom panel and remove the bottom panel. 4 3 Install the HDD using the screws provided and connect the SATA cable to the HDD. SATA 4 Connect the SATA cable to Save and Exit. 按啟 F4 BIOS Note: 'USB Power On' functionality in the left corner M.2 SSD。 VESA...
...;部。 2 Attach the VESA mounting plate to the rear of presence. 備考3 Note 3:The "--" indicates that secure the bottom panel and remove the bottom panel. 4 3 Install the HDD using the screws provided and connect the SATA cable to the HDD. SATA 4 Connect the SATA cable to Save and Exit. 按啟 F4 BIOS Note: 'USB Power On' functionality in the left corner M.2 SSD。 VESA...

Datasheet
Page 1
... 64bit System Environment Operating Temperature: 0°C to +50°C (Core i3), +35°C (Core i5/i7) System Storage Temperature: -20°C to 50 degree (i3 model) VESA mounting bracket (75 x 75mm + 100 x 100mm) Connecting the Future Headphone / Mic 1 x USB 3.2 Gen2 with Type-CTM Support 3 x USB 3.2 Gen2 Power Button 2 x USB 3.2 Gen2 SPEC Dimension Motherboard Size CPU Memory LAN Graphic Audio HDMI Resolution MAX Expansion Slots Front I/O Rear I/O Side I/O Power Supply VESA Support OS Environment...
... 64bit System Environment Operating Temperature: 0°C to +50°C (Core i3), +35°C (Core i5/i7) System Storage Temperature: -20°C to 50 degree (i3 model) VESA mounting bracket (75 x 75mm + 100 x 100mm) Connecting the Future Headphone / Mic 1 x USB 3.2 Gen2 with Type-CTM Support 3 x USB 3.2 Gen2 Power Button 2 x USB 3.2 Gen2 SPEC Dimension Motherboard Size CPU Memory LAN Graphic Audio HDMI Resolution MAX Expansion Slots Front I/O Rear I/O Side I/O Power Supply VESA Support OS Environment...
