

User Manual
Page 2
... part. (Please refer to the transportation of liquids other than GIGABYTE™ Liquid Coolant is not covered by the warranty 1. The product's warranty label has been removed or damaged. 8. Use only GIGABYTE™ Liquid Coolant. Malfunction due to interference from other objects ...due to other devices. 4. Consequential damage to the product's fault. 6. Use the product incorrectly or in damage to the system arising from...
... part. (Please refer to the transportation of liquids other than GIGABYTE™ Liquid Coolant is not covered by the warranty 1. The product's warranty label has been removed or damaged. 8. Use only GIGABYTE™ Liquid Coolant. Malfunction due to interference from other objects ...due to other devices. 4. Consequential damage to the product's fault. 6. Use the product incorrectly or in damage to the system arising from...

User Manual
Page 7
... component of CPU (Mosfet). 10.GIGABYTE™ excusive 4-way splitter valve design for faster replacement and add new cooling equipment. 11.PCI Rear Fan Speed Controller 12.Free heat sink for memory 13.Wide range use for AMD K8/AM2;Intel®... refilling coolant. 6.Well-executed liquid cooling radiator fits most existed PC chassis. 7.Multipurpose nanometer GIGABYTE™ coolant. 8.1/2inch UV soft tube; English 5.Delicate sparkly blue LED light design tank; Tool needed: scissors, GIGABYTE™ coolant, grease, screwdriver. 4-2 Intel® Pentium® 4 LGA775 Back Plate Installation...
... component of CPU (Mosfet). 10.GIGABYTE™ excusive 4-way splitter valve design for faster replacement and add new cooling equipment. 11.PCI Rear Fan Speed Controller 12.Free heat sink for memory 13.Wide range use for AMD K8/AM2;Intel®... refilling coolant. 6.Well-executed liquid cooling radiator fits most existed PC chassis. 7.Multipurpose nanometer GIGABYTE™ coolant. 8.1/2inch UV soft tube; English 5.Delicate sparkly blue LED light design tank; Tool needed: scissors, GIGABYTE™ coolant, grease, screwdriver. 4-2 Intel® Pentium® 4 LGA775 Back Plate Installation...
User Manual
Page 9
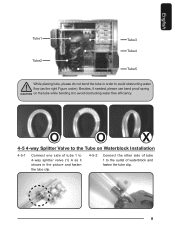
Besides, if needed, please use bend proof spring on Waterblock Installation 4-5-1 Connect one side of waterblock and fasten the tube clip. 9 English Tube1 Tube2 Tube3 Tube4 Tube5 While placing tube, please do not bend the tube in the picture and fasten the tube clip. 4-5-2 Connect the other side of tube 1 to the outlet of tube 1 to 4-way splitter valve (1) A as the right Figure under). O O X 4-5 4-way Splitter Valve to the Tube on the tube while bending it to avoid obstructing water flow (as it shows in order to avoid obstructing water flow efficiency.
Besides, if needed, please use bend proof spring on Waterblock Installation 4-5-1 Connect one side of waterblock and fasten the tube clip. 9 English Tube1 Tube2 Tube3 Tube4 Tube5 While placing tube, please do not bend the tube in the picture and fasten the tube clip. 4-5-2 Connect the other side of tube 1 to the outlet of tube 1 to 4-way splitter valve (1) A as the right Figure under). O O X 4-5 4-way Splitter Valve to the Tube on the tube while bending it to avoid obstructing water flow (as it shows in order to avoid obstructing water flow efficiency.

User Manual
Page 10
... shows in the figure and fasten the tube clip. 4-5-4 Connect the other liquid cooling system. Figure a Figure b Figure c For GIGABYTE™ 3D Aurora, Triton or Poseidon series user, the tube can be used to support VGA, chipset liquid cooling system or other side of tube 2 to the inlet of 4-way splitter valve...
... shows in the figure and fasten the tube clip. 4-5-4 Connect the other liquid cooling system. Figure a Figure b Figure c For GIGABYTE™ 3D Aurora, Triton or Poseidon series user, the tube can be used to support VGA, chipset liquid cooling system or other side of tube 2 to the inlet of 4-way splitter valve...

User Manual
Page 14
English 4 -13 4-13-1 Fasten 4-way Splitter Valve Using the nylon tie to fasten 4-way splitter valve on trestle of MOSFET air cooling fan into fan 1 to the socket on waterblock. 4-14-2 Plug the ...
English 4 -13 4-13-1 Fasten 4-way Splitter Valve Using the nylon tie to fasten 4-way splitter valve on trestle of MOSFET air cooling fan into fan 1 to the socket on waterblock. 4-14-2 Plug the ...
User Manual
Page 18
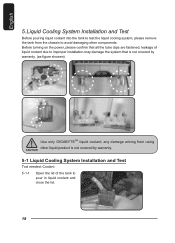
...Liquid Cooling System Installation and Test Before pouring liquid coolant into the tank to test the liquid cooling system, please remove the tank from using other components. any damage arising from the chassis to avoid damaging other liquid product is not covered by warranty. 5-1 Liquid Cooling System ... and close the lid. 18 Before turning on the power, please confirm that is not covered by warranty. (as figure showen) Use only GIGABYTE™ liquid coolant; leakage of the tank to improper installation may damage the system that all the tube clips are fastened;
...Liquid Cooling System Installation and Test Before pouring liquid coolant into the tank to test the liquid cooling system, please remove the tank from using other components. any damage arising from the chassis to avoid damaging other liquid product is not covered by warranty. 5-1 Liquid Cooling System ... and close the lid. 18 Before turning on the power, please confirm that is not covered by warranty. (as figure showen) Use only GIGABYTE™ liquid coolant; leakage of the tank to improper installation may damage the system that all the tube clips are fastened;

User Manual
Page 20
... from any electronic part. 6-1-1 Remove radiator from the rear of the chassis. [use 2 screws (b), please refer to accessories list] Velcro could be used to place the tank while using the chassis other than 3D Aurora, Triton and Poseidon series. 6. With GIGABYTE™ 3D Aurora, Triton, Poseidon series, water tank can be placed inside of...
... from any electronic part. 6-1-1 Remove radiator from the rear of the chassis. [use 2 screws (b), please refer to accessories list] Velcro could be used to place the tank while using the chassis other than 3D Aurora, Triton and Poseidon series. 6. With GIGABYTE™ 3D Aurora, Triton, Poseidon series, water tank can be placed inside of...

User Manual
Page 21
...; English 6-1-3 Release the clip of waterblock from CPU. (Caution: Do not remove the tube at this point) 6-1-4 Cut and remove the nylon tie which is used to fill the coming out coolant. 6-1-6 Release the tube clip on the inlet of the waterblock; Remove the tube, tube clip and spring. 21
...; English 6-1-3 Release the clip of waterblock from CPU. (Caution: Do not remove the tube at this point) 6-1-4 Cut and remove the nylon tie which is used to fill the coming out coolant. 6-1-6 Release the tube clip on the inlet of the waterblock; Remove the tube, tube clip and spring. 21
