
Manual
Page 1
... properties of this manual may be authorized by U.S. GV-R485ZL-512H/ GV-R485MC-1GH/ GV-R485OC-1GH/ GV-R485SO-1GH ATI RadeonTM HD 4850 Graphics Accelerator User's Manual Rev. 102 12MM-R4850S-102R Copyright © 2009 GIGABYTE TECHNOLOGY CO., LTD Copyright by Rovi Corporation. Macrovision corporation product notice: This product incorporates copyright protection technology that may void the warranty of GBT. patents and other limited viewing uses only unless otherwise authorized by GIGA-BYTE TECHNOLOGY...
... properties of this manual may be authorized by U.S. GV-R485ZL-512H/ GV-R485MC-1GH/ GV-R485OC-1GH/ GV-R485SO-1GH ATI RadeonTM HD 4850 Graphics Accelerator User's Manual Rev. 102 12MM-R4850S-102R Copyright © 2009 GIGABYTE TECHNOLOGY CO., LTD Copyright by Rovi Corporation. Macrovision corporation product notice: This product incorporates copyright protection technology that may void the warranty of GBT. patents and other limited viewing uses only unless otherwise authorized by GIGA-BYTE TECHNOLOGY...

Manual
Page 4
Introduction ...5 1.1. Board Layout ...6 2.2. Driver and Utility Installation 12 3.1.1. Appendix ...34 5.1. Table of Contents 1. Hardware Installation 6 2.1. Hardware Installation ...9 3. Regulatory Statements 35 - 4 - Resolutions and Color Depth Tables 34 5.2. Software Installation 12 3.1. Features ...5 1.2. GIGABYTE Gamer HUD on Driver Disk 14 3.2. Taskbar Icon ...16 3.3. Display Properties Pages 18 4. Troubleshooting Tips 33 5. Minimum System Requirements 5 2. Driver Installation ...12 3.1.2.
Introduction ...5 1.1. Board Layout ...6 2.2. Driver and Utility Installation 12 3.1.1. Appendix ...34 5.1. Table of Contents 1. Hardware Installation 6 2.1. Hardware Installation ...9 3. Regulatory Statements 35 - 4 - Resolutions and Color Depth Tables 34 5.2. Software Installation 12 3.1. Features ...5 1.2. GIGABYTE Gamer HUD on Driver Disk 14 3.2. Taskbar Icon ...16 3.3. Display Properties Pages 18 4. Troubleshooting Tips 33 5. Minimum System Requirements 5 2. Driver Installation ...12 3.1.2.

Manual
Page 5
.... The power supply should be with one 2x3-pin PCIe power connector is required: - Optical drive for best performance - Minimum System Requirements • Hardware - Windows® XP with 1 GB GDDR3 memory (For GV-R485MC-1GH/GV-R485OC-1GH/GV-R485SO-1GH only) • Supports DirectX 10.1 • Supports CrossFireXTM • Supports AV / S-Video / TV-Out and HDTV output • Supports 2 Dual-Link DVI-I connectors • Supports 2 D-Sub connectors (by adapters) • Supports HDTV output (by optional adapter) • Supports HDMI connector (by ATI RadeonTMHD 4850 Graphics...
.... The power supply should be with one 2x3-pin PCIe power connector is required: - Optical drive for best performance - Minimum System Requirements • Hardware - Windows® XP with 1 GB GDDR3 memory (For GV-R485MC-1GH/GV-R485OC-1GH/GV-R485SO-1GH only) • Supports DirectX 10.1 • Supports CrossFireXTM • Supports AV / S-Video / TV-Out and HDTV output • Supports 2 Dual-Link DVI-I connectors • Supports 2 D-Sub connectors (by adapters) • Supports HDTV output (by optional adapter) • Supports HDMI connector (by ATI RadeonTMHD 4850 Graphics...

Manual
Page 6
Board Layout 1. Hardware Installation 2.1. GV-R485ZL-512H/GV-R485OC-1GH/GV-R485SO-1GH CrossFire Connector DVI-I Connector 1 TV-Out DVI-I Connector 2 HDTV or NTSC / PAL TV Projector or NTSC / PAL TV Projector Digital LCD Monitor Y Pr Pb/AV Output S-Video Output DVI Output or Analog LCD Monitor Analog Monitor D-Sub Output DVI-I to D-Sub Adapter DVI-I Connector 1 TV-Out DVI-I Connector 2 HDMI TV GV-R485 Series Graphics Accelerator DVI-I to HDMI Adapter - 6 - 2.
Board Layout 1. Hardware Installation 2.1. GV-R485ZL-512H/GV-R485OC-1GH/GV-R485SO-1GH CrossFire Connector DVI-I Connector 1 TV-Out DVI-I Connector 2 HDTV or NTSC / PAL TV Projector or NTSC / PAL TV Projector Digital LCD Monitor Y Pr Pb/AV Output S-Video Output DVI Output or Analog LCD Monitor Analog Monitor D-Sub Output DVI-I to D-Sub Adapter DVI-I Connector 1 TV-Out DVI-I Connector 2 HDMI TV GV-R485 Series Graphics Accelerator DVI-I to HDMI Adapter - 6 - 2.

Manual
Page 7
2. GV-R485MC-1GH CrossFire Connector DVI-I Connector 1 TV-Out DVI-I Connector 2 HDTV or NTSC / PAL TV Projector or NTSC / PAL TV Projector Digital LCD Monitor Y Pr Pb/AV Output S-Video Output DVI Output or Analog LCD Monitor Analog Monitor D-Sub Output DVI-I to D-Sub Adapter DVI-I Connector 1 TV-Out DVI-I Connector 2 HDMI TV DVI-I to HDMI Adapter - 7 - Hardware Installation
2. GV-R485MC-1GH CrossFire Connector DVI-I Connector 1 TV-Out DVI-I Connector 2 HDTV or NTSC / PAL TV Projector or NTSC / PAL TV Projector Digital LCD Monitor Y Pr Pb/AV Output S-Video Output DVI Output or Analog LCD Monitor Analog Monitor D-Sub Output DVI-I to D-Sub Adapter DVI-I Connector 1 TV-Out DVI-I Connector 2 HDMI TV DVI-I to HDMI Adapter - 7 - Hardware Installation

Manual
Page 8
... from your computer and unplug power supply. 2. Use a grounded wrist strap before proceeding. To protect them against damage from the onboard audio controller or the external sound card will be left in its original packing until it is activated. The entire Radeon HD 4800 series support HDMI output which can be easily damaged by static electricity, so the card should be disabled when HDMI output is installed.
... from your computer and unplug power supply. 2. Use a grounded wrist strap before proceeding. To protect them against damage from the onboard audio controller or the external sound card will be left in its original packing until it is activated. The entire Radeon HD 4800 series support HDMI output which can be easily damaged by static electricity, so the card should be disabled when HDMI output is installed.

Manual
Page 9
... Panel Display Connect a D-Sub monitor via DVI-I to D-Sub adapter Connect a HDMI monitor via DVI-I to HDMI adapter You are ready to connect a 15-pin D-Sub monitor. Or use the DVI-I digital connectors. Please refer to fasten the card in firmly until the card is securely inserted. Locate the PCI Express x16 slot. Make sure that you have prepared your computer, you are now ready to your graphics card. This graphics card provides two DVI-I to D-Sub adapter to install your graphics card...
... Panel Display Connect a D-Sub monitor via DVI-I to D-Sub adapter Connect a HDMI monitor via DVI-I to HDMI adapter You are ready to connect a 15-pin D-Sub monitor. Or use the DVI-I digital connectors. Please refer to fasten the card in firmly until the card is securely inserted. Locate the PCI Express x16 slot. Make sure that you have prepared your computer, you are now ready to your graphics card. This graphics card provides two DVI-I to D-Sub adapter to install your graphics card...

Manual
Page 11
...Figure 2 - 11 - Hardware Installation Two CrossFire bridge interconnect cables. From the ATI Catalyst Control Center, enter the CrossFire menu and assure to enable the ATI CrossFireXTM technology? If ATI CrossFireX is selected based on a CrossFireX-supported motherboard and connect the graphics cards via two CrossFire bridge interconnect cables (Figure 1). How to select the Enable CrossFireXTM check box (Figure 2). Step 1: Install two CrossFireX graphics cards of the same type. (Example: GV-RX195P256D-RH) Figure 1 Step 2: After installing graphics card driver in operating...
...Figure 2 - 11 - Hardware Installation Two CrossFire bridge interconnect cables. From the ATI Catalyst Control Center, enter the CrossFire menu and assure to enable the ATI CrossFireXTM technology? If ATI CrossFireX is selected based on a CrossFireX-supported motherboard and connect the graphics cards via two CrossFire bridge interconnect cables (Figure 1). How to select the Enable CrossFireXTM check box (Figure 2). Step 1: Install two CrossFireX graphics cards of the same type. (Example: GV-RX195P256D-RH) Figure 1 Step 2: After installing graphics card driver in operating...

Manual
Page 12
... optical drive. Driver Installation After installing the operating system, insert the driver disk into your system has installed DirectX 9 or later version. 2. Step 2: Select the displayed language and then click Next. Users who run Windows XP with Service Pack 2 or above do not need to My Computer, double-click the optical drive and execute the setup.exe program.) Step 1: Click the Install Display Driver item. Driver and Utility Installation 3.1.1. GV-R485 Series Graphics Accelerator - 12 - 3. For software MPEG support...
... optical drive. Driver Installation After installing the operating system, insert the driver disk into your system has installed DirectX 9 or later version. 2. Step 2: Select the displayed language and then click Next. Users who run Windows XP with Service Pack 2 or above do not need to My Computer, double-click the optical drive and execute the setup.exe program.) Step 1: Click the Install Display Driver item. Driver and Utility Installation 3.1.1. GV-R485 Series Graphics Accelerator - 12 - 3. For software MPEG support...

Manual
Page 15
Software Installation GIGABYTE Gamer HUD The GIGABYTE Gamer HUD allows you to manually configure the voltage and GPU/Memory frequency settings Lets the utility optimize the Power PWM working frequency for normal working mode Lets the utility optimize the Power PWM working frequency for 3D gaming mode Displays the GPU usage and temperature, the GPU usage/thermal curve, and your graphics card information Opens Help page • Incorrectly doing overclock/overvoltage may result in damage to your system and reduce the...
Software Installation GIGABYTE Gamer HUD The GIGABYTE Gamer HUD allows you to manually configure the voltage and GPU/Memory frequency settings Lets the utility optimize the Power PWM working frequency for normal working mode Lets the utility optimize the Power PWM working frequency for 3D gaming mode Displays the GPU usage and temperature, the GPU usage/thermal curve, and your graphics card information Opens Help page • Incorrectly doing overclock/overvoltage may result in damage to your system and reduce the...

Manual
Page 17
Using the picture to the left as the example, to set HDMI audio to Start > Control Panel > Hardware and Sound > Manage audio devices. Configuring Audio Output Configure the default audio output device based upon your needs. Software Installation Step 1: Go to be the default Sound Playback device, select Digital Output Device (HDMI). Figure 1 Figure 2 Figure 3 Step 2: In the Manage audio devices dialog box, click the Playback tab. Otherwise, select Digital Output Device (SPDIF), which is the onboard audio controller. - 17 -
Using the picture to the left as the example, to set HDMI audio to Start > Control Panel > Hardware and Sound > Manage audio devices. Configuring Audio Output Configure the default audio output device based upon your needs. Software Installation Step 1: Go to be the default Sound Playback device, select Digital Output Device (HDMI). Figure 1 Figure 2 Figure 3 Step 2: In the Manage audio devices dialog box, click the Playback tab. Otherwise, select Digital Output Device (SPDIF), which is the onboard audio controller. - 17 -

Manual
Page 18
... the DVI-I Connector 2 on desktop and select Personalize, then the Personalization windows will show up. Select Display Settings to change the resolution. You can move the slider to ensure normal operation. Click the Advanced button for Windows) To access Display Settings page, right-click on the graphics card and then plug the HDMI monitor cable into the adapter to change the color quality. Display Properties Pages Display Settings (Resolutions and Color Quality for advanced settings. GV-R485 Series Graphics Accelerator...
... the DVI-I Connector 2 on desktop and select Personalize, then the Personalization windows will show up. Select Display Settings to change the resolution. You can move the slider to ensure normal operation. Click the Advanced button for Windows) To access Display Settings page, right-click on the graphics card and then plug the HDMI monitor cable into the adapter to change the color quality. Display Properties Pages Display Settings (Resolutions and Color Quality for advanced settings. GV-R485 Series Graphics Accelerator...

Manual
Page 21
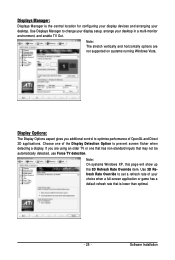
... driver version, CATALYST version, Direct 3D version and so on. „ Graphics Hardware Provides hardware information including graphics chipset, BIOS version, memory size, core clock and so on the second display. „ Display Setup This option allows you to configure your desktop, including changing desktop resolution and desktop mode, setting up extended desktop (requires more balanced setting. „ Video Playback Use this option to optimize video playback in different room environment or to select how video playback appears on . - 21 - Quick Settings: The Quick Settings...
... driver version, CATALYST version, Direct 3D version and so on. „ Graphics Hardware Provides hardware information including graphics chipset, BIOS version, memory size, core clock and so on the second display. „ Display Setup This option allows you to configure your desktop, including changing desktop resolution and desktop mode, setting up extended desktop (requires more balanced setting. „ Video Playback Use this option to optimize video playback in different room environment or to select how video playback appears on . - 21 - Quick Settings: The Quick Settings...

Manual
Page 23
Note: A profile applies to restore defaults, change skins, and update the Catalyst Control Center. Preferences Properties: The Preferences page helps to a specific graphics card. Software Installation Profiles Properties: You can use profiles to create customized environments for your own personal video settings that can be quickly activated manually, through a Hotkey, or by file association. Define and save your desktop, video, and 3D applications. The Catalyst Control Center Preferences page contains the following options: „ Always on Top...
Note: A profile applies to restore defaults, change skins, and update the Catalyst Control Center. Preferences Properties: The Preferences page helps to a specific graphics card. Software Installation Profiles Properties: You can use profiles to create customized environments for your own personal video settings that can be quickly activated manually, through a Hotkey, or by file association. Define and save your desktop, video, and 3D applications. The Catalyst Control Center Preferences page contains the following options: „ Always on Top...
Manual
Page 25
... to prevent screen flicker when detecting a display. Use 3D Refresh Rate Override to optimize performance of your choice when a full-screen application or game has a default refresh rate that may not be automatically detected, use Force TV detection. Choose one that has non-standard inputs that is the central location for configuring your display devices and arranging your desktop in a multi-monitor environment, and enable TV Out. Software Installation
... to prevent screen flicker when detecting a display. Use 3D Refresh Rate Override to optimize performance of your choice when a full-screen application or game has a default refresh rate that may not be automatically detected, use Force TV detection. Choose one that has non-standard inputs that is the central location for configuring your display devices and arranging your desktop in a multi-monitor environment, and enable TV Out. Software Installation

Manual
Page 26
... or enable composite sync. „ AvivoTM Color Use AvivoTM Color for each attached and enabled display. You can also enable Extended Display Identification Data (EDID). Independently set the hue, saturation, and temperature for ATI graphics cards that support per-display color settings. EDID uses the information provided by the attached monitor to determine the limits for the resolution and refresh rate. „ Adjustments Use Monitor Adjustments to resize and reposition the computer desktop on your monitor's display screen. GV-R485 Series Graphics Accelerator - 26...
... or enable composite sync. „ AvivoTM Color Use AvivoTM Color for each attached and enabled display. You can also enable Extended Display Identification Data (EDID). Independently set the hue, saturation, and temperature for ATI graphics cards that support per-display color settings. EDID uses the information provided by the attached monitor to determine the limits for the resolution and refresh rate. „ Adjustments Use Monitor Adjustments to resize and reposition the computer desktop on your monitor's display screen. GV-R485 Series Graphics Accelerator - 26...

Manual
Page 29
... understood. „ More Settings Use the More Settings dialog to preview the adjusted settings because the effect is not supported on systems running Windows Vista. Use this dialog when you want to select a particular API-specific feature. „ All Settings The All Settings page combines all of color by using the Gamma control. This page is useful when it is not necessary to select settings for quick access and...
... understood. „ More Settings Use the More Settings dialog to preview the adjusted settings because the effect is not supported on systems running Windows Vista. Use this dialog when you want to select a particular API-specific feature. „ All Settings The All Settings page combines all of color by using the Gamma control. This page is useful when it is not necessary to select settings for quick access and...

Manual
Page 31
... Mode to preview the adjusted settings because the effect is not supported on systems running Windows Vista. • This item will only affect applications with video overlay support. This page is useful when it is not necessary to change the way you connect two monitors. „ All Settings The All Settings page combines all of the principal Video features onto a single page, without any preview window, allowing quick...
... Mode to preview the adjusted settings because the effect is not supported on systems running Windows Vista. • This item will only affect applications with video overlay support. This page is useful when it is not necessary to change the way you connect two monitors. „ All Settings The All Settings page combines all of the principal Video features onto a single page, without any preview window, allowing quick...

Manual
Page 32
... full booted, disable Preserve ATI Overdrive settings at logon. You can be configured to run when the computer is detected for ATI CrossFireX configuration. Note: This page is only for the first time by dynamically and safely overclocking the graphics processor and memory. GV-R485 Series Graphics Accelerator - 32 - Use the Automated clock configuration utility to meet your specific requirements. Once your computer cannot restart after setting a higher clock speed, press...
... full booted, disable Preserve ATI Overdrive settings at logon. You can be configured to run when the computer is detected for ATI CrossFireX configuration. Note: This page is only for the first time by dynamically and safely overclocking the graphics processor and memory. GV-R485 Series Graphics Accelerator - 32 - Use the Automated clock configuration utility to meet your specific requirements. Once your computer cannot restart after setting a higher clock speed, press...

Manual
Page 33
... in the PCI Express x16 slot. „ Ensure that the monitor and computer are plugged in and receiving power. „ If necessary, disable any built-in the Windows Help or contact your monitor's setting using monitor's adjust panel to make the screen look focused, crisp, and sharp. (Please refer to the monitor's manual.) - 33 - Troubleshooting Tips The following troubleshooting tips may help if you install the graphics driver. „ Restart...
... in the PCI Express x16 slot. „ Ensure that the monitor and computer are plugged in and receiving power. „ If necessary, disable any built-in the Windows Help or contact your monitor's setting using monitor's adjust panel to make the screen look focused, crisp, and sharp. (Please refer to the monitor's manual.) - 33 - Troubleshooting Tips The following troubleshooting tips may help if you install the graphics driver. „ Restart...


