
Manual
Page 4
...-party brands and names are the property of their respective owners. GV-R80T256V Graphics Accelerator - 2 - English Chapter 1 User's Manual Copyright Copyright by GIGA-BYTE TECHNOLOGY CO., LTD. ("GBT") No part of this manual may be reproduced or transmitted in any labels on VGA card , this may appear in this document nor does it make a commitment to rapid change in technology, some of the specifications might be out of date...
...-party brands and names are the property of their respective owners. GV-R80T256V Graphics Accelerator - 2 - English Chapter 1 User's Manual Copyright Copyright by GIGA-BYTE TECHNOLOGY CO., LTD. ("GBT") No part of this manual may be reproduced or transmitted in any labels on VGA card , this may appear in this document nor does it make a commitment to rapid change in technology, some of the specifications might be out of date...
Manual
Page 7
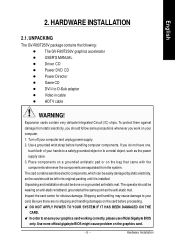
... power supply. 2. Use a grounded wrist strap before proceeding. Unpacking and installation should follow some precautions whenever you do not have one, touch both of your hands to a safely grounded object or to D-Sub adapter l Video in its original packing until it is installed. HARDWARE INSTALLATION 2.1. English 2. UNPACKING The GV-R80T256V package contains the following: l The GV-R80T256V graphics accelerator l USER'S MANUAL l Driver CD l Power DVD CD l Power Director l Game CD l DVI...
... power supply. 2. Use a grounded wrist strap before proceeding. Unpacking and installation should follow some precautions whenever you do not have one, touch both of your hands to a safely grounded object or to D-Sub adapter l Video in its original packing until it is installed. HARDWARE INSTALLATION 2.1. English 2. UNPACKING The GV-R80T256V package contains the following: l The GV-R80T256V graphics accelerator l USER'S MANUAL l Driver CD l Power DVD CD l Power Director l Game CD l DVI...
Manual
Page 9
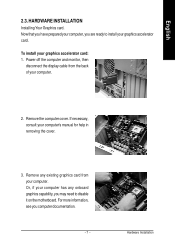
... are ready to disable it on the motherboard. Remove the computer cover. Or, if your graphics accelerator card. Hardware Installation HARDWARE INSTALLATION Installing Your Graphics card. To install your computer's manual for help in removing the cover. 3. If necessary, consult your graphics accelerator card: 1. Remove any onboard graphics capability, you computer documentation. - 7 - Power off the computer and monitor, then disconnect the display cable from your computer. 2. English 2.3. For more information, see you may need to install...
... are ready to disable it on the motherboard. Remove the computer cover. Or, if your graphics accelerator card. Hardware Installation HARDWARE INSTALLATION Installing Your Graphics card. To install your computer's manual for help in removing the cover. 3. If necessary, consult your graphics accelerator card: 1. Remove any onboard graphics capability, you computer documentation. - 7 - Power off the computer and monitor, then disconnect the display cable from your computer. 2. English 2.3. For more information, see you may need to install...
Manual
Page 10
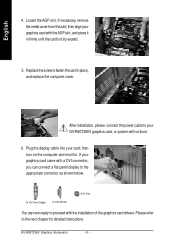
.... 5. After installation, please connect the power cable to your card; To Flat Panel Display To VGA Monitor VIVO 9-pin You are now ready to proceed with a DVI connector, you can connect a flat panel display to the next chapter for detailed instructions. then align your graphics card came with the installation of the graphics card drivers. Locate the AGP slot. If necessary, remove the metal cover from this slot; then turn on the computer and monitor. GV-R80T256V Graphics Accelerator...
.... 5. After installation, please connect the power cable to your card; To Flat Panel Display To VGA Monitor VIVO 9-pin You are now ready to proceed with a DVI connector, you can connect a flat panel display to the next chapter for detailed instructions. then align your graphics card came with the installation of the graphics card drivers. Locate the AGP slot. If necessary, remove the metal cover from this slot; then turn on the computer and monitor. GV-R80T256V Graphics Accelerator...
Manual
Page 11
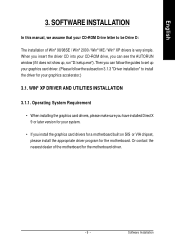
... the AUTORUN window (if it does not show up your system. • If you can follow the subsection 3.1.3 "Driver installation" to be Drive D: The installation of the motherboard for the motherboard driver. - 9 - Operating System Requirement • When installing the graphics card drivers, please make sure you have installed DirectX 9 or later version for your graphics card driver. (Please follow the guides to set up , run "D:\setup.exe"). When you insert the driver CD into...
... the AUTORUN window (if it does not show up your system. • If you can follow the subsection 3.1.3 "Driver installation" to be Drive D: The installation of the motherboard for the motherboard driver. - 9 - Operating System Requirement • When installing the graphics card drivers, please make sure you have installed DirectX 9 or later version for your graphics card driver. (Please follow the guides to set up , run "D:\setup.exe"). When you insert the driver CD into...
Manual
Page 12
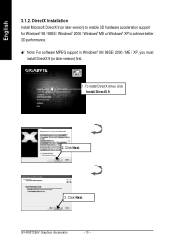
Click Next. 3. English 3.1.2. To install DirectX driver, click Install DirectX 9. 2. GV-R80T256V Graphics Accelerator - 10 - M Note: For software MPEG support in Windows® 98/ 98SE/ 2000 / ME / XP, you must install DirectX 9 (or later version) first. 1. Click Next. DirectX Installation Install Microsoft DirectX 9 (or later version) to enable 3D hardware acceleration support for Windows® 98 / 98SE / Windows® 2000 / Windows® ME or Windows® XP to achieve better 3D performance.
Click Next. 3. English 3.1.2. To install DirectX driver, click Install DirectX 9. 2. GV-R80T256V Graphics Accelerator - 10 - M Note: For software MPEG support in Windows® 98/ 98SE/ 2000 / ME / XP, you must install DirectX 9 (or later version) first. 1. Click Next. DirectX Installation Install Microsoft DirectX 9 (or later version) to enable 3D hardware acceleration support for Windows® 98 / 98SE / Windows® 2000 / Windows® ME or Windows® XP to achieve better 3D performance.
Manual
Page 14
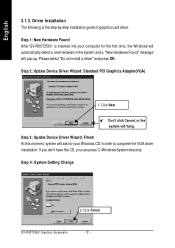
... automatically detect a new hardware in order to complete the VGA driver installation. Step 4: System Setting Change 2.Click Finish. Driver Installation The following is inserted into your Windows CD in the system and a "New Hardware Found" message will hang. Click Next. If you don't have the CD, you can press C:\Windows\System directory. Step 2: Update Device Driver Wizard: Standard PCI Graphics Adapter(VGA) 1. GV-R80T256V Graphics Accelerator - 12 - Please select "Do not install a driver" and press...
... automatically detect a new hardware in order to complete the VGA driver installation. Step 4: System Setting Change 2.Click Finish. Driver Installation The following is inserted into your Windows CD in the system and a "New Hardware Found" message will hang. Click Next. If you don't have the CD, you can press C:\Windows\System directory. Step 2: Update Device Driver Wizard: Standard PCI Graphics Adapter(VGA) 1. GV-R80T256V Graphics Accelerator - 12 - Please select "Do not install a driver" and press...
Manual
Page 20
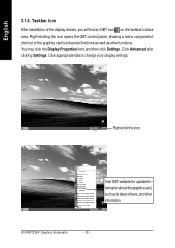
... click Settings. GV-R80T256V Graphics Accelerator - 18 - Visit GBT website for updated information about the graphics card, such as other information. Taskbar Icon After installation of the graphics card's enhanced functions as well as its latest drivers, and other functions. Click appropriate tabs to change your display settings. Click Advanced after clicking Settings. Right-click the icon. English 3.1.5. Right-clicking this icon opens the GBT control panel, showing...
... click Settings. GV-R80T256V Graphics Accelerator - 18 - Visit GBT website for updated information about the graphics card, such as other information. Taskbar Icon After installation of the graphics card's enhanced functions as well as its latest drivers, and other functions. Click appropriate tabs to change your display settings. Click Advanced after clicking Settings. Right-click the icon. English 3.1.5. Right-clicking this icon opens the GBT control panel, showing...
Manual
Page 21
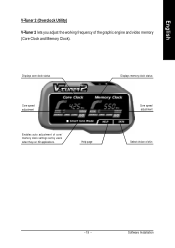
Help page Displays memory clock status Core speed adjustment Select choice of core/ memory clock settings set by users when they run 3D applications. Displays core clock status Core speed adjustment Enables auto adjustment of skin - 19 - Software Installation English V-Tuner 2 (Overclock Utility) V-Tuner 2 lets you adjust the working frequency of the graphic engine and video memory (Core Clock and Memory Clock).
Help page Displays memory clock status Core speed adjustment Select choice of core/ memory clock settings set by users when they run 3D applications. Displays core clock status Core speed adjustment Enables auto adjustment of skin - 19 - Software Installation English V-Tuner 2 (Overclock Utility) V-Tuner 2 lets you adjust the working frequency of the graphic engine and video memory (Core Clock and Memory Clock).
Manual
Page 23
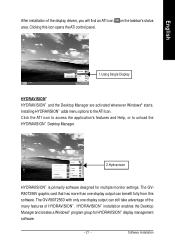
The GVR80T256V graphic card that has more than one display output can benefit fully from this icon opens the ATi control panel. 1.Using Single Display HYDRAVISION™ HYDRAVISION™ and the Desktop Manager are activated whenever Windows® starts. Software Installation English After installation of HYDRAVISION™ . HYDRAVISION™ installation enables the Desktop Manager and creates a Windows® program group for multiple monitor settings. Click the ATI icon to access the...
The GVR80T256V graphic card that has more than one display output can benefit fully from this icon opens the ATi control panel. 1.Using Single Display HYDRAVISION™ HYDRAVISION™ and the Desktop Manager are activated whenever Windows® starts. Software Installation English After installation of HYDRAVISION™ . HYDRAVISION™ installation enables the Desktop Manager and creates a Windows® program group for multiple monitor settings. Click the ATI icon to access the...
Manual
Page 24
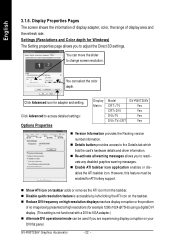
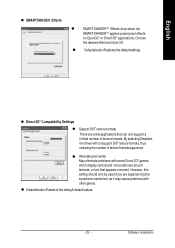
... the problem of display area and the refresh rate. n Reduce DVI frequency on your DVI flat panel. n Show ATI icon on the taskbar. You can select the color depth. n Enable ATI taskbar icon application enables or disables the ATI taskbar icon. n Disable quick resolution feature is not functional with a DVI-to-VGA adapter.) n Alternate DVI operational mode can be enabled for Windows) The Setting properties page allows you to adjust the Direct 3D settings. Settings (Resolutions and Color...
... the problem of display area and the refresh rate. n Reduce DVI frequency on your DVI flat panel. n Show ATI icon on the taskbar. You can select the color depth. n Enable ATI taskbar icon application enables or disables the ATI taskbar icon. n Disable quick resolution feature is not functional with a DVI-to-VGA adapter.) n Alternate DVI operational mode can be enabled for Windows) The Setting properties page allows you to adjust the Direct 3D settings. Settings (Resolutions and Color...
Manual
Page 25
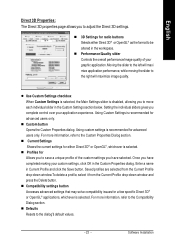
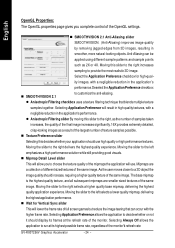
.... n Compatibility settings button Accesses advanced settings that may solve compatibility issues for a few specific Direct 3D® or OpenGL® applications, whichever is recommended for advanced users only. l Use Custom Settings checkbox When Custom Settings is selected, the Main Settings slider is recommended for advanced users only. n Defaults Resets to the right will maximize image quality. n Custom button Opens the Custom Properties dialog. n Profiles for...
.... n Compatibility settings button Accesses advanced settings that may solve compatibility issues for a few specific Direct 3D® or OpenGL® applications, whichever is recommended for advanced users only. l Use Custom Settings checkbox When Custom Settings is selected, the Main Settings slider is recommended for advanced users only. n Defaults Resets to the right will maximize image quality. n Custom button Opens the Custom Properties dialog. n Profiles for...
Manual
Page 26
...will allow you complete control of the OpenGL settings. Select the Application Preference checkbox for Vertical Sync silder This will lower the frame rate of the monitor's refresh rate GV-R80T256V Graphics Accelerator - 24 - The.... As the user moves closer to a 3D object the image quality should use . Moving this decides whether your application should increase, requiring a higher quality... whether or not it should display its highest possible frame rate, regardless of full screen games but reduce the image tearing that blends multiple texture samples together. Moving the...
...will allow you complete control of the OpenGL settings. Select the Application Preference checkbox for Vertical Sync silder This will lower the frame rate of the monitor's refresh rate GV-R80T256V Graphics Accelerator - 24 - The.... As the user moves closer to a 3D object the image quality should use . Moving this decides whether your application should increase, requiring a higher quality... whether or not it should display its highest possible frame rate, regardless of full screen games but reduce the image tearing that blends multiple texture samples together. Moving the...
Manual
Page 27
...® applications. By selecting Disabled, the driver will not support DXT texture formats, thus reducing the number of texture formats. l Alternate pixel center May eliminate problems with other games. Software Installation However, this setting should only be used if you are a few applications that appears incorrect. l Defaults button Restores the default settings. English n SMARTSHADER. l Defaults button Resets to the dialog's default values. - 25 - Choose the...
...® applications. By selecting Disabled, the driver will not support DXT texture formats, thus reducing the number of texture formats. l Alternate pixel center May eliminate problems with other games. Software Installation However, this setting should only be used if you are a few applications that appears incorrect. l Defaults button Restores the default settings. English n SMARTSHADER. l Defaults button Resets to the dialog's default values. - 25 - Choose the...
Manual
Page 28
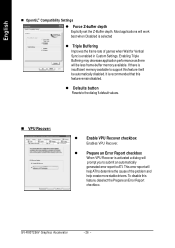
... an Error Report checkbox. English n OpenGL® Compatibility Settings l Force Z-buffer depth Explicitly set the Z-Buffer depth. To disable this feature remain disabled. GV-R80T256V Graphics Accelerator - 26 - n VPU Recover: l Enable VPU Recover checkbox Enables VPU Recover. Most applications will be automatically disabled. l Defaults button Resets to support this feature it will be less frame-buffer memory available. Enabling Triple Buffering may decrease application performance as there will work...
... an Error Report checkbox. English n OpenGL® Compatibility Settings l Force Z-buffer depth Explicitly set the Z-Buffer depth. To disable this feature remain disabled. GV-R80T256V Graphics Accelerator - 26 - n VPU Recover: l Enable VPU Recover checkbox Enables VPU Recover. Most applications will be automatically disabled. l Defaults button Resets to support this feature it will be less frame-buffer memory available. Enabling Triple Buffering may decrease application performance as there will work...

Manual
Page 29
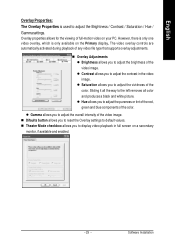
... color settings. It also allows gamma control for your mouse, to increase or decrease the color gamma/brightness/contrast of your display. Software Installation The higher the gamma value, the higher the brightness and contrast of the Video Overlay. English Color Properties: The Color Properties is NOT supported in fullscreen mode. (NOTE: Game Gamma is used to the default values. Note that the configured settings will only be changed...
... color settings. It also allows gamma control for your mouse, to increase or decrease the color gamma/brightness/contrast of your display. Software Installation The higher the gamma value, the higher the brightness and contrast of the Video Overlay. English Color Properties: The Color Properties is NOT supported in fullscreen mode. (NOTE: Game Gamma is used to the default values. Note that the configured settings will only be changed...

Manual
Page 30
GV-R80T256V Graphics Accelerator - 28 - Select Display Type Enable / Disable "Extend my windows desktop onto this monitor" The Display tab provides the multi monitor features. Using an S-Video cable or the supplied adapter cable, attach one end of Primary and Secondary displays. Turn off your computer and your television (or VCR) has an S-Video or Composite video connection. 4. Here you can enable/disable display devices and swap the assignment of the cable to your graphics card and the other to second...
GV-R80T256V Graphics Accelerator - 28 - Select Display Type Enable / Disable "Extend my windows desktop onto this monitor" The Display tab provides the multi monitor features. Using an S-Video cable or the supplied adapter cable, attach one end of Primary and Secondary displays. Turn off your computer and your television (or VCR) has an S-Video or Composite video connection. 4. Here you can enable/disable display devices and swap the assignment of the cable to your graphics card and the other to second...
Manual
Page 31
... that supports overlay adjustments. n Difaults button allows you to adjust the overall intensity of the color. Software Installation Overlay properties allows for the viewing of the color. The video overlay controls are automatically activated during playback of the video image. Sliding it all the way to default values. n Theater Mode checkbox allows you to adjust the contrast in full screen on a secondary monitor, if available and enabled. - 29...
... that supports overlay adjustments. n Difaults button allows you to adjust the overall intensity of the color. Software Installation Overlay properties allows for the viewing of the color. The video overlay controls are automatically activated during playback of the video image. Sliding it all the way to default values. n Theater Mode checkbox allows you to adjust the contrast in full screen on a secondary monitor, if available and enabled. - 29...
Manual
Page 33
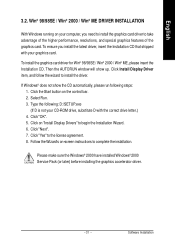
... installed Windows® 2000 Service Pack (or later) before installing the graphics accelerator driver. - 31 - English 3.2. To install the graphics card driver for Win® 98/98SE / Win® 2000 / Win® ME, please insert the Installation CD. To ensure you need to install the graphics card driver to take advantage of the higher performance, resolutions, and special graphics features of the graphics card. Then the AUTORUN window will show the CD automatically, please run following : D:\SETUP...
... installed Windows® 2000 Service Pack (or later) before installing the graphics accelerator driver. - 31 - English 3.2. To install the graphics card driver for Win® 98/98SE / Win® 2000 / Win® ME, please insert the Installation CD. To ensure you need to install the graphics card driver to take advantage of the higher performance, resolutions, and special graphics features of the graphics card. Then the AUTORUN window will show the CD automatically, please run following : D:\SETUP...
Manual
Page 34
... duplicate display adapter and monitor entries if you installed the graphics driver. n If necessary, disable any built-in and receiving power. Then select the number for Safe Mode, and press Enter. (You can also use the Troubleshooting Guide located in the Windows® Help or contact your computer's manual or manufacturer. (NOTE: Some manufacturers do not allow the built-in graphics to be disabled or to the monitor's manual.) GV-R80T256V Graphics Accelerator...
... duplicate display adapter and monitor entries if you installed the graphics driver. n If necessary, disable any built-in and receiving power. Then select the number for Safe Mode, and press Enter. (You can also use the Troubleshooting Guide located in the Windows® Help or contact your computer's manual or manufacturer. (NOTE: Some manufacturers do not allow the built-in graphics to be disabled or to the monitor's manual.) GV-R80T256V Graphics Accelerator...


