
Manual
Page 1
... rapid change in any from without the expressed, written permission of their respective owners. Use of this may be reproduced or transmitted in technology, some of the specifications might be authorized by Macrovision. Reverse engineering or disassembly is intended for any labels on VGA card, this booklet. GV-RX24P256HE RadeonTM HD 2400 Pro Graphics Accelerator User's Manual Rev. 101 12MD-RX24P2HE-101R Copyright © 2007 GIGABYTE TECHNOLOGY CO...
... rapid change in any from without the expressed, written permission of their respective owners. Use of this may be reproduced or transmitted in technology, some of the specifications might be authorized by Macrovision. Reverse engineering or disassembly is intended for any labels on VGA card, this booklet. GV-RX24P256HE RadeonTM HD 2400 Pro Graphics Accelerator User's Manual Rev. 101 12MD-RX24P2HE-101R Copyright © 2007 GIGABYTE TECHNOLOGY CO...

Manual
Page 2
... System Requirement 9 3.1.2. Introduction 3 1.1. Hardware Installation 6 3. Taskbar Icon ...13 3.1.5. Software Installation 9 3.1. Resolutions and Color Depth Table (In Windows® XP 34 Regulatory Statements 35 GV-RX24P256HE Graphics Accelerator - 2 - Troubleshooting Tips 32 5. Windows® XP Driver and Utilities Installation 9 3.1.1. How to Reflash the BIOS in MS-DOS mode 33 5.2. Driver Installation ...11 3.1.4. Board Layout 4 2.2. DirectX Installation ...10 3.1.3. Display Properties pages 15 4. English Table of Contents 1. Hardware Installation...
... System Requirement 9 3.1.2. Introduction 3 1.1. Hardware Installation 6 3. Taskbar Icon ...13 3.1.5. Software Installation 9 3.1. Resolutions and Color Depth Table (In Windows® XP 34 Regulatory Statements 35 GV-RX24P256HE Graphics Accelerator - 2 - Troubleshooting Tips 32 5. Windows® XP Driver and Utilities Installation 9 3.1.1. How to Reflash the BIOS in MS-DOS mode 33 5.2. Driver Installation ...11 3.1.4. Board Layout 4 2.2. DirectX Installation ...10 3.1.3. Display Properties pages 15 4. English Table of Contents 1. Hardware Installation...

Manual
Page 3
...; Supports 1 D-Sub connector • Supports HDMI connector (by adapter, optional) 1.2. English 1. Intel® Pentium® 4 or AMD AthlonTM - 512 MB of system memory; 1 GB or more for software installation (CD-ROM or DVD-ROM drive) • Operating System - Introduction Optical drive for best performance - Windows® XP Professional x64 Edition - 3 - Minimum System Requirements • Hardware - Introduction 1.1. Windows® Vista - Features Powered by ATi RadeonTM HD 2400 Pro Graphics Processing Unit (GPU) • Supports PCI Express...
...; Supports 1 D-Sub connector • Supports HDMI connector (by adapter, optional) 1.2. English 1. Intel® Pentium® 4 or AMD AthlonTM - 512 MB of system memory; 1 GB or more for software installation (CD-ROM or DVD-ROM drive) • Operating System - Introduction Optical drive for best performance - Windows® XP Professional x64 Edition - 3 - Minimum System Requirements • Hardware - Introduction 1.1. Windows® Vista - Features Powered by ATi RadeonTM HD 2400 Pro Graphics Processing Unit (GPU) • Supports PCI Express...
Manual
Page 5
... Radeon HD 2000 series support HDMI output which can handle both of your graphics card working correctly, please use official GIGABYTE BIOS only. Expansion cards contain very delicate Integrated Circuit (IC) chips. DO NOT APPLY POWER TO YOUR SYSTEM IF IT HAS BEEN DAMAGED ON THE CARD. Hardware Installation For more details, refer to page 14. Inspect the card carton for HDMI output function, set the onboard audio controller or the external sound card...
... Radeon HD 2000 series support HDMI output which can handle both of your graphics card working correctly, please use official GIGABYTE BIOS only. Expansion cards contain very delicate Integrated Circuit (IC) chips. DO NOT APPLY POWER TO YOUR SYSTEM IF IT HAS BEEN DAMAGED ON THE CARD. Hardware Installation For more details, refer to page 14. Inspect the card carton for HDMI output function, set the onboard audio controller or the external sound card...

Manual
Page 6
To remove the existing graphics card: 1. Remove the computer cover. If necessary, consult your graphics accelerator card. Power off the computer and monitor, then disconnect the display cable from your computer. 2. Remove any existing graphics card from the back of your computer. GV-RX24P256HE Graphics Accelerator - 6 - Hardware installation Installing Your graphics card. Now that you have prepared your computer, you are ready to install your computer's manual for help in removing the cover. 3. English 2.2.
To remove the existing graphics card: 1. Remove the computer cover. If necessary, consult your graphics accelerator card. Power off the computer and monitor, then disconnect the display cable from your computer. 2. Remove any existing graphics card from the back of your computer. GV-RX24P256HE Graphics Accelerator - 6 - Hardware installation Installing Your graphics card. Now that you have prepared your computer, you are ready to install your computer's manual for help in removing the cover. 3. English 2.2.

Manual
Page 7
... panel display to fasten the card in firmly until the card is fully seated. * Pleasemakesurethatthegoldedgeconnector of the graphics card driver. If your graphics card with the PCI Express x16 slot, and press it in place, and replace the computer cover. 3. To D-Sub Monitor To TV/VCR To Flat Panel Display Connect an HDMI monitor via DVI-I to HDMI adapter You are now ready to proceed with a DVI-I -to-HDMI adapter to next chapter for detailed instructions. - 7 - Hardware Installation...
... panel display to fasten the card in firmly until the card is fully seated. * Pleasemakesurethatthegoldedgeconnector of the graphics card driver. If your graphics card with the PCI Express x16 slot, and press it in place, and replace the computer cover. 3. To D-Sub Monitor To TV/VCR To Flat Panel Display Connect an HDMI monitor via DVI-I to HDMI adapter You are now ready to proceed with a DVI-I -to-HDMI adapter to next chapter for detailed instructions. - 7 - Hardware Installation...

Manual
Page 9
... the guides to setup your graphics card driver. (Please follow the subsection 3.1.3 "Driver Installation" to install the driver for that your CD-ROM Drive letter to be Drive D: The installation of SIS, or VIA chipsets, please install the appropriate driver program for your graphics accelerator.) 3.1. Operating System Requirement • When loading the graphics card drivers for the system, please make sure your motherboard nearest dealer for motherboard driver. - 9 - Software Installation In this manual, we assume that motherboard. Windows...
... the guides to setup your graphics card driver. (Please follow the subsection 3.1.3 "Driver Installation" to install the driver for that your CD-ROM Drive letter to be Drive D: The installation of SIS, or VIA chipsets, please install the appropriate driver program for your graphics accelerator.) 3.1. Operating System Requirement • When loading the graphics card drivers for the system, please make sure your motherboard nearest dealer for motherboard driver. - 9 - Software Installation In this manual, we assume that motherboard. Windows...

Manual
Page 10
.... Users who run Windows XP with Service Pack 2 or above do not need to restart computer. Step 2. Installing the components. Click Finish to install DirectX separately. GV-RX24P256HE Graphics Accelerator - 10 - Click the Install DirectX 9 item. Click the Next button. DirectX Installation Install Microsoft DirectX to enable 3D hardware acceleration support for Windows® XP to achieve better 3D performance. 0 Note: For software MPEG support in Windows® XP, you must install DirectX first. Step 3. Then the DirectX 9 installation is...
.... Users who run Windows XP with Service Pack 2 or above do not need to restart computer. Step 2. Installing the components. Click Finish to install DirectX separately. GV-RX24P256HE Graphics Accelerator - 10 - Click the Install DirectX 9 item. Click the Next button. DirectX Installation Install Microsoft DirectX to enable 3D hardware acceleration support for Windows® XP to achieve better 3D performance. 0 Note: For software MPEG support in Windows® XP, you must install DirectX first. Step 3. Then the DirectX 9 installation is...
Manual
Page 11
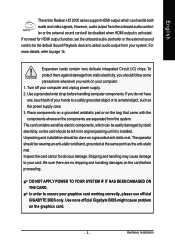
... install it now.) Or click the Cancel button to install the driver from AUTORUN window. Step 1: Found new hardware wizard: Video controller (VGA Compatible) Click the Next button to finish the installation. - 11 - New hardware found After the graphics card is inserted into your graphics accelerator, please insert it automatically. Step 3: Found new hardware wizard: Finish Click the Finish button to install the driver. (There is the step-by-step installation guide. English 3.1.3. Software Installation...
... install it now.) Or click the Cancel button to install the driver from AUTORUN window. Step 1: Found new hardware wizard: Video controller (VGA Compatible) Click the Next button to finish the installation. - 11 - New hardware found After the graphics card is inserted into your graphics accelerator, please insert it automatically. Step 3: Found new hardware wizard: Finish Click the Finish button to install the driver. (There is the step-by-step installation guide. English 3.1.3. Software Installation...
Manual
Page 12
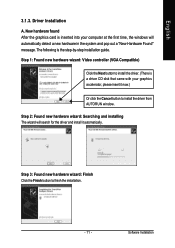
Step 3. Click Yes button. Then the driver installation is completed. When autorun window show up , click the Install Display Driver item. GV-RX24P256HE Graphics Accelerator - 12 - If it does not show up , please run "D:\setup.exe". Click the Install Display Driver item. Driver installation (Autorun Window) Insert the driver CD disk into your CD-ROM, and then you can see the AUTORUN window. Step 2. Windows installings the components. Step 1. Setp 4. Click the Finish button...
Step 3. Click Yes button. Then the driver installation is completed. When autorun window show up , click the Install Display Driver item. GV-RX24P256HE Graphics Accelerator - 12 - If it does not show up , please run "D:\setup.exe". Click the Install Display Driver item. Driver installation (Autorun Window) Insert the driver CD disk into your CD-ROM, and then you can see the AUTORUN window. Step 2. Windows installings the components. Step 1. Setp 4. Click the Finish button...

Manual
Page 13
Taskbar Icon ATI CATALYSTTM Control Center: After installation of the display driver, you can right-click on the taskbar's status area. Right-click the icon to enter the CATALYSTTM Control Center (refer to configure all your graphics card settings. Fig. 1 Fig. 2 - 13 - Software Installation The ATI CATALYSTTM Control Center is used to Fig. 1). Or you will find an ATI CATALYSTTM Control Center icon on the desktop and select ATI CATALYST Control Center (refer to Fig. 2). English 3.1.4.
Taskbar Icon ATI CATALYSTTM Control Center: After installation of the display driver, you can right-click on the taskbar's status area. Right-click the icon to enter the CATALYSTTM Control Center (refer to configure all your graphics card settings. Fig. 1 Fig. 2 - 13 - Software Installation The ATI CATALYSTTM Control Center is used to Fig. 1). Or you will find an ATI CATALYSTTM Control Center icon on the desktop and select ATI CATALYST Control Center (refer to Fig. 2). English 3.1.4.

Manual
Page 15
... refresh rate. Display Matrix Model CRT+TV (Note) CRT+DVI DVI+TV DVI+TV+CRT HDMI+TV HDMI+CRT GV-RX24P256HE Yes Yes Yes No Yes Yes (Note) The CRT+TV configuration requires that you connect your CRT display to the DVI-I connector on the card using the DVI-I to D-Sub adapter to change the color quality. You can click the item to the D-Sub port on Desktop and then select Properties. English 3.1.5. Software Installation Click the Advanced button for Windows) You may adjust the screen resolution and color...
... refresh rate. Display Matrix Model CRT+TV (Note) CRT+DVI DVI+TV DVI+TV+CRT HDMI+TV HDMI+CRT GV-RX24P256HE Yes Yes Yes No Yes Yes (Note) The CRT+TV configuration requires that you connect your CRT display to the DVI-I connector on the card using the DVI-I to D-Sub adapter to change the color quality. You can click the item to the D-Sub port on Desktop and then select Properties. English 3.1.5. Software Installation Click the Advanced button for Windows) You may adjust the screen resolution and color...

Manual
Page 16
... folder where the new file will be converted. Click Next. English ATI CATALYSTTM Control Center Basic View : The Basic View is the default view when CATALYST Control Center is launched for step-by-step assistance. „ Avivo Video Converter This wizard assists you to convert videos from one file format to the basic settings and advanced features of your ATI graphics products. Easy Setup Wizards: Choose...
... folder where the new file will be converted. Click Next. English ATI CATALYSTTM Control Center Basic View : The Basic View is the default view when CATALYST Control Center is launched for step-by-step assistance. „ Avivo Video Converter This wizard assists you to convert videos from one file format to the basic settings and advanced features of your ATI graphics products. Easy Setup Wizards: Choose...
Manual
Page 18
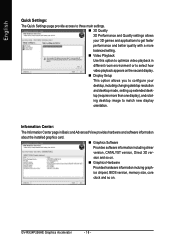
... Center page in different room environment or to match new display orientation. GV-RX24P256HE Graphics Accelerator - 18 - English Quick Settings: The Quick Settings page provide access to three main settings. „ 3D Quality 3D Performance and Quality settings allows your desktop, including changing desktop resolution and desktop mode, setting up extended desktop (requires more balanced setting. „ Video Playback Use this option to optimize video playback in Basic and Advanced View provides hardware and software information about the installed graphics card. „ Graphics...
... Center page in different room environment or to match new display orientation. GV-RX24P256HE Graphics Accelerator - 18 - English Quick Settings: The Quick Settings page provide access to three main settings. „ 3D Quality 3D Performance and Quality settings allows your desktop, including changing desktop resolution and desktop mode, setting up extended desktop (requires more balanced setting. „ Video Playback Use this option to optimize video playback in Basic and Advanced View provides hardware and software information about the installed graphics card. „ Graphics...

Manual
Page 20
... your own personal video settings that can use profiles to a specific graphics card. Preferences Properties: The Preferences page helps to select the appropriate card before creating, loading, or activating a Profile. If there is more than one graphics card installed in your desktop, video, and 3D applications. GV-RX24P256HE Graphics Accelerator - 20 - Note: A profile applies to create customized environments for your computer, you need to restore defaults, change skins, and update the CATALYST Control Center. The CATALYST Control Center Preferences page...
... your own personal video settings that can use profiles to a specific graphics card. Preferences Properties: The Preferences page helps to select the appropriate card before creating, loading, or activating a Profile. If there is more than one graphics card installed in your desktop, video, and 3D applications. GV-RX24P256HE Graphics Accelerator - 20 - Note: A profile applies to create customized environments for your computer, you need to restore defaults, change skins, and update the CATALYST Control Center. The CATALYST Control Center Preferences page...

Manual
Page 22
... Display Detection Option to set a refresh rate of your desktop. Note: The stretch vertically and horizontally options are not supported since refresh rate is lower than optimal. Use 3D Refresh Rate Override to configure panning on displays with limited resolution capabilities are not supported on systems running Windows VistaTM . GV-RX24P256HE Graphics Accelerator - 22 - If you additional control to optimize performance of the Display Detection Options to quickly change your display setup, arrange your desktop in a multi-monitor environment, and enable...
... Display Detection Option to set a refresh rate of your desktop. Note: The stretch vertically and horizontally options are not supported since refresh rate is lower than optimal. Use 3D Refresh Rate Override to configure panning on displays with limited resolution capabilities are not supported on systems running Windows VistaTM . GV-RX24P256HE Graphics Accelerator - 22 - If you additional control to optimize performance of the Display Detection Options to quickly change your display setup, arrange your desktop in a multi-monitor environment, and enable...

Manual
Page 23
... display. - 23 - Software Installation You can also enable Extended Display Identification Data. English Monitor Properties1 : „ Attributes Monitor Attributes provides information about the attached monitor. Independently set the hue, saturation, and temperature for ATI graphics cards that supports per-display color settings. Extended Display Identification Data (EDID) uses the information provided by the attached monitor to determine the limits for the resolution and refresh rate. „ Adjustments Use Monitor Adjustments to resize and reposition the computer desktop...
... display. - 23 - Software Installation You can also enable Extended Display Identification Data. English Monitor Properties1 : „ Attributes Monitor Attributes provides information about the attached monitor. Independently set the hue, saturation, and temperature for ATI graphics cards that supports per-display color settings. Extended Display Identification Data (EDID) uses the information provided by the attached monitor to determine the limits for the resolution and refresh rate. „ Adjustments Use Monitor Adjustments to resize and reposition the computer desktop...

Manual
Page 24
..., or the application can be set to configure anti-aliasing, use an overall adjustment control that rapidly configures your application. „ Anti-Aliasing Anti-Aliasing (AA) is the most important consideration. This page is the most important consideration. English 3D : „ Standard Settings The Standard Settings page provides access to produce the final color. GV-RX24P256HE Graphics Accelerator - 24 - Anti-Aliasing can decide...
..., or the application can be set to configure anti-aliasing, use an overall adjustment control that rapidly configures your application. „ Anti-Aliasing Anti-Aliasing (AA) is the most important consideration. This page is the most important consideration. English 3D : „ Standard Settings The Standard Settings page provides access to produce the final color. GV-RX24P256HE Graphics Accelerator - 24 - Anti-Aliasing can decide...
Manual
Page 27
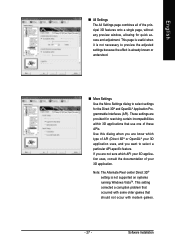
... understood. „ More Settings Use the More Settings dialog to select settings for quick access and adjustment. Use this dialog when you are know which API your 3D application uses, consult the documentation of your 3D application. If you want to preview the adjusted settings because the effect is not supported on systems running Windows VistaTM. Software Installation English „ All Settings The All Settings page combines all...
... understood. „ More Settings Use the More Settings dialog to select settings for quick access and adjustment. Use this dialog when you are know which API your 3D application uses, consult the documentation of your 3D application. If you want to preview the adjusted settings because the effect is not supported on systems running Windows VistaTM. Software Installation English „ All Settings The All Settings page combines all...

Manual
Page 32
... display cable is securely fastened to the monitor's manual.) GV-RX24P256HE Graphics Accelerator - 32 - For more assistance, use the Troubleshooting Guide located in graphics capabilities on your motherboard. If necessary, adjust your monitor's setting by monitor's adjust panel to make the screen looks focused, crisp, and sharp. (Please refer to the card's display connector. „ Make sure that the monitor and computer are plugged in and receiving power. „ If necessary, disable any built-in the Windows...
... display cable is securely fastened to the monitor's manual.) GV-RX24P256HE Graphics Accelerator - 32 - For more assistance, use the Troubleshooting Guide located in graphics capabilities on your motherboard. If necessary, adjust your monitor's setting by monitor's adjust panel to make the screen looks focused, crisp, and sharp. (Please refer to the card's display connector. „ Make sure that the monitor and computer are plugged in and receiving power. „ If necessary, disable any built-in the Windows...


