

Manual
Page 1
... this VGA card Due to update the information contained herein. Trademarks Third-party brands and names are the property of this document nor does the author make a commitment to rapid change in technology, some of the specifications might be reproduced or transmitted in this booklet. GV-RX30128D/ GV-RX30128DE Radeon X300LE Graphics Accelerator User's Manual Rev. 103 12MD-RX30128D-103 Copyright © 2004 GIGABYTE TECHNOLOGY CO., LTD Copyright by GIGA-BYTE TECHNOLOGY...
... this VGA card Due to update the information contained herein. Trademarks Third-party brands and names are the property of this document nor does the author make a commitment to rapid change in technology, some of the specifications might be reproduced or transmitted in this booklet. GV-RX30128D/ GV-RX30128DE Radeon X300LE Graphics Accelerator User's Manual Rev. 103 12MD-RX30128D-103 Copyright © 2004 GIGABYTE TECHNOLOGY CO., LTD Copyright by GIGA-BYTE TECHNOLOGY...
Manual
Page 2
Board Layout 4 2.2. Resolutions and Color Depth Table (In Windows® XP 32 GV-RX30128D(DE) Graphics Accelerator - 2 - Hardware Installation 4 2.1. Win® XP Driver and Utilities Installation 9 3.1.1. DirectX Installation 10 3.1.3. Minimum System Requirement 3 2. Hardware Installation 7 3. Troubleshooting Tips 30 5. Reflash BIOS in Windows mode 31 5.2. Software Installation 9 3.1. Utilities on Driver CD 13 3.1.5. Reflash BIOS in MS-DOS mode 31 5.1.2. How to Reflash the BIOS 31 5.1.1. Driver Installation 11 3.1.4. Introduction 3 1.1. ...
Board Layout 4 2.2. Resolutions and Color Depth Table (In Windows® XP 32 GV-RX30128D(DE) Graphics Accelerator - 2 - Hardware Installation 4 2.1. Win® XP Driver and Utilities Installation 9 3.1.1. DirectX Installation 10 3.1.3. Minimum System Requirement 3 2. Hardware Installation 7 3. Troubleshooting Tips 30 5. Reflash BIOS in Windows mode 31 5.2. Software Installation 9 3.1. Utilities on Driver CD 13 3.1.5. Reflash BIOS in MS-DOS mode 31 5.1.2. How to Reflash the BIOS 31 5.1.1. Driver Installation 11 3.1.4. Introduction 3 1.1. ...
Manual
Page 4
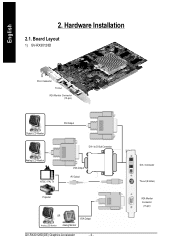
English 2. DVI-I to D-Sub Connector Analog LCD Monitor NTSC / PAL TV VGA Output AV Output Projector OR VGA Output Analog LCD Monitor Analog Monitor GV-RX30128D(DE) Graphics Accelerator - 4 - Board Layout 1) GV-RX30128D DVI-I Connector TV-Out VGA Monitor Connector (15-pin) Digital LCD Monitor DVI Output DVI-I Connector TV-out (S-Video) VGA Monitor Connector (15-pin) Hardware Installation 2.1.
English 2. DVI-I to D-Sub Connector Analog LCD Monitor NTSC / PAL TV VGA Output AV Output Projector OR VGA Output Analog LCD Monitor Analog Monitor GV-RX30128D(DE) Graphics Accelerator - 4 - Board Layout 1) GV-RX30128D DVI-I Connector TV-Out VGA Monitor Connector (15-pin) Digital LCD Monitor DVI Output DVI-I Connector TV-out (S-Video) VGA Monitor Connector (15-pin) Hardware Installation 2.1.
Manual
Page 5
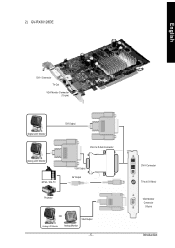
2) GV-RX30128DE English DVI-I Connector TV-Out VGA Monitor Connector (15-pin) Digital LCD Monitor DVI Output DVI-I Connector TV-out (S-Video) VGA Monitor Connector (15-pin) Introduction DVI-I to D-Sub Connector Analog LCD Monitor NTSC / PAL TV VGA Output AV Output Projector OR VGA Output Analog LCD Monitor Analog Monitor - 5 -
2) GV-RX30128DE English DVI-I Connector TV-Out VGA Monitor Connector (15-pin) Digital LCD Monitor DVI Output DVI-I Connector TV-out (S-Video) VGA Monitor Connector (15-pin) Introduction DVI-I to D-Sub Connector Analog LCD Monitor NTSC / PAL TV VGA Output AV Output Projector OR VGA Output Analog LCD Monitor Analog Monitor - 5 -
Manual
Page 7
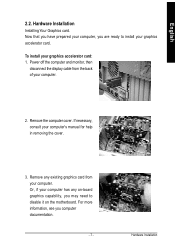
... information, see you are ready to disable it on -board graphics capability, you may need to install your computer, you computer documentation. - 7 - Remove any on the motherboard. Hardware Installation English 2.2. Or, if your computer has any existing graphics card from the back of your computer. Now that you have prepared your graphics accelerator card. If necessary, consult your graphics accelerator card: 1. To install your computer's manual for help in removing...
... information, see you are ready to disable it on -board graphics capability, you may need to install your computer, you computer documentation. - 7 - Remove any on the motherboard. Hardware Installation English 2.2. Or, if your computer has any existing graphics card from the back of your computer. Now that you have prepared your graphics accelerator card. If necessary, consult your graphics accelerator card: 1. To install your computer's manual for help in removing...

Manual
Page 8
... this slot; Replace the screw to the appropriate connector, as shown below... Plug the display cable into your graphics card with a DVI connector, you can connect a flat panel display to fasten the card in firmly until the card is fully seated. 5. If your graphics card came with the PCI Express x 16 slot, and press it in place, and replace the computer cover. 6. GV-RX30128D(DE) Graphics Accelerator - 8 - Locate the PCI Express x 16 slot...
... this slot; Replace the screw to the appropriate connector, as shown below... Plug the display cable into your graphics card with a DVI connector, you can connect a flat panel display to fasten the card in firmly until the card is fully seated. 5. If your graphics card came with the PCI Express x 16 slot, and press it in place, and replace the computer cover. 6. GV-RX30128D(DE) Graphics Accelerator - 8 - Locate the PCI Express x 16 slot...

Manual
Page 9
... see the AUTORUN window (if it does not show up, run "D:\setup.exe"). Software Installation Or please contact your graphics accelerator.) 3.1. Win® XP Driver and Utilities Installation 3.1.1. English 3. Software Installation In this manual, we assume that motherboard. When you insert the driver CD into your CD-ROM Drive letter to install the driver for your motherboard nearest dealer for that your CD-ROM drive, you install the graphics card drivers for the motherboard, which consist...
... see the AUTORUN window (if it does not show up, run "D:\setup.exe"). Software Installation Or please contact your graphics accelerator.) 3.1. Win® XP Driver and Utilities Installation 3.1.1. English 3. Software Installation In this manual, we assume that motherboard. When you insert the driver CD into your CD-ROM Drive letter to install the driver for your motherboard nearest dealer for that your CD-ROM drive, you install the graphics card drivers for the motherboard, which consist...
Manual
Page 11
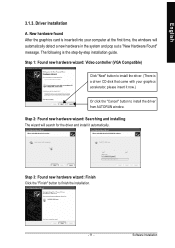
... is inserted into your graphics accelerator, please insert it automatically. Software Installation Step 1: Found new hardware wizard: Video controller (VGA Compatible) Click "Next" button to install the driver. (There is a driver CD disk that came with your computer at the first time, the windows will search for the driver and install it now.) Or click the "Cancel" button to finish the installation. - 11 - Step 3: Found new hardware wizard: Finish Click...
... is inserted into your graphics accelerator, please insert it automatically. Software Installation Step 1: Found new hardware wizard: Video controller (VGA Compatible) Click "Next" button to install the driver. (There is a driver CD disk that came with your computer at the first time, the windows will search for the driver and install it now.) Or click the "Cancel" button to finish the installation. - 11 - Step 3: Found new hardware wizard: Finish Click...
Manual
Page 12
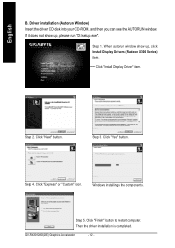
... disk into your CD-ROM, and then you can see the AUTORUN window. Step 1. Click "Express" or "Custom" icon. Click "Install Display Driver" item. Click "Yes" button. Then the driver installation is completed. Step 5. If it does not show up , please run "D:\setup.exe". Step 2. GV-RX30128D(DE) Graphics Accelerator - 12 - Click "Finish" button to restart computer. When autorun window show up , click Install Display Drivers (Radeon X300 Series...
... disk into your CD-ROM, and then you can see the AUTORUN window. Step 1. Click "Express" or "Custom" icon. Click "Install Display Driver" item. Click "Yes" button. Then the driver installation is completed. Step 5. If it does not show up , please run "D:\setup.exe". Step 2. GV-RX30128D(DE) Graphics Accelerator - 12 - Click "Finish" button to restart computer. When autorun window show up , click Install Display Drivers (Radeon X300 Series...

Manual
Page 15
... graphics card's enhanced and other information. - 15 - You may click the "Display Properties" item, and then click Settings. Click the appropriate tab to GIGABYTE website for updated information about the graphics accelerator, latest drivers, and other functions. Click "VGA Information" item into the "VGA Info" and "Color Adjust"tabs. Click "Advanced" after clickng Settings. You can link to change your display settings. Software Installation Right-clicking this icon opens the GIGABYTE control panel...
... graphics card's enhanced and other information. - 15 - You may click the "Display Properties" item, and then click Settings. Click the appropriate tab to GIGABYTE website for updated information about the graphics accelerator, latest drivers, and other functions. Click "VGA Information" item into the "VGA Info" and "Color Adjust"tabs. Click "Advanced" after clickng Settings. You can link to change your display settings. Software Installation Right-clicking this icon opens the GIGABYTE control panel...
Manual
Page 18
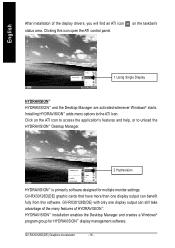
...(DE) graphic cards that have more than one display output can benefit fully from this icon open the ATi control panel. GV-RX30128D(DE) with only one display output can still take advantage of the many features of the display drivers, you will find an ATI icon status area. HYDRAVISION™ installation enables the Desktop Manager and creates a Windows® program group for multiple monitor settings. Clicking this software.
...(DE) graphic cards that have more than one display output can benefit fully from this icon open the ATi control panel. GV-RX30128D(DE) with only one display output can still take advantage of the many features of the display drivers, you will find an ATI icon status area. HYDRAVISION™ installation enables the Desktop Manager and creates a Windows® program group for multiple monitor settings. Clicking this software.

Manual
Page 19
... color quality. Display Properties Pages The screen shows the information of display adapter, color, the range of display area and the refresh rate. Click "Advanced" icon for windows) The Setting properties page allows you to change resolution. Click "Advanced", into details settings: Display Matrix Model GV-RX30128D(DE) CRT+TV Yes CRT+DVI Yes DVI+TV Yes DVI+TV+CRT Yes - 19 - You can click the item to adjust the Direct 3D settings. English 3.1.6. Software Installation Settings (Resolutions and Color depth for adapter...
... color quality. Display Properties Pages The screen shows the information of display adapter, color, the range of display area and the refresh rate. Click "Advanced" icon for windows) The Setting properties page allows you to change resolution. Click "Advanced", into details settings: Display Matrix Model GV-RX30128D(DE) CRT+TV Yes CRT+DVI Yes DVI+TV Yes DVI+TV+CRT Yes - 19 - You can click the item to adjust the Direct 3D settings. English 3.1.6. Software Installation Settings (Resolutions and Color depth for adapter...

Manual
Page 20
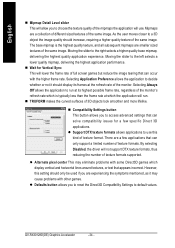
... your desktop. English Color Properties: The Color Properties is NOT supported in Windows NT4.0) n Default resets the desktop brightness and color settings to the default values. Set Desktop and Video Overlay brightness (gamma) levels can change red, green, and blue display colors. Note that the configured settings will only be changed. n All Colors checkbox adjust the RGB individually or adjust all display devices mapped to adjust the color settings. It also allows gamma control for your desktop or full screen 3D...
... your desktop. English Color Properties: The Color Properties is NOT supported in Windows NT4.0) n Default resets the desktop brightness and color settings to the default values. Set Desktop and Video Overlay brightness (gamma) levels can change red, green, and blue display colors. Note that the configured settings will only be changed. n All Colors checkbox adjust the RGB individually or adjust all display devices mapped to adjust the color settings. It also allows gamma control for your desktop or full screen 3D...
Manual
Page 21
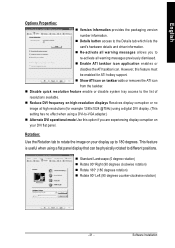
... icon from the taskbar. n Disable quick resolution feature enable or disable system tray access to the Details tab which lists the card's hardware details and driver information. English Options Properties: n Version Information provides the packaging version number information. n Re-activate all warning messages previously dismissed. n Show ATI icon on your DVI flat panel. Rotation: Use the Rotation tab to -VGA adapter.) n Alternate DVI operational mode Use this option if you...
... icon from the taskbar. n Disable quick resolution feature enable or disable system tray access to the Details tab which lists the card's hardware details and driver information. English Options Properties: n Version Information provides the packaging version number information. n Re-activate all warning messages previously dismissed. n Show ATI icon on your DVI flat panel. Rotation: Use the Rotation tab to -VGA adapter.) n Alternate DVI operational mode Use this option if you...
Manual
Page 24
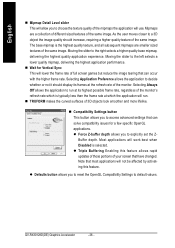
... supported. By selecting Disabled, the driver will not support DTX texture formats, thus reducing the number of 3D objects look smoother and more lifelike. As the user moves closer to a 3D object the image quality should only be used if you to access advanced settings that can solve compatibility issues for Vertical Sync This will lower the frame rate of full screen...
... supported. By selecting Disabled, the driver will not support DTX texture formats, thus reducing the number of 3D objects look smoother and more lifelike. As the user moves closer to a 3D object the image quality should only be used if you to access advanced settings that can solve compatibility issues for Vertical Sync This will lower the frame rate of full screen...
Manual
Page 26
... the same image. l Force Z-buffer depth allows you to reset the OpenGL Compatibility Settings to default values. l Defaults button allows you to explicitly set the ZBuffer depth. As the user moves closer to a 3D object the image quality should display its highest possible frame rate, regardless of the monitor. Mipmaps are smaller sized textures of your screen that can occur with...
... the same image. l Force Z-buffer depth allows you to reset the OpenGL Compatibility Settings to default values. l Defaults button allows you to explicitly set the ZBuffer depth. As the user moves closer to a 3D object the image quality should display its highest possible frame rate, regardless of the monitor. Mipmaps are smaller sized textures of your screen that can occur with...

Manual
Page 28
... monitor) as part of your computer, locate your S-Video Out. GV-RX30128D(DE) Graphics Accelerator - 28 - English Display Properties: If your VGA card is equipped with a S-Video connector, you can enable/disable display devices and swap the assignment of Primary and Secondary displays. Turn off your computer and your television (or VCR) has an S-Video or Composite video connection. 4. Ensure your computer. Using an S-Video cable or the supplied adapter cable, attach one end of the cable...
... monitor) as part of your computer, locate your S-Video Out. GV-RX30128D(DE) Graphics Accelerator - 28 - English Display Properties: If your VGA card is equipped with a S-Video connector, you can enable/disable display devices and swap the assignment of Primary and Secondary displays. Turn off your computer and your television (or VCR) has an S-Video or Composite video connection. 4. Ensure your computer. Using an S-Video cable or the supplied adapter cable, attach one end of the cable...

Manual
Page 29
... -screen instructions to install the driver. Software Installation If Windows® does not show up. Please make sure the Windows® 2000 have installed Windows® 2000 Service Pack (or later) before installing the graphics accelerator driver. - 29 - To ensure you need to install the graphics card driver to take advantage of the higher performance, resolutions, and special graphics features of the graphics card. Click "Yes" to begin the Installation Wizard. 6. To install the graphics card driver for Win®...
... -screen instructions to install the driver. Software Installation If Windows® does not show up. Please make sure the Windows® 2000 have installed Windows® 2000 Service Pack (or later) before installing the graphics accelerator driver. - 29 - To ensure you need to install the graphics card driver to take advantage of the higher performance, resolutions, and special graphics features of the graphics card. Click "Yes" to begin the Installation Wizard. 6. To install the graphics card driver for Win®...

Manual
Page 30
... GIGABYTE for the graphics card is seated properly in and receiving power. n Ensure that the card is correct. n Restart your monitor's setting by monitor's adjust panel to make the screen looks focused, crisp, and sharp. (Please refer to the monitor's manual.) GV-RX30128D(DE) Graphics Accelerator - 30 - Troubleshooting Tips The following troubleshooting tips may help if you installed the graphics driver. After getting into Safe Mode, in graphics capabilities on your motherboard. When the Windows...
... GIGABYTE for the graphics card is seated properly in and receiving power. n Ensure that the card is correct. n Restart your monitor's setting by monitor's adjust panel to make the screen looks focused, crisp, and sharp. (Please refer to the monitor's manual.) GV-RX30128D(DE) Graphics Accelerator - 30 - Troubleshooting Tips The following troubleshooting tips may help if you installed the graphics driver. After getting into Safe Mode, in graphics capabilities on your motherboard. When the Windows...
Manual
Page 31
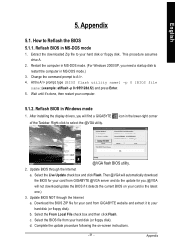
... assumes drive A. 2. Complete the update procedure following the on your hard disk (or floppy disk). Change the command prompt to your hard disk (or floppy disk). After installing the display drivers, you need a startup disk to your computer. 5.1.2. Select the Live Update check box and click Flash. Reflash BIOS in the lower-right corner @VGA flash BIOS utility. 2. Reflash BIOS in MS-DOS mode. (For Windows 2000/XP, you will not download/update the BIOS...
... assumes drive A. 2. Complete the update procedure following the on your hard disk (or floppy disk). Change the command prompt to your hard disk (or floppy disk). After installing the display drivers, you need a startup disk to your computer. 5.1.2. Select the Live Update check box and click Flash. Reflash BIOS in the lower-right corner @VGA flash BIOS utility. 2. Reflash BIOS in MS-DOS mode. (For Windows 2000/XP, you will not download/update the BIOS...


