
User Manual
Page 2
... installation may cause bodily harm or damage to follow the installation process with the most optimal solution for purchasing Gigabyte Tech. Nonobservance of the "3D Mercury" series, please visit Gigabyte Tech. The devices inside, including power supply, hard disk, CD-ROM drive, motherboard, ventilator, etc, are...observe the instructions in the user manual. The product's warranty label has been removed or damaged. 8. Gigabyte Tech. thermal product. For further information and specifications of the proper operation provided. 3. English Thank you for thermal dissipation.
... installation may cause bodily harm or damage to follow the installation process with the most optimal solution for purchasing Gigabyte Tech. Nonobservance of the "3D Mercury" series, please visit Gigabyte Tech. The devices inside, including power supply, hard disk, CD-ROM drive, motherboard, ventilator, etc, are...observe the instructions in the user manual. The product's warranty label has been removed or damaged. 8. Gigabyte Tech. thermal product. For further information and specifications of the proper operation provided. 3. English Thank you for thermal dissipation.

User Manual
Page 11
... cooling system tray (above the power supply area and back panel, total of 5 screws.) 4-1-7i Reverse the steps to reassemble the parts 4-2 Installation of Motherboard 3D Mercury can support ATX / Micro ATX / Mini ATX / E-ATX / CEB Please confirm the motherboard screw holes locations and size specification before installation Required Tools: Screwdriver, stand...
... cooling system tray (above the power supply area and back panel, total of 5 screws.) 4-1-7i Reverse the steps to reassemble the parts 4-2 Installation of Motherboard 3D Mercury can support ATX / Micro ATX / Mini ATX / E-ATX / CEB Please confirm the motherboard screw holes locations and size specification before installation Required Tools: Screwdriver, stand...

User Manual
Page 12
... ATX E-ATX Motherboard screws 9 9 9 12 Code name A1-A9 M1-M9 U1-U9 E1-E12 Case copper post 9 9 9 12 4-3 Installation of Add on Card The 3D Mercury does not require any tools for installation of add-on cards such as graphics cards and network cards.
... ATX E-ATX Motherboard screws 9 9 9 12 Code name A1-A9 M1-M9 U1-U9 E1-E12 Case copper post 9 9 9 12 4-3 Installation of Add on Card The 3D Mercury does not require any tools for installation of add-on cards such as graphics cards and network cards.

User Manual
Page 14
... the Audio connector into the system fan 14 Please read the motherboard user manual supplied by the motherboard manufacturer 4-5 Connection of Fan Power Cables The 3D Mercury has one 12cm silent, blue LED cooling fan at the front and two at the rear Pin Definition Pin Definition 1 MIC2_L 6 FSENSE1 2 GND 7 FAUDIO_JD 3 MIC2_R...
... the Audio connector into the system fan 14 Please read the motherboard user manual supplied by the motherboard manufacturer 4-5 Connection of Fan Power Cables The 3D Mercury has one 12cm silent, blue LED cooling fan at the front and two at the rear Pin Definition Pin Definition 1 MIC2_L 6 FSENSE1 2 GND 7 FAUDIO_JD 3 MIC2_R...
User Manual
Page 15
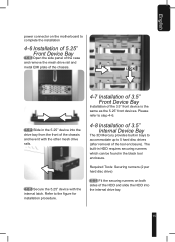
... drive) 4-8-1 Fit the securing runners on the motherboard to the figure for installation procedure. 4-7 Installation of 3.5" Front Device Bay Installation of 3.5" Internal Device Bay The 3D Mercury provides built-in the black tool enclosure.
... drive) 4-8-1 Fit the securing runners on the motherboard to the figure for installation procedure. 4-7 Installation of 3.5" Front Device Bay Installation of 3.5" Internal Device Bay The 3D Mercury provides built-in the black tool enclosure.
User Manual
Page 16
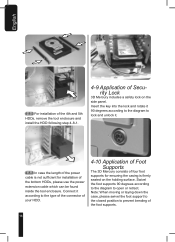
... according to the diagram to lock and unlock it according to the type of the connector of your HDD. 4-10 Application of Foot Supports The 3D Mercury consists of four foot supports for installation of the bottom HDDs, please use the power extension cable which can be found inside the tool enclosure.... English 4-8-2 For installation of the 4th and 5th HDDs, remove the tool enclosure and install the HDD following step 4-8-1. 4-9 Application of Security Lock 3D Mercury includes a safety lock on the holding surface.
... according to the diagram to lock and unlock it according to the type of the connector of your HDD. 4-10 Application of Foot Supports The 3D Mercury consists of four foot supports for installation of the bottom HDDs, please use the power extension cable which can be found inside the tool enclosure.... English 4-8-2 For installation of the 4th and 5th HDDs, remove the tool enclosure and install the HDD following step 4-8-1. 4-9 Application of Security Lock 3D Mercury includes a safety lock on the holding surface.