
User Manual
Page 1
H610M S2H H610M S2H V2 DDR4 User's Manual Rev. 1002 For more product details, please visit GIGABYTE's website. https://www.gigabyte.com/Motherboard/H610M-S2H-rev-10?m=ma#kf https://www.gigabyte.com/Motherboard/H610M-S2H-V2-DDR4-rev-10?m=ma#kf GIGABYTE will reduce paper use in order to fulfill the responsibilities of this product are recyclable and reusable. GIGABYTE works with you to reduce the impacts on global warming, the packaging materials of a global citizen. Also, to protect the environment.
H610M S2H H610M S2H V2 DDR4 User's Manual Rev. 1002 For more product details, please visit GIGABYTE's website. https://www.gigabyte.com/Motherboard/H610M-S2H-rev-10?m=ma#kf https://www.gigabyte.com/Motherboard/H610M-S2H-V2-DDR4-rev-10?m=ma#kf GIGABYTE will reduce paper use in order to fulfill the responsibilities of this product are recyclable and reusable. GIGABYTE works with you to reduce the impacts on global warming, the packaging materials of a global citizen. Also, to protect the environment.
User Manual
Page 2
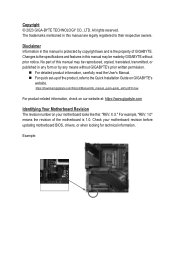
...© 2023 GIGA-BYTE TECHNOLOGY CO., LTD. Disclaimer Information in this manual may be made by GIGABYTE without GIGABYTE's prior written permission. „„ For detailed product information, carefully read the User's Manual. „„ For quick set-up of the product, refer to...prior notice. The trademarks mentioned in this : "REV: X.X." All rights reserved. https://download.gigabyte.com/FileList/Manual/mb_manual_quick-guide_am5.pdf?m=sw For product-related information, check on our website at: https://www.gigabyte.com Identifying Your Motherboard Revision The revision number on...
...© 2023 GIGA-BYTE TECHNOLOGY CO., LTD. Disclaimer Information in this manual may be made by GIGABYTE without GIGABYTE's prior written permission. „„ For detailed product information, carefully read the User's Manual. „„ For quick set-up of the product, refer to...prior notice. The trademarks mentioned in this : "REV: X.X." All rights reserved. https://download.gigabyte.com/FileList/Manual/mb_manual_quick-guide_am5.pdf?m=sw For product-related information, check on our website at: https://www.gigabyte.com Identifying Your Motherboard Revision The revision number on...
User Manual
Page 6
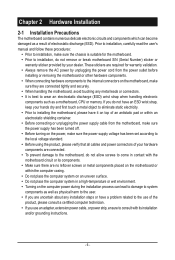
.... •• When connecting hardware components to the user. •• If you use of electrostatic discharge (ESD). Prior to installation, carefully read the user's manual and follow these procedures: •• Prior to installation, make sure the chassis is best to wear an electrostatic discharge (ESD) wrist strap when handling...
.... •• When connecting hardware components to the user. •• If you use of electrostatic discharge (ESD). Prior to installation, carefully read the user's manual and follow these procedures: •• Prior to installation, make sure the chassis is best to wear an electrostatic discharge (ESD) wrist strap when handling...
User Manual
Page 12
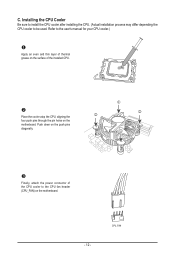
CPU_FAN v Place the cooler atop the CPU, aligning the four push pins through the pin holes on the push pins diagonally. Push down on the motherboard. j k k j w Finally, attach the power connector of the installed CPU. C. Installing the CPU Cooler Be sure to install the CPU cooler after installing the CPU. (Actual installation process may differ depending the CPU cooler to the CPU fan header (CPU_FAN) on the surface of the CPU cooler to be used. Refer to the user's manual for your CPU cooler.) u Apply an even and thin layer of thermal grease on the motherboard. - 12 -
CPU_FAN v Place the cooler atop the CPU, aligning the four push pins through the pin holes on the push pins diagonally. Push down on the motherboard. j k k j w Finally, attach the power connector of the installed CPU. C. Installing the CPU Cooler Be sure to install the CPU cooler after installing the CPU. (Actual installation process may differ depending the CPU cooler to the CPU fan header (CPU_FAN) on the surface of the CPU cooler to be used. Refer to the user's manual for your CPU cooler.) u Apply an even and thin layer of thermal grease on the motherboard. - 12 -
User Manual
Page 14
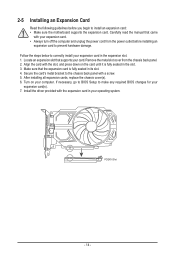
... panel with your operating system. 2-5 Installing an Expansion Card Read the following guidelines before installing an expansion card to prevent hardware damage. Carefully read the manual that supports your expansion card in its slot. 4. Locate an expansion slot that came with a screw. 5.
... panel with your operating system. 2-5 Installing an Expansion Card Read the following guidelines before installing an expansion card to prevent hardware damage. Carefully read the manual that supports your expansion card in its slot. 4. Locate an expansion slot that came with a screw. 5.
User Manual
Page 26
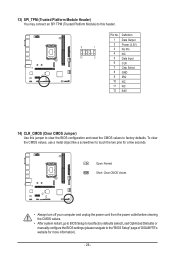
... values. •• After system restart, go to BIOS Setup to load factory defaults (select Load Optimized Defaults) or manually configure the BIOS settings (please navigate to the "BIOS Setup" page of GIGABYTE's website for a few seconds. To clear the CMOS values, use a metal object like a screwdriver to factory defaults. F_USB3 F 13...
... values. •• After system restart, go to BIOS Setup to load factory defaults (select Load Optimized Defaults) or manually configure the BIOS settings (please navigate to the "BIOS Setup" page of GIGABYTE's website for a few seconds. To clear the CMOS values, use a metal object like a screwdriver to factory defaults. F_USB3 F 13...


