GIGABYTE User Manual
Page 2
... this manual is the property of HDMI Licensing Administrator, Inc. LCD Monitor User's Manual Copyright © 2020 GIGA-BYTE TECHNOLOGY CO., LTD. in this monitor, carefully read the User Guide. • For more information, check on our website at: https://www.gigabyte.com The terms HDMI and HDMI High-Definition Multimedia Interface, and...
... this manual is the property of HDMI Licensing Administrator, Inc. LCD Monitor User's Manual Copyright © 2020 GIGA-BYTE TECHNOLOGY CO., LTD. in this monitor, carefully read the User Guide. • For more information, check on our website at: https://www.gigabyte.com The terms HDMI and HDMI High-Definition Multimedia Interface, and...
GIGABYTE User Manual
Page 3
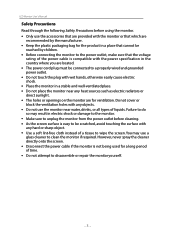
...; As the screen surface is compatible with the power specification in the country where you are recommended by children. • Before connecting the monitor to the power outlet, make sure that which are located. • The power cord plug must be connected to disassemble or repair the... monitor yourself. - 3 - However, never spray the cleaner directly onto the screen. • Disconnect the power cable if the monitor is not being used for a long period of time. • Do not attempt to a...
...; As the screen surface is compatible with the power specification in the country where you are recommended by children. • Before connecting the monitor to the power outlet, make sure that which are located. • The power cord plug must be connected to disassemble or repair the... monitor yourself. - 3 - However, never spray the cleaner directly onto the screen. • Disconnect the power cable if the monitor is not being used for a long period of time. • Do not attempt to a...

GIGABYTE User Manual
Page 4
... stands or installation methods recommended by tipping over , pulled or grabbed. • NEVER place a product in accordance with the installation instructions. Stability Hazard Precautions LCD Monitor User's Manual The product may be located between the product and supporting furniture. • NEVER place items that might tempt children to climb, such as...
... stands or installation methods recommended by tipping over , pulled or grabbed. • NEVER place a product in accordance with the installation instructions. Stability Hazard Precautions LCD Monitor User's Manual The product may be located between the product and supporting furniture. • NEVER place items that might tempt children to climb, such as...

GIGABYTE User Manual
Page 5
...'s Manual Contents INTRODUCTION 6 Unpacking...6 Package Contents...8 Product Overview...9 GETTING STARTED 11 Installing the Stand Base 11 Lift the monitor...12 Adjusting the Viewing Angle 13 Installing a Wall-Mount Bracket (Optional 15 Making Connections...17 USING THE DEVICE 18 Turning the Power On/Off 18 ... Guide...23 Configure the Device Settings 28 APPENDICES 39 Specifications...39 Supported Timing List...40 Troubleshooting...41 Basic Care...42 Notes on USB Charging 42 GIGABYTE Service Information 42 SAFETY INFORMATION 43 Regulatory Notices...43 - 5 -
...'s Manual Contents INTRODUCTION 6 Unpacking...6 Package Contents...8 Product Overview...9 GETTING STARTED 11 Installing the Stand Base 11 Lift the monitor...12 Adjusting the Viewing Angle 13 Installing a Wall-Mount Bracket (Optional 15 Making Connections...17 USING THE DEVICE 18 Turning the Power On/Off 18 ... Guide...23 Configure the Device Settings 28 APPENDICES 39 Specifications...39 Supported Timing List...40 Troubleshooting...41 Basic Care...42 Notes on USB Charging 42 GIGABYTE Service Information 42 SAFETY INFORMATION 43 Regulatory Notices...43 - 5 -
GIGABYTE User Manual
Page 6
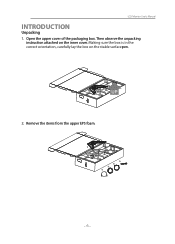
Remove the items from the upper EPS foam. - 6 - Open the upper cover of the packaging box. Then observe the unpacking instruction attached on the stable surfacepen. 2. LCD Monitor User's Manual INTRODUCTION Unpacking 1. Making sure the box is in the correct orientation, carefully lay the box on the inner cover.
Remove the items from the upper EPS foam. - 6 - Open the upper cover of the packaging box. Then observe the unpacking instruction attached on the stable surfacepen. 2. LCD Monitor User's Manual INTRODUCTION Unpacking 1. Making sure the box is in the correct orientation, carefully lay the box on the inner cover.
GIGABYTE User Manual
Page 7
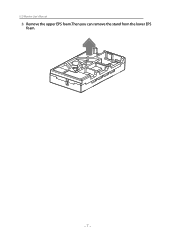
Remove the upper EPS foam.Then you can remove the stand from the lower EPS foam. - 7 - LCD Monitor User's Manual 3.
Remove the upper EPS foam.Then you can remove the stand from the lower EPS foam. - 7 - LCD Monitor User's Manual 3.
GIGABYTE User Manual
Page 8
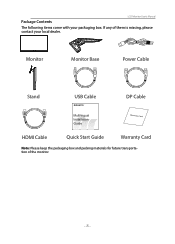
LCD Monitor User's Manual Package Contents The following items come with your local dealer. Monitor Monitor Base Power Cable Stand USB Cable DP Cable Multilingual Installation Guide Warranty Card HDMI Cable Quick Start Guide Warranty Card Note: Please keep the packaging box and packing materials for future transportation of them is missing, please contact your packaging box. If any of the monitor. - 8 -
LCD Monitor User's Manual Package Contents The following items come with your local dealer. Monitor Monitor Base Power Cable Stand USB Cable DP Cable Multilingual Installation Guide Warranty Card HDMI Cable Quick Start Guide Warranty Card Note: Please keep the packaging box and packing materials for future transportation of them is missing, please contact your packaging box. If any of the monitor. - 8 -
GIGABYTE User Manual
Page 9
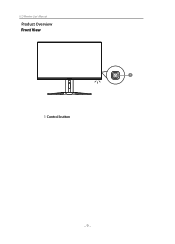
LCD Monitor User's Manual Product Overview Front View 1 1 Control button - 9 -
LCD Monitor User's Manual Product Overview Front View 1 1 Control button - 9 -
GIGABYTE User Manual
Page 10
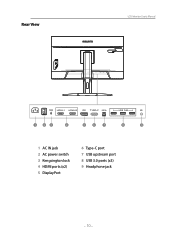
Rear View LCD Monitor User's Manual 1 23 4 5 6 7 8 9 1 AC IN jack 2 AC power switch 3 Kengsington lock 4 HDMI ports (x2) 5 DisplayPort 6 Type-C port 7 USB upstream port 8 USB 3.0 ports (x3) 9 Headphone jack - 10 -
Rear View LCD Monitor User's Manual 1 23 4 5 6 7 8 9 1 AC IN jack 2 AC power switch 3 Kengsington lock 4 HDMI ports (x2) 5 DisplayPort 6 Type-C port 7 USB upstream port 8 USB 3.0 ports (x3) 9 Headphone jack - 10 -
GIGABYTE User Manual
Page 11
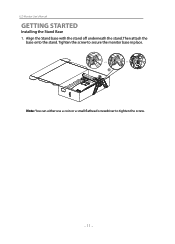
Note: You can either use a coin or a small flathead screwdriver to secure the monitor base in place. Align the Stand base with the stand off underneath the stand.Then attach the base onto the stand. Tighten the screw to tighten the screw. - 11 - LCD Monitor User's Manual GETTING STARTED Installing the Stand Base 1.
Note: You can either use a coin or a small flathead screwdriver to secure the monitor base in place. Align the Stand base with the stand off underneath the stand.Then attach the base onto the stand. Tighten the screw to tighten the screw. - 11 - LCD Monitor User's Manual GETTING STARTED Installing the Stand Base 1.
GIGABYTE User Manual
Page 12
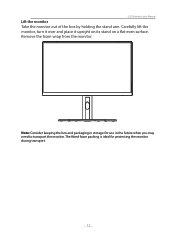
LCD Monitor User's Manual Lift the monitor Take the monitor out of the box by holding the stand arm. Carefully lift the monitor, turn it over and place it upright on its stand on a flat even surface. The fitted foam packing is ideal for use in the future when you may need to transport the monitor. Remove the foam wrap from the monitor. Note: Consider keeping the box and packaging in storage for protecting the monitor during transport. - 12 -
LCD Monitor User's Manual Lift the monitor Take the monitor out of the box by holding the stand arm. Carefully lift the monitor, turn it over and place it upright on its stand on a flat even surface. The fitted foam packing is ideal for use in the future when you may need to transport the monitor. Remove the foam wrap from the monitor. Note: Consider keeping the box and packaging in storage for protecting the monitor during transport. - 12 -
GIGABYTE User Manual
Page 13
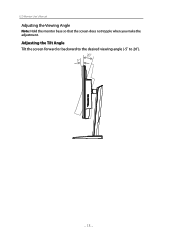
LCD Monitor User's Manual Adjusting the Viewing Angle Note: Hold the monitor base so that the screen does not topple when you make the adjustment. Adjusting the Tilt Angle Tilt the screen forward or backward to the desired viewing angle (-5˚ to 20˚). 20 - 13 -
LCD Monitor User's Manual Adjusting the Viewing Angle Note: Hold the monitor base so that the screen does not topple when you make the adjustment. Adjusting the Tilt Angle Tilt the screen forward or backward to the desired viewing angle (-5˚ to 20˚). 20 - 13 -
GIGABYTE User Manual
Page 14
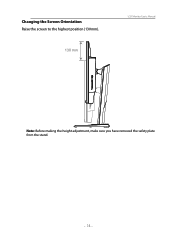
LCD Monitor User's Manual Note: Before making the height adjustment, make sure you have removed the safety plate from the stand. - 14 - Changing the Screen Orientation Raise the screen to the highest position (130mm).
LCD Monitor User's Manual Note: Before making the height adjustment, make sure you have removed the safety plate from the stand. - 14 - Changing the Screen Orientation Raise the screen to the highest position (130mm).
GIGABYTE User Manual
Page 15
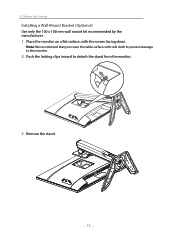
Place the monitor on a flat surface, with soft cloth to prevent damage to detach the stand from the monitor. 3. Remove the stand. - 15 - LCD Monitor User's Manual Installing a Wall-Mount Bracket (Optional) Use only the 100 x 100 mm wall mount kit recommended by the manufacturer. 1. Push the locking clips inward to the monitor. 2. Note: We recommend that you cover the table surface with the screen facing down.
Place the monitor on a flat surface, with soft cloth to prevent damage to detach the stand from the monitor. 3. Remove the stand. - 15 - LCD Monitor User's Manual Installing a Wall-Mount Bracket (Optional) Use only the 100 x 100 mm wall mount kit recommended by the manufacturer. 1. Push the locking clips inward to the monitor. 2. Note: We recommend that you cover the table surface with the screen facing down.
GIGABYTE User Manual
Page 16
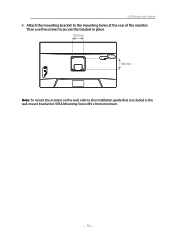
Then use the screws to secure the bracket in place. 100 mm 100 mm Note: To mount the monitor on the wall, refer to the mounting holes at the rear of the monitor. Attach the mounting bracket to the installation guide that is included in the wall-mount bracket kit. LCD Monitor User's Manual 4. VESA Mounting Screw M4 x 8mm minimum. - 16 -
Then use the screws to secure the bracket in place. 100 mm 100 mm Note: To mount the monitor on the wall, refer to the mounting holes at the rear of the monitor. Attach the mounting bracket to the installation guide that is included in the wall-mount bracket kit. LCD Monitor User's Manual 4. VESA Mounting Screw M4 x 8mm minimum. - 16 -
GIGABYTE User Manual
Page 17
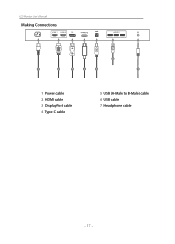
LCD Monitor User's Manual Making Connections HDMI-1 HDMI-2 DP USB 3.0 6 1 2 3 4 5 7 1 Power cable 2 HDMI cable 3 DisplayPort cable 4 Type-C cable 5 USB (A-Male to B-Male) cable 6 USB cable 7 Headphone cable - 17 -
LCD Monitor User's Manual Making Connections HDMI-1 HDMI-2 DP USB 3.0 6 1 2 3 4 5 7 1 Power cable 2 HDMI cable 3 DisplayPort cable 4 Type-C cable 5 USB (A-Male to B-Male) cable 6 USB cable 7 Headphone cable - 17 -
GIGABYTE User Manual
Page 18
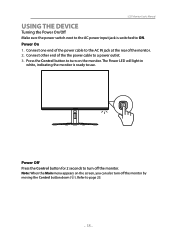
... of the the power cable to turn on the screen, you can also turn off the monitor by moving the Control button down ( ). Power Off Press the Control button for 2 seconds to turn off the monitor. Press the Control button to a power outlet. 3. The Power LED will light in white..., indicating the monitor is switched to use. Power On 1. LCD Monitor User's Manual USING THE DEVICE Turning the Power On/Off Make sure the ...
... of the the power cable to turn on the screen, you can also turn off the monitor by moving the Control button down ( ). Power Off Press the Control button for 2 seconds to turn off the monitor. Press the Control button to a power outlet. 3. The Power LED will light in white..., indicating the monitor is switched to use. Power On 1. LCD Monitor User's Manual USING THE DEVICE Turning the Power On/Off Make sure the ...
GIGABYTE User Manual
Page 19
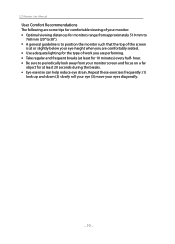
... or slightly below your eye-height when you are comfortably seated. • Use adequate lighting for the type of your monitor: • Optimal viewing distances for monitors range from your monitor screen and focus on a far object for 10 minutes) every half- Repeat these exercises frequently: (1) look away from ...approximately 510 mm to 760 mm (20" to 30"). • A general guideline is to position the monitor such that the top of the screen is at least 20 seconds during the breaks. • Eye exercise can help reduce eye strain.
... or slightly below your eye-height when you are comfortably seated. • Use adequate lighting for the type of your monitor: • Optimal viewing distances for monitors range from your monitor screen and focus on a far object for 10 minutes) every half- Repeat these exercises frequently: (1) look away from ...approximately 510 mm to 760 mm (20" to 30"). • A general guideline is to position the monitor such that the top of the screen is at least 20 seconds during the breaks. • Eye exercise can help reduce eye strain.
GIGABYTE User Manual
Page 20
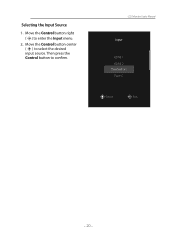
Then press the Control LCD Monitor User's Manual Input HDMI 1 HDMI 2 DisplayPort Type-C Select Exit - 20 - Move the Control button center ( ) to enter the Input menu. 2. Selecting the Input Source 1. Move the Control button right ( ) to select the desired input source.
Then press the Control LCD Monitor User's Manual Input HDMI 1 HDMI 2 DisplayPort Type-C Select Exit - 20 - Move the Control button center ( ) to enter the Input menu. 2. Selecting the Input Source 1. Move the Control button right ( ) to select the desired input source.
GIGABYTE User Manual
Page 21
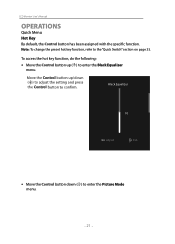
To access the hot key function, do the following: • Move the Control button up /down ( ) to adjust the setting and press the Control Black Equalizer 10 Adjust Exit • Move the Control button down ( ) to enter the Picture Mode menu. - 21 - Move the Control button up ( ) to the "Quick Switch" section on page 35. Note: To change the preset hot key function, refer to enter the Black Equalizer menu. LCD Monitor User's Manual OPERATIONS Quick Menu Hot Key By default, the Control button has been assigned with the specific function.
To access the hot key function, do the following: • Move the Control button up /down ( ) to adjust the setting and press the Control Black Equalizer 10 Adjust Exit • Move the Control button down ( ) to enter the Picture Mode menu. - 21 - Move the Control button up ( ) to the "Quick Switch" section on page 35. Note: To change the preset hot key function, refer to enter the Black Equalizer menu. LCD Monitor User's Manual OPERATIONS Quick Menu Hot Key By default, the Control button has been assigned with the specific function.

