
Manual
Page 2
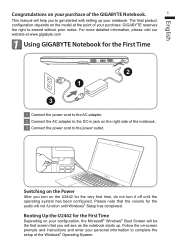
... the setup of your purchase. Booting Up the U2442 for the audio will not function until the operating system has been configured. Follow the on your personal information to the power outlet. GIGABYTE reserves the right to get started with setting up . Please note that the volume for the First Time Depending on -screen prompts and instructions and enter your configuration, the Microsoft® Windows® Boot Screen...
... the setup of your purchase. Booting Up the U2442 for the audio will not function until the operating system has been configured. Follow the on your personal information to the power outlet. GIGABYTE reserves the right to get started with setting up . Please note that the volume for the First Time Depending on -screen prompts and instructions and enter your configuration, the Microsoft® Windows® Boot Screen...

Manual
Page 3
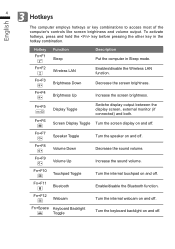
... Port 3 USB Port x 2 4 Microphone Jack 5 Headphone Jack 6 Kensington Lock Slot English 2 2 Your GIGABYTE Notebook Tour Top View 1 Webcam Status LED Indicator 2 Webcam 3 Light sensor 2 1 3 4 Microphone x 2 5 Speakers 6 TouchPad 4 7 Battery Indicator Button 8 LED Indicators 10 9 8 9 Power Button 5 10 Smart+ Button Press the right button of touchpad to check the remaining battery power. Bluetooth Status LED Wireless Lan Status LED HDD Status LED Battery Status LED 6 Power Status LED 7 To call out smart manager function...
... Port 3 USB Port x 2 4 Microphone Jack 5 Headphone Jack 6 Kensington Lock Slot English 2 2 Your GIGABYTE Notebook Tour Top View 1 Webcam Status LED Indicator 2 Webcam 3 Light sensor 2 1 3 4 Microphone x 2 5 Speakers 6 TouchPad 4 7 Battery Indicator Button 8 LED Indicators 10 9 8 9 Power Button 5 10 Smart+ Button Press the right button of touchpad to check the remaining battery power. Bluetooth Status LED Wireless Lan Status LED HDD Status LED Battery Status LED 6 Power Status LED 7 To call out smart manager function...
Manual
Page 5
... the screen brightness. Fn+F4 Brightness Up Increase the screen brightness. Fn+F5 Fn+F6 Display Toggle Switche display output between the display screen, external monitor (if connected) and both. Fn+F11 Bluetooth Enable/disable the Bluetooth function. Fn+F9 Volume Up Increase the sound volume. Fn+F12 Webcam Turn the internal webcam on and off . English 3 4 Hotkeys The computer employs hotkeys or key combinations to access most of the computer's controls like screen brightness and volume output. Fn+F8 Volume Down Decrease the sound volume. Hotkey...
... the screen brightness. Fn+F4 Brightness Up Increase the screen brightness. Fn+F5 Fn+F6 Display Toggle Switche display output between the display screen, external monitor (if connected) and both. Fn+F11 Bluetooth Enable/disable the Bluetooth function. Fn+F9 Volume Up Increase the sound volume. Fn+F12 Webcam Turn the internal webcam on and off . English 3 4 Hotkeys The computer employs hotkeys or key combinations to access most of the computer's controls like screen brightness and volume output. Fn+F8 Volume Down Decrease the sound volume. Hotkey...
Manual
Page 6
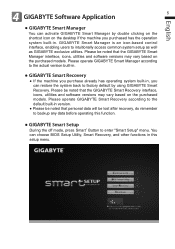
... noted that the GIGABYTE Smart Manager interface, icons, utilities and software versions may vary based on the purchased models. You can choose BIOS Setup Utility, Smart Recovery, and other functions in , you can restore the system back to factory default by double clicking on the shortcut icon on the purchased models. English 4 GIGABYTE Software Application 5 ● GIGABYTE Smart Manager You can activate GIGABYTE Smart Manager by using GIGABYTE Smart Recovery. Please operate GIGABYTE Smart Manager according to...
... noted that the GIGABYTE Smart Manager interface, icons, utilities and software versions may vary based on the purchased models. You can choose BIOS Setup Utility, Smart Recovery, and other functions in , you can restore the system back to factory default by double clicking on the shortcut icon on the purchased models. English 4 GIGABYTE Software Application 5 ● GIGABYTE Smart Manager You can activate GIGABYTE Smart Manager by using GIGABYTE Smart Recovery. Please operate GIGABYTE Smart Manager according to...
Manual
Page 7
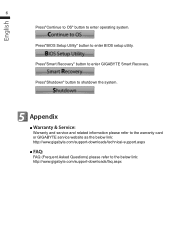
... to OS" button to enter BIOS setup utility. Press"BIOS Setup Utility" button to enter operating system. Press"Smart Recovery" button to the below link: http://www.gigabyte.com/support-downloads/technical-support.aspx ■ FAQ: FAQ (Frequent Asked Questions) please refer to enter GIGABYTE Smart Recovery. Press"Shutdown" button to shutdown the system. 5 Appendix ■ Warranty & Service: Warranty and service and related information please refer to the warranty card or GIGABYTE service website as the...
... to OS" button to enter BIOS setup utility. Press"BIOS Setup Utility" button to enter operating system. Press"Smart Recovery" button to the below link: http://www.gigabyte.com/support-downloads/technical-support.aspx ■ FAQ: FAQ (Frequent Asked Questions) please refer to enter GIGABYTE Smart Recovery. Press"Shutdown" button to shutdown the system. 5 Appendix ■ Warranty & Service: Warranty and service and related information please refer to the warranty card or GIGABYTE service website as the...


