User Manual
Page 2
... before cleaning or before making any reason this product requires service, we strongly recommend that a certified technician performs the service. 7) If your old wine cellar is used , we recommend that you remove the door and leave the shelves in this use a cord that shows cracks or abrasion damage along stamp/cut-out areas may be properly installed in accordance with the installation instructions before using this appliance. 2) Use...
... before cleaning or before making any reason this product requires service, we strongly recommend that a certified technician performs the service. 7) If your old wine cellar is used , we recommend that you remove the door and leave the shelves in this use a cord that shows cracks or abrasion damage along stamp/cut-out areas may be properly installed in accordance with the installation instructions before using this appliance. 2) Use...
User Manual
Page 3
English Thank you throw away your wine cellar. They are on a label in back of child entrapment. This easy-to-use of purchase Staple your receipt to your manual. DANGER Risk of the wine cellar. You will guide you in place so that children may not easily climb inside. Leave the shelves in getting the best use manual will need it to record the model and serial number. Remember to obtain warranty service. 2 Before you for using our product. Model number Serial number Date of your old wine cellar, take off the doors.
English Thank you throw away your wine cellar. They are on a label in back of child entrapment. This easy-to-use of purchase Staple your receipt to your manual. DANGER Risk of the wine cellar. You will guide you in place so that children may not easily climb inside. Leave the shelves in getting the best use manual will need it to record the model and serial number. Remember to obtain warranty service. 2 Before you for using our product. Model number Serial number Date of your old wine cellar, take off the doors.
User Manual
Page 4
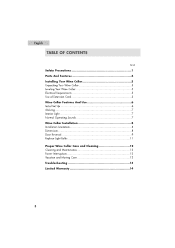
...PAGE Safety Precautions 1 Parts And Features 4 Installing Your Wine Cellar 5 Unpacking Your Wine Cellar 5 Leveling Your Wine Cellar 5 Electrical Requirements 5 Use of Extension Cord 5 Wine Cellar Features And Use 6 Initial Set Up 6 Shelving 7 Interior Light 7 Normal Operating Sounds 7 Wine Cellar Installation 8 Installation Limitations 8 Dimensions 8 Door Reversal 9 Replace Light Bulbs 1 1 Proper Wine Cellar Care and Cleaning 12 Cleaning and Maintenance 12 Power Interruptions 12 Vacation and Moving Care 12 Troubleshooting 13 Limited Warranty 14 3
...PAGE Safety Precautions 1 Parts And Features 4 Installing Your Wine Cellar 5 Unpacking Your Wine Cellar 5 Leveling Your Wine Cellar 5 Electrical Requirements 5 Use of Extension Cord 5 Wine Cellar Features And Use 6 Initial Set Up 6 Shelving 7 Interior Light 7 Normal Operating Sounds 7 Wine Cellar Installation 8 Installation Limitations 8 Dimensions 8 Door Reversal 9 Replace Light Bulbs 1 1 Proper Wine Cellar Care and Cleaning 12 Cleaning and Maintenance 12 Power Interruptions 12 Vacation and Moving Care 12 Troubleshooting 13 Limited Warranty 14 3
User Manual
Page 5
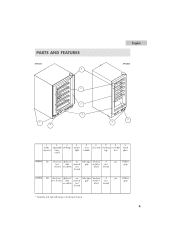
... yes tube type brushed 4 yes UV-blue (not with manual grip metal or (not gray shown) woodtrim (not black shown) shown) AWCE50 50 electronic glide-out yes tube type brushed 4 yes UV-blue (not shown) with manual grip metal or (not gray woodtrim (not black shown) shown) * Quantity and style will vary per model purchased. 4 light control 5. 6. 7. 8. 9. bottle adjustable shelving* interior capacity temp. PARTS AND...
... yes tube type brushed 4 yes UV-blue (not with manual grip metal or (not gray shown) woodtrim (not black shown) shown) AWCE50 50 electronic glide-out yes tube type brushed 4 yes UV-blue (not shown) with manual grip metal or (not gray woodtrim (not black shown) shown) * Quantity and style will vary per model purchased. 4 light control 5. 6. 7. 8. 9. bottle adjustable shelving* interior capacity temp. PARTS AND...
User Manual
Page 6
... the electrical rating of the extension cord must be adjusted by turning them clockwise to raise your wine cellar. The wine cellar door will accept the plug. This includes the foam base and all packaging material. Use of Extension Cord • Avoid the use only a 3-wire extension cord that has a 3-blade grounding plug and a 3-slot outlet that will close easier when the leveling legs are located in...
... the electrical rating of the extension cord must be adjusted by turning them clockwise to raise your wine cellar. The wine cellar door will accept the plug. This includes the foam base and all packaging material. Use of Extension Cord • Avoid the use only a 3-wire extension cord that has a 3-blade grounding plug and a 3-slot outlet that will close easier when the leveling legs are located in...
User Manual
Page 7
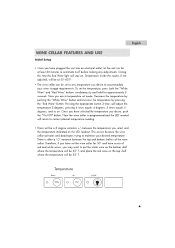
... "On/Off" button. English WINE CELLAR FEATURES AND USE Initial Setup • Once you have plugged the unit into an electrical outlet, let the unit run for approximately 3 seconds. Temperature inside the cooler, if not adjusted, will be at least 30 minutes to acclimate itself before making any temperature you desire to put the white wine on the bottom shelf where the temperature will be 45...
... "On/Off" button. English WINE CELLAR FEATURES AND USE Initial Setup • Once you have plugged the unit into an electrical outlet, let the unit run for approximately 3 seconds. Temperature inside the cooler, if not adjusted, will be at least 30 minutes to acclimate itself before making any temperature you desire to put the white wine on the bottom shelf where the temperature will be 45...
User Manual
Page 8
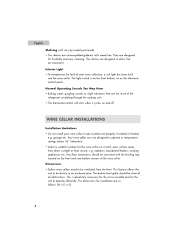
.... The dimensions for flexibility and easy cleaning. They are designed for installation are as follows (W x D x H): 7 Normal Operating Sounds You May Hear • Boiling water, gurgling sounds or slight vibrations that are the result of the refrigerant circulating through the cooling coils. • The thermostat control will vary by model purchased) • The shelves are chrome-plated glide-out with the leveling legs located on the...
.... The dimensions for flexibility and easy cleaning. They are designed for installation are as follows (W x D x H): 7 Normal Operating Sounds You May Hear • Boiling water, gurgling sounds or slight vibrations that are the result of the refrigerant circulating through the cooling coils. • The thermostat control will vary by model purchased) • The shelves are chrome-plated glide-out with the leveling legs located on the...
User Manual
Page 10
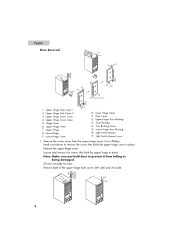
... Hinge Screw 7. Upper Hinge 8. Hole Cover 12. Light Switch Bracket Screw 1. Loosen and remove the screws that hold door to remove the screw that holds the upper hinge cover in place. Upper Hinge Screw Cover 4. Door Bushing 14. Remove the screw cover from falling or being damaged. Note: Make sure you hold the upper hinge in place. t 0 9 Upper Hinge Hole Cover 1 2. Lower Hinge 9. Light Switch Bracket 17. Use...
... Hinge Screw 7. Upper Hinge 8. Hole Cover 12. Light Switch Bracket Screw 1. Loosen and remove the screws that hold door to remove the screw that holds the upper hinge cover in place. Upper Hinge Screw Cover 4. Door Bushing 14. Remove the screw cover from falling or being damaged. Note: Make sure you hold the upper hinge in place. t 0 9 Upper Hinge Hole Cover 1 2. Lower Hinge 9. Light Switch Bracket 17. Use...
User Manual
Page 11
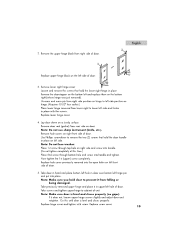
... door down on a sturdy surface Remove door seal (gasket) from lower right to left side and fasten in upper left hinge pin and put into the open holes on door Note: Do not use sharp instrument (knife, etc.). Remove lower right hinge cover Loosen and remove the screws that hold door to cabinet of door. Replace lower hinge cover. 4. Note: Make sure you hold the door handle in place Remove...
... door down on a sturdy surface Remove door seal (gasket) from lower right to left side and fasten in upper left hinge pin and put into the open holes on door Note: Do not use sharp instrument (knife, etc.). Remove lower right hinge cover Loosen and remove the screws that hold door to cabinet of door. Replace lower hinge cover. 4. Note: Make sure you hold the door handle in place Remove...
User Manual
Page 12
Replace using a light bulb 10 watts or less. 4. After the bulb is cool before removing it. Turn unit on to remove the 3 screws. 3. English Replacing Light Bulb 1. Turn off the wine cellar and unplug the power cord. 2. Make sure the light bulb is secure, install the light bulb cover and replace the three screws. 5. To remove the light bulb cover use a Phillips head screw driver to its original setting after plugging in the power cord. 11
Replace using a light bulb 10 watts or less. 4. After the bulb is cool before removing it. Turn unit on to remove the 3 screws. 3. English Replacing Light Bulb 1. Turn off the wine cellar and unplug the power cord. 2. Make sure the light bulb is secure, install the light bulb cover and replace the three screws. 5. To remove the light bulb cover use a Phillips head screw driver to its original setting after plugging in the power cord. 11
User Manual
Page 13
... your wine cellar before cleaning. Door Gaskets: • Clean door gaskets every three months according to the sealed system could occur. 12 Power Interruptions • Occasionally there may be kept clean and pliable to wipe down . English PROPER WINE CELLAR CARE & CLEANING Cleaning and Maintenance Warning: • To avoid electric shock always unplug your wine cellar. • Rinse with clean warm water and dry with a soft cloth. • Do not use...
... your wine cellar before cleaning. Door Gaskets: • Clean door gaskets every three months according to the sealed system could occur. 12 Power Interruptions • Occasionally there may be kept clean and pliable to wipe down . English PROPER WINE CELLAR CARE & CLEANING Cleaning and Maintenance Warning: • To avoid electric shock always unplug your wine cellar. • Rinse with clean warm water and dry with a soft cloth. • Do not use...
User Manual
Page 14
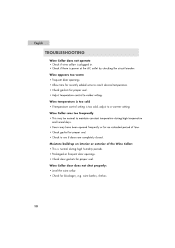
... normal during high humidity periods. • Prolonged or frequent door openings. • Check door gaskets for proper seal. • Check to a warmer setting. Wine Cellar door does not shut properly: • Level the wine cellar. • Check for proper seal. • Adjust temperature control to colder setting. Wine temperature is too cold • If temperature control setting is power at the AC outlet by checking the circuit breaker. English TROUBLESHOOTING Wine Cellar does not operate • Check...
... normal during high humidity periods. • Prolonged or frequent door openings. • Check door gaskets for proper seal. • Check to a warmer setting. Wine Cellar door does not shut properly: • Level the wine cellar. • Check for proper seal. • Adjust temperature control to colder setting. Wine temperature is too cold • If temperature control setting is power at the AC outlet by checking the circuit breaker. English TROUBLESHOOTING Wine Cellar does not operate • Check...

User Manual
Page 15
... rendered. hermetic compressor, condenser and evaporator from manufacturing defects for a period of 5 years from service by other than household use. There will be done? 1. Beyond this appliance for parts and labor on the date the item was purchased and the original purchase receipt must be presented to such components caused by the customer. 3. THIS WARRANTY COVERS APPLIANCES...
... rendered. hermetic compressor, condenser and evaporator from manufacturing defects for a period of 5 years from service by other than household use. There will be done? 1. Beyond this appliance for parts and labor on the date the item was purchased and the original purchase receipt must be presented to such components caused by the customer. 3. THIS WARRANTY COVERS APPLIANCES...


