

User Manual
Page 2
... controls 4 Using the remote control 7 Basic operation Switching on/off the TV set 8 Searching channels 9 Full automatic mode 9 Semi-automatic search 10 Manual fine tune 11 Program skip 12 Watching TV 13 Watching TV program 13 Program swap and auto scan functions 14 Convenient picture and sound control functions 15 Multiple picture modes 15 Black stretch and noise reduce 16 Mute 17 Time functions 18 Clock setting and timer on/off functions 18 Sleep timer and program...
... controls 4 Using the remote control 7 Basic operation Switching on/off the TV set 8 Searching channels 9 Full automatic mode 9 Semi-automatic search 10 Manual fine tune 11 Program skip 12 Watching TV 13 Watching TV program 13 Program swap and auto scan functions 14 Convenient picture and sound control functions 15 Multiple picture modes 15 Black stretch and noise reduce 16 Mute 17 Time functions 18 Clock setting and timer on/off functions 18 Sleep timer and program...
User Manual
Page 3
In such cases please press the "TITLE" button on the remote then operate the arrow / navigation buttons on the remote control switches the unit between TV and DVD, after watching a DVD Disc press the DVD button to return to TV mode. 22 DVD Function Button Please note the DVD function button on the remote controller. IMPORTANT REMOTE CONTROL INFORMATION On some DVD disc formats the navigation (arrow buttons) buttons on the remote may not operate.
In such cases please press the "TITLE" button on the remote then operate the arrow / navigation buttons on the remote control switches the unit between TV and DVD, after watching a DVD Disc press the DVD button to return to TV mode. 22 DVD Function Button Please note the DVD function button on the remote controller. IMPORTANT REMOTE CONTROL INFORMATION On some DVD disc formats the navigation (arrow buttons) buttons on the remote may not operate.

User Manual
Page 4
... proper ventilation. The graphic symbols on using certain electrical appiiances near the receiver. This circuit removes any other power. ALLOW enough space between the receiver and the wall to the cabinet or component failure. Soft and indirect lighting is intended to alert the user to DC supply or any residual magnetism in the picture. Warning and cautions CAUTION: TO...
... proper ventilation. The graphic symbols on using certain electrical appiiances near the receiver. This circuit removes any other power. ALLOW enough space between the receiver and the wall to the cabinet or component failure. Soft and indirect lighting is intended to alert the user to DC supply or any residual magnetism in the picture. Warning and cautions CAUTION: TO...

User Manual
Page 6
... accordance with instruction give in this mains lead are available from the wall socket and replace the fuse with a 5Amp ASTA approved to rain or moisture. Never use the plug without the fuse cover fitted. This wires in this unit is double insulated. NO USER SERVICEABLE PARTS INSIDE REFER SERVICING TO QUALIFIED SERVICE PERSONNEL. This symbol means that this manual. 4. CAUTION...
... accordance with instruction give in this mains lead are available from the wall socket and replace the fuse with a 5Amp ASTA approved to rain or moisture. Never use the plug without the fuse cover fitted. This wires in this unit is double insulated. NO USER SERVICEABLE PARTS INSIDE REFER SERVICING TO QUALIFIED SERVICE PERSONNEL. This symbol means that this manual. 4. CAUTION...
User Manual
Page 7
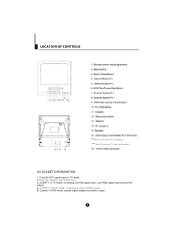
Rear AV interface: AV2 signal input. 3. SCART2; Coaxial: in TV mode, containing one AV2 signal input, one RGB signal input and one AV (CVBS) output. 5. Scart Connector(DVD output) Scart Connector(TV input and output) 1. SCART1: in DVD mode, coaxial signal (digital and audio) output. 6 Front AV: AV1 signal input in DVD mode, containing one AV output. 4. in TV mode. 2.
Rear AV interface: AV2 signal input. 3. SCART2; Coaxial: in TV mode, containing one AV2 signal input, one RGB signal input and one AV (CVBS) output. 5. Scart Connector(DVD output) Scart Connector(TV input and output) 1. SCART1: in DVD mode, coaxial signal (digital and audio) output. 6 Front AV: AV1 signal input in DVD mode, containing one AV output. 4. in TV mode. 2.

User Manual
Page 9
Auto switch-off function Should the signal input from the aerial be interrupted for more than 5 minutes, the TV will not switch to "Standby". buttons, if the"Child lock" is "Red" press the button on the remote control. Alternatively you can turn off the TV fully, press the Power button and release. If the Tv is in A/V mode or the "background" is set to off (see page...
Auto switch-off function Should the signal input from the aerial be interrupted for more than 5 minutes, the TV will not switch to "Standby". buttons, if the"Child lock" is "Red" press the button on the remote control. Alternatively you can turn off the TV fully, press the Power button and release. If the Tv is in A/V mode or the "background" is set to off (see page...
User Manual
Page 10
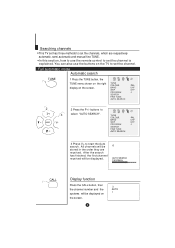
... and manual fine TUNE. BAND SKIP UHF OFF PROGRAM 0 SEARCH FINE TUNE AUTO SEARCH 2 2 Press the P+/- Full automatic mode Automatic search TUNE 1 1 Press the TUNE button, the TUNE menu shown on the right TUNE COLOUR PAL display on the TV to 3 select "AUTO SEARCH". In this section, how to use the buttons on the screen. buttons to set the channel. You can also use the remote control to...
... and manual fine TUNE. BAND SKIP UHF OFF PROGRAM 0 SEARCH FINE TUNE AUTO SEARCH 2 2 Press the P+/- Full automatic mode Automatic search TUNE 1 1 Press the TUNE button, the TUNE menu shown on the right TUNE COLOUR PAL display on the TV to 3 select "AUTO SEARCH". In this section, how to use the buttons on the screen. buttons to set the channel. You can also use the remote control to...
User Manual
Page 13
... V-/+ buttons to select the skipped channel numbers. If you use the PROGRAM NUMBER buttons to turn the SKIP function "OFF". 12 buttons to turn the SKIP function "ON". When you want to recover the skipped channel 1 Use the PROGRAM NUMBER buttons to select the channel number to be recovered. 2 Repeat those steps just now. 3 Press the V-/+ buttons to select "SKIP". These can still use the P+/buttons to select channel, this PROGRAM SEARCH FINE TUNE 0 channel will be removed...
... V-/+ buttons to select the skipped channel numbers. If you use the PROGRAM NUMBER buttons to turn the SKIP function "OFF". 12 buttons to turn the SKIP function "ON". When you want to recover the skipped channel 1 Use the PROGRAM NUMBER buttons to select the channel number to be recovered. 2 Repeat those steps just now. 3 Press the V-/+ buttons to select "SKIP". These can still use the P+/buttons to select channel, this PROGRAM SEARCH FINE TUNE 0 channel will be removed...
User Manual
Page 14
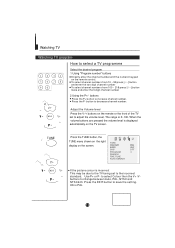
... If the picture colour is displayed automatically on the screen. buttons Press the P+ button to select a TV programme Select the desired program 1 Using "Program number" buttons Directly enter the channel number with the numeric keypad on the remote or the front of the TV set to adjust the volume level. Watching TV Watching TV program How to increase channel number. To select channel numbers from 10 ~ 99 press [-/--] button and enter the two digit channel number To select channel numbers from 100...
... If the picture colour is displayed automatically on the screen. buttons Press the P+ button to select a TV programme Select the desired program 1 Using "Program number" buttons Directly enter the channel number with the numeric keypad on the remote or the front of the TV set to adjust the volume level. Watching TV Watching TV program How to increase channel number. To select channel numbers from 10 ~ 99 press [-/--] button and enter the two digit channel number To select channel numbers from 100...
User Manual
Page 16
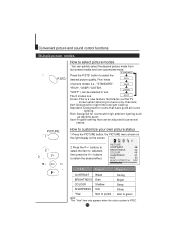
... V-/+ buttons to select picture modes You can quickly select the desired picture mode from four preset modes and one customized mode. Soft-Designed for rooms with high ambient lighting such as daytime sport; Convenient picture and sound control functions Multiple picture modes P.STD How to obtain the desired effect. User-A spare setting that can be adjusted to music only channels; Rich-Designed for night time low light viewing; PICTURE CONTRAST BRIGHTNESS COLOUR SHARPNESS *HUE BLACK...
... V-/+ buttons to select picture modes You can quickly select the desired picture mode from four preset modes and one customized mode. Soft-Designed for rooms with high ambient lighting such as daytime sport; Convenient picture and sound control functions Multiple picture modes P.STD How to obtain the desired effect. User-A spare setting that can be adjusted to music only channels; Rich-Designed for night time low light viewing; PICTURE CONTRAST BRIGHTNESS COLOUR SHARPNESS *HUE BLACK...

User Manual
Page 17
... CHILD LOCK AVL CALENDAR ON OFF ON OFF ON buttons to select "NOISE REDUCE". 3 Press the V-/+ buttons to turn the BLACK STRETCH function "ON" or "OFF". Convenient picture and sound control functions Continued Noise Reduce Picture Noise & Grain Reduction Circuit. (Use only on poor reception) Black stretch and noise reduce PICTURE 1 2 3 How to select BLACK STRETCH 1 Press the PICTURE button, the PICTURE menu shown on the right display on the screen.
... CHILD LOCK AVL CALENDAR ON OFF ON OFF ON buttons to select "NOISE REDUCE". 3 Press the V-/+ buttons to turn the BLACK STRETCH function "ON" or "OFF". Convenient picture and sound control functions Continued Noise Reduce Picture Noise & Grain Reduction Circuit. (Use only on poor reception) Black stretch and noise reduce PICTURE 1 2 3 How to select BLACK STRETCH 1 Press the PICTURE button, the PICTURE menu shown on the right display on the screen.
User Manual
Page 19
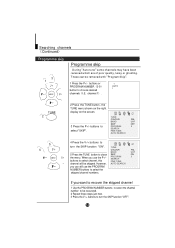
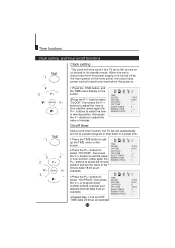
... and set can automatically turn on the screen. 2Press the P+/- buttons to select "ON PROG", then press the V-/+ or program direct number buttons to a preset program or shut down in hour position; press again the P+/- press again the P+/- TIME CLOCK ON TIME ON PROG OFF TIME SLEEP TIMER REMIND TIME REMIND PROG 17:18 18:00 1 --:-0 --:-1 On/off timer Using on/off by the main power on the front panel...
... and set can automatically turn on the screen. 2Press the P+/- buttons to select "ON PROG", then press the V-/+ or program direct number buttons to a preset program or shut down in hour position; press again the P+/- press again the P+/- TIME CLOCK ON TIME ON PROG OFF TIME SLEEP TIMER REMIND TIME REMIND PROG 17:18 18:00 1 --:-0 --:-1 On/off timer Using on/off by the main power on the front panel...
User Manual
Page 20
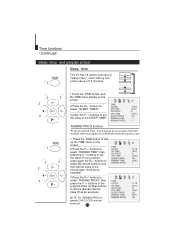
... TIME menu on the screen. 2 Press the P+/- Time functions Continued Sleep timer and program preset Sleep timer The TV has 18 option settings for 0 TIME "Sleep timer", each setting has 10 1 a time value of the minute.(take 18 as an example) TIME CLOCK ON TIME ON PROG OFF TIME SLEEP TIMER REMIND TIME REMIND PROG 3.Press the P+/- buttons to select "REMIND PROG", then press the V -/+ buttons or the program direct number buttons to operate CHILD LOCK must be turned off. 19 TIME...
... TIME menu on the screen. 2 Press the P+/- Time functions Continued Sleep timer and program preset Sleep timer The TV has 18 option settings for 0 TIME "Sleep timer", each setting has 10 1 a time value of the minute.(take 18 as an example) TIME CLOCK ON TIME ON PROG OFF TIME SLEEP TIMER REMIND TIME REMIND PROG 3.Press the P+/- buttons to select "REMIND PROG", then press the V -/+ buttons or the program direct number buttons to operate CHILD LOCK must be turned off. 19 TIME...
User Manual
Page 23
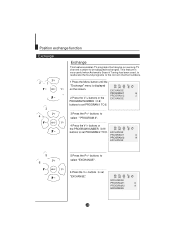
...the PROGRAM NUMBER 0-9 buttons to set PROGRAM 2 TO 9. EXCHANGE PROGRAM 1 6 PROGRAM 2 9 EXCHANGE 5 6 5 Press the P+/- buttons to select "EXCHANGE". 6 Press the V-/+ buttons to set "EXCHANGE". EXCHANGE PROGRAM 1 6 PROGRAM 2 2 2 Press the V-/+ buttons or the EXCHANGE PROGRAM NUMBER 0-9 buttons to be swapped/exchanged. EXCHANGE PROGRAM 1 6 PROGRAM 2 9 EXCHANGE 22 This feature is very useful when Automatic Search Tuning has been used, to reallocate the found programs to the correct channel numbers. 1 Press the Menu button until the "Exchange" menu is displayed on...
...the PROGRAM NUMBER 0-9 buttons to set PROGRAM 2 TO 9. EXCHANGE PROGRAM 1 6 PROGRAM 2 9 EXCHANGE 5 6 5 Press the P+/- buttons to select "EXCHANGE". 6 Press the V-/+ buttons to set "EXCHANGE". EXCHANGE PROGRAM 1 6 PROGRAM 2 2 2 Press the V-/+ buttons or the EXCHANGE PROGRAM NUMBER 0-9 buttons to be swapped/exchanged. EXCHANGE PROGRAM 1 6 PROGRAM 2 9 EXCHANGE 22 This feature is very useful when Automatic Search Tuning has been used, to reallocate the found programs to the correct channel numbers. 1 Press the Menu button until the "Exchange" menu is displayed on...
User Manual
Page 25
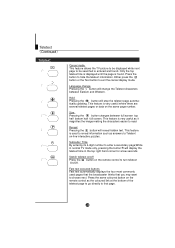
... teletext information. Subcode / Time By entering its 4-digit number to Teletext on-line interactive puzzles. Switch teletext on/off Press the button on the remote control as answers to enter a secondary page;While in normal TV mode only, pressing the button will change the Teletext characters between full screen top half bottom half full screen. Hold Pressing the button will reveal hidden text...
... teletext information. Subcode / Time By entering its 4-digit number to Teletext on-line interactive puzzles. Switch teletext on/off Press the button on the remote control as answers to enter a secondary page;While in normal TV mode only, pressing the button will change the Teletext characters between full screen top half bottom half full screen. Hold Pressing the button will reveal hidden text...

User Manual
Page 27
...,for CD and MP3. Press the digit buttons to select the End point. Press again to select the program number that you can change the mode of this function. Each time the SLOW button is invalid for example,front, side, whole view TITLE/PBC With some DVD discs pressing this function. Press PLAY/ENTER to display the search menu. Press "SEARCH" once to resume normal...
...,for CD and MP3. Press the digit buttons to select the End point. Press again to select the program number that you can change the mode of this function. Each time the SLOW button is invalid for example,front, side, whole view TITLE/PBC With some DVD discs pressing this function. Press PLAY/ENTER to display the search menu. Press "SEARCH" once to resume normal...
User Manual
Page 29
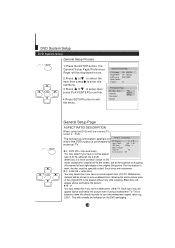
... picture. s Angle Mark On 4£3:L. This will be viewed without any side cropping. b to select the item,then press to use ultra widescreen aspect ratios e.g. 2.35:1. TV Type Auto Parental Password Default PAL AUTO NTSC General Setup Page ASPECT RATIO DESCRIPTION When using a widescreen TV. Widescreen material will normally be specially coded. Back bars may select this if you have a normal aspect ratio (4:3) TV. b OSD Lang ENG 16£9 Spdif Output Caption...
... picture. s Angle Mark On 4£3:L. This will be viewed without any side cropping. b to select the item,then press to use ultra widescreen aspect ratios e.g. 2.35:1. TV Type Auto Parental Password Default PAL AUTO NTSC General Setup Page ASPECT RATIO DESCRIPTION When using a widescreen TV. Widescreen material will normally be specially coded. Back bars may select this if you have a normal aspect ratio (4:3) TV. b OSD Lang ENG 16£9 Spdif Output Caption...
User Manual
Page 30
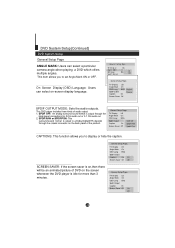
... DVD player includes three kinds of audio output: 1. On Screen Display (OSD) Language: Users can select a particular camera angle .when playing a DVD which offers multiple angles. Raw Spdif:. TV Display LB Angle Mark On OSD Lang ENG Spdif Output Caption On Screen Saver Off On Off 29 TV Display LB Angle Mark On OSD Lang ENG Spdif Output Caption On Screen Saver Off English France SPDlF OUTPUT MODE: Sets the audio outputs. DVD System Setup(Continued) DVD...
... DVD player includes three kinds of audio output: 1. On Screen Display (OSD) Language: Users can select a particular camera angle .when playing a DVD which offers multiple angles. Raw Spdif:. TV Display LB Angle Mark On OSD Lang ENG Spdif Output Caption On Screen Saver Off On Off 29 TV Display LB Angle Mark On OSD Lang ENG Spdif Output Caption On Screen Saver Off English France SPDlF OUTPUT MODE: Sets the audio outputs. DVD System Setup(Continued) DVD...

User Manual
Page 32
Press the OPEN/CLOSE button to perform the reset. ..Preference Page.. Press ENTER to close the DVD draw after screen saver has activated. 31 DVD System Setup(Continued) DVD System Setup DEFAULT: Resets all settings (except password and parental lock status) for this DVD player back to the manufacturers original settings. TV Type Auto Parental Password Default Reset Note: Some functions may not be available depending on the type of disc.
Press the OPEN/CLOSE button to perform the reset. ..Preference Page.. Press ENTER to close the DVD draw after screen saver has activated. 31 DVD System Setup(Continued) DVD System Setup DEFAULT: Resets all settings (except password and parental lock status) for this DVD player back to the manufacturers original settings. TV Type Auto Parental Password Default Reset Note: Some functions may not be available depending on the type of disc.

User Manual
Page 36
.... Adjust brightness level. No disc on handset. Dirty disc. Clean disc carefully. 35 Trouble shooting guide Before calling the "Help" line please make these preliminary tests. Symptom Screen not lit, Led is Red Screen not lit, Led is Green. Remedy Press P+ or P- Press "Picture" button on handset. Aerial may be in AV mode Switch set . Screen lit. Sound muted. Switch sound mute "Off" One sound channel missing. DVD not playing. Balance incorrectly set...
.... Adjust brightness level. No disc on handset. Dirty disc. Clean disc carefully. 35 Trouble shooting guide Before calling the "Help" line please make these preliminary tests. Symptom Screen not lit, Led is Red Screen not lit, Led is Green. Remedy Press P+ or P- Press "Picture" button on handset. Aerial may be in AV mode Switch set . Screen lit. Sound muted. Switch sound mute "Off" One sound channel missing. DVD not playing. Balance incorrectly set...


