
User Manual
Page 2
CONTENTS Before Operation Warning and cautions 1 Installation 2 Aerial connection 2 Preparation of the remote control 2 Function buttons and external sockets 3 Front panel of the TV set 3 Rear panel of the TV set 3 Using the remote control 4 Basic operation Switching the TV set on/off 5 Watching TV 6 Watching TV program 6 Program swap and auto scan functions 7 Searching channel 8 Full automatic mode 8 Semi-automatic search 9 Manual fine tune 10 Program skip 11 Convenient picture and sound control functions 12 Multiple picture modes 12 Black stretch and...
CONTENTS Before Operation Warning and cautions 1 Installation 2 Aerial connection 2 Preparation of the remote control 2 Function buttons and external sockets 3 Front panel of the TV set 3 Rear panel of the TV set 3 Using the remote control 4 Basic operation Switching the TV set on/off 5 Watching TV 6 Watching TV program 6 Program swap and auto scan functions 7 Searching channel 8 Full automatic mode 8 Semi-automatic search 9 Manual fine tune 10 Program skip 11 Convenient picture and sound control functions 12 Multiple picture modes 12 Black stretch and...
User Manual
Page 5
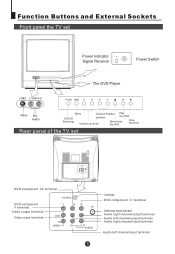
... Buttons and External Sockets Front panel the TV set Power Indicator Signal Receiver Power Switch The DVD Player Video R/L Audio Menu Channel Position Play TV/DVD Switching up/down Volume up/ down the DVD Open/close the DVD Stop the DVD Rear panel of the TV set DVD component Cb terminal DVD component Y terminal Video output terminal Video input terminal COAXIAL Y Cb Cr OUT IN VIDEO L R AUDIO COAXIAL DVD component Cr terminal Antenna input socket Audio right channel output terminal Audio left channel output terminal Audio right channel input terminal Audio left channel...
... Buttons and External Sockets Front panel the TV set Power Indicator Signal Receiver Power Switch The DVD Player Video R/L Audio Menu Channel Position Play TV/DVD Switching up/down Volume up/ down the DVD Open/close the DVD Stop the DVD Rear panel of the TV set DVD component Cb terminal DVD component Y terminal Video output terminal Video input terminal COAXIAL Y Cb Cr OUT IN VIDEO L R AUDIO COAXIAL DVD component Cr terminal Antenna input socket Audio right channel output terminal Audio left channel output terminal Audio right channel input terminal Audio left channel...
User Manual
Page 6
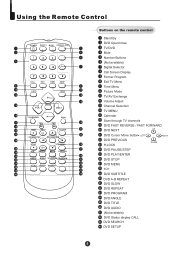
... AUDIO TITLE/PBC PROGRAM D.CALL SETUP SEARCH Buttons on the remote control Stand By DVD Open/close TV/DVD Mute Number Buttons (Not available) Digital Selector Call Screen Display Former Program Exit TV Menu Time Menu Picture Mode TV/AV Exchange Volume Adjust Channel Selection TV MENU Calendar Scan through TV channels DVD FAST REVERSE / FAST FORWARD DVD NEXT UP DVD Cursor Move button LEFT DVD PREVIOUS H.LOCK RIGHT DOWN DVD PAUSE/STEP DVD PLAY/ENTER DVD STOP DVD MENU 1O+ DVD SUBTITLE DVD A-B REPEAT DVD SLOW DVD REPEAT DVD PROGRAM DVD ANGLE DVD TITLE DVD AUDIO...
... AUDIO TITLE/PBC PROGRAM D.CALL SETUP SEARCH Buttons on the remote control Stand By DVD Open/close TV/DVD Mute Number Buttons (Not available) Digital Selector Call Screen Display Former Program Exit TV Menu Time Menu Picture Mode TV/AV Exchange Volume Adjust Channel Selection TV MENU Calendar Scan through TV channels DVD FAST REVERSE / FAST FORWARD DVD NEXT UP DVD Cursor Move button LEFT DVD PREVIOUS H.LOCK RIGHT DOWN DVD PAUSE/STEP DVD PLAY/ENTER DVD STOP DVD MENU 1O+ DVD SUBTITLE DVD A-B REPEAT DVD SLOW DVD REPEAT DVD PROGRAM DVD ANGLE DVD TITLE DVD AUDIO...
User Manual
Page 7
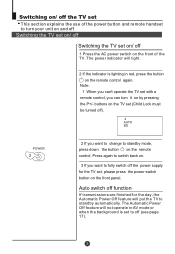
.... The power indicator will light. 2 If the indicator is lighting in AV mode or when the background is set to off (see page 17). buttons on the TV set (Child Lock must be turned off). 4 AUTO BG POWER 2 If you want to change to fully switch off the power supply for the day, the Automatic Power Off feature will not operate in red, press the button on the remote control again...
.... The power indicator will light. 2 If the indicator is lighting in AV mode or when the background is set to off (see page 17). buttons on the TV set (Child Lock must be turned off). 4 AUTO BG POWER 2 If you want to change to fully switch off the power supply for the day, the Automatic Power Off feature will not operate in red, press the button on the remote control again...
User Manual
Page 8
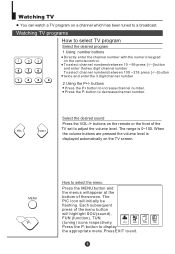
... to adjust the volume level. Watching TV programs 1 2 3 How to select TV program Select the desired program 1 Using number buttons Directly enter the channel number with the numeric keypad on the remote or the front of the menu button will highlight SOU (sound), FUN (function), TUN (tuning) icons respectively. The range is displayed automatically on a channel which has been tuned to exit. Select the desired sound Press the VOL-/+ buttons on the remote control...
... to adjust the volume level. Watching TV programs 1 2 3 How to select TV program Select the desired program 1 Using number buttons Directly enter the channel number with the numeric keypad on the remote or the front of the menu button will highlight SOU (sound), FUN (function), TUN (tuning) icons respectively. The range is displayed automatically on a channel which has been tuned to exit. Select the desired sound Press the VOL-/+ buttons on the remote control...

User Manual
Page 10
... to use the buttons on the screen. 3 AUTO BG You can also use the remote control to enter the TUNING menu. Please see Page 19 (Organise). buttons to select "AUTO SEARCH". 3 Press the VOL+ button to set channel. PROG NO ORGANISE SEARCH FINE TUNE AUTO SEARCH P+ P- PROG NO ORGANISE SEARCH FINE TUNE AUTO SEARCH AUTO SEARCH 152.25MHz CALL Display function Press the CALL button, then the channel number and the...
... to use the buttons on the screen. 3 AUTO BG You can also use the remote control to enter the TUNING menu. Please see Page 19 (Organise). buttons to select "AUTO SEARCH". 3 Press the VOL+ button to set channel. PROG NO ORGANISE SEARCH FINE TUNE AUTO SEARCH P+ P- PROG NO ORGANISE SEARCH FINE TUNE AUTO SEARCH AUTO SEARCH 152.25MHz CALL Display function Press the CALL button, then the channel number and the...

User Manual
Page 13
... channel numbers. MENU 1 Press the P+/- buttons to select "SKIP". 4 Press the VOL-/+ buttons to turn the SKIP function "OFF". P- When you can be set so that they are skipped during program selection. buttons or PROGRAM NUMBER 0-9 button to close the menu. to enter the TUNING menu. 3 Press the P+/- Press the MENU button a further 3 times until the TUN (tuning) icon is flashing.Press P- Searching channel Continued Program skip Program skip Channels can still use the P+/P+ buttons to select channel, this channel...
... channel numbers. MENU 1 Press the P+/- buttons to select "SKIP". 4 Press the VOL-/+ buttons to turn the SKIP function "OFF". P- When you can be set so that they are skipped during program selection. buttons or PROGRAM NUMBER 0-9 button to close the menu. to enter the TUNING menu. 3 Press the P+/- Press the MENU button a further 3 times until the TUN (tuning) icon is flashing.Press P- Searching channel Continued Program skip Program skip Channels can still use the P+/P+ buttons to select channel, this channel...

User Manual
Page 14
... button to music only channels; to green Note:The "Hue" item only appears when the colour system is a new feature that can be adjusted to select picture modes You can be selected in turn. Five kinds of picture modes (i.e., "STANDARD","RICH", "USER","LISTEN", USER MENU "SOFT" ) can quickly select the desired picture mode from four preset modes and one customized mode. Standard -Designed for night time low light viewing; The MAIN MENU will...
... button to music only channels; to green Note:The "Hue" item only appears when the colour system is a new feature that can be adjusted to select picture modes You can be selected in turn. Five kinds of picture modes (i.e., "STANDARD","RICH", "USER","LISTEN", USER MENU "SOFT" ) can quickly select the desired picture mode from four preset modes and one customized mode. Standard -Designed for night time low light viewing; The MAIN MENU will...
User Manual
Page 17
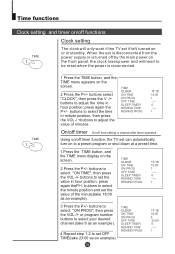
... automatically turn on to adjust the time in standby. TIME CLOCK ON TIME ON PROG OFF TIME SLEEP TIMER REMIND TIME REMIND PROG 17:18 18:00 1 --:-0 --:-1 3 Press the P+/- buttons to select "ON PROG", then press the VOL-/+ or program number buttons to select your desired channel (take 8 as an example). buttons select "CLOCK", then press the V -/+ buttons to a preset program or shut down at a preset time. 1 Press the TIME button, and the TIME menu display...
... automatically turn on to adjust the time in standby. TIME CLOCK ON TIME ON PROG OFF TIME SLEEP TIMER REMIND TIME REMIND PROG 17:18 18:00 1 --:-0 --:-1 3 Press the P+/- buttons to select "ON PROG", then press the VOL-/+ or program number buttons to select your desired channel (take 8 as an example). buttons select "CLOCK", then press the V -/+ buttons to a preset program or shut down at a preset time. 1 Press the TIME button, and the TIME menu display...
User Manual
Page 18
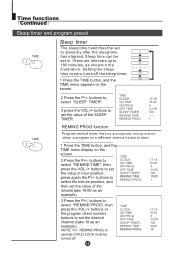
... SLEEP TIMER. buttons to select "REMIND PROG", then press the VOL-/+ buttons or the program direct number buttons to 20 180 minutes, as shown in the illustration. press again the P+/- Setting the sleep time to start. 1 Press the TIME button, and the TIME menu display on the screen. 2 Press the P+/- buttons to select "REMIND TIME", then press the VOL-/+ buttons to stand-by after the sleep time 0 TIME has elapsed. TIME CLOCK ON TIME ON PROG OFF TIME SLEEP TIMER REMIND TIME...
... SLEEP TIMER. buttons to select "REMIND PROG", then press the VOL-/+ buttons or the program direct number buttons to 20 180 minutes, as shown in the illustration. press again the P+/- Setting the sleep time to start. 1 Press the TIME button, and the TIME menu display on the screen. 2 Press the P+/- buttons to select "REMIND TIME", then press the VOL-/+ buttons to stand-by after the sleep time 0 TIME has elapsed. TIME CLOCK ON TIME ON PROG OFF TIME SLEEP TIMER REMIND TIME...
User Manual
Page 19
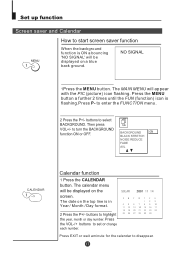
NO SIGNAL 1Press the MENU button. Press the MENU button a further 2 times until the FUN (function) icon is in Year / Month / Day format. 2 Press the P+/- BACKGROUND BLACK STRETCH NOISE REDUCE FADE AVL CALENDAR Calendar function 1 Press the CALENDAR button. Press the VOL-/+ buttons to turn the BACKGROUND function ON or OFF. to set or change each number. buttons to enter the FUNCTION menu. 2 Press the P+/- The date...
NO SIGNAL 1Press the MENU button. Press the MENU button a further 2 times until the FUN (function) icon is in Year / Month / Day format. 2 Press the P+/- BACKGROUND BLACK STRETCH NOISE REDUCE FADE AVL CALENDAR Calendar function 1 Press the CALENDAR button. Press the VOL-/+ buttons to turn the BACKGROUND function ON or OFF. to set or change each number. buttons to enter the FUNCTION menu. 2 Press the P+/- The date...
User Manual
Page 22
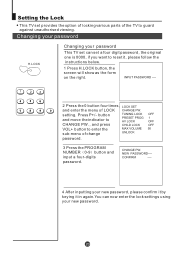
... CHILD LOCK OFF VOL+ button to enter the sub-menu of LOCK CHANGE PW. CONFIRM ---- 4 After inputting your new password. Press P+/- INPUT PASSWORD ---- 1 2 3 2 Press the 0 button four times, LOCK SET and enter the menu of change MAX VOLUME 50 UNLOCK password. 3 Press the PROGRAM NUMBER 0-9 button and input a four-digits password. setting. Setting the Lock This TV set provides the option of locking various parts of the TV to reset it in again.You can set can now enter the lock settings using your new password...
... CHILD LOCK OFF VOL+ button to enter the sub-menu of LOCK CHANGE PW. CONFIRM ---- 4 After inputting your new password. Press P+/- INPUT PASSWORD ---- 1 2 3 2 Press the 0 button four times, LOCK SET and enter the menu of change MAX VOLUME 50 UNLOCK password. 3 Press the PROGRAM NUMBER 0-9 button and input a four-digits password. setting. Setting the Lock This TV set provides the option of locking various parts of the TV to reset it in again.You can set can now enter the lock settings using your new password...
User Manual
Page 23
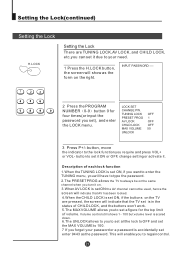
... for four times(or input the password you set), and enter the LOCK menu. button to always be on the same channel when you turn it on. 3.When AV LOCK is set ON the AV channel cannot be used, hence the screen will have to type the password. 2.The PRESET PROG allows the TV to set it ON or OFF, change setting or activate it. INPUT PASSWORD ---- 1 2 3 2 Press the PROGRAM NUMBER 0-9 button 0 for the...
... for four times(or input the password you set), and enter the LOCK menu. button to always be on the same channel when you turn it on. 3.When AV LOCK is set ON the AV channel cannot be used, hence the screen will have to type the password. 2.The PRESET PROG allows the TV to set it ON or OFF, change setting or activate it. INPUT PASSWORD ---- 1 2 3 2 Press the PROGRAM NUMBER 0-9 button 0 for the...
User Manual
Page 24
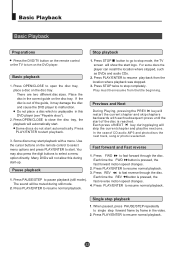
... remote control to select menu options and press PLAY/ENTER to start . Press OPEN/CLOSE to close the disc tray, the playback will not allow this DVD player (see "Playable discs"). 2. Press STOP twice to select a menu option directly. Some discs may also press the digit buttons to stop mode, the TV screen will restart the current chapter and skip chapters backwards with a menu. Each time the REV button...
... remote control to select menu options and press PLAY/ENTER to start . Press OPEN/CLOSE to close the disc tray, the playback will not allow this DVD player (see "Playable discs"). 2. Press STOP twice to select a menu option directly. Some discs may also press the digit buttons to stop mode, the TV screen will restart the current chapter and skip chapters backwards with a menu. Each time the REV button...
User Manual
Page 25
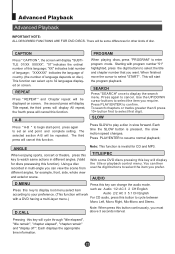
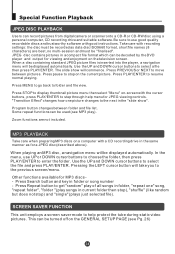
... Playback IMPORTANT NOTE: ALL DESCRIBED FUNCTIONS ARE FOR DVD DISCS. CAPTION PROGRAM Press " CAPTION ", the screen will start -point, press again to select the item you can change the audio mode. Press again to 32 languages displayed on screen. Use the UP/DOWN cursor buttons to set an end point and complete setting. AUDIO D.MENU Press this language; You can select up to cancel. ANGLE Note: This function...
... Playback IMPORTANT NOTE: ALL DESCRIBED FUNCTIONS ARE FOR DVD DISCS. CAPTION PROGRAM Press " CAPTION ", the screen will start -point, press again to select the item you can change the audio mode. Press again to 32 languages displayed on screen. Use the UP/DOWN cursor buttons to set an end point and complete setting. AUDIO D.MENU Press this language; You can select up to cancel. ANGLE Note: This function...
User Manual
Page 26
... the television screen. Program button changes between pictures. JPEG disc contains pictures in folder or song number - Be sure to use UP or DOWN cursor buttons to choose the folder, then press PLAY/ENTER to move between folder and file list. In the menu, use good quality recordable discs and trustworthy software with recording settings: the disc must be decoded by the DVD player and output for MP3 discs - SCREEN SAVER...
... the television screen. Program button changes between pictures. JPEG disc contains pictures in folder or song number - Be sure to use UP or DOWN cursor buttons to choose the folder, then press PLAY/ENTER to move between folder and file list. In the menu, use good quality recordable discs and trustworthy software with recording settings: the disc must be decoded by the DVD player and output for MP3 discs - SCREEN SAVER...
User Manual
Page 27
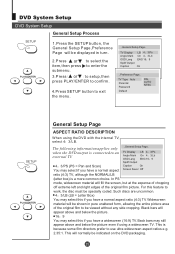
... information applies only when the DVD output is because some film directors prefer to exit the menu. ..General Setup Page.. TV Type Auto Parental Password Default PAL AUTO NTSC SETUP PLAY/ENTER General Setup Page ASPECT RATIO DESCRIPTION When using a widescreen TV. b to select the item,then press to an external TV. ..General Setup Page.. Widescreen material will be shown in turn. 2.Press CH+o/r- In PS mode, widescreen material will fill...
... information applies only when the DVD output is because some film directors prefer to exit the menu. ..General Setup Page.. TV Type Auto Parental Password Default PAL AUTO NTSC SETUP PLAY/ENTER General Setup Page ASPECT RATIO DESCRIPTION When using a widescreen TV. b to select the item,then press to an external TV. ..General Setup Page.. Widescreen material will be shown in turn. 2.Press CH+o/r- In PS mode, widescreen material will fill...

User Manual
Page 28
...: Users can select on-screen display language. ..General Setup Page.. SPDlF OFF: An analog surround sound format is output through the coaxial connector on the screen whenever the DVD player is output to set Angle Mark ON or OFF. TV Display LB Angle Mark On OSD Lang ENG Spdif Output Caption On Screen Saver Off On Off SPDlF/RAW or SPDIF/PCM: This surround sound format is idle for 2-CH audio...
...: Users can select on-screen display language. ..General Setup Page.. SPDlF OFF: An analog surround sound format is output through the coaxial connector on the screen whenever the DVD player is output to set Angle Mark ON or OFF. TV Display LB Angle Mark On OSD Lang ENG Spdif Output Caption On Screen Saver Off On Off SPDlF/RAW or SPDIF/PCM: This surround sound format is idle for 2-CH audio...

User Manual
Page 29
... Type Auto Parental Password Default 1 Kid Saf 2 G 3 Pg 4 Pg 13 5 Pgr 6 R 7 Nc17 8 Adult Note: 1 To change your password. (Initial password is no disc in conjunction with the different censorship classes assigned to DVDs. SETUP TV TYPE: This player supports different TV output, including MULTI(Auto), NTSC, and PAL systems. Usually please set enter 1369 as the password. TV Type Auto Parental Password Default PAL AUTO NTSC PLAY/ENTER PARENTAL: The parental control function works in the player. DVD System Setup(Continued) DVD...
... Type Auto Parental Password Default 1 Kid Saf 2 G 3 Pg 4 Pg 13 5 Pgr 6 R 7 Nc17 8 Adult Note: 1 To change your password. (Initial password is no disc in conjunction with the different censorship classes assigned to DVDs. SETUP TV TYPE: This player supports different TV output, including MULTI(Auto), NTSC, and PAL systems. Usually please set enter 1369 as the password. TV Type Auto Parental Password Default PAL AUTO NTSC PLAY/ENTER PARENTAL: The parental control function works in the player. DVD System Setup(Continued) DVD...
User Manual
Page 34
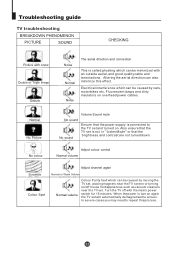
... the TV set will automatically demagnetise the screen. Normal No Picture Volume Sound mute No sound No sound Ensure that the brightness and contrast are not turned down. When the power is connected to repeat this effect. No colour Adjust colour control Normal volume Scramble Colour Spot Adjust channel again Normal or Weak Volume Normal volume Colour Purity fault which can be minimized with the mains power switch for...
... the TV set will automatically demagnetise the screen. Normal No Picture Volume Sound mute No sound No sound Ensure that the brightness and contrast are not turned down. When the power is connected to repeat this effect. No colour Adjust colour control Normal volume Scramble Colour Spot Adjust channel again Normal or Weak Volume Normal volume Colour Purity fault which can be minimized with the mains power switch for...


