
User Manual
Page 2
... cautions 2 Installation 3 Aerial connection 3 Preparation of the remote control unit 3 Function buttons and external sockets 4 Front panel of the TV set 4 Rear panel of the TV set 4 Buttons on the remote control 5 Basic operation Switching on/off the TV set 6 Watching TV program 7 Watching TV program 7 Program swap and auto scan functions 8 Searching channel 9 Full automatic search mode 9 Semi-automatic search 10 Manual fine tune 11 Program skip 12 Convenient picture and sound control functions 13 Multiple picture modes 13 Black stretch...
... cautions 2 Installation 3 Aerial connection 3 Preparation of the remote control unit 3 Function buttons and external sockets 4 Front panel of the TV set 4 Rear panel of the TV set 4 Buttons on the remote control 5 Basic operation Switching on/off the TV set 6 Watching TV program 7 Watching TV program 7 Program swap and auto scan functions 8 Searching channel 9 Full automatic search mode 9 Semi-automatic search 10 Manual fine tune 11 Program skip 12 Convenient picture and sound control functions 13 Multiple picture modes 13 Black stretch...
User Manual
Page 4
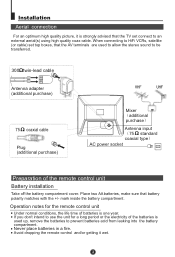
... remote control unit Under normal conditions, the life time of the remote control unit Battery installation Take off the battery compartment cover. Place two AA batteries, make sure that the AV terminals are used up, remove the batteries to be transferred. 300 twin-lead cable Antenna adapter (additional purchase) 75 coaxial cable Plug (additional purchase) Mixer additional purchase Antenna input 75 standard coaxial type AC power...
... remote control unit Under normal conditions, the life time of the remote control unit Battery installation Take off the battery compartment cover. Place two AA batteries, make sure that the AV terminals are used up, remove the batteries to be transferred. 300 twin-lead cable Antenna adapter (additional purchase) 75 coaxial cable Plug (additional purchase) Mixer additional purchase Antenna input 75 standard coaxial type AC power...
User Manual
Page 5
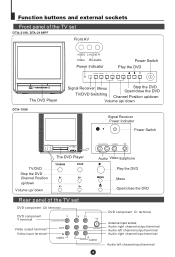
... DVD Player DTA-1586 Signal Receiver Menu TV/DVD Switching Stop the DVD Open/close the DVD Channel Position up/down Volume up/ down Signal Receiver Power Indicator Power Switch R-AUDIO-L VIDEO TV/DVD Stop the DVD Channel Position up/down Volume up/ down The DVD Player TV/DVD Audio Video Earphone Play the DVD Menu Open/close the DVD Rear panel of the TV set DVD component Cb terminal DVD component Y terminal Y Component input Cb Cr Video output terminal OUT Video input terminal IN VIDEO L TV Antenna R AUDIO DVD component Cr terminal Antenna input socket Audio right channel...
... DVD Player DTA-1586 Signal Receiver Menu TV/DVD Switching Stop the DVD Open/close the DVD Channel Position up/down Volume up/ down Signal Receiver Power Indicator Power Switch R-AUDIO-L VIDEO TV/DVD Stop the DVD Channel Position up/down Volume up/ down The DVD Player TV/DVD Audio Video Earphone Play the DVD Menu Open/close the DVD Rear panel of the TV set DVD component Cb terminal DVD component Y terminal Y Component input Cb Cr Video output terminal OUT Video input terminal IN VIDEO L TV Antenna R AUDIO DVD component Cr terminal Antenna input socket Audio right channel...
User Manual
Page 6
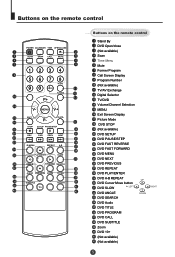
... SEARCH AUDIO PROGRAM ZOOM D.CALL SUBTITLE 10+ H.LOCK Buttons on the remote control POWER CALENDAR TIME OPEN/CLOSE SCAN SWAP CALL MUTE 1234 5678 TV/AV 9 0 -/-- Buttons on the remote control Stand By DVD Open/close (Not available) Scan Time Menu Mute Former Program Call Screen Display Program Number (Not available) TV/AV Exchange Digital Selector TV/DVD Volume/Channel Selection MENU Exit Screen Display Picture Mode DVD STOP (Not available) DVD SETUP DVD PAUSE/STEP DVD FAST REVERSE DVD FAST FORWARD DVD MENU DVD NEXT DVD PREVIOUS DVD REPEAT DVD PLAY/ENTER DVD A-B REPEAT DVD Cursor...
... SEARCH AUDIO PROGRAM ZOOM D.CALL SUBTITLE 10+ H.LOCK Buttons on the remote control POWER CALENDAR TIME OPEN/CLOSE SCAN SWAP CALL MUTE 1234 5678 TV/AV 9 0 -/-- Buttons on the remote control Stand By DVD Open/close (Not available) Scan Time Menu Mute Former Program Call Screen Display Program Number (Not available) TV/AV Exchange Digital Selector TV/DVD Volume/Channel Selection MENU Exit Screen Display Picture Mode DVD STOP (Not available) DVD SETUP DVD PAUSE/STEP DVD FAST REVERSE DVD FAST FORWARD DVD MENU DVD NEXT DVD PREVIOUS DVD REPEAT DVD PLAY/ENTER DVD A-B REPEAT DVD Cursor...
User Manual
Page 7
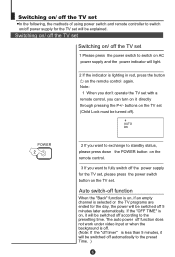
..., it directly through pressing the P+/- Switching on/ off the TV set In the following, the methods of using power switch and remote controller to switch on the remote control again. Switching on/ off the TV set Switching on/ off the TV set 1 Please press the power switch to fully switch off timer" is on it will be explained. Auto switch-off 5 minutes later automatically. The auto power off function does not work under video input or...
..., it directly through pressing the P+/- Switching on/ off the TV set In the following, the methods of using power switch and remote controller to switch on the remote control again. Switching on/ off the TV set Switching on/ off the TV set 1 Please press the power switch to fully switch off timer" is on it will be explained. Auto switch-off 5 minutes later automatically. The auto power off function does not work under video input or...
User Manual
Page 8
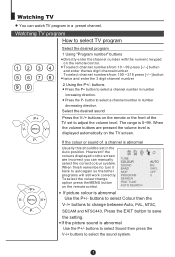
... channel. When finish remember to turn it back to select TV program 1234 5678 90 P+ V- Select the desired sound Press the V-/+ buttons on the remote control. The range is abnormal Usually this should be set to change option press the MENU button on the remote or the front of a channel is 0~99. Press the P- P+ V- buttons to select Colour then the V-/+ buttons to adjust the volume level. Select the desired program 1 Using "Program number" buttons Directly enter the channel number...
... channel. When finish remember to turn it back to select TV program 1234 5678 90 P+ V- Select the desired sound Press the V-/+ buttons on the remote control. The range is abnormal Usually this should be set to change option press the MENU button on the remote or the front of a channel is 0~99. Press the P- P+ V- buttons to select Colour then the V-/+ buttons to adjust the volume level. Select the desired program 1 Using "Program number" buttons Directly enter the channel number...

User Manual
Page 10
... channel This TV set has three methods to select "AUTO SEARCH". You can also use the remote control to set the channel is explained. TUNE COLOUR SOUND BAND SKIP PROGRAM SEARCH FINE TUNE AUTO SEARCH 2 Press the P+/- Display function Press the CALL button, then the channel number and the systems will display on the screen. Full automatic mode P+ V- CALL 3 Press the V+ button to set to ensure automatic search function operates. MENU V+ P- 1 Press the MENU menu button...
... channel This TV set has three methods to select "AUTO SEARCH". You can also use the remote control to set the channel is explained. TUNE COLOUR SOUND BAND SKIP PROGRAM SEARCH FINE TUNE AUTO SEARCH 2 Press the P+/- Display function Press the CALL button, then the channel number and the systems will display on the screen. Full automatic mode P+ V- CALL 3 Press the V+ button to set to ensure automatic search function operates. MENU V+ P- 1 Press the MENU menu button...

User Manual
Page 11
... press the MENU button, the menu item EXIT display (PICTURE, TIME, FUNCTION, TUNE, EXCHANGE, ETC.) will automatically disappear within 15 seconds. buttons to choose desired channels I.E. MENU V+ P- The V- down button is used for higher side program search. To turn off the on the screen. 3 Press the P+/- P+ V- buttons or PROGRAM NUMBER 0-9 buttons to select " SEARCH". TUNE COLOUR SOUND BAND SKIP PROGRAM SEARCH FINE TUNE AUTO SEARCH AUTO BG VHFL OFF 0 4 Press the V-/+ buttons to eliminate...
... press the MENU button, the menu item EXIT display (PICTURE, TIME, FUNCTION, TUNE, EXCHANGE, ETC.) will automatically disappear within 15 seconds. buttons to choose desired channels I.E. MENU V+ P- The V- down button is used for higher side program search. To turn off the on the screen. 3 Press the P+/- P+ V- buttons or PROGRAM NUMBER 0-9 buttons to select " SEARCH". TUNE COLOUR SOUND BAND SKIP PROGRAM SEARCH FINE TUNE AUTO SEARCH AUTO BG VHFL OFF 0 4 Press the V-/+ buttons to eliminate...
User Manual
Page 12
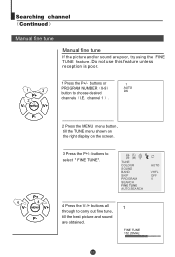
P+ V- buttons or PROGRAM NUMBER 0-9 button to select " FINE TUNE". TUNE COLOUR SOUND BAND SKIP PROGRAM SEARCH FINE TUNE AUTO SEARCH AUTO VHFL OFF 0 4 Press the V-/+ buttons all through to carry out fine tune, till the best picture and sound are poor, try using the FINE TUNE feature. Searching channel Continued Manual fine tune Manual fine tune If the picture and/or sound are obtained. 1 FINE TUNE 152.25MHz buttons to choose...
P+ V- buttons or PROGRAM NUMBER 0-9 button to select " FINE TUNE". TUNE COLOUR SOUND BAND SKIP PROGRAM SEARCH FINE TUNE AUTO SEARCH AUTO VHFL OFF 0 4 Press the V-/+ buttons all through to carry out fine tune, till the best picture and sound are poor, try using the FINE TUNE feature. Searching channel Continued Manual fine tune Manual fine tune If the picture and/or sound are obtained. 1 FINE TUNE 152.25MHz buttons to choose...
User Manual
Page 13
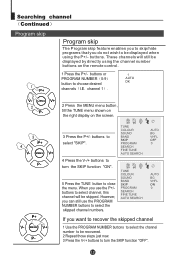
... use the PROGRAM NUMBER buttons to close the menu. MENU V+ P- 3 Press the P+/- However, you can still use the P+/buttons to select channel, this channel will still be recovered. 2 Repeat those steps just now. 3 Press the V-/+ buttons to turn the SKIP function "ON". 5 Press the TUNE button to select the skipped channel numbers. buttons or PROGRAM NUMBER 0-9 button to select "SKIP". MENU V+ P- 2 Press the MENU menu button , till the TUNE menu shown on the right display on the remote control. 1 Press the P+/- MENU V+ P- P+ V- buttons...
... use the PROGRAM NUMBER buttons to close the menu. MENU V+ P- 3 Press the P+/- However, you can still use the P+/buttons to select channel, this channel will still be recovered. 2 Repeat those steps just now. 3 Press the V-/+ buttons to turn the SKIP function "ON". 5 Press the TUNE button to select the skipped channel numbers. buttons or PROGRAM NUMBER 0-9 button to select "SKIP". MENU V+ P- 2 Press the MENU menu button , till the TUNE menu shown on the right display on the remote control. 1 Press the P+/- MENU V+ P- P+ V- buttons...
User Manual
Page 14
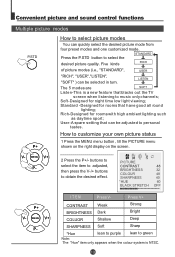
... music only channels; MENU V+ P- LISTEN The 5 modes are SOFT Listen-This is NTSC. User-A spare setting that have good all round lighting; Rich-Designed for rooms that can quickly select the desired picture mode from four preset modes and one customized mode. ITEM Press V- Soft-Designed for night time low light viewing; MENU V+ P- 2 Press the P+/- Convenient picture and sound control functions Multiple picture modes P.STD P+ How to select picture modes You can be selected in turn.
... music only channels; MENU V+ P- LISTEN The 5 modes are SOFT Listen-This is NTSC. User-A spare setting that have good all round lighting; Rich-Designed for rooms that can quickly select the desired picture mode from four preset modes and one customized mode. ITEM Press V- Soft-Designed for night time low light viewing; MENU V+ P- 2 Press the P+/- Convenient picture and sound control functions Multiple picture modes P.STD P+ How to select picture modes You can be selected in turn.
User Manual
Page 15
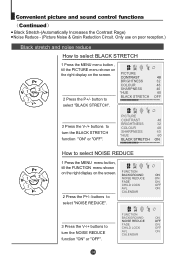
... NOISE REDUCE ON FADE ON CHILD LOCK OFF AVL ON CALENDAR 2 Press the P+/- MENU V+ P- 1 Press the MENU menu button , till the PICTURE menu shown on the right display on the screen. Convenient picture and sound control functions Continued Black Stretch-(Automatically Increases the Contrast Rage) Noise Reduce - (Picture Noise & Grain Reduction Circuit. buttons to select "NOISE REDUCE". 3 Press the V-/+ buttons to turn the NOISE REDUCE function "ON" or...
... NOISE REDUCE ON FADE ON CHILD LOCK OFF AVL ON CALENDAR 2 Press the P+/- MENU V+ P- 1 Press the MENU menu button , till the PICTURE menu shown on the right display on the screen. Convenient picture and sound control functions Continued Black Stretch-(Automatically Increases the Contrast Rage) Noise Reduce - (Picture Noise & Grain Reduction Circuit. buttons to select "NOISE REDUCE". 3 Press the V-/+ buttons to turn the NOISE REDUCE function "ON" or...
User Manual
Page 16
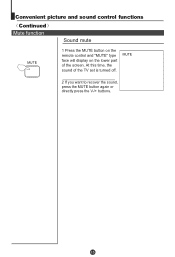
MUTE 2 If you want to recover the sound, press the MUTE button again or directly press the V-/+ buttons. Convenient picture and sound control functions Continued Mute function Sound mute MUTE 1 Press the MUTE button on the remote control and "MUTE" type face will display on the lower part of the TV set is turned off. At this time, the sound of the screen.
MUTE 2 If you want to recover the sound, press the MUTE button again or directly press the V-/+ buttons. Convenient picture and sound control functions Continued Mute function Sound mute MUTE 1 Press the MUTE button on the remote control and "MUTE" type face will display on the lower part of the TV set is turned off. At this time, the sound of the screen.
User Manual
Page 17
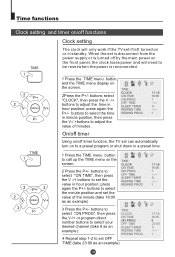
... power supply or is reconnected. Time functions Clock setting and timer on/off functions TIME Clock setting The clock will need to be reset when the power is turned off by the main power on the front panel, the clock loses power and will only work if the TV set if left turned on or in standby. buttons select "CLOCK", then press the V -/+ buttons to call up the TIME menu on the screen...
... power supply or is reconnected. Time functions Clock setting and timer on/off functions TIME Clock setting The clock will need to be reset when the power is turned off by the main power on the front panel, the clock loses power and will only work if the TV set if left turned on or in standby. buttons select "CLOCK", then press the V -/+ buttons to call up the TIME menu on the screen...
User Manual
Page 18
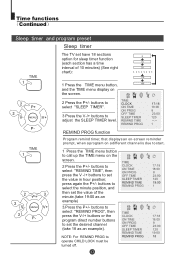
... P+/- buttons to select "REMIND PROG", then press the V-/+ buttons or the program direct number buttons to operate CHILD LOCK must be turned off. TIME CLOCK ON TIME ON PROG OFF TIME SLEEP TIMER REMIND TIME REMIND PROG TIME CLOCK ON TIME ON PROG OFF TIME SLEEP TIMER REMIND TIME REMIND PROG 17:18 18:00 8 23:00 120 19:00 1 17:18 18:00 8 23:00 120 19:00 18 MENU V+ P- Time functions Continued Sleep timer...
... P+/- buttons to select "REMIND PROG", then press the V-/+ buttons or the program direct number buttons to operate CHILD LOCK must be turned off. TIME CLOCK ON TIME ON PROG OFF TIME SLEEP TIMER REMIND TIME REMIND PROG TIME CLOCK ON TIME ON PROG OFF TIME SLEEP TIMER REMIND TIME REMIND PROG 17:18 18:00 8 23:00 120 19:00 1 17:18 18:00 8 23:00 120 19:00 18 MENU V+ P- Time functions Continued Sleep timer...
User Manual
Page 22
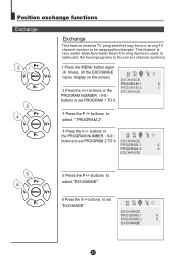
... buttons or the EXCHANGE PROGRAM NUMBER 0-9 buttons to set PROGRAM 1 TO 6. the PROGRAM NUMBER 0-9 buttons to select " PROGRAM 2". 4 Press the V-/+ buttons or P- This feature is very useful when Automatic Search Tuning has been used, to reallocate the found programs to the correct channel numbers. 1 Press the MENU button again (6 times), till the EXCHANGE menu display on a wrong TV channel number to P+ select "EXCHANGE". V- MENU V+ P- MENU V+ 3 Press the P-/+ buttons to set PROGRAM 2 TO 9. buttons to be on the screen. EXCHANGE PROGRAM 1 6 PROGRAM...
... buttons or the EXCHANGE PROGRAM NUMBER 0-9 buttons to set PROGRAM 1 TO 6. the PROGRAM NUMBER 0-9 buttons to select " PROGRAM 2". 4 Press the V-/+ buttons or P- This feature is very useful when Automatic Search Tuning has been used, to reallocate the found programs to the correct channel numbers. 1 Press the MENU button again (6 times), till the EXCHANGE menu display on a wrong TV channel number to P+ select "EXCHANGE". V- MENU V+ P- MENU V+ 3 Press the P-/+ buttons to set PROGRAM 2 TO 9. buttons to be on the screen. EXCHANGE PROGRAM 1 6 PROGRAM...
User Manual
Page 23
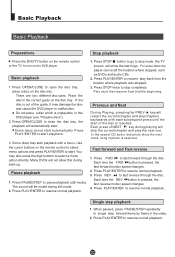
... speed changes. 2. The sound will be muted during playing will show the start . Press PLAY/ENTER to turn on the DVD player. Each time the REV button is unplayable in the video. 2. Do not place a disc which is pressed, the fast reverse motion speed changes. 4. For some discs the player can recall the location where stopped, such as DVDs and audio CDs. 2. Press PLAY/ENTER...
... speed changes. 2. The sound will be muted during playing will show the start . Press PLAY/ENTER to turn on the DVD player. Each time the REV button is unplayable in the video. 2. Do not place a disc which is pressed, the fast reverse motion speed changes. 4. For some discs the player can recall the location where stopped, such as DVDs and audio CDs. 2. Press PLAY/ENTER...
User Manual
Page 25
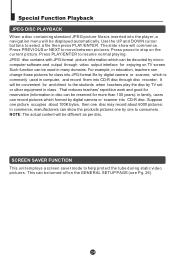
..., teachers can change those pictures for class into JPG-format file by TV set or other equipment in class. That reduces teachers' repetition work and good for reservation (information in disc can be reserved for and direct to consumers. SCREEN SAVER FUNCTION This unit employs a screen saver mode to resume normal playing. Press PREVIOUS or NEXT to select a file then press PLAY/ENTER. JPEG...
..., teachers can change those pictures for class into JPG-format file by TV set or other equipment in class. That reduces teachers' repetition work and good for reservation (information in disc can be reserved for and direct to consumers. SCREEN SAVER FUNCTION This unit employs a screen saver mode to resume normal playing. Press PREVIOUS or NEXT to select a file then press PLAY/ENTER. JPEG...
User Manual
Page 26
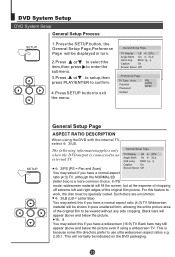
... film picture. TV Type Auto Parental Password Default PAL AUTO NTSC SETUP PLAY/ENTER General Setup Page ASPECT RATIO DESCRIPTION When using a widescreen TV. For this if you have a widescreen (16:9) TV. The following information applies only when the DVD output is because some film directors prefer to an external TV. ..General Setup Page.. b to select the item,then press to exit the menu. ..General Setup Page.. This is connected to use...
... film picture. TV Type Auto Parental Password Default PAL AUTO NTSC SETUP PLAY/ENTER General Setup Page ASPECT RATIO DESCRIPTION When using a widescreen TV. For this if you have a widescreen (16:9) TV. The following information applies only when the DVD output is because some film directors prefer to an external TV. ..General Setup Page.. b to select the item,then press to exit the menu. ..General Setup Page.. This is connected to use...

User Manual
Page 33
... screen or turning on overhead power cables. 1. Also ensure that the TV set will automatically degauss the picture. Press S.STD button to 0. The cabinet may cause a fatally or fire. 3. Troubleshooting guide To assist in USER mode. Altering the aerial direction can be minimized with the mains power switch for 15 minutes. Volume Sound mute. 2. Adjust the BALANCE item in SOUND menu as the TV set has dangerous voltages in "Listen Mode...
... screen or turning on overhead power cables. 1. Also ensure that the TV set will automatically degauss the picture. Press S.STD button to 0. The cabinet may cause a fatally or fire. 3. Troubleshooting guide To assist in USER mode. Altering the aerial direction can be minimized with the mains power switch for 15 minutes. Volume Sound mute. 2. Adjust the BALANCE item in SOUND menu as the TV set has dangerous voltages in "Listen Mode...


