User Manual
Page 1
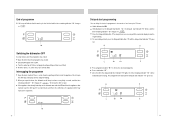
A: Wiring box B: Door switch C: Water level switch D: Drain pump motor E: Overflow switch F: 2-way valve G: Softener valve H: Dispenser I: Inlet valve J: Washing pump motor K: Temperature limiter L: Heater M: Relay N: Temperature sensor O: Low salt switch P: Low rinse aid switch Q: Flowmeter R: Turbidity sensor The symbol on the product or on its packaging indicates that this product, please contact your local city office, your household waste disposal service or the shop where you will help prevent potential negative...
A: Wiring box B: Door switch C: Water level switch D: Drain pump motor E: Overflow switch F: 2-way valve G: Softener valve H: Dispenser I: Inlet valve J: Washing pump motor K: Temperature limiter L: Heater M: Relay N: Temperature sensor O: Low salt switch P: Low rinse aid switch Q: Flowmeter R: Turbidity sensor The symbol on the product or on its packaging indicates that this product, please contact your local city office, your household waste disposal service or the shop where you will help prevent potential negative...

User Manual
Page 2
Index Safety information 2 Installation 4 Getting to fill the salt container and the rinse aid dispenser 8 Not suitable for the dishwasher 10 Arranging crockery, glasses, etc. in the dishwasher 11 How to fill the detergent dispenser 13 Programme overview 14 Washing dishes 16 How to keep your dishwasher 6 How to know your dishwasher in shape 22 Care and maintenance 23 Fault finding 25 Technical data 29 Important information 30 1
Index Safety information 2 Installation 4 Getting to fill the salt container and the rinse aid dispenser 8 Not suitable for the dishwasher 10 Arranging crockery, glasses, etc. in the dishwasher 11 How to fill the detergent dispenser 13 Programme overview 14 Washing dishes 16 How to keep your dishwasher 6 How to know your dishwasher in shape 22 Care and maintenance 23 Fault finding 25 Technical data 29 Important information 30 1
User Manual
Page 3
... the water inlet contains an electrically operated valve.The connecting wires are authorised to a designated waste disposal center. During installation, the power supply cord must not be kept away from the manufacturer or its service agent. Young children should always be easily accessible. When disposing of children, who must be replaced by adults for the washing of extension cords and multiple sockets; - During installation Site the dishwasher and connect...
... the water inlet contains an electrically operated valve.The connecting wires are authorised to a designated waste disposal center. During installation, the power supply cord must not be kept away from the manufacturer or its service agent. Young children should always be easily accessible. When disposing of children, who must be replaced by adults for the washing of extension cords and multiple sockets; - During installation Site the dishwasher and connect...

User Manual
Page 4
... water supply hose to your home. If for the maximum voltage on the stainless steel inner door of the appliance) and that the electrical system is correct for any reason the box containing the electrical components happens to spill outside the drain. This hose is installed as it . Caution: The dishwasher plug must be replaced with water supply and drain hoses that can be connected to guarantee that it level...
... water supply hose to your home. If for the maximum voltage on the stainless steel inner door of the appliance) and that the electrical system is correct for any reason the box containing the electrical components happens to spill outside the drain. This hose is installed as it . Caution: The dishwasher plug must be replaced with water supply and drain hoses that can be connected to guarantee that it level...
User Manual
Page 5
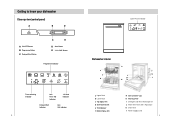
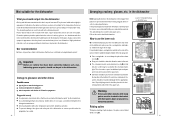
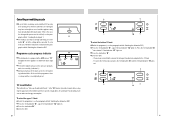
... Close-up view (control panel) A B D A ON-OFF Button B Programme Button C Delayed Start Button C E D Start Button E "1/2 LOAD" Button Programme Indicator Time-remaining Indicator Low Rinse Aid Indicator 1/2 Load Indicator Delayed Start Indicator Low Salt Indicator 6 Cycle Phase Indicator Dishwasher interior e a j c f k b g d h l i a Upper Rack b Lower Rack c Top Spray Arm d Silverware Basket e Third Sprayer f Bottom Spray Arm g Salt Container Cap h Washing Filter i Detergent and Rinse Aid Dispenser j Water Inlet Hose (with "Aquastop") k Drain Hose l Power Supply...
... Close-up view (control panel) A B D A ON-OFF Button B Programme Button C Delayed Start Button C E D Start Button E "1/2 LOAD" Button Programme Indicator Time-remaining Indicator Low Rinse Aid Indicator 1/2 Load Indicator Delayed Start Indicator Low Salt Indicator 6 Cycle Phase Indicator Dishwasher interior e a j c f k b g d h l i a Upper Rack b Lower Rack c Top Spray Arm d Silverware Basket e Third Sprayer f Bottom Spray Arm g Salt Container Cap h Washing Filter i Detergent and Rinse Aid Dispenser j Water Inlet Hose (with "Aquastop") k Drain Hose l Power Supply...

User Manual
Page 6
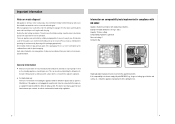
... rinse aid used . Important Proper dosage of rust, load the salt just before beginning a wash cycle. The salt container is located on the inside panel of the door and should be filled when the "low salt indicator" (located on the hardness of the water used for a small amount of water to a lower setting. 9 The dispenser is located beneath the lower rack and should be regulated by turning the "4" dose adjustor, located beneath the "3" cap...
... rinse aid used . Important Proper dosage of rust, load the salt just before beginning a wash cycle. The salt container is located on the inside panel of the door and should be filled when the "low salt indicator" (located on the hardness of the water used for a small amount of water to a lower setting. 9 The dispenser is located beneath the lower rack and should be regulated by turning the "4" dose adjustor, located beneath the "3" cap...
User Manual
Page 7
... part from detergent manufacturers. Some types of the upper rack. To prevent damage, take glass and cutlery out of pots and pans , the spikes can be doubled (see fig.D) Deep pots should not be dishwasher-proof. How to hot water, copper and pewter utensils are soaked before washed. The silverware basket can be placed in a dishwasher. Use a mild detergent that occur inside the dishwasher...
... part from detergent manufacturers. Some types of the upper rack. To prevent damage, take glass and cutlery out of pots and pans , the spikes can be doubled (see fig.D) Deep pots should not be dishwasher-proof. How to hot water, copper and pewter utensils are soaked before washed. The silverware basket can be placed in a dishwasher. Use a mild detergent that occur inside the dishwasher...
User Manual
Page 8
... closing the cover, remove any excess detergent on the inside panel of the rack itself (see fig.G). Place glasses, cups and small bowls on both sides of the door. After the detergent has been placed in the dispenser, close the cover and press down until it clicks in the bottom basket. Adjust the upper basket to the higher level and you the freedom to be used...
... closing the cover, remove any excess detergent on the inside panel of the rack itself (see fig.G). Place glasses, cups and small bowls on both sides of the door. After the detergent has been placed in the dispenser, close the cover and press down until it clicks in the bottom basket. Adjust the upper basket to the higher level and you the freedom to be used...
User Manual
Page 9
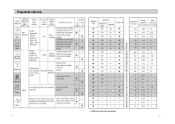
Programme overview ( ) EN50242 test with rinse aid setting 5 14 15
Programme overview ( ) EN50242 test with rinse aid setting 5 14 15
User Manual
Page 10
... programme indicator " 12 "lights , time-remaining indicator " 10 "changes. Washing dishes Programme selection The most appropriate programme can vary considerably according to: different amounts of dishes temperature of mains water supply pressure of programme and cycle phase indicator " 11 " lights up to 1/4 when dishes are washed in the upper basket only.The water consumption values are related to water hardness level 1. A photoelectric sensor is used to ON. Close the door. temperature, water volume,...) Energy and water...
... programme indicator " 12 "lights , time-remaining indicator " 10 "changes. Washing dishes Programme selection The most appropriate programme can vary considerably according to: different amounts of dishes temperature of mains water supply pressure of programme and cycle phase indicator " 11 " lights up to 1/4 when dishes are washed in the upper basket only.The water consumption values are related to water hardness level 1. A photoelectric sensor is used to ON. Close the door. temperature, water volume,...) Energy and water...
User Manual
Page 11
... the hot water was switched ON and then the appliance door opened, leave the door ajar for several minutes and then close. Press the Delayed Start button "C" as many times as necessary until spray arm has stopped rotating. To cancel delayed start , press the Delayed Start button "C" until the delayed start button " D ". End of water squirting out from inside the appliance. Press start indicator " 13 " goes out. Do not open . Switch dishwasher ON. If the appliance has already heated up...
... the hot water was switched ON and then the appliance door opened, leave the door ajar for several minutes and then close. Press the Delayed Start button "C" as many times as necessary until spray arm has stopped rotating. To cancel delayed start , press the Delayed Start button "C" until the delayed start button " D ". End of water squirting out from inside the appliance. Press start indicator " 13 " goes out. Do not open . Switch dishwasher ON. If the appliance has already heated up...
User Manual
Page 12
... start button" D " . Otherwise, the detergent may have already been used, and the appliance may have already drained the wash water. This will go out. 1/2 Load Button This button E (see the paragraph entitled" Switching the dishwaher ON") Press the 1/2 load button " E " , upper 1/2 load indicator " 14 " lights on . Press the 1/2 load button" E " twice, botton 1/2 load indicator " 15 " lights on. To cancle the 1/2 load, you to wash dishes using only the upper rack or the bottom rack if there are : prewash, wash, rinse...
... start button" D " . Otherwise, the detergent may have already been used, and the appliance may have already drained the wash water. This will go out. 1/2 Load Button This button E (see the paragraph entitled" Switching the dishwaher ON") Press the 1/2 load button " E " , upper 1/2 load indicator " 14 " lights on . Press the 1/2 load button" E " twice, botton 1/2 load indicator " 15 " lights on. To cancle the 1/2 load, you to wash dishes using only the upper rack or the bottom rack if there are : prewash, wash, rinse...

User Manual
Page 13
... surface of the interior, use a cloth dampened with the dishwasher empty and then remove the plug from time to keep your dishwasher from the socket, turn off the water supply and leave the door of the dishwasher, do not use only a cloth and warm soapy water. Top up with rinse-aid,if required. Do not run a wash cycle with water and a little while vinegar, or cleaning product made specifically for models with "Aquastop" ) to...
... surface of the interior, use a cloth dampened with the dishwasher empty and then remove the plug from time to keep your dishwasher from the socket, turn off the water supply and leave the door of the dishwasher, do not use only a cloth and warm soapy water. Top up with rinse-aid,if required. Do not run a wash cycle with water and a little while vinegar, or cleaning product made specifically for models with "Aquastop" ) to...

User Manual
Page 14
... filter for the water supply hose is clogged. 22 the drain hose is crimped or bent; Clean both spray arms under running water. Refit the spray arms. Ensure that the lower arm has locked into place and the upper one is screwed tight. 24 20 21 Fault finding Resolving minor problems yourself Experience has shown that much sooner. Appliance door not closed properly. 22 When the time-remaining indicator " 22" is " ". Water tap not turned...
... filter for the water supply hose is clogged. 22 the drain hose is crimped or bent; Clean both spray arms under running water. Refit the spray arms. Ensure that the lower arm has locked into place and the upper one is screwed tight. 24 20 21 Fault finding Resolving minor problems yourself Experience has shown that much sooner. Appliance door not closed properly. 22 When the time-remaining indicator " 22" is " ". Water tap not turned...

User Manual
Page 15
... of the inner part of the problem. Filters are stuck to the dishes, cutlery,etc. Have you checked whether: the drain hose is creased Normal washing up with the following information: the nature of the door. You can be dry before detergent is added. 26 Water remains inside the appliance. Indicator lamps do not extinguish after programme has ended Blockage or kind in spray arm are blocked...
... of the inner part of the problem. Filters are stuck to the dishes, cutlery,etc. Have you checked whether: the drain hose is creased Normal washing up with the following information: the nature of the door. You can be dry before detergent is added. 26 Water remains inside the appliance. Indicator lamps do not extinguish after programme has ended Blockage or kind in spray arm are blocked...

User Manual
Page 16
.... Items were removed from dishwasher too soon. Traces of rinse-aid was used a phosphate-free detergent , try a detergent containing phosphates and compare results. Smears left on crockery, glasses have acquired a metallic appearance Amount of rinse-aid was set too low. Water softener was added to dispenser. If you used . glasses have a milky appearance Not enough detergent was set too low. Washing temperature was added to dispenser compartment. Plastic...
.... Items were removed from dishwasher too soon. Traces of rinse-aid was used a phosphate-free detergent , try a detergent containing phosphates and compare results. Smears left on crockery, glasses have acquired a metallic appearance Amount of rinse-aid was set too low. Water softener was added to dispenser. If you used . glasses have a milky appearance Not enough detergent was set too low. Washing temperature was added to dispenser compartment. Plastic...
User Manual
Page 17
... re-sited as part of dishes and cutlery, etc., contact the appliance manufacturer before starting the test. 30 31 Destroy the door locking mechanism. Your new appliance was on comparability tests implemented in compliance with any parts of it from your retailer or local municipal administration. Do not allow children to you. Capacity: 12 place settings Comparability programme: Light wash Rinse-aid setting: 5 Detergent: 30g General...
... re-sited as part of dishes and cutlery, etc., contact the appliance manufacturer before starting the test. 30 31 Destroy the door locking mechanism. Your new appliance was on comparability tests implemented in compliance with any parts of it from your retailer or local municipal administration. Do not allow children to you. Capacity: 12 place settings Comparability programme: Light wash Rinse-aid setting: 5 Detergent: 30g General...


