User Manual
Page 2
... DX-R20TR ATSC 20" Round TV/DVD Combo Contents Important safety instructions 3 Features 8 Front 8 Back 9 Remote control 10 Setting up your TV combo 14 Connecting an antenna 14 Connecting cable TV 16 Connecting other video devices 18 Using the front audio/video input jacks 19 Using the TV 19 Turning your TV combo on and off 19 Selecting the video mode 20 Memorizing TV channels 20 Deleting a memorized channel 21 Changing TV channels 21 Adjusting the volume 23 Adjusting the video...
... DX-R20TR ATSC 20" Round TV/DVD Combo Contents Important safety instructions 3 Features 8 Front 8 Back 9 Remote control 10 Setting up your TV combo 14 Connecting an antenna 14 Connecting cable TV 16 Connecting other video devices 18 Using the front audio/video input jacks 19 Using the TV 19 Turning your TV combo on and off 19 Selecting the video mode 20 Memorizing TV channels 20 Deleting a memorized channel 21 Changing TV channels 21 Adjusting the volume 23 Adjusting the video...

User Manual
Page 3
DX-R20TR.fm Page 2 Thursday, January 18, 2007 3:19 PM 2 Contents Displaying closed captions 37 Customizing closed captions for digital channels 40 Setting parental controls 42 Setting the ATSC parental lock 48 Using the DVD player 50 Playing a disc 50 Controlling disc playback 51 Searching on a disc 51 Selecting the audio mode 52 Viewing subtitles on a DVD 52 Repeating a DVD chapter, DVD title, or an entire DVD 52 Creating a playback loop 52 Viewing different recording angles 53 Opening the main DVD menu 53...
DX-R20TR.fm Page 2 Thursday, January 18, 2007 3:19 PM 2 Contents Displaying closed captions 37 Customizing closed captions for digital channels 40 Setting parental controls 42 Setting the ATSC parental lock 48 Using the DVD player 50 Playing a disc 50 Controlling disc playback 51 Searching on a disc 51 Selecting the audio mode 52 Viewing subtitles on a DVD 52 Repeating a DVD chapter, DVD title, or an entire DVD 52 Creating a playback loop 52 Viewing different recording angles 53 Opening the main DVD menu 53...

User Manual
Page 4
... not remove the cover or back. Use only a damp cloth to unplugging the appliance in the operating instructions. Note: A product that is meant for uninterrupted service and, that for some specific reason, such as the possibility of the loss of an authorization code for a CATV converter, is located on the back of your TV combo. Refer servicing to replace...
... not remove the cover or back. Use only a damp cloth to unplugging the appliance in the operating instructions. Note: A product that is meant for uninterrupted service and, that for some specific reason, such as the possibility of the loss of an authorization code for a CATV converter, is located on the back of your TV combo. Refer servicing to replace...

User Manual
Page 6
... kind on your TV combo. DX-R20TR.fm Page 5 Thursday, January 18, 2007 3:19 PM Important safety instructions 5 Stand Do not place your TV combo to the wall, follow the manufacturer's instructions and use a mounting accessory recommended by the manufacturer. If you install the your TV combo. Use only with care. Servicing Do not attempt to qualified service personnel. Never spill liquid...
... kind on your TV combo. DX-R20TR.fm Page 5 Thursday, January 18, 2007 3:19 PM Important safety instructions 5 Stand Do not place your TV combo to the wall, follow the manufacturer's instructions and use a mounting accessory recommended by the manufacturer. If you install the your TV combo. Use only with care. Servicing Do not attempt to qualified service personnel. Never spill liquid...
User Manual
Page 7
... grounding electrode. Adjust only those controls that the antenna or cable system is made of glass. Non-active pixels The LCD panel contains almost 3 million thin-film transistors, which provide exceptionally sharp video quality. Occasionally, a few non-active pixels may result in damage and will often require extensive work by following conditions: • When the power supply cord or plug is in...
... grounding electrode. Adjust only those controls that the antenna or cable system is made of glass. Non-active pixels The LCD panel contains almost 3 million thin-film transistors, which provide exceptionally sharp video quality. Occasionally, a few non-active pixels may result in damage and will often require extensive work by following conditions: • When the power supply cord or plug is in...

User Manual
Page 9
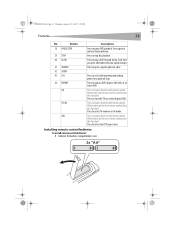
..., or press to decrease or increase the volume. Press to turn your TV combo out of standby mode. Component 1 Headphone jack 2 VIDEO jack 3 L-AUDIO-R jacks 4 Power indicator 5 Remote control sensor 6 INPUT button 7 MENU button 8 VOL-/VOL+ 9 CH-/CH+ 10 OPEN/CLOSE button 11 PLAY button 12 STOP button 13 Power/Standby button Description Plug headphones into this jack. Press to open the TV on a standard A/V cable into this jack. Press to select TV or DVD mode. DX-R20TR.fm Page 8 Thursday, January 18, 2007...
..., or press to decrease or increase the volume. Press to turn your TV combo out of standby mode. Component 1 Headphone jack 2 VIDEO jack 3 L-AUDIO-R jacks 4 Power indicator 5 Remote control sensor 6 INPUT button 7 MENU button 8 VOL-/VOL+ 9 CH-/CH+ 10 OPEN/CLOSE button 11 PLAY button 12 STOP button 13 Power/Standby button Description Plug headphones into this jack. Press to open the TV on a standard A/V cable into this jack. Press to select TV or DVD mode. DX-R20TR.fm Page 8 Thursday, January 18, 2007...

User Manual
Page 12
DX-R20TR.fm Page 11 Thursday, January 18, 2007 3:19 PM Features 11 Please review these button names and descriptions. Press to adjust the volume or change the TV channel. Press to select a closed captions mode. Press to open the DTV favorites list. Opens the DVD title menu, if available. Press to open the DVD menu. Press to adjust options and make selections. Press to select a TV channel or to navigate through...
DX-R20TR.fm Page 11 Thursday, January 18, 2007 3:19 PM Features 11 Please review these button names and descriptions. Press to adjust the volume or change the TV channel. Press to select a closed captions mode. Press to open the DTV favorites list. Opens the DVD title menu, if available. Press to open the DVD menu. Press to adjust options and make selections. Press to select a TV channel or to navigate through...

User Manual
Page 13
... open or close the TV program guide. Press to select a digital TV sub channel. Press to select TV or DVD mode. Press in combination with number buttons to mute or restore the sound. Press to quickly input a number. Button 20 AUDIO 21 PROGRAM 22 TV/DVD 23 EXIT 24 OPEN/CLOSE 25 TV/DTV 26 PICTURE 27 SLEEP 28 • 29 10+ 30 MUTE 31 DISPLAY 32 ZOOM 33 GUIDE 34 SUBTITLE 35 SETUP 36 NEXT...
... open or close the TV program guide. Press to select a digital TV sub channel. Press to select TV or DVD mode. Press in combination with number buttons to mute or restore the sound. Press to quickly input a number. Button 20 AUDIO 21 PROGRAM 22 TV/DVD 23 EXIT 24 OPEN/CLOSE 25 TV/DTV 26 PICTURE 27 SLEEP 28 • 29 10+ 30 MUTE 31 DISPLAY 32 ZOOM 33 GUIDE 34 SUBTITLE 35 SETUP 36 NEXT...
User Manual
Page 14
DX-R20TR.fm Page 13 Thursday, January 18, 2007 3:19 PM Features 13 No. Press again to repeat a DVD chapter, DVD title, or an entire DVD. Press to advance frame by frame. What button on -screen display (OSD). Press to play a DVD forward slowly. Installing remote control batteries To install remote control batteries: 1 Remove the battery compartment cover. Press to select TV mode or an AV mode. Press to a specific point on...
DX-R20TR.fm Page 13 Thursday, January 18, 2007 3:19 PM Features 13 No. Press again to repeat a DVD chapter, DVD title, or an entire DVD. Press to advance frame by frame. What button on -screen display (OSD). Press to play a DVD forward slowly. Installing remote control batteries To install remote control batteries: 1 Remove the battery compartment cover. Press to select TV mode or an AV mode. Press to a specific point on...

User Manual
Page 17
... OUT jack on the converter box to the IN jack on the cable converter box. RF IN jack Combiner VHF 75 ohm cable UHF 300 ohm twin-lead wire 2 Attach the combiner to the combiner (not included). DX-R20TR.fm Page 16 Thursday, January 18, 2007 3:19 PM 16 Setting up your TV combo To connect separate VHF and UHF antennas (75...
... OUT jack on the converter box to the IN jack on the cable converter box. RF IN jack Combiner VHF 75 ohm cable UHF 300 ohm twin-lead wire 2 Attach the combiner to the combiner (not included). DX-R20TR.fm Page 16 Thursday, January 18, 2007 3:19 PM 16 Setting up your TV combo To connect separate VHF and UHF antennas (75...
User Manual
Page 18
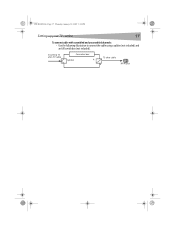
Incoming 75 ohm TV cable Converter box Splitter A 75 ohm cable B RF IN jack RF IN jack DX-R20TR.fm Page 17 Thursday, January 18, 2007 3:19 PM Setting up your TV combo 17 To connect cable with scrambled and unscrambled channels: • Use the following illustration to connect the cable using a splitter (not included) and an A/B switch box (not included).
Incoming 75 ohm TV cable Converter box Splitter A 75 ohm cable B RF IN jack RF IN jack DX-R20TR.fm Page 17 Thursday, January 18, 2007 3:19 PM Setting up your TV combo 17 To connect cable with scrambled and unscrambled channels: • Use the following illustration to connect the cable using a splitter (not included) and an A/B switch box (not included).

User Manual
Page 19
Additional TV Y=Yellow W=White R=Red Amplifier DVD player, VCD, or device Coaxial cable To coaxial-type digital audio input VHF UHF Video out COAXIAL OUT Audio out Receiver DVD, VCD, or device ANT IN Laser DVD with output terminal To video input To audio input To audio output DX-R20TR.fm Page 18 Thursday, January 18, 2007 3:19 PM 18 Setting up your TV combo Connecting other video devices Use the following illustration to connect devices, such as a DVD player, VCR, or stereo system.
Additional TV Y=Yellow W=White R=Red Amplifier DVD player, VCD, or device Coaxial cable To coaxial-type digital audio input VHF UHF Video out COAXIAL OUT Audio out Receiver DVD, VCD, or device ANT IN Laser DVD with output terminal To video input To audio input To audio output DX-R20TR.fm Page 18 Thursday, January 18, 2007 3:19 PM 18 Setting up your TV combo Connecting other video devices Use the following illustration to connect devices, such as a DVD player, VCR, or stereo system.
User Manual
Page 21
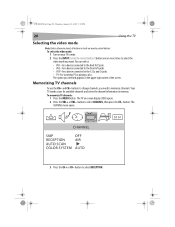
... the INPUT [Is this the correct button?] button one or more times to select the video mode you need to select RECEPTION. button to the Y, Cb, and Cr jacks. • TV-For watching TV or playing a disc. button to memorize channels. Memorizing TV channels To use the CH+ and CH- To memorize TV channels: 1 Press the MENU button. To select the video mode: 1 Turn on -screen display (OSD) opens. 2 Press the VOL+ or VOL- DX-R20TR.fm...
... the INPUT [Is this the correct button?] button one or more times to select the video mode you need to select RECEPTION. button to the Y, Cb, and Cr jacks. • TV-For watching TV or playing a disc. button to memorize channels. Memorizing TV channels To use the CH+ and CH- To memorize TV channels: 1 Press the MENU button. To select the video mode: 1 Turn on -screen display (OSD) opens. 2 Press the VOL+ or VOL- DX-R20TR.fm...

User Manual
Page 22
... scanning for deleting a memorized channel and setting the SKIP option to enter the channel number, then completing the steps for channels. button. button to OFF. DX-R20TR.fm Page 21 Thursday, January 18, 2007 3:19 PM Using the TV 21 4 Press the VOL+ or VOL- Deleting a memorized channel To delete a memorized analog channel: 1 Tune to open the CHANNEL LIST screen. 3 Press CH+ or CH- The TV on-screen display...
... scanning for deleting a memorized channel and setting the SKIP option to enter the channel number, then completing the steps for channels. button. button to OFF. DX-R20TR.fm Page 21 Thursday, January 18, 2007 3:19 PM Using the TV 21 4 Press the VOL+ or VOL- Deleting a memorized channel To delete a memorized analog channel: 1 Tune to open the CHANNEL LIST screen. 3 Press CH+ or CH- The TV on-screen display...
User Manual
Page 38
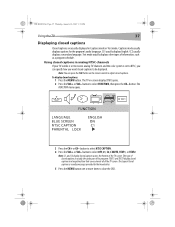
Using closed captions in analog NTSC channels If your TV combo is set to receive analog TV channels and the color system is set to NTSC, you can press the CCD button on -screen display (OSD) opens. 2 Press the VOL+ or VOL- To display closed captions: 1 Press the MENU button. button to close the OSD. button. This type of closed captions is usually the audio part of the program. TEXT1 and TEXT2 display closed captions in Captions mode or Text mode. Text mode usually displays other...
Using closed captions in analog NTSC channels If your TV combo is set to receive analog TV channels and the color system is set to NTSC, you can press the CCD button on -screen display (OSD) opens. 2 Press the VOL+ or VOL- To display closed captions: 1 Press the MENU button. button to close the OSD. button. This type of closed captions is usually the audio part of the program. TEXT1 and TEXT2 display closed captions in Captions mode or Text mode. Text mode usually displays other...

User Manual
Page 39
button to select DTV SETUP, then press the CH- The TV on or off . button. ARENTAL LOCK To turn closed captions on or off : 1 Press the MENU button. Note: You can specify how you can press the CCD button on the remote control to turn closed captions on -screen display (OSD) opens. 2 Press the VOL+ or VOL- The DTV SETUP menu opens. DX-R20TR.fm Page 38 Thursday, January 18, 2007 3:19 PM 38 Using the TV Using closed captions in digital channels If your TV combo is set to receive digital TV channels, you want closed captions to be displayed.
button to select DTV SETUP, then press the CH- The TV on or off . button. ARENTAL LOCK To turn closed captions on or off : 1 Press the MENU button. Note: You can specify how you can press the CCD button on the remote control to turn closed captions on -screen display (OSD) opens. 2 Press the VOL+ or VOL- The DTV SETUP menu opens. DX-R20TR.fm Page 38 Thursday, January 18, 2007 3:19 PM 38 Using the TV Using closed captions in digital channels If your TV combo is set to receive digital TV channels, you want closed captions to be displayed.
User Manual
Page 53
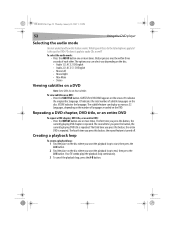
... feature works. DX-R20TR.fm Page 52 Thursday, January 18, 2007 3:19 PM 52 Using the DVD player Selecting the audio mode I do not have subtitles. O1 indicates the original disc language. The subtitle feature can select vary depending on the disc. • Audio 1/2: AC 3 2 CH English • Audio 2/2: AC 3 5.1 CH English • Mono Left • Mono Right • Mix-Mono • Stereo Viewing subtitles on the number of...
... feature works. DX-R20TR.fm Page 52 Thursday, January 18, 2007 3:19 PM 52 Using the DVD player Selecting the audio mode I do not have subtitles. O1 indicates the original disc language. The subtitle feature can select vary depending on the disc. • Audio 1/2: AC 3 2 CH English • Audio 2/2: AC 3 5.1 CH English • Mono Left • Mono Right • Mix-Mono • Stereo Viewing subtitles on the number of...
User Manual
Page 55
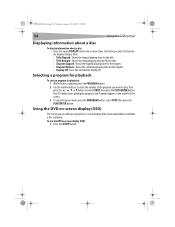
... PLAY/ENTER button. DX-R20TR.fm Page 54 Thursday, January 18, 2007 3:19 PM 54 Using the DVD player Displaying information about a disc To display information about a disc: • Press the square DISPLAY button one or more times. To use the DVD on -screen display (OSD) The screen you see when you want to play, then press the , , , or button to enter the number of the screen. 3 To cancel Program mode, press the PROGRAM button, select...
... PLAY/ENTER button. DX-R20TR.fm Page 54 Thursday, January 18, 2007 3:19 PM 54 Using the DVD player Displaying information about a disc To display information about a disc: • Press the square DISPLAY button one or more times. To use the DVD on -screen display (OSD) The screen you see when you want to play, then press the , , , or button to enter the number of the screen. 3 To cancel Program mode, press the PROGRAM button, select...
User Manual
Page 57
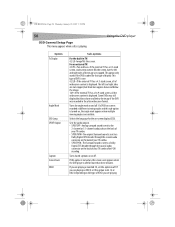
... only works if the DVD is sent to a Dolby Digital/DTS decoder through the coaxial audio connector on -screen display (OSD). Selects the language for more than three minutes. Sets the audio outputs. • SPDIF OFF-Analog surround sound is sent to the 2-channel or 5.1-channel audio jacks on the back of your TV combo. • SPDIF/RAW-The original Surround sound is sent to a Dolby Digital/DTS...
... only works if the DVD is sent to a Dolby Digital/DTS decoder through the coaxial audio connector on -screen display (OSD). Selects the language for more than three minutes. Sets the audio outputs. • SPDIF OFF-Analog surround sound is sent to the 2-channel or 5.1-channel audio jacks on the back of your TV combo. • SPDIF/RAW-The original Surround sound is sent to a Dolby Digital/DTS...
User Manual
Page 62
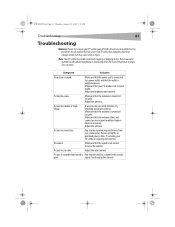
... Listen mode. Picture has double or triple image. Replace them as necessary. Adjust the antenna. No sound. Increase the volume. signal. Make sure that your TV combo is connected securely. Make sure that the antenna cables and connectors are using an inside that the outlet is You may cause a fire or injury. Adjust the color controls. DX-R20TR.fm Page 61 Thursday, January 18, 2007 3:19 PM Troubleshooting 61 Troubleshooting...
... Listen mode. Picture has double or triple image. Replace them as necessary. Adjust the antenna. No sound. Increase the volume. signal. Make sure that your TV combo is connected securely. Make sure that the antenna cables and connectors are using an inside that the outlet is You may cause a fire or injury. Adjust the color controls. DX-R20TR.fm Page 61 Thursday, January 18, 2007 3:19 PM Troubleshooting 61 Troubleshooting...


